2009 MITSUBISHI ASX check engine
[x] Cancel search: check enginePage 193 of 368

NOTE
l An
operation noise may be emitted from the
engine compartment in the following situa-
tions. The sound is associated with checking
the operations of the ASC. At this time, you
may feel a shock from the brake pedal if you
depress it. These do not indicate a malfunc-
tion. • When the ignition switch is turned to the“ON” position or the operation mode is
put in ON.
• When the vehicle is driven for a while af- ter the engine is turned on.
l When the ASC is activated, you may feel a
vibration in the vehicle body or hear a whin-
ing sound from the engine compartment.
This indicates that the system is operating nor-
mally. It does not indicate a malfunction.
l When the anti-lock brake system warning
lamp is illuminated, the ASC is not active.
Traction control function E00619000087
On slippery surfaces, the traction control function
prevents
the drive wheels from spinning excessive,
thus helping the vehicle to start moving from a stop-
ped condition. It also provides sufficient driving
force and steering performance as the vehicle turns
while pressing the acceleration pedal. CAUTION
l
When
driving a vehicle on a snowy or icy
road, be sure to install snow tyres and
drive the vehicle at moderate speeds. Stability control function
E00619100017
The
stability control function is designed to help
the driver maintain control of the vehicle on slip-
pery roads or during rapid steering manoeuvres. It
works by controlling the engine output and brake
on each wheel.
NOTE
l The stability control function operates at
speeds of about 15 km/h (9 mph) or higher.
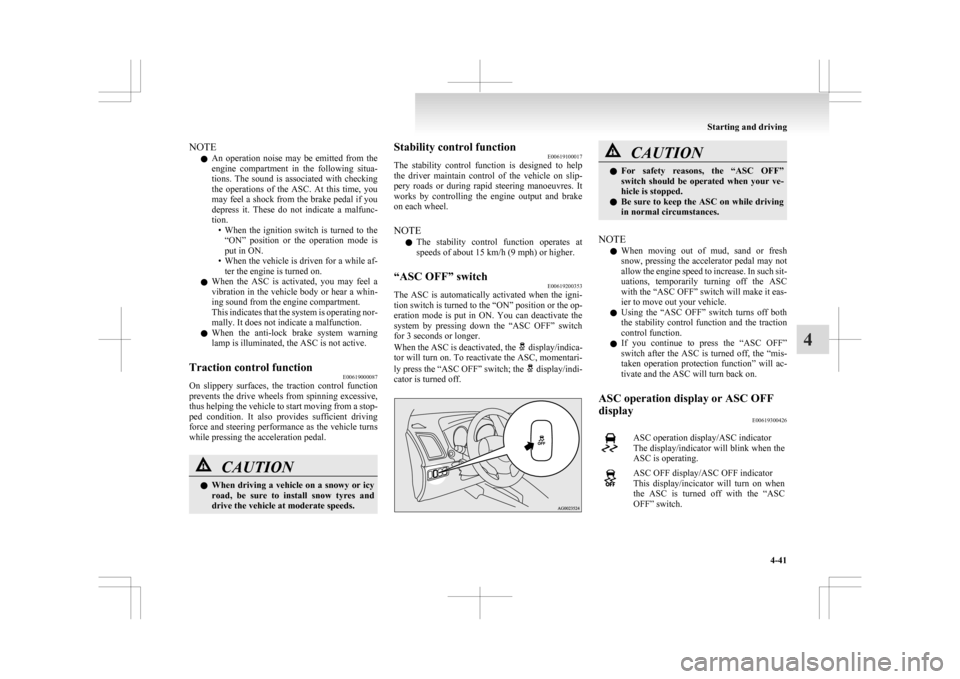
“ASC OFF” switch E00619200353
The ASC is automatically activated when the igni-
tion
switch is turned to the “ON” position or the op-
eration mode is put in ON. You can deactivate the
system by pressing down the “ASC OFF” switch
for 3 seconds or longer.
When the ASC is deactivated, the display/indica-
tor
will turn on. To reactivate the ASC, momentari-
ly press the “ASC OFF” switch; the display/indi-
cator is turned off. CAUTION
l
For
safety reasons, the “ASC OFF”
switch should be operated when your ve-
hicle is stopped.
l Be sure to keep the ASC on while driving
in normal circumstances.
NOTE l When
moving out of mud, sand or fresh
snow, pressing the accelerator pedal may not
allow the engine speed to increase. In such sit-
uations, temporarily turning off the ASC
with the “ASC OFF” switch will make it eas-
ier to move out your vehicle.
l Using the “ASC OFF” switch turns off both
the stability control function and the traction
control function.
l If you continue to press the “ASC OFF”
switch after the ASC is turned off, the “mis-
taken operation protection function” will ac-
tivate and the ASC will turn back on.
ASC operation display or ASC OFF
display E00619300426 ASC operation display/ASC indicator
The
display/indicator will blink when the
ASC is operating. ASC OFF display/ASC OFF indicator
This
display/incicator will turn on when
the ASC is turned off with the “ASC
OFF” switch. Starting and driving
4-41 4
Page 194 of 368

NOTE
l The
combination of items shown on the dis-
play varies depending on the vehicle model. CAUTION
l
When display/indicator blinks, ASC is
operating,
which means that the road is
slippery or that your vehicle’s wheels are
beginning to slip. If this happens, drive
slower with less accelerator input.
l If the temperature in the braking system
continues to increase due to continuous
brake control on a slippery road surface,
the display/indicator will blink. To pre-
vent
the brake system from overheating,
the brake control of the traction control
function will be temporarily suspended.
The engine control of the traction control
function and normal brake operation will
not be affected. Park your vehicle in a
safe place. When the temperature in the
braking system has come down, the dis-
play/indicator
will be turned off and the
traction control function will start operat-
ing again.
NOTE l The display/indicator may turn on when
you
start the engine. This means that the bat-
tery voltage momentarily dropped when the
engine was started. It does not indicate a mal-
function, provided that the display goes out
immediately. l
When
a compact spare tyre has been put on
your vehicle, the gripping ability of the tyre
will be lower, making it more likely that the display/indicator will blink.
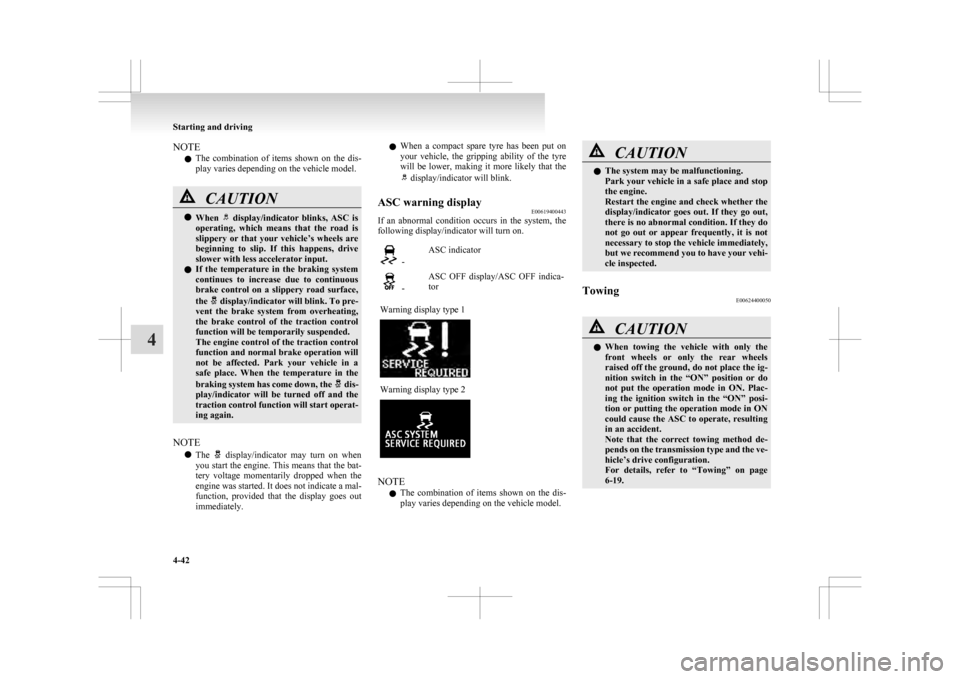
ASC warning display E00619400443
If an abnormal condition occurs in the system, the
following display/indicator will turn on. -
ASC indicator -
ASC OFF display/ASC OFF indica-
tor
Warning display type 1 Warning display type 2
NOTE
l The
combination of items shown on the dis-
play varies depending on the vehicle model. CAUTION
l
The system may be malfunctioning.
Park
your vehicle in a safe place and stop
the engine.
Restart the engine and check whether the
display/indicator goes out. If they go out,
there is no abnormal condition. If they do
not go out or appear frequently, it is not
necessary to stop the vehicle immediately,
but we recommend you to have your vehi-
cle inspected.
Towing E00624400050 CAUTION
l
When
towing the vehicle with only the
front wheels or only the rear wheels
raised off the ground, do not place the ig-
nition switch in the “ON” position or do
not put the operation mode in ON. Plac-
ing the ignition switch in the “ON” posi-
tion or putting the operation mode in ON
could cause the ASC to operate, resulting
in an accident.
Note that the correct towing method de-
pends on the transmission type and the ve-
hicle’s drive configuration.
For details, refer to “Towing” on page
6-19. Starting and driving
4-42
4
Page 207 of 368

1
830.5 mm
2 461 mm
3 68.5 mm
4 75 mm
5 310 mm
6 13.5 mm
7 66.5 mm
8 50 mm
9 52 mm
10 464 mm
(at kerb weight condi- tion)
370 mm to 384 mm (at laden condition)
11 447 mm
12 487 mm
13 495 mm
14 525.5 mmNOTE
l The
values under item 12 can be varied de-
pending on the loading condition of cargo or
luggage.
Operating hints l To prevent the clutch from slipping (Vehicle
with a M/T only), do not rev the engine more
than is required when starting off. l
Be
sure that the driving speed does not ex-
ceed 100 km/h (62 mph) for trailer operation.
It is also recommended that you obey the lo-
cal regulations in case driving speed with a
trailer is limited to less than 100 km/h
(62 mph).
l To prevent shocks from the overrun brake, de-
press the brake pedal lightly at first and then
more strongly.
l To make full use of engine braking, change
to a lower shift point before descending a
slope.
Additional precautions for vehicles equipped with
a CVT
It is recommended the “D” position on slopes or at
low speed.
Use the sports mode in mountainous areas in order
to make better use of engine braking and to assist
the brake system.
However, be sure that the speed does not exceed
the maximum speed limit for the selected shift posi-
tion.
Overheating
This will normally occur as a result of some me-
chanical failure. If your vehicle should overheat,
stop and check for a loose or broken water pump/
alternator drive belt, a blocked radiator air intake
or a low coolant level. If these items are satisfacto-
ry the overheating could be caused by a number of
mechanical causes that would have to be checked
at a competent service centre. CAUTION
l
If the engine overheats, please refer to the
“Engine
overheating” section of “For
emergencies” prior to taking any correc-
tive action.
l On vehicles equipped with CVT, if the warning display is showing, the tempera-
ture of the CVT fluid is high.
Read
the reference page and take the re-
quired measures.
Refer to “When a malfunction occurs in
the CVT” on page 4-27. Starting and driving
4-55 4
Page 213 of 368

l
On vehicles with the automatic air condition-
ing, when the engine coolant temperature
rises to a certain level, the air selection is au-
tomatically switched to the recirculation posi-
tion and the indication lamp (A) comes on.
At this time, the system will not switch to the
outside position even if the air selection
switch is pushed.
Customizing the air selection E00732500107
Functions can be changed as desired, as stated below.
l Enable automatic air control
•
Heater/Manual air conditioning:When the system operates, the air selec-
tion switch will be automatically control-
led.
• Automatic air conditioning: When the mode selection dial or blower
speed selection dial is turned to the “AU-
TO” position, the air selection switch is al-
so controlled automatically.
l Disable automatic air control
• Heater/Manual air conditioning:Even when the system operates, the air se-
lection switch will not be automatically
controlled.
• Automatic air conditioning: Even when the mode selection dial or
blower speed selection dial is turned to
the “AUTO” position, the air selection
switch is not controlled automatically.
l Setting change method
Hold down the air selection switch for about
10 seconds or more.
When the setting is changed, a sound is emit-
ted and the indication lamp flashes. • When
the setting is changed from enable
to disable 3 sounds are emitted and the in-
dication lamp flashes 3 times.
• When the setting is changed from disable to enable 2 sounds are emitted and the in-
dication lamp flashes 3 times.
NOTE l The factory setting is “Enable automatic air
control.”
l When the mode selection dial is turned to
“ ”,
in order to prevent misting of the win-
dows the ventilator automatically switches to
outside air even if “Disable automatic air con-
trol” is set.
Air conditioning switch (Air conditioning) E00701500909
Push the switch to turn the air conditioning on, indi-
cation lamp (A) will come on.
There is a sound each time the switch is pressed.
Manual air conditioning Automatic air conditioning Push the switch again to switch it off. CAUTION
l
When
using the air conditioning, the
idling speed may slightly increase as the
air conditioning compressor is switched
on/off automatically. While the vehicle
with a CVT is stationary, fully depress
the brake pedal to prevent the vehicle
from creeping.
NOTE l If
a problem is detected in the air condition-
ing system, the air conditioning operation in-
dication lamp (A) blinks. Press the air condi-
tioning switch once to turn it off, then once
more to turn it back on. If the air condition-
ing operation indication lamp does not blink
for a while, there is nothing wrong. If it
starts to blink again, we recommend you to
have it checked.
l Sometimes, for example after using a high-
pressure car wash, the condenser can get wet,
and the operation indication lamp (A) blinks
temporarily. In this case there is nothing
wrong. Wait a while, press the air condition-
ing switch once to turn the system off, then
once more to turn it back on. Once the water
evaporates, the blinking will stop.
Customizing the air conditioning switch (Automat-
ic air conditioning) E00764700030
Functions can be changed as desired, as stated below. For pleasant driving
5-05 5
Page 218 of 368

Air purifier
E00708400561
An
air filter has been incorporated into the air con-
ditioning so that pollen and dust are cleaned from
the air.
Replace the air filter periodically as its ability to
clean the air will be reduced as it collects pollen
and dirt. For the maintenance interval, refer to the
“SERVICE BOOKLET”.
NOTE
l Operation in certain conditions such as driv-
ing on a dusty road and frequent use of the
air conditioning can lead to reduction of serv-
ice life of the filter. When you feel that the
air flow is lower than normal or when the
windscreen or windows start to fog up easily,
replace the air filter.
We recommend you to have it checked. Audio system*
E00708502090
Type 1
Type 2 Type 1- LW/MW/FM digital turning radio with
CD player
Type
2- LW/MW/FM digital turning radio with
CD changer
For information on operations of the audio system
for vehicles equipped with MITSUBISHI Multi-Co-
munication system (MMCS), refer to the separate
owner’s manual.
The audio system can only be used when the igni-
tion switch or the operation mode is in ON or ACC. NOTE
l To
listen to the audio system while the en-
gine is not running, turn the ignition switch
to the “ACC” position or put the operation
mode in ACC.
If the ignition switch or the operation mode
is left in ACC, the accessory power will auto-
matically turn off after a certain period of
time and you will no longer be able to use
the audio system. The accessory power
comes on again if the ignition switch or the
engine switch is operated with it in the
“ACC” position. Refer to “ACC power auto-
cutout function” on pages 1-12 and 4-11.
l If a cellular phone is used inside the vehicle,
it may create noise from the audio equip-
ment. This does not mean that anything is
wrong with your audio equipment. In such a
case, use the cellular phone at a place as far
away as possible from the audio equipment.
l If foreign objects or water get into the audio
equipment, or if smoke or a strange odour
comes from it, immediately turn off the au-
dio system. We recommend you to have it
checked. Never try to repair it by yourself.
Avoid continuous usage without inspection
by a qualified person.
l The audio amplifier (if so equipped) is loca-
ted under the front right seat. Do not subject
the amplifier to a strong impact. It could dam-
age the amplifier or malfunctioning could re-
sult. For pleasant driving
5-10
5
Page 252 of 368

With the confirmation function activated, you are
given
more opportunities than normal to confirm a
command when making various settings to Blue-
tooth ®
2.0 interface. This allows you to decrease
the possibility that a setting is accidentally changed.
The confirmation function can be turned on or off
by following the steps below. 1. Press the SPEECH button.
2. Say “Setup”.
3. Say “Confirmation prompts”.
4. The voice guide will say “Confirmationprompts are
confirmation prompts
Answer “Yes” to change the setting or an-
swer “No” to keep the current setting.
5. The voice guide will say “Confirmation prompts are
will return to the main menu.
Security function E00760500043
It is possible to use a password as a security func-
tion
by setting a password of your choice for the
Bluetooth ®
2.0 interface.
When the security function is turned on, it is neces-
sary to make a voice input of a 4-digit password in
order to use all functions of the Bluetooth ®
2.0 in-
terface, except for reception.
Setting the password
Use the following procedure to turn on the security
function by setting a password. 1. Press the SPEECH button.
2. Say “Setup”.
3. Say “Password.” 4. The
voice guide will say “Password is disa-
bled. Would you like to enable it?” Answer
“Yes.”
Answer “No” to cancel the setting of the pass-
word and return to the main menu.
5. The voice guide will say “Please say a 4-dig- it password. Remember this password. It will
be required to use this system”.
Say a 4-digit number which you want to set
as a password.
6. For confirmation purposes, the voice guide will say “Password <4-digit password>. Is
this correct?” Answer “Yes.”
Answer “No” to return to the password input
in Step 5.
7. When the registration of the password is com- pleted, the voice guide will say “Password is
enabled” and the system will return to the
main menu.
NOTE l Password will be required to access the sys-
tem after the next ignition cycle.
l It is required for a little time after engine
stop that the entered password is actually re-
corded in the system.
If the ignition switch or the operation mode
is made to ACC or ON or the engine is star-
ted immediately after engine stop, there is a
case when the entered password is not recor-
ded in the system. At this time, please try to
enter the password again. Entering the password
If
a password has been set and the security function
is enabled, the voice guide will say “Hands-free sys-
tem is locked. State the password to continue”
when the SPEECH button is pressed to enter voice
recognition mode. Say the 4-digit password num-
ber to enter the password.
If the entered password is wrong, the voice guide
will say “<4- digit password>, Incorrect password.
Please try again”. Enter the correct password.
NOTE
l You can re-enter the password as many times
as you want.
l If you have forgotten your password, say
“Cancel” to quit the voice input mode and
then check with a MITSUBISHI MOTORS
Authorized Service Point.
Disabling the password
Use the following procedure to turn off the security
function by disabling the password.
NOTE l System must be unlocked to disable the pass-
word.
1. Press the SPEECH button.
2. Say “Setup”.
3. Say “Password.”
4. The voice guide will say “Password is en- abled. Would you like to disable it?” An-
swer “Yes.”
Answer “No” to cancel the disabling of
the password and return to the main menu. For pleasant driving
5-44
5
Page 280 of 368

If the vehicle breaks down
E00800101108
If
the vehicle breaks down on the road, move it to
the shoulder and turn on the hazard warning flash-
ers and set up a warning triangle, flashing lamp, etc.
Refer to “Hazard warning flasher switch” on page
3-50.
If the engine stops/fails
Vehicle operation and control are affected if the en-
gine stops.
Before moving the vehicle to a safe area, be aware
of the following:
l The brake booster becomes inoperative and
the pedal effort will increase. Press down the
brake pedal harder than usual.
l Since the power steering system is no longer
operative, the steering wheel feels heavy
when turning it. Emergency starting
E00800502503
If
the engine cannot be started because the battery
is weak or dead, the battery from another vehicle
can be used with jumper cables to start the engine. WARNING
l To
start the engine using jumper cables
connected to another vehicle, perform the
correct procedures according to the in-
struction below. Incorrect procedures
could result in a fire or explosion or dam-
age to the vehicles. CAUTION
l
Do
not attempt to start the engine by pull-
ing or pushing the vehicle.
It could damage your vehicle.
l Always wear protective eye goggles when
working near the battery.
l Keep the battery out of the reach of chil-
dren.
1. Get
the vehicles close enough so the jumper cables can reach, but be sure the vehicles
aren’t touching each other. CAUTION
l
Check
the other vehicle. It must have a 12-
volt battery.
If the other system isn’t 12-volt, shorting
can damage both vehicles. 2. Turn
off all lamps, heater and other electrical
loads.
3. Set the parking brake firmly on each vehicle. Put an A/T, CVT in “P” (PARK) or a M/T in
“N” (Neutral).
4. Turn the ignition switch to the “LOCK” posi- tion or put the operation mode in OFF. WARNING
l Perform
step 4 on both vehicles before-
hand.
Make sure that the cables or your clothes
cannot be caught by the fan or drive belt.
Personal injury could result.
5. Make
sure battery electrolyte is at the proper level.
Refer to “Battery” on page 8-08. WARNING
l If
electrolyte fluid is not visible, or ap-
pears to be frozen, Do Not Attempt Jump
Starting!
A battery might rupture or explode if the
temperature is below the freezing point
or if it is not filled to the proper level.
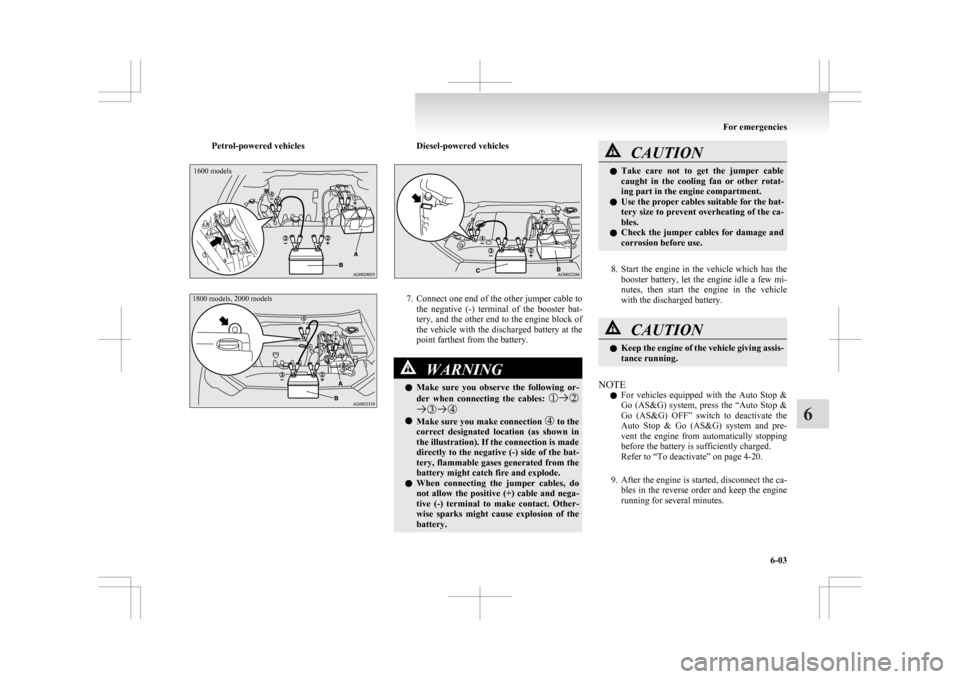
6. Connect
one end of one jumper cable to the positive (+) terminal of the discharged bat-
tery (A), and the other end to the positive (+)
terminal of the booster battery (B).
For emergencies
6-02
6
Page 281 of 368

Petrol-powered vehicles1600 models
1800 models, 2000 models Diesel-powered vehicles
7. Connect one end of the other jumper cable to
the negative (-) terminal of the booster bat-
tery, and the other end to the engine block of
the vehicle with the discharged battery at the
point farthest from the battery. WARNING
l Make
sure you observe the following or-
der when connecting the cables: l
Make sure you make connection to the
correct
designated location (as shown in
the illustration). If the connection is made
directly to the negative (-) side of the bat-
tery, flammable gases generated from the
battery might catch fire and explode.
l When connecting the jumper cables, do
not allow the positive (+) cable and nega-
tive (-) terminal to make contact. Other-
wise sparks might cause explosion of the
battery. CAUTION
l
Take
care not to get the jumper cable
caught in the cooling fan or other rotat-
ing part in the engine compartment.
l Use the proper cables suitable for the bat-
tery size to prevent overheating of the ca-
bles.
l Check the jumper cables for damage and
corrosion before use.
8. Start
the engine in the vehicle which has the booster battery, let the engine idle a few mi-
nutes, then start the engine in the vehicle
with the discharged battery. CAUTION
l
Keep
the engine of the vehicle giving assis-
tance running.
NOTE l For
vehicles equipped with the Auto Stop &
Go (AS&G) system, press the “Auto Stop &
Go (AS&G) OFF” switch to deactivate the
Auto Stop & Go (AS&G) system and pre-
vent the engine from automatically stopping
before the battery is sufficiently charged.
Refer to “To deactivate” on page 4-20.
9. After the engine is started, disconnect the ca- bles in the reverse order and keep the engine
running for several minutes. For emergencies
6-03 6