2009 MITSUBISHI ASX air condition
[x] Cancel search: air conditionPage 216 of 368
Demisting of the windscreen and door windows
E00702100768CAUTION
l
For safety, make sure you have a clear
view through all the windows.
Use the mode selection dial (“ ”
or “ ”) to re-
move frost or mist from the windscreen or door win-
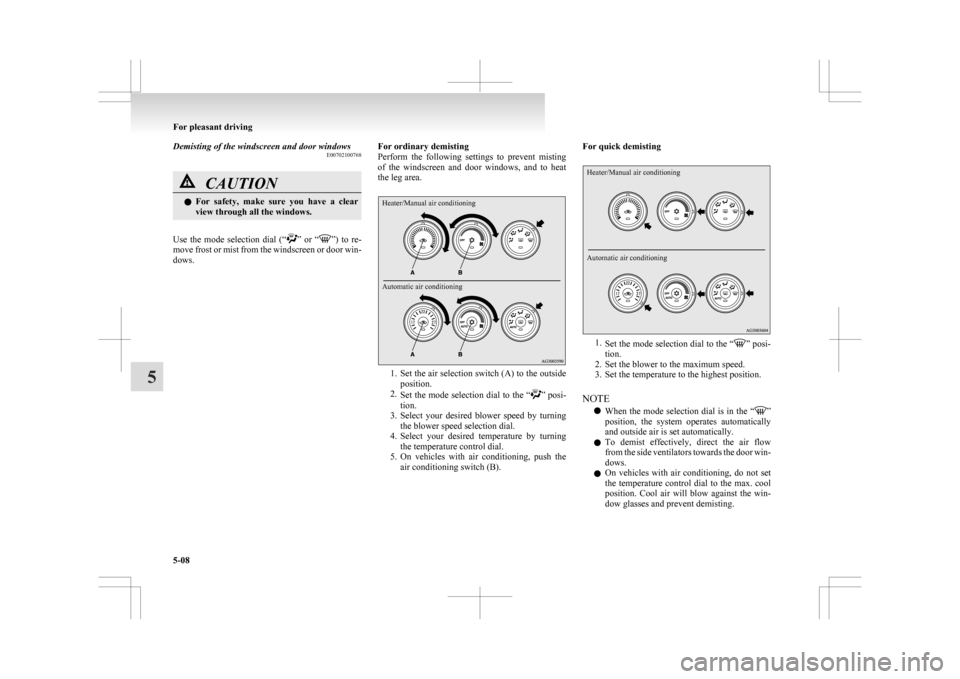
dows. For ordinary demisting
Perform
the following settings to prevent misting
of the windscreen and door windows, and to heat
the leg area.
Heater/Manual air conditioning
Automatic air conditioning 1. Set
the air selection switch (A) to the outside
position.
2. Set the mode selection dial to the “ ”
posi-
tion.
3. Select your desired blower speed by turning the blower speed selection dial.
4. Select your desired temperature by turning the temperature control dial.
5. On vehicles with air conditioning, push the air conditioning switch (B). For quick demisting
Heater/Manual air conditioning
Automatic air conditioning
1.
Set
the mode selection dial to the “ ” posi-
tion.
2.
Set the blower to the maximum speed.
3. Set the temperature to the highest position.
NOTE l When the mode selection dial is in the “ ”
position,
the system operates automatically
and outside air is set automatically.
l To demist effectively, direct the air flow
from the side ventilators towards the door win-
dows.
l On vehicles with air conditioning, do not set
the temperature control dial to the max. cool
position. Cool air will blow against the win-
dow glasses and prevent demisting. For pleasant driving
5-08
5
Page 217 of 368
l
For vehicles with the Auto Stop & Go
(AS&G) system, if the mode selection dial is
set to the demister position shown in the illus-
tration, the Auto Stop & Go (AS&G) system
will not operate and the engine will not stop
automatically even if the vehicle is stopped.
This is to ensure that good visibility is main-
tained.
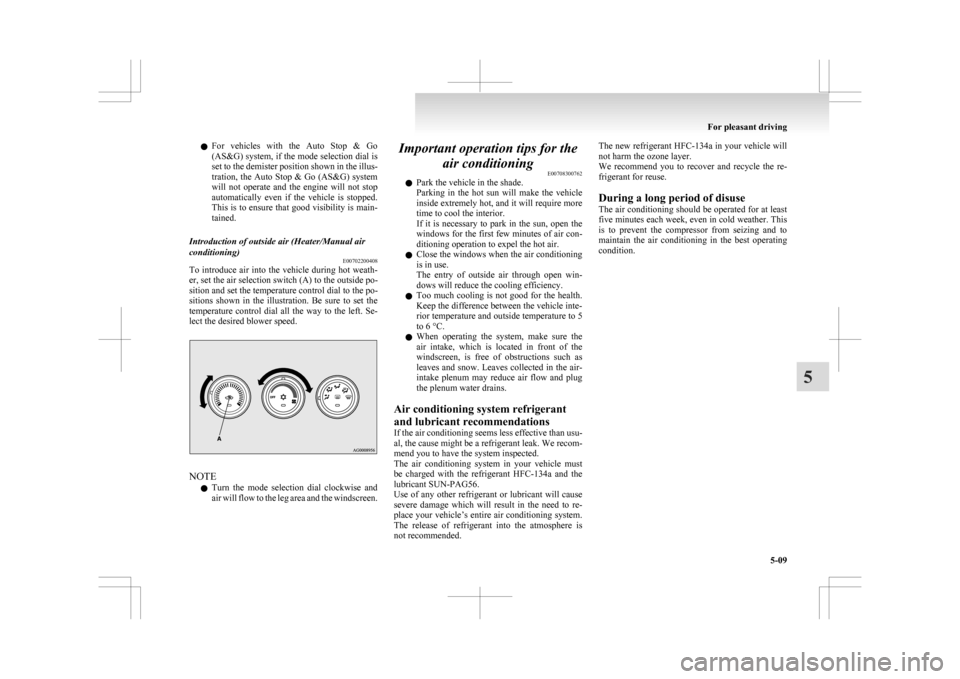
Introduction of outside air (Heater/Manual air
conditioning) E00702200408
To introduce air into the vehicle during hot weath-
er, set the air selection switch (A) to the outside po-
sition and set the temperature control dial to the po-
sitions
shown in the illustration. Be sure to set the
temperature control dial all the way to the left. Se-
lect the desired blower speed. NOTE
l Turn
the mode selection dial clockwise and
air will flow to the leg area and the windscreen. Important operation tips for the
air conditioning E00708300762
l Park the vehicle in the shade.
Parking
in the hot sun will make the vehicle
inside extremely hot, and it will require more
time to cool the interior.
If it is necessary to park in the sun, open the
windows for the first few minutes of air con-
ditioning operation to expel the hot air.
l Close the windows when the air conditioning
is in use.
The entry of outside air through open win-
dows will reduce the cooling efficiency.
l Too much cooling is not good for the health.
Keep the difference between the vehicle inte-
rior temperature and outside temperature to 5
to 6 °C.
l When operating the system, make sure the
air intake, which is located in front of the
windscreen, is free of obstructions such as
leaves and snow. Leaves collected in the air-
intake plenum may reduce air flow and plug
the plenum water drains.
Air conditioning system refrigerant
and lubricant recommendations
If the air conditioning seems less effective than usu-
al, the cause might be a refrigerant leak. We recom-
mend you to have the system inspected.
The air conditioning system in your vehicle must
be charged with the refrigerant HFC-134a and the
lubricant SUN-PAG56.
Use of any other refrigerant or lubricant will cause
severe damage which will result in the need to re-
place your vehicle’s entire air conditioning system.
The release of refrigerant into the atmosphere is
not recommended. The new refrigerant HFC-134a
in your vehicle will
not harm the ozone layer.
We recommend you to recover and recycle the re-
frigerant for reuse.
During a long period of disuse
The air conditioning should be operated for at least
five minutes each week, even in cold weather. This
is to prevent the compressor from seizing and to
maintain the air conditioning in the best operating
condition. For pleasant driving
5-09 5
Page 218 of 368

Air purifier
E00708400561
An
air filter has been incorporated into the air con-
ditioning so that pollen and dust are cleaned from
the air.
Replace the air filter periodically as its ability to
clean the air will be reduced as it collects pollen
and dirt. For the maintenance interval, refer to the
“SERVICE BOOKLET”.
NOTE
l Operation in certain conditions such as driv-
ing on a dusty road and frequent use of the
air conditioning can lead to reduction of serv-
ice life of the filter. When you feel that the
air flow is lower than normal or when the
windscreen or windows start to fog up easily,
replace the air filter.
We recommend you to have it checked. Audio system*
E00708502090
Type 1
Type 2 Type 1- LW/MW/FM digital turning radio with
CD player
Type
2- LW/MW/FM digital turning radio with
CD changer
For information on operations of the audio system
for vehicles equipped with MITSUBISHI Multi-Co-
munication system (MMCS), refer to the separate
owner’s manual.
The audio system can only be used when the igni-
tion switch or the operation mode is in ON or ACC. NOTE
l To
listen to the audio system while the en-
gine is not running, turn the ignition switch
to the “ACC” position or put the operation
mode in ACC.
If the ignition switch or the operation mode
is left in ACC, the accessory power will auto-
matically turn off after a certain period of
time and you will no longer be able to use
the audio system. The accessory power
comes on again if the ignition switch or the
engine switch is operated with it in the
“ACC” position. Refer to “ACC power auto-
cutout function” on pages 1-12 and 4-11.
l If a cellular phone is used inside the vehicle,
it may create noise from the audio equip-
ment. This does not mean that anything is
wrong with your audio equipment. In such a
case, use the cellular phone at a place as far
away as possible from the audio equipment.
l If foreign objects or water get into the audio
equipment, or if smoke or a strange odour
comes from it, immediately turn off the au-
dio system. We recommend you to have it
checked. Never try to repair it by yourself.
Avoid continuous usage without inspection
by a qualified person.
l The audio amplifier (if so equipped) is loca-
ted under the front right seat. Do not subject
the amplifier to a strong impact. It could dam-
age the amplifier or malfunctioning could re-
sult. For pleasant driving
5-10
5
Page 273 of 368
NOTE
l The
interior lamp auto cut-out function can
be deactivated. The time until the lamps auto-
matically go off can be adjusted. For details
and support, consult your nearest
MITSUBISHI MOTORS Authorized Service
Point.
On vehicles equipped with MITSUBISHI
Multi-Communication System (MMCS),
screen operations can be used to make the ad-
justment. Refer to the separate owner’s man-
ual for details. Storage spaces
E00713101664 CAUTION
l
Never
leave lighters, cans of carbonated
drink, and spectacles in the cabin when
parking the vehicle in hot sunshine. The
cabin will become extremely hot, so light-
ers and other flammable items may catch
fire and unopened drink cans (including
soft drink or beer cans) may rupture. Al-
so, spectacles with plastic lenses or mate-
rials could deform or crack.
l Keep the lids of storage spaces closed
while driving the vehicle. A lid or the con-
tents of a storage space could otherwise
cause injuries.
NOTE l When
leaving your vehicle, do not leave val-
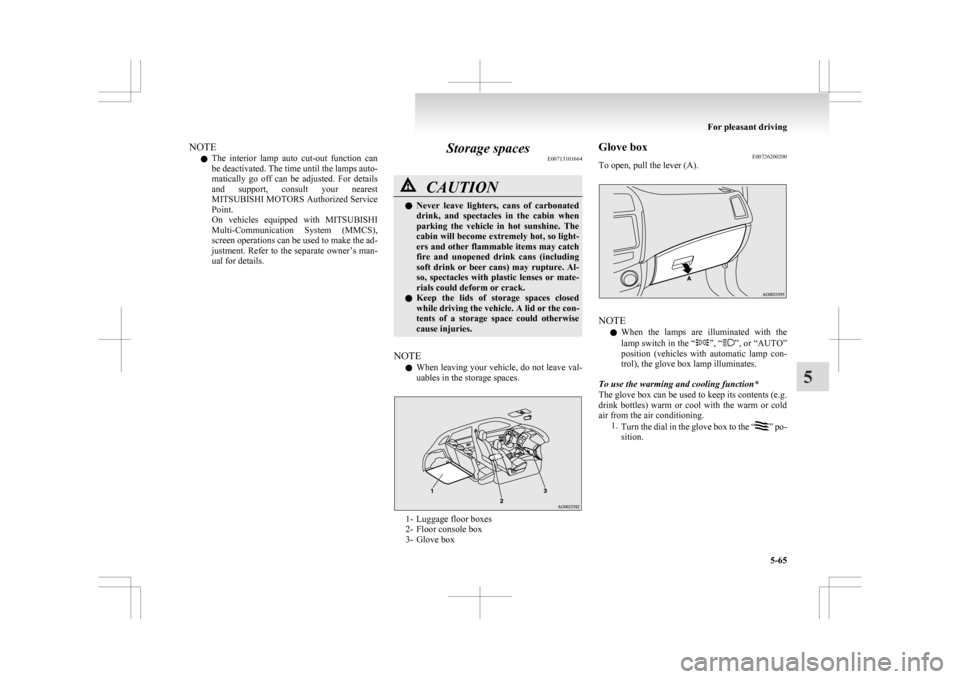
uables in the storage spaces. 1- Luggage floor boxes
2-
Floor console box
3- Glove box Glove box
E00726200200
To open, pull the lever (A). NOTE
l When
the lamps are illuminated with the
lamp switch in the “ ”, “ ”,
or “AUTO”
position (vehicles with automatic lamp con-
trol), the glove box lamp illuminates.
To use the warming and cooling function*
The glove box can be used to keep its contents (e.g.
drink bottles) warm or cool with the warm or cold
air from the air conditioning. 1.Turn the dial in the glove box to the “ ”
po-
sition. For pleasant driving
5-65 5
Page 274 of 368
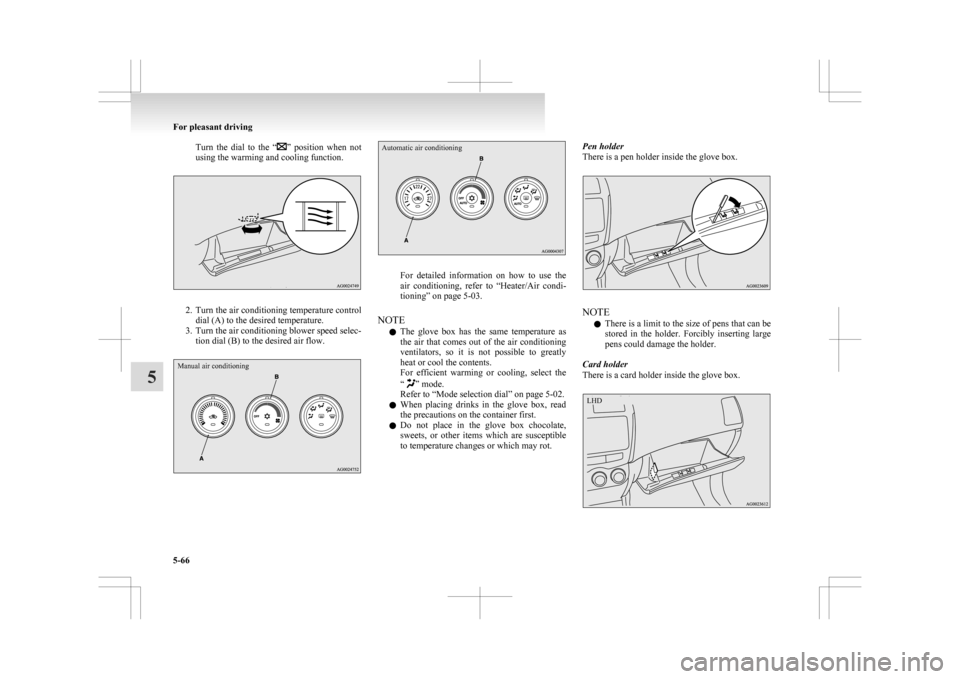
Turn the dial to the “ ” position when not
using the warming and cooling function. 2. Turn
the air conditioning temperature control
dial (A) to the desired temperature.
3. Turn the air conditioning blower speed selec- tion dial (B) to the desired air flow.
Manual air conditioning
Automatic air conditioning For detailed information on how to use the
air
conditioning, refer to “Heater/Air condi-
tioning” on page 5-03.
NOTE l The glove box has the same temperature as
the air that comes out of the air conditioning
ventilators, so it is not possible to greatly
heat or cool the contents.
For efficient warming or cooling, select the
“ ” mode.
Refer to “Mode selection dial” on page
5-02.
l When placing drinks in the glove box, read
the precautions on the container first.
l Do not place in the glove box chocolate,
sweets, or other items which are susceptible
to temperature changes or which may rot. Pen holder
There is a pen holder inside the glove box.
NOTE
l There
is a limit to the size of pens that can be
stored in the holder. Forcibly inserting large
pens could damage the holder.
Card holder
There is a card holder inside the glove box. For pleasant driving
5-66
5 LHD
Page 279 of 368

If the vehicle breaks down
............................................................ 6-02
Emergency starting ....................................................................... 6-02
Engine overheating ....................................................................... 6-04
Tools, jack and tyre repair kit ....................................................... 6-06
How to change a tyre .................................................................... 6-12
Towing.......................................................................................... 6-19
Operation under adverse driving conditions .................................6-22For emergencies
6
Page 286 of 368
l
Use the tyre sealant only at ambient tempera-
tures of -30 °C to + 60 °C.
l Effect an emergency repair without pulling
out the object (nail, screw, etc.) that is stuck
in the tyre.
l Do not use the tyre sealant if the tyre has
been damaged by being driven when insuffi-
ciently inflated (e.g. bumps, cuts, cracks etc.
on the tyre).
l Allow any tyre sealant seeping out of the
hole to dry, then pull off like a film.
l Wipe tyre sealant off the paintwork immedi-
ately with a damp cloth.
l Allow any tyre sealant in a damaged tyre to
dry out and dispose of it together with the tyre.
l Immediately change out of any clothes conta-
minated with the tyre sealant.
Before repairing a tyre, first stop your vehicle in a
safe, flat location. 1. Park the vehicle on level and stable ground.
2. Set the parking brake firmly.
3. On vehicles with M/T, stop the engine andmove the gearshift lever to the “R” (Reverse)
position.
On vehicles with CVT, move the selector lev-
er to the “P” (PARK) position and stop the en-
gine.
4. Turn on the hazard warning flashers and set up a warning triangle, flashing signal lamp,
etc., at an adequate distance from the vehi-
cle, and have all your passengers leave the ve-
hicle.
5. Take out the tyre sealant bottle and the com- pressor.
6. Shake the tyre sealant bottle well. NOTE
l In
cold conditions (when the ambient temper-
ature is 0 °C or lower), thickening of the tyre
sealant can make the tyre sealant hard to
squeeze out of the bottle. Warm the bottle in-
side the vehicle.
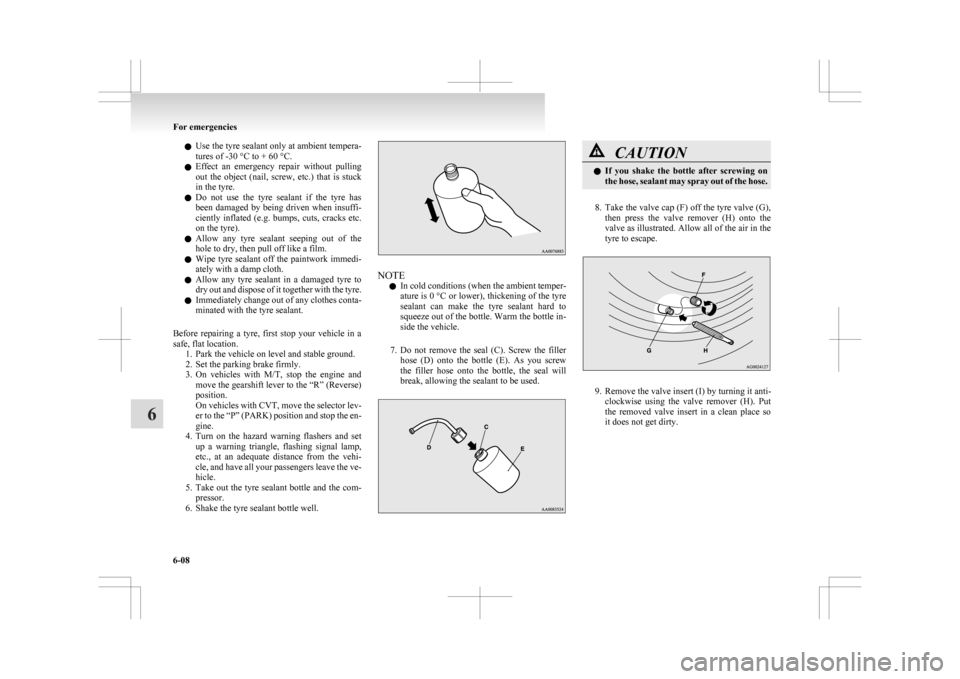
7. Do not remove the seal (C). Screw the filler hose (D) onto the bottle (E). As you screw
the filler hose onto the bottle, the seal will
break, allowing the sealant to be used. CAUTION
l
If
you shake the bottle after screwing on
the hose, sealant may spray out of the hose.
8. Take
the valve cap (F) off the tyre valve (G), then press the valve remover (H) onto the
valve as illustrated. Allow all of the air in the
tyre to escape. 9. Remove the valve insert (I) by turning it anti-
clockwise
using the valve remover (H). Put
the removed valve insert in a clean place so
it does not get dirty. For emergencies
6-08
6
Page 289 of 368
CAUTION
l
If you sense any abnormality while driv-
ing, stop the vehicle and contact a
MITSUBISHI MOTORS Authorized
Service Point or another specialist. Other-
wise the tyre pressure may drop before
the emergency repair procedure is com-
pleted, rendering the vehicle unsafe.
NOTE l Driving
faster than 80 km/h (50 mph) can
make the vehicle vibrate.
18. After driving for 10 minutes or 5 km (3 miles), check the tyre pressure using the
air pressure gauge on the compressor.
(Refer to “Tyre inflation pressures” on page
8-12.)
If the tyre pressure is not sufficient, inflate
the tyre to the specified pressure again and
drive the vehicle carefully without exceeding
a speed of 80 km/h (50 mph). CAUTION
l
If
the tyre pressure is lower than the min-
imum permitted pressure (1.3 bar
{130 kPa}), the tyre cannot successfully
be repaired with the tyre sealant. Do not
drive the vehicle any further. Contact a
MITSUBISHI MOTORS Authorized
Service Point or another specialist.
19. After
driving for 10 minutes or 5 km (3 miles), check the tyre pressure using the
air pressure gauge on the compressor. (Refer to “Tyre
inflation pressures” on page 8-12.)
If the tyre pressure has apparently not drop-
ped, the emergency repair procedure is com-
plete. You must still not exceed a speed of
80 km/h (50 mph). Observe local speed limits.
NOTE l If the tyre pressure has dropped below the
specified level when you check it at the end
of the repair procedure, do not drive the vehi-
cle any further. Contact a MITSUBISHI
MOTORS Authorized Service Point or anoth-
er specialist.
l In cold conditions (when the ambient temper-
ature is 0 °C or lower), the time and driving
distance necessary until completion of the re-
pair can be longer than in warmer conditions,
meaning that the tyre pressure can drop be-
low the specified level even when you have
inflated the tyre a second time and subsequent-
ly driven the vehicle. If this happens, inflate
the tyre to the specified pressure once more,
drive for about 10 minutes or 5 km (3 miles),
then check the tyre pressure again. If the tyre
pressure has again dropped below the speci-
fied level, stop driving the vehicle and con-
tact a MITSUBISHI MOTORS Authorized
Service Point or another specialist.
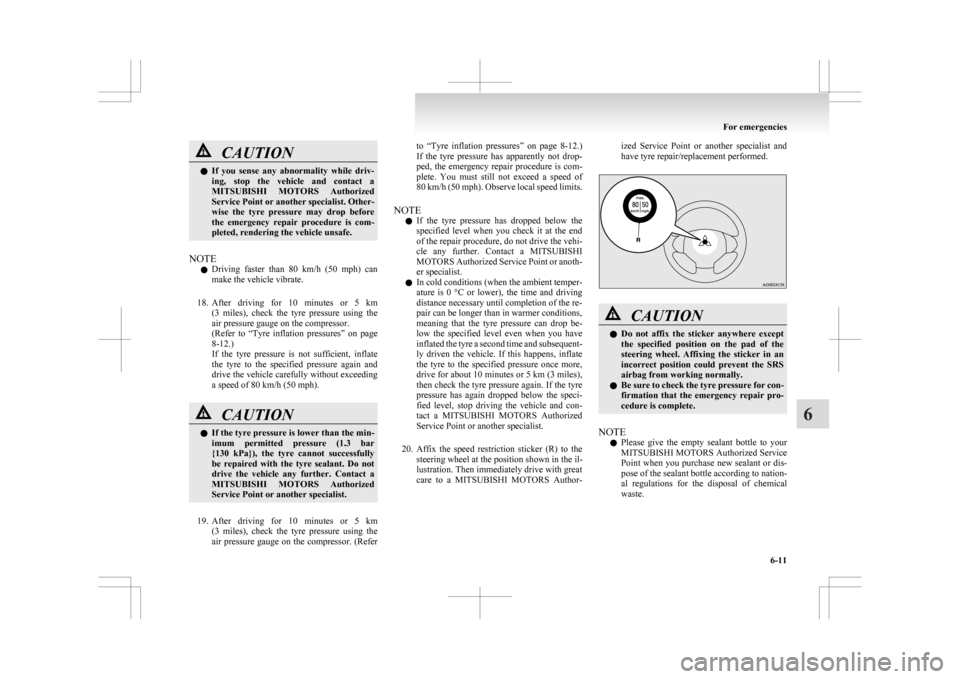
20. Affix the speed restriction sticker (R) to the steering wheel at the position shown in the il-
lustration. Then immediately drive with great
care to a MITSUBISHI MOTORS Author- ized Service Point or another specialist and
have tyre repair/replacement performed.
CAUTION
l
Do
not affix the sticker anywhere except
the specified position on the pad of the
steering wheel. Affixing the sticker in an
incorrect position could prevent the SRS
airbag from working normally.
l Be sure to check the tyre pressure for con-
firmation that the emergency repair pro-
cedure is complete.
NOTE l Please
give the empty sealant bottle to your
MITSUBISHI MOTORS Authorized Service
Point when you purchase new sealant or dis-
pose of the sealant bottle according to nation-
al regulations for the disposal of chemical
waste. For emergencies
6-11 6