2009 MITSUBISHI ASX steering
[x] Cancel search: steeringPage 86 of 368
WARNING
• Do not turn OFF the front passen- ger’s airbag ON-OFF switch except
when a child restraint system is fitted
to the front passenger seat.
• If the indicator does not come on when the front passenger’s airbag ON-
OFF switch is turned OFF, do not fit a
child restraint system to the front pas-
senger seat. We recommend you to
have the system inspected by a
MITSUBISHI MOTORS Authorized
Service Point.
• If the indication lamp remains on when the front passenger’s airbag ON-
OFF switch is turned ON, do not al-
low anyone to sit on the front passen-
ger seat. We recommend you to have
the system inspected by a
MITSUBISHI MOTORS Authorized
Service Point.
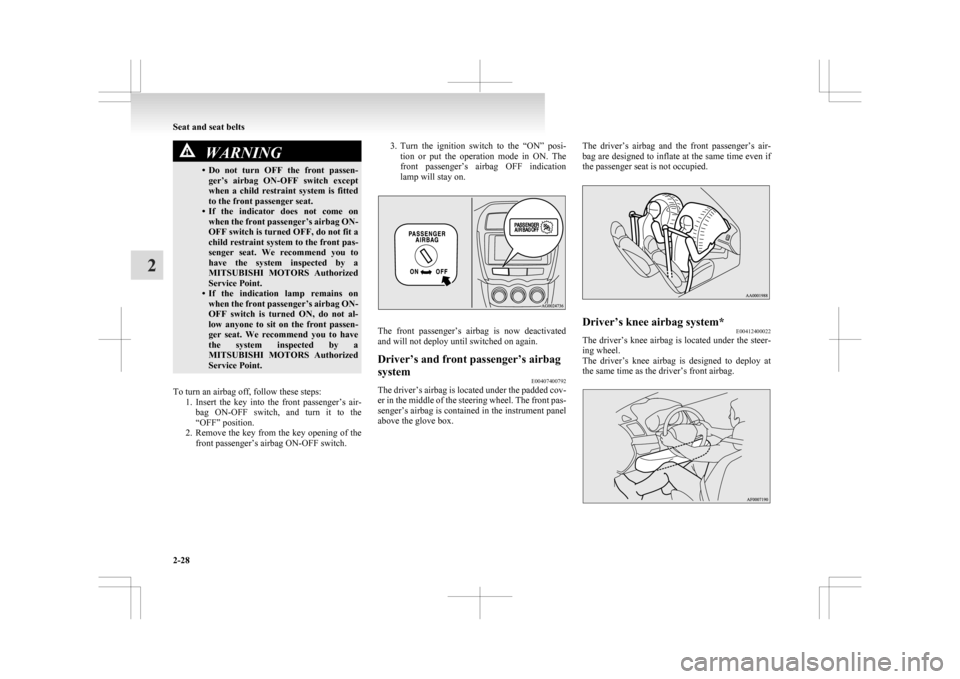
To turn an airbag off, follow these steps: 1. Insert
the key into the front passenger’s air-
bag ON-OFF switch, and turn it to the
“OFF” position.
2. Remove the key from the key opening of the front passenger’s airbag ON-OFF switch. 3. Turn
the ignition switch to the “ON” posi-
tion or put the operation mode in ON. The
front passenger’s airbag OFF indication
lamp will stay on. The front passenger’s airbag is now deactivated
and will not deploy until switched on again.
Driver’s and front passenger’s airbag
system
E00407400792
The driver’s airbag is located under the padded cov-
er
in the middle of the steering wheel. The front pas-
senger’s airbag is contained in the instrument panel
above the glove box. The driver’s airbag and the front passenger’s air-
bag
are designed to inflate at the same time even if
the passenger seat is not occupied. Driver’s knee airbag system*
E00412400022
The driver’s knee airbag is located under the steer-
ing wheel.
The
driver’s knee airbag is designed to deploy at
the same time as the driver’s front airbag. Seat and seat belts
2-28
2
Page 87 of 368
Deployment of front airbags and driv-
er’s knee airbag
E00407501644
The front airbags and driver’s knee airbag ARE
DESIGNED TO DEPLOY when…
The
front airbags and driver’s knee airbag are de-
signed to deploy when the vehicle suffers a moder-
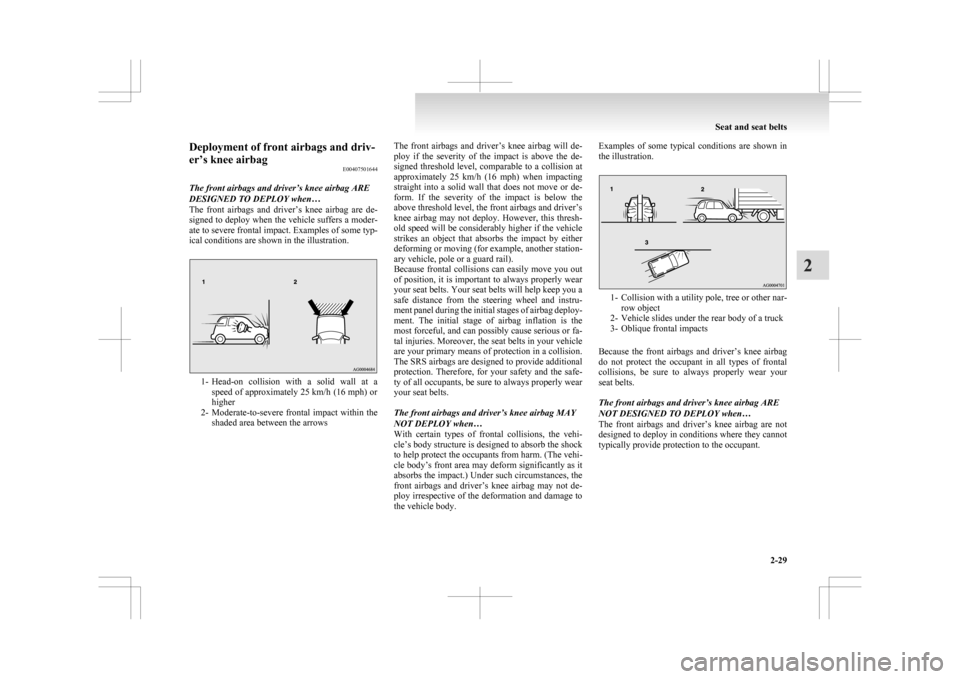
ate to severe frontal impact. Examples of some typ-
ical conditions are shown in the illustration. 1- Head-on
collision with a solid wall at a
speed of approximately 25 km/h (16 mph) or
higher
2- Moderate-to-severe frontal impact within the shaded area between the arrows The front airbags and driver’s knee airbag will de-
ploy
if the severity of the impact is above the de-
signed threshold level, comparable to a collision at
approximately 25 km/h (16 mph) when impacting
straight into a solid wall that does not move or de-
form. If the severity of the impact is below the
above threshold level, the front airbags and driver’s
knee airbag may not deploy. However, this thresh-
old speed will be considerably higher if the vehicle
strikes an object that absorbs the impact by either
deforming or moving (for example, another station-
ary vehicle, pole or a guard rail).
Because frontal collisions can easily move you out
of position, it is important to always properly wear
your seat belts. Your seat belts will help keep you a
safe distance from the steering wheel and instru-
ment panel during the initial stages of airbag deploy-
ment. The initial stage of airbag inflation is the
most forceful, and can possibly cause serious or fa-
tal injuries. Moreover, the seat belts in your vehicle
are your primary means of protection in a collision.
The SRS airbags are designed to provide additional
protection. Therefore, for your safety and the safe-
ty of all occupants, be sure to always properly wear
your seat belts.
The front airbags and driver’s knee airbag MAY
NOT DEPLOY when…
With certain types of frontal collisions, the vehi-
cle’s body structure is designed to absorb the shock
to help protect the occupants from harm. (The vehi-
cle body’s front area may deform significantly as it
absorbs the impact.) Under such circumstances, the
front airbags and driver’s knee airbag may not de-
ploy irrespective of the deformation and damage to
the vehicle body. Examples of some typical conditions are shown in
the illustration.
1- Collision
with a utility pole, tree or other nar-
row object
2- Vehicle slides under the rear body of a truck
3- Oblique frontal impacts
Because the front airbags and driver’s knee airbag
do not protect the occupant in all types of frontal
collisions, be sure to always properly wear your
seat belts.
The front airbags and driver’s knee airbag ARE
NOT DESIGNED TO DEPLOY when…
The front airbags and driver’s knee airbag are not
designed to deploy in conditions where they cannot
typically provide protection to the occupant. Seat and seat belts
2-29 2
Page 88 of 368
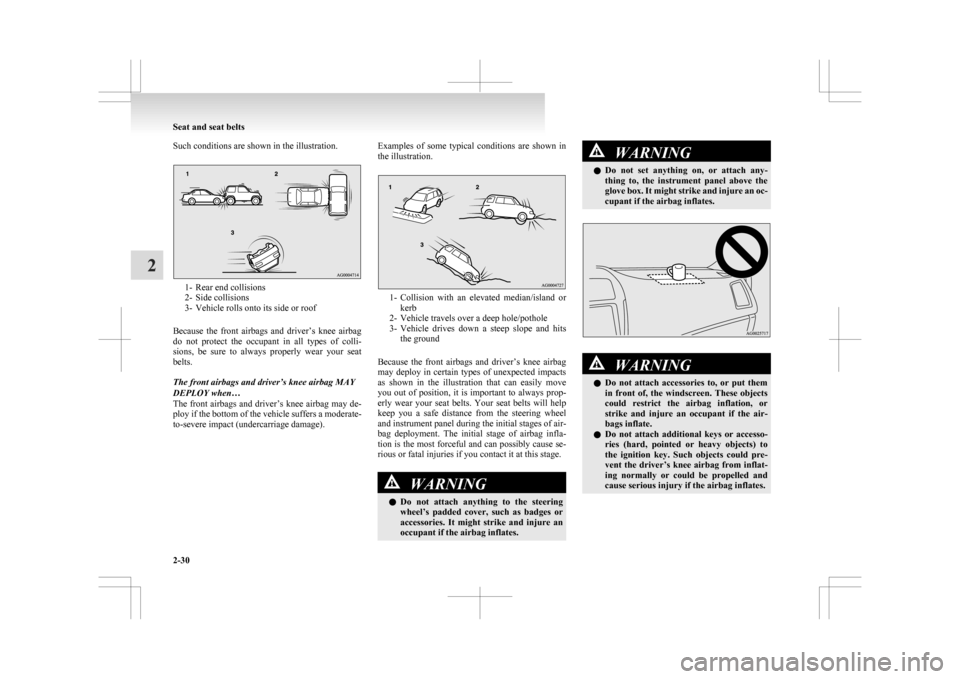
Such conditions are shown in the illustration.
1- Rear end collisions
2-
Side collisions
3- Vehicle rolls onto its side or roof
Because the front airbags and driver’s knee airbag
do not protect the occupant in all types of colli-
sions, be sure to always properly wear your seat
belts.
The front airbags and driver’s knee airbag MAY
DEPLOY when…
The front airbags and driver’s knee airbag may de-
ploy if the bottom of the vehicle suffers a moderate-
to-severe impact (undercarriage damage). Examples of some typical conditions are shown in
the illustration.
1- Collision
with an elevated median/island or
kerb
2- Vehicle travels over a deep hole/pothole
3- Vehicle drives down a steep slope and hits the ground
Because the front airbags and driver’s knee airbag
may deploy in certain types of unexpected impacts
as shown in the illustration that can easily move
you out of position, it is important to always prop-
erly wear your seat belts. Your seat belts will help
keep you a safe distance from the steering wheel
and instrument panel during the initial stages of air-
bag deployment. The initial stage of airbag infla-
tion is the most forceful and can possibly cause se-
rious or fatal injuries if you contact it at this stage. WARNING
l Do
not attach anything to the steering
wheel’s padded cover, such as badges or
accessories. It might strike and injure an
occupant if the airbag inflates. WARNING
l Do
not set anything on, or attach any-
thing to, the instrument panel above the
glove box. It might strike and injure an oc-
cupant if the airbag inflates. WARNING
l Do
not attach accessories to, or put them
in front of, the windscreen. These objects
could restrict the airbag inflation, or
strike and injure an occupant if the air-
bags inflate.
l Do not attach additional keys or accesso-
ries (hard, pointed or heavy objects) to
the ignition key. Such objects could pre-
vent the driver’s knee airbag from inflat-
ing normally or could be propelled and
cause serious injury if the airbag inflates. Seat and seat belts
2-30
2
Page 93 of 368
WARNING
l Do not modify your steering wheel, seat
belt retractor or any other SRS compo-
nents. For example, replacement of the
steering wheel, or modifications to the
front bumper or body structure can ad-
versely affect SRS performance and lead
to possible injury.
l If your vehicle has sustained any damage,
we recommend you to have the SRS in-
spected to ensure it is in proper working
order.
l On vehicles with the side airbags, do not
modify your front seats, centre pillar and
centre console.
It can adversely affect SRS performance
and lead to possible injury.
If you found any tear, scratch, crack or
damage to the seat fabric near the side air-
bag, the portion of the front and rear pil-
lars and roof side rail, you should have
the SRS inspected by a MITSUBISHI
MOTORS Authorized Service Point.
NOTE l When
you transfer ownership of the vehicle
to some other person, we urge you to alert
the new owner that it is equipped with the
SRS and refer the new owner to the applica-
ble section in this owner’s manual.
l If your vehicle has to be scrapped, do this in
line with local legislation and contact a
MITSUBISHI MOTORS Authorized Service
Point to safely dismantle the airbag system. Seat and seat belts
2-35 2
Page 123 of 368
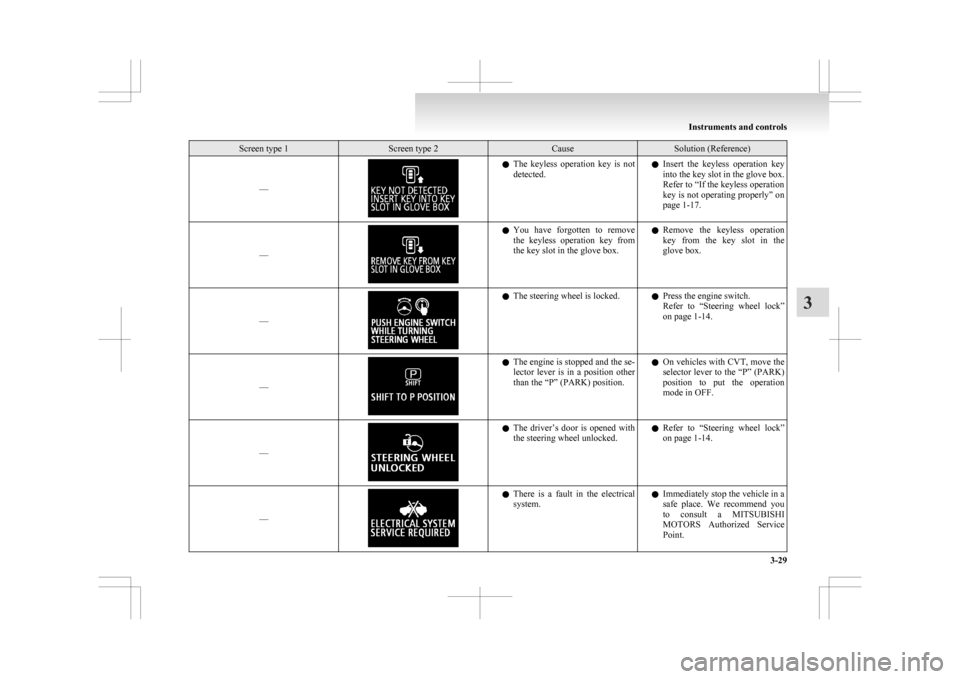
Screen type 1 Screen type 2 Cause Solution (Reference)
–– l
The keyless operation key is not
detected. l
Insert the keyless operation key
into the key slot in the glove box.
Refer to “If the keyless operation
key is not operating properly” on
page 1-17.
–– l
You
have forgotten to remove
the keyless operation key from
the key slot in the glove box. l
Remove the keyless operation
key from the key slot in the
glove box.
–– l
The steering wheel is locked.
lPress the engine switch.
Refer
to “Steering wheel lock”
on page 1-14.
–– l
The engine is stopped and the se-
lector
lever is in a position other
than the “P” (PARK) position. l
On vehicles with CVT, move the
selector lever to the “P” (PARK)
position to put the operation
mode in OFF.
–– l
The
driver’s door is opened with
the steering wheel unlocked. l
Refer to “Steering wheel lock”
on page 1-14.
–– l
There
is a fault in the electrical
system. l
Immediately stop the vehicle in a
safe place. We recommend you
to consult a MITSUBISHI
MOTORS Authorized Service
Point. Instruments and controls
3-29 3
Page 124 of 368
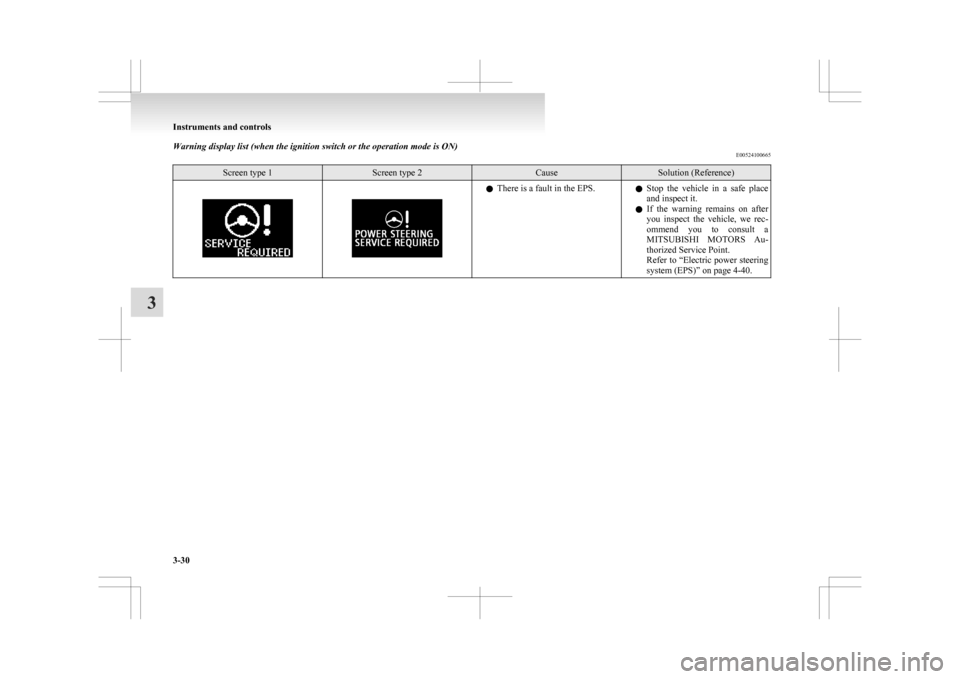
Warning display list (when the ignition switch or the operation mode is ON)
E00524100665Screen type 1 Screen type 2 Cause Solution (Reference)
l
There is a fault in the EPS.
lStop the vehicle in a safe place
and inspect it.
l If the warning remains on after
you inspect the vehicle, we rec-
ommend you to consult a
MITSUBISHI MOTORS Au-
thorized Service Point.
Refer to “Electric power steering
system (EPS)” on page 4-40. Instruments and controls
3-30
3
Page 127 of 368

Screen type 1 Screen type 2 Cause Solution (Reference)
–– l
There is a fault in the steering
wheel lock. l
Immediately stop the vehicle in a
safe place.
We recommend you to consult a
MITSUBISHI MOTORS Au-
thorized Service Point.
–– l
There
is a fault in the electrical
system. l
Immediately stop the vehicle in a
safe place.
We recommend you to consult a
MITSUBISHI MOTORS Au-
thorized Service Point. l
The engine is overheated.
lStop
the vehicle in a safe place
and take corrective measures.
Refer to “Engine overheating”
on page 6-04. l
The
automatic transmission
(CVT) fluid temperature is too
high. Refer to “Automatic transmission IN-
VECS-III Sports Mode 6CVT (Intelli-
gent & Innovative Vehicle Electronic
Control System III)” on page 4-24. l
You
turned the ignition switch to
the “ON” position or put the op-
eration mode in ON without fas-
tening your seat belt. l
Fasten your seat belt properly. Re-
fer to “Seat belt warning” on
page 2-11. Instruments and controls
3-33 3
Page 151 of 368
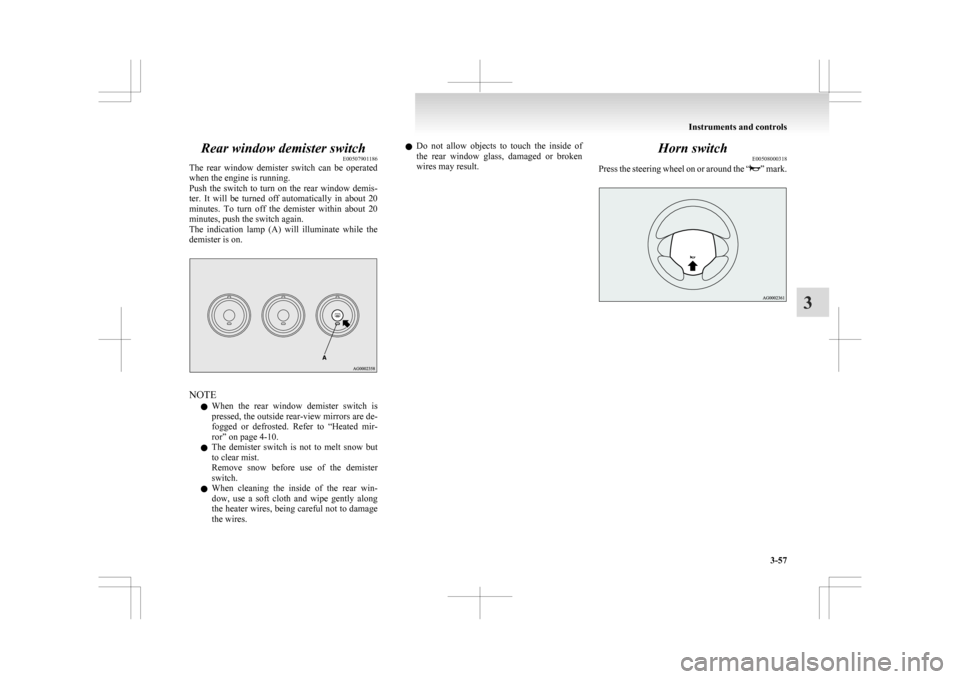
Rear window demister switch
E00507901186
The
rear window demister switch can be operated
when the engine is running.
Push the switch to turn on the rear window demis-
ter. It will be turned off automatically in about 20
minutes. To turn off the demister within about 20
minutes, push the switch again.
The indication lamp (A) will illuminate while the
demister is on. NOTE
l When
the rear window demister switch is
pressed, the outside rear-view mirrors are de-
fogged or defrosted. Refer to “Heated mir-
ror” on page 4-10.
l The demister switch is not to melt snow but
to clear mist.
Remove snow before use of the demister
switch.
l When cleaning the inside of the rear win-
dow, use a soft cloth and wipe gently along
the heater wires, being careful not to damage
the wires. l
Do
not allow objects to touch the inside of
the rear window glass, damaged or broken
wires may result. Horn switch
E00508000318
Press
the steering wheel on or around the “ ”
mark.Instruments and controls
3-57 3