2009 MITSUBISHI ASX reset
[x] Cancel search: resetPage 113 of 368
l
When the engine switch or the operation
mode is in the following conditions, the aver-
age fuel consumption display and average
speed display are automatically reset.
[Except for vehicles equipped with keyless
operation system]
The ignition switch is in the “ACC” or
“LOCK” position for about 4 hours or longer.
[For vehicles equipped with keyless opera-
tion system]
The operation mode is in ACC or OFF for
about 4 hours or longer.
NOTE l The average fuel consumption display and
average speed display can be reset individual-
ly for the auto reset mode and manual reset
mode.
l The memory of the auto reset mode or man-
ual reset mode for the average fuel consump-
tion display and average speed display is
erased if the battery is disconnected.
l The initial (default) setting is “Auto reset
mode”.
Changing the fuel consumption display unit E00523000579
The display unit for fuel consumption can be switch-
ed.
The distance, speed, and amount units are also
switched to match the selected fuel consumption
unit. 1. Press and hold the multi-information meterswitch for about 2 seconds or more to switch
from the setting mode screen to the menu
screen.
Refer to “Changing the function settings
(when the ignition switch or the operation
mode is ON)” on page 3-17. 2. Lightly
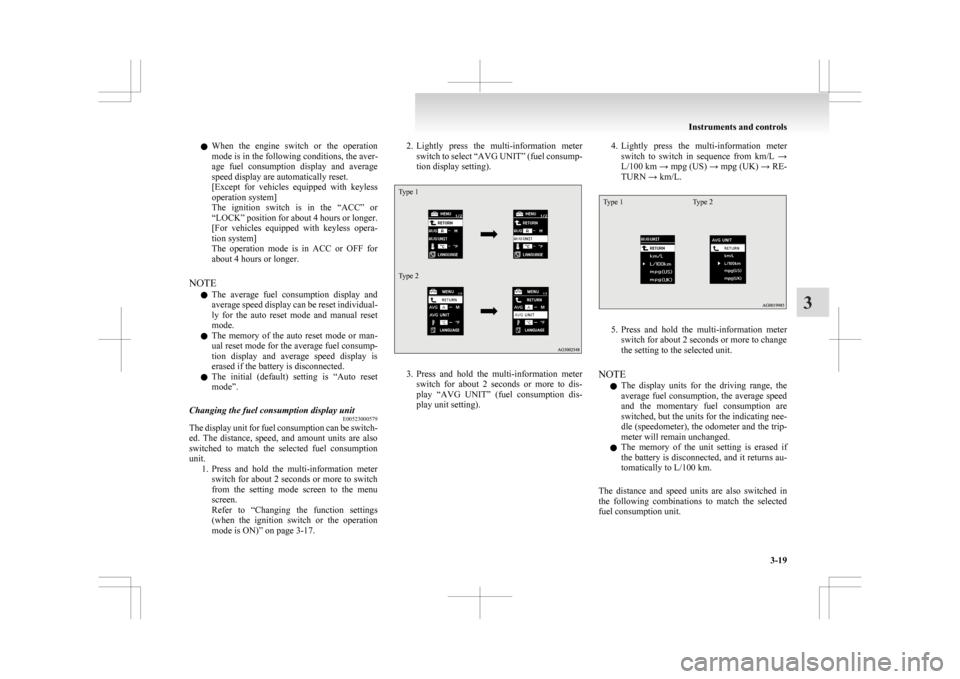
press the multi-information meter
switch to select “AVG UNIT” (fuel consump-
tion display setting).
Type 1
Type 2 3. Press
and hold the multi-information meter
switch for about 2 seconds or more to dis-
play “AVG UNIT” (fuel consumption dis-
play unit setting). 4. Lightly
press the multi-information meter
switch to switch in sequence from km/L →
L/100 km → mpg (US) → mpg (UK) → RE-
TURN → km/L.
Type 1 Type 2 5. Press
and hold the multi-information meter
switch for about 2 seconds or more to change
the setting to the selected unit.
NOTE l The display units for the driving range, the
average fuel consumption, the average speed
and the momentary fuel consumption are
switched, but the units for the indicating nee-
dle (speedometer), the odometer and the trip-
meter will remain unchanged.
l The memory of the unit setting is erased if
the battery is disconnected, and it returns au-
tomatically to L/100 km.
The distance and speed units are also switched in
the following combinations to match the selected
fuel consumption unit. Instruments and controls
3-19 3
Page 117 of 368
4. Lightly press the multi-information meter
switch to select the time until the display.
5. Press and hold the multi-information meter switch for about 2 seconds or more, the set-
ting is changed to the selected time.
NOTE l If the battery is disconnected, the unit setting
is erased from memory and is automatically
set to OFF.
l The drive time is reset when the ignition
switch is turned off or the operation mode is
put in OFF.
Changing the turn-signal sound E00529100211
It is possible to change the turn-signal sound.
1. Press
and hold the multi-information meter
switch for about 2 seconds or more to switch
from the setting mode screen to the menu
screen.
Refer to “Changing the function settings
(when the ignition switch or the operation
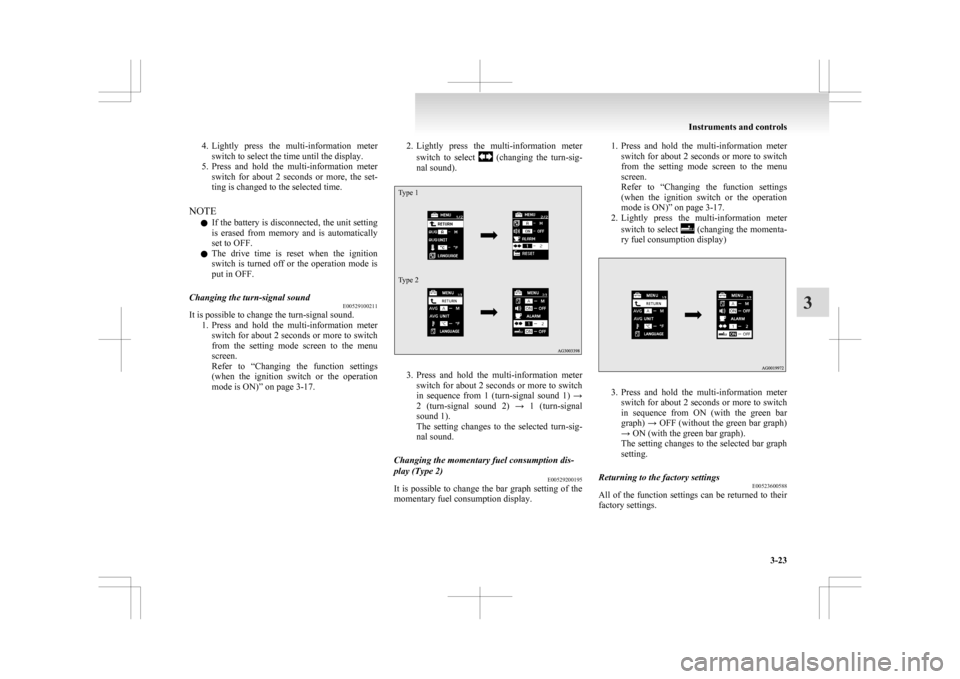
mode is ON)” on page 3-17. 2. Lightly
press the multi-information meter
switch to select (changing the turn-sig-
nal sound).
Type 1
Type 2 3. Press
and hold the multi-information meter
switch for about 2 seconds or more to switch
in sequence from 1 (turn-signal sound 1) →
2 (turn-signal sound 2) → 1 (turn-signal
sound 1).
The setting changes to the selected turn-sig-
nal sound.
Changing the momentary fuel consumption dis-
play (Type 2) E00529200195
It is possible to change the bar graph setting of the
momentary fuel consumption display. 1. Press
and hold the multi-information meter
switch for about 2 seconds or more to switch
from the setting mode screen to the menu
screen.
Refer to “Changing the function settings
(when the ignition switch or the operation
mode is ON)” on page 3-17.
2. Lightly press the multi-information meter
switch to select (changing the momenta-
ry fuel consumption display) 3. Press
and hold the multi-information meter
switch for about 2 seconds or more to switch
in sequence from ON (with the green bar
graph) → OFF (without the green bar graph)
→ ON (with the green bar graph).
The setting changes to the selected bar graph
setting.
Returning to the factory settings E00523600588
All of the function settings can be returned to their
factory settings. Instruments and controls
3-23 3
Page 118 of 368
1. Press and hold the multi-information meter
switch for about 2 seconds or more to switch
from the setting mode screen to the menu
screen.
Refer to “Changing the function settings
(when the ignition switch or the operation
mode is ON)” on page 3-17.
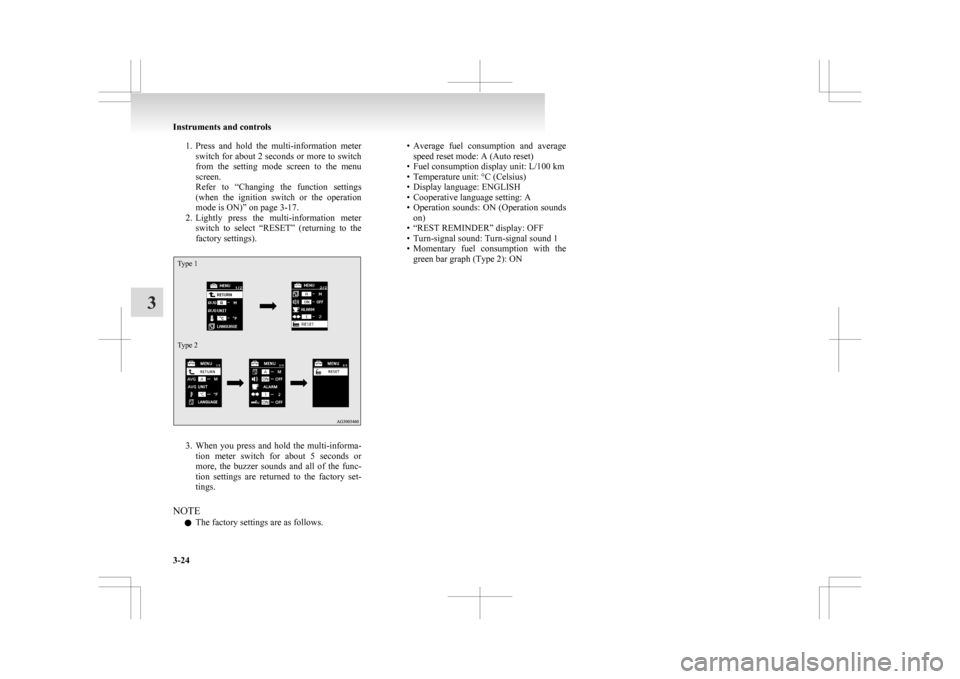
2. Lightly press the multi-information meter switch to select “RESET” (returning to the
factory settings).
Type 1
Type 2 3. When
you press and hold the multi-informa-
tion meter switch for about 5 seconds or
more, the buzzer sounds and all of the func-
tion settings are returned to the factory set-
tings.
NOTE l The factory settings are as follows. • Average
fuel consumption and average
speed reset mode: A (Auto reset)
• Fuel consumption display unit: L/100 km
• Temperature unit: °C (Celsius)
• Display language: ENGLISH
• Cooperative language setting: A
• Operation sounds: ON (Operation sounds on)
• “REST REMINDER” display: OFF
• Turn-signal sound: Turn-signal sound 1
• Momentary fuel consumption with the green bar graph (Type 2): ON Instruments and controls
3-24
3
Page 133 of 368
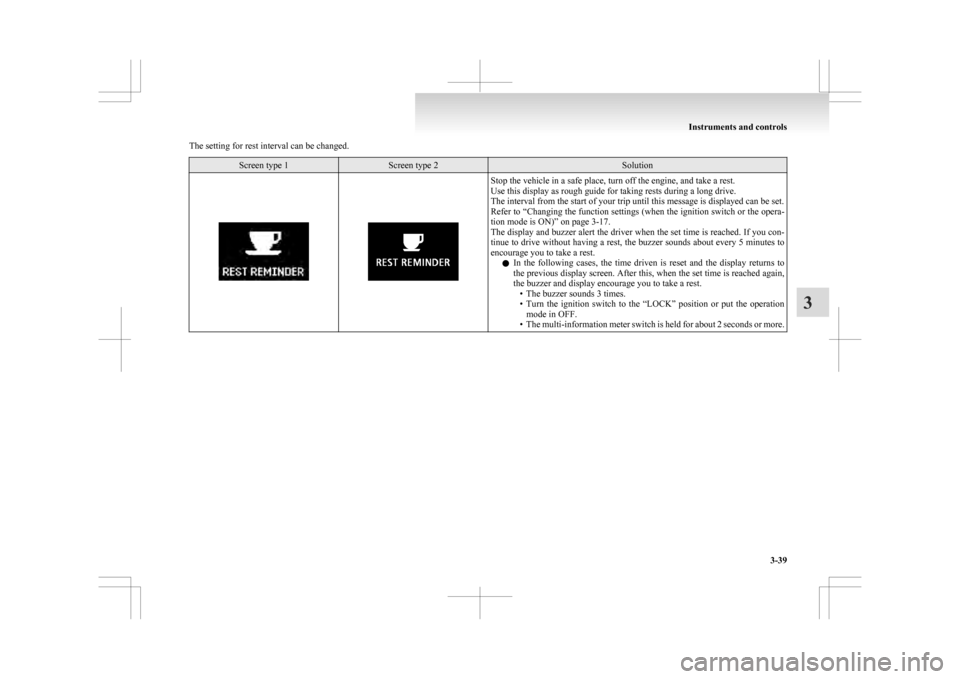
The setting for rest interval can be changed.
Screen type 1 Screen type 2 Solution
Stop the vehicle in a safe place, turn off the engine, and take a rest.
Use this display as rough guide for taking rests during a long drive.
The interval from the start of your trip until this message is displayed can be set.
Refer
to “Changing the function settings (when the ignition switch or the opera-
tion mode is ON)” on page 3-17.
The display and buzzer alert the driver when the set time is reached. If you con-
tinue to drive without having a rest, the buzzer sounds about every 5 minutes to
encourage you to take a rest.
l In the following cases, the time driven is reset and the display returns to
the previous display screen. After this, when the set time is reached again,
the buzzer and display encourage you to take a rest.
• The buzzer sounds 3 times.
• Turn the ignition switch to the “LOCK” position or put the operationmode in OFF.
• The multi-information meter switch is held for about 2 seconds or more. Instruments and controls
3-39 3
Page 171 of 368

• Electric power consumption is high, such
as when the rear window demister or oth-
er electrical components are operating or
the blower speed is set to a high setting.
• Battery voltage or battery performance is low
• Check engine warning lamp is illumina-
ted or the “ ”
display/indicator is blinking
l If the Auto Stop & Go (AS&G) system oper-
ates while the air conditioning is operating,
both the engine and the air conditioning com-
pressor will stop. Therefore, only the blower
will operate.
l If the demisting function and the Auto Stop
& Go (AS&G) system are needed at the
same time, it is recommended to set the
mode selection dial to the Foot/demister posi-
tion.
Refer to “Mode selection dial” on page
5-02.
l If the air conditioning is operating, set the
temperature control dial higher to lengthen
the time that the engine is stopped automati-
cally. Automatically restarting the engine
E00627600037
Depress the clutch pedal while the gearshift lever is
in
the “N” (Neutral) position. The “ ” display/indi-
cator
in the meter turns off and the engine restarts
automatically. NOTE
l If the engine does not restart automatically or
if
the engine stalls, the oil pressure warning
lamp, charge warning lamp, and check en-
gine warning lamp will illuminate.
If this occurs, the engine will not restart even
if the clutch pedal is depressed again. While
depressing the brake pedal, fully depress the
clutch pedal and turn the ignition switch to
the “START” position to start the engine.
For details, refer to “Starting and stopping
the engine” on page 1-15 or “Starting” on
page 4-13. CAUTION
l
In
the following cases, the engine will re-
start automatically even if the engine was
stopped by the Auto Stop & Go (AS&G)
system. Pay attention, otherwise an unex-
pected accident might occur when the en-
gine restarts. • Vehicle speed is 3 km/h (2 mph) orhigher when coasting down a slope
• Brake booster vacuum pressure is low because the brake pedal is depressed
repeatedly or depressed harder than
usual
• Engine coolant temperature is low
• When the air conditioning is operated by pressing the air conditioning switch.
• When the preset temperature of the air conditioning is changed significant-
ly. Starting and driving
4-19 4
Page 221 of 368
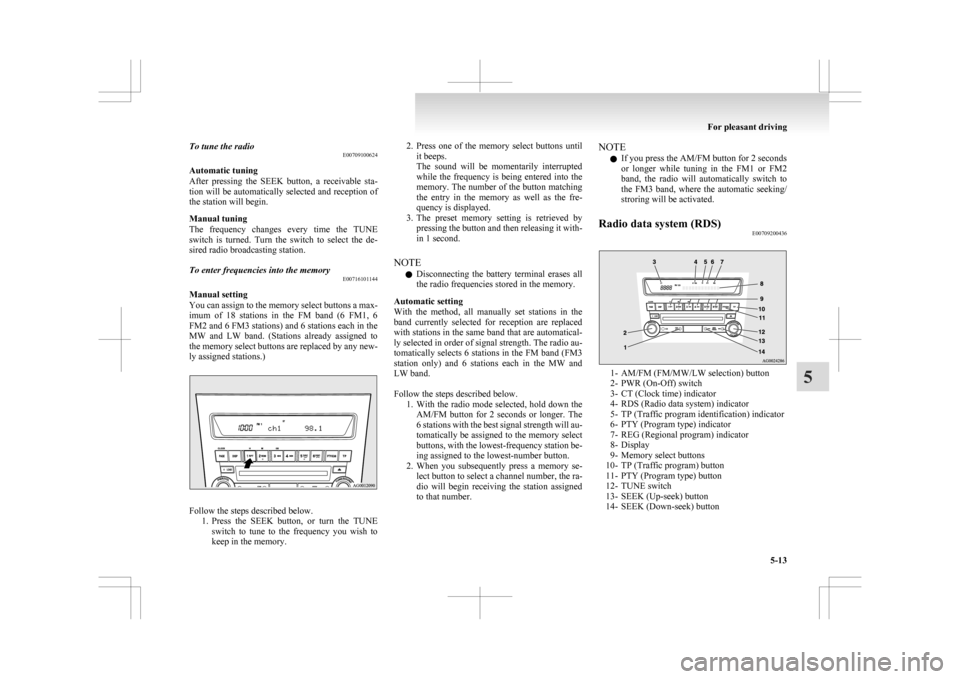
To tune the radio
E00709100624
Automatic tuning
After
pressing the SEEK button, a receivable sta-
tion will be automatically selected and reception of
the station will begin.
Manual tuning
The frequency changes every time the TUNE
switch is turned. Turn the switch to select the de-
sired radio broadcasting station.
To enter frequencies into the memory E00716101144
Manual setting
You
can assign to the memory select buttons a max-
imum of 18 stations in the FM band (6 FM1, 6
FM2 and 6 FM3 stations) and 6 stations each in the
MW and LW band. (Stations already assigned to
the memory select buttons are replaced by any new-
ly assigned stations.) Follow the steps described below.
1. Press
the SEEK button, or turn the TUNE
switch to tune to the frequency you wish to
keep in the memory. 2. Press
one of the memory select buttons until
it beeps.
The sound will be momentarily interrupted
while the frequency is being entered into the
memory. The number of the button matching
the entry in the memory as well as the fre-
quency is displayed.
3. The preset memory setting is retrieved by pressing the button and then releasing it with-
in 1 second.
NOTE l Disconnecting the battery terminal erases all
the radio frequencies stored in the memory.
Automatic setting
With the method, all manually set stations in the
band currently selected for reception are replaced
with stations in the same band that are automatical-
ly selected in order of signal strength. The radio au-
tomatically selects 6 stations in the FM band (FM3
station only) and 6 stations each in the MW and
LW band.
Follow the steps described below. 1. With the radio mode selected, hold down theAM/FM button for 2 seconds or longer. The
6 stations with the best signal strength will au-
tomatically be assigned to the memory select
buttons, with the lowest-frequency station be-
ing assigned to the lowest-number button.
2. When you subsequently press a memory se- lect button to select a channel number, the ra-
dio will begin receiving the station assigned
to that number. NOTE
l If you press the AM/FM button for 2 seconds
or
longer while tuning in the FM1 or FM2
band, the radio will automatically switch to
the FM3 band, where the automatic seeking/
stroring will be activated.
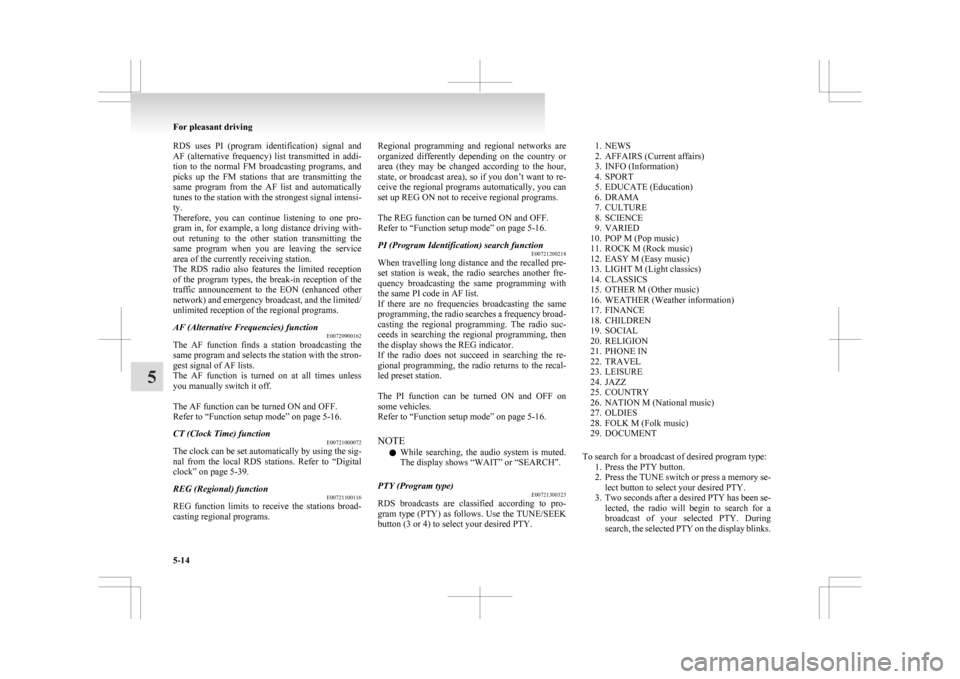
Radio data system (RDS) E00709200436 1- AM/FM (FM/MW/LW selection) button
2-
PWR (On-Off) switch
3- CT (Clock time) indicator
4- RDS (Radio data system) indicator
5- TP (Traffic program identification) indicator
6- PTY (Program type) indicator
7- REG (Regional program) indicator
8- Display
9- Memory select buttons
10- TP (Traffic program) button
11- PTY (Program type) button
12- TUNE switch
13- SEEK (Up-seek) button
14- SEEK (Down-seek) button For pleasant driving
5-13 5
Page 222 of 368
RDS uses PI (program identification) signal and
AF
(alternative frequency) list transmitted in addi-
tion to the normal FM broadcasting programs, and
picks up the FM stations that are transmitting the
same program from the AF list and automatically
tunes to the station with the strongest signal intensi-
ty.
Therefore, you can continue listening to one pro-
gram in, for example, a long distance driving with-
out retuning to the other station transmitting the
same program when you are leaving the service
area of the currently receiving station.
The RDS radio also features the limited reception
of the program types, the break-in reception of the
traffic announcement to the EON (enhanced other
network) and emergency broadcast, and the limited/
unlimited reception of the regional programs.
AF (Alternative Frequencies) function E00720900162
The AF function finds a station broadcasting the
same
program and selects the station with the stron-
gest signal of AF lists.
The AF function is turned on at all times unless
you manually switch it off.
The AF function can be turned ON and OFF.
Refer to “Function setup mode” on page 5-16.
CT (Clock Time) function E00721000072
The clock can be set automatically by using the sig-
nal
from the local RDS stations. Refer to “Digital
clock” on page 5-39.
REG (Regional) function E00721100116
REG function limits to receive the stations broad-
casting regional programs. Regional programming and regional networks are
organized
differently depending on the country or
area (they may be changed according to the hour,
state, or broadcast area), so if you don’t want to re-
ceive the regional programs automatically, you can
set up REG ON not to receive regional programs.
The REG function can be turned ON and OFF.
Refer to “Function setup mode” on page 5-16.
PI (Program Identification) search function E00721200218
When travelling long distance and the recalled pre-
set
station is weak, the radio searches another fre-
quency broadcasting the same programming with
the same PI code in AF list.
If there are no frequencies broadcasting the same
programming, the radio searches a frequency broad-
casting the regional programming. The radio suc-
ceeds in searching the regional programming, then
the display shows the REG indicator.
If the radio does not succeed in searching the re-
gional programming, the radio returns to the recal-
led preset station.
The PI function can be turned ON and OFF on
some vehicles.
Refer to “Function setup mode” on page 5-16.
NOTE
l While searching, the audio system is muted.
The display shows “WAIT” or “SEARCH”.
PTY (Program type) E00721300323
RDS broadcasts are classified according to pro-
gram
type (PTY) as follows. Use the TUNE/SEEK
button (3 or 4) to select your desired PTY.
1. NEWS
2.
AFFAIRS (Current affairs)
3. INFO (Information)
4. SPORT
5. EDUCATE (Education)
6. DRAMA
7. CULTURE
8. SCIENCE
9. VARIED
10. POP M (Pop music)
11. ROCK M (Rock music)
12. EASY M (Easy music)
13. LIGHT M (Light classics)
14. CLASSICS
15. OTHER M (Other music)
16. WEATHER (Weather information)
17. FINANCE
18. CHILDREN
19. SOCIAL
20. RELIGION
21. PHONE IN
22. TRAVEL
23. LEISURE
24. JAZZ
25. COUNTRY
26. NATION M (National music)
27. OLDIES
28. FOLK M (Folk music)
29. DOCUMENT
To search for a broadcast of desired program type: 1. Press the PTY button.
2. Press the TUNE switch or press a memory se-lect button to select your desired PTY.
3. Two seconds after a desired PTY has been se- lected, the radio will begin to search for a
broadcast of your selected PTY. During
search, the selected PTY on the display blinks. For pleasant driving
5-14
5
Page 223 of 368
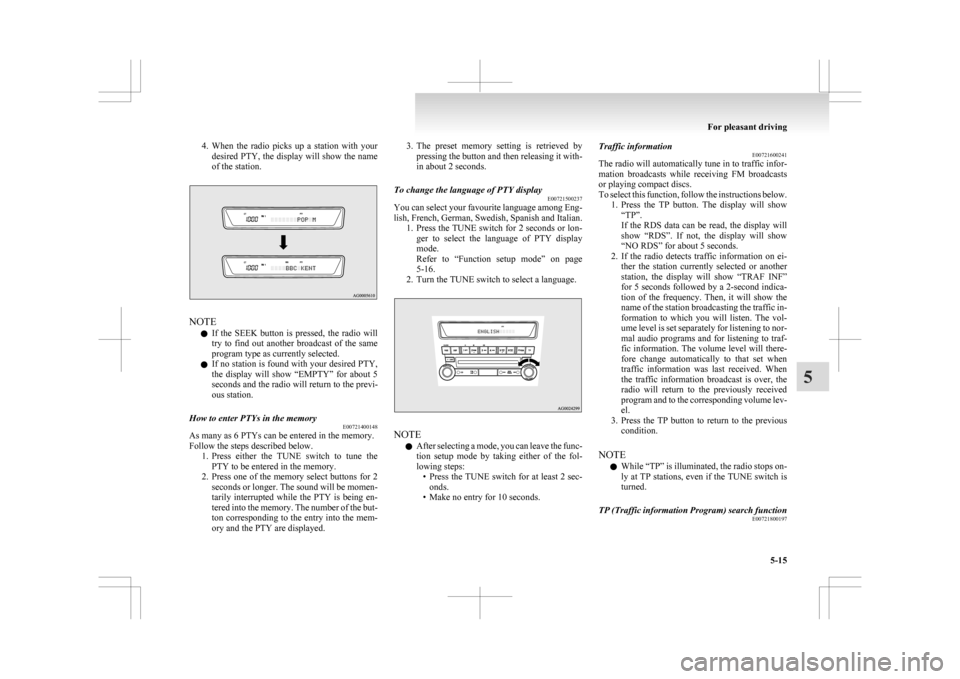
4. When the radio picks up a station with your
desired PTY, the display will show the name
of the station. NOTE
l If
the SEEK button is pressed, the radio will
try to find out another broadcast of the same
program type as currently selected.
l If no station is found with your desired PTY,
the display will show “EMPTY” for about 5
seconds and the radio will return to the previ-
ous station.
How to enter PTYs in the memory E00721400148
As many as 6 PTYs can be entered in the memory.
Follow the steps described below.
1. Press
either the TUNE switch to tune the
PTY to be entered in the memory.
2. Press one of the memory select buttons for 2 seconds or longer. The sound will be momen-
tarily interrupted while the PTY is being en-
tered into the memory. The number of the but-
ton corresponding to the entry into the mem-
ory and the PTY are displayed. 3. The
preset memory setting is retrieved by
pressing the button and then releasing it with-
in about 2 seconds.
To change the language of PTY display E00721500237
You can select your favourite language among Eng-
lish,
French, German, Swedish, Spanish and Italian.
1. Press the TUNE switch for 2 seconds or lon- ger to select the language of PTY display
mode.
Refer to “Function setup mode” on page
5-16.
2. Turn the TUNE switch to select a language. NOTE
l After
selecting a mode, you can leave the func-
tion setup mode by taking either of the fol-
lowing steps: • Press the TUNE switch for at least 2 sec-onds.
• Make no entry for 10 seconds. Traffic information
E00721600241
The
radio will automatically tune in to traffic infor-
mation broadcasts while receiving FM broadcasts
or playing compact discs.
To select this function, follow the instructions below. 1. Press the TP button. The display will show“TP”.
If the RDS data can be read, the display will
show “RDS”. If not, the display will show
“NO RDS” for about 5 seconds.
2. If the radio detects traffic information on ei- ther the station currently selected or another
station, the display will show “TRAF INF”
for 5 seconds followed by a 2-second indica-
tion of the frequency. Then, it will show the
name of the station broadcasting the traffic in-
formation to which you will listen. The vol-
ume level is set separately for listening to nor-
mal audio programs and for listening to traf-
fic information. The volume level will there-
fore change automatically to that set when
traffic information was last received. When
the traffic information broadcast is over, the
radio will return to the previously received
program and to the corresponding volume lev-
el.
3. Press the TP button to return to the previous condition.
NOTE l While “TP” is illuminated, the radio stops on-
ly at TP stations, even if the TUNE switch is
turned.
TP (Traffic information Program) search function E00721800197
For pleasant driving
5-15 5