2009 MITSUBISHI ASX ECO mode
[x] Cancel search: ECO modePage 258 of 368

l
If the name you selected has matching data
in the mobile phone book but no telephone
number is registered under the selected loca-
tion, the voice guide will say “{home/work/
mobile/other} not found for
you like to try again?”
Answer “Yes,” and the system will return to
Step 3.
Answer “No,” and the call will be cancelled.
Start over again from Step 1.
6. The voice guide will say “Calling
telephone number.
NOTE l When the confirmation function is on, the sys-
tem will ask if the name and location of the
receiver are correct.
If the name is correct, answer “Yes.”
If you want to change the name or location to
call, answer “No.” The system will return to
Step 3.
Redialing
You can redial the last number called, based on the
history of dialed calls in the paired cellular phone.
Use the following procedure to redial. 1. Press the SPEECH button.
2. Say “Redial.”
SEND function E00761300035
During a call, press the SPEECH button to enter
voice
recognition mode, then say “
SEND” to generate DTMF tones. For example, if during a call you need to simulate
the
press of a phone button as a response to an auto-
mated system, press the SPEECH button and speak
“1 2 3 4 pound SEND” and the 1234# will be sent
on your cellular phone.
Receiving calls E00761600025
If an incoming phone call is received while the ig-
nition
switch or the operation mode is in ON or
ACC, the audio system will be automatically
turned on and switched to the incoming call, even
when the audio system was originally off.
The voice guide announcement for the incoming
call will be output from the front passenger’s seat
speaker.
If the CD player or radio was playing when the in-
coming call was received, the audio system will
mute the sound from the CD player or radio and out-
put only the incoming call.
To receive the call, press the PICK-UP button on
the steering wheel control switch.
When the call is over, the audio system will return
to its previous state.
MUTE function E00760300054
At any time during a call, you can mute the vehicle
microphone.
Pressing
the SPEECH button and then saying
“Mute” during a call will turn ON the MUTE func-
tion and mute the microphone.
Saying “Mute off” in the same way will turn off
the MUTE function and cancel the mute on the mi-
crophone. Switching between hands-free mode and private
mode
E00761400036
The
Bluetooth ®
2.0 interface can switch between
Hands-free mode (Hands-free calls) and private
mode (calls using cellular phone).
If you press the SPEECH button and say “Transfer
call” during a Hands-free call, you can stop the
Hands-free mode and talk in private mode.
To return to Hands-free mode, press the SPEECH
button again and say “Transfer call”.
Phone book function E00763700020
The Bluetooth ®
2.0 interface has 2 types of unique
phone books that are different from the phone book
stored in the cellular phone. They are the vehicle
phone book and the mobile phone book.
These phone books are used to register telephone
numbers and to make calls to desired numbers via
the voice recognition function.
NOTE
l Disconnecting the battery cable will not de-
lete information registered in the phone book.
Vehicle phone book E00763800050
This phone book is used when making calls with
the voice recognition function.
Up
to 32 names can be registered in the vehicle
phone book per language.
Also, each entry has 4 locations associated with:
home, work, mobile and other. You can register
one telephone number for each location.
You can register a desired name as a name for any
phone book entry registered in the vehicle phone
book. For pleasant driving
5-50
5
Page 266 of 368
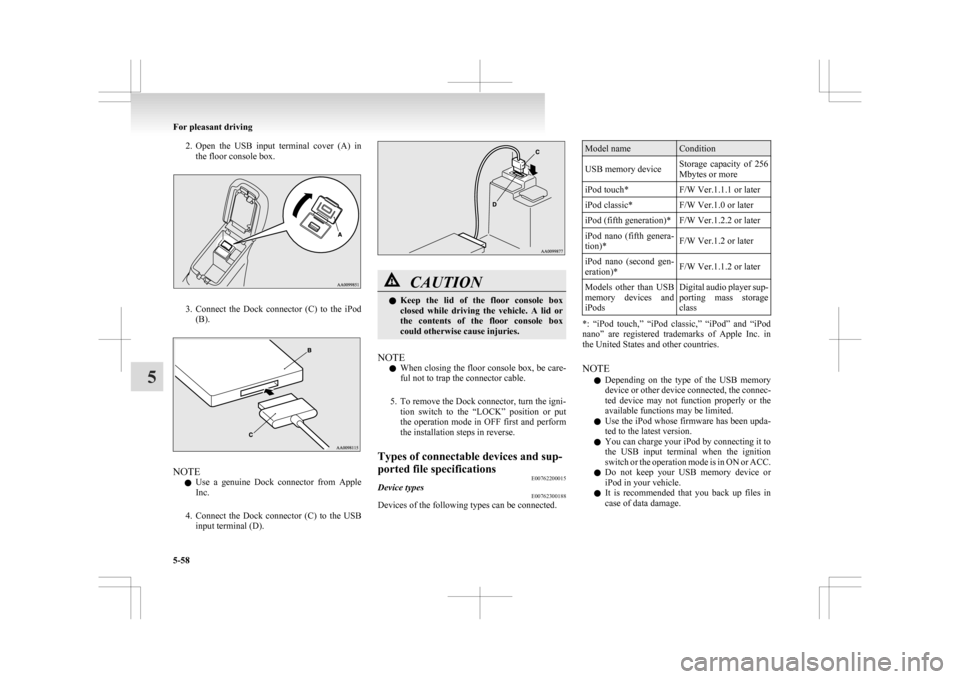
2. Open the USB input terminal cover (A) in
the floor console box. 3. Connect
the Dock connector (C) to the iPod
(B). NOTE
l Use
a genuine Dock connector from Apple
Inc.
4. Connect the Dock connector (C) to the USB input terminal (D). CAUTION
l
Keep
the lid of the floor console box
closed while driving the vehicle. A lid or
the contents of the floor console box
could otherwise cause injuries.
NOTE l When
closing the floor console box, be care-
ful not to trap the connector cable.
5. To remove the Dock connector, turn the igni- tion switch to the “LOCK” position or put
the operation mode in OFF first and perform
the installation steps in reverse.
Types of connectable devices and sup-
ported file specifications E00762200015
Device types E00762300188
Devices of the following types can be connected. Model name Condition
USB memory device Storage capacity of 256
Mbytes or more
iPod touch* F/W Ver.1.1.1 or later
iPod classic* F/W Ver.1.0 or later
iPod (fifth generation)* F/W Ver.1.2.2 or later
iPod nano (fifth genera-
tion)* F/W Ver.1.2 or later
iPod nano (second gen-
eration)* F/W Ver.1.1.2 or later
Models other than USB
memory
devices and
iPods Digital audio player sup-
porting
mass storage
class *: “iPod touch,” “iPod classic,” “iPod” and “iPod
nano”
are registered trademarks of Apple Inc. in
the United States and other countries.
NOTE
l Depending on the type of the USB memory
device or other device connected, the connec-
ted device may not function properly or the
available functions may be limited.
l Use the iPod whose firmware has been upda-
ted to the latest version.
l You can charge your iPod by connecting it to
the USB input terminal when the ignition
switch or the operation mode is in ON or ACC.
l Do not keep your USB memory device or
iPod in your vehicle.
l It is recommended that you back up files in
case of data damage. For pleasant driving
5-58
5
Page 269 of 368
CAUTION
l
Do not allow children to operate or play
with the cigarette lighter as burns may oc-
cur.
l Something is wrong with the cigarette
lighter if it does not pop back out within
approximately 30 seconds of being push-
ed in.
Pull it out and have the problem correc-
ted at MITSUBISHI MOTORS Author-
ized Service Point.
l Do not use any electric appliance that is
not approved by MITSUBISHI
MOTORS. Doing so could damage the
socket. If you used the cigarette lighter af-
ter damaging the socket, the cigarette
lighter might pop out or fail to come out
after being pushed in.
l When the cigarette lighter socket is used
as a power source for an electric appli-
ance, be sure that the electric appliance
operates at 12 V and has an electric ca-
pacity of 120 W or less. In addition, long
use of the electric appliance without run-
ning the engine may run down the battery. Accessory socket
E00711601346 CAUTION
l
Be
sure to use a “plug-in” type accessory
operating at 12 V and at 120 W or less.
When using more than one socket at the
same time, make sure that the electrical
accessories are 12 V accessories and that
the total power consumption does not ex-
ceed 120 W.
l Long use of the electric appliance without
running the engine may run down the bat-
tery.
l When the accessory socket is not in use,
be sure to close the lid or install the cap,
because the socket might become clogged
by foreign material and be short-circuited.
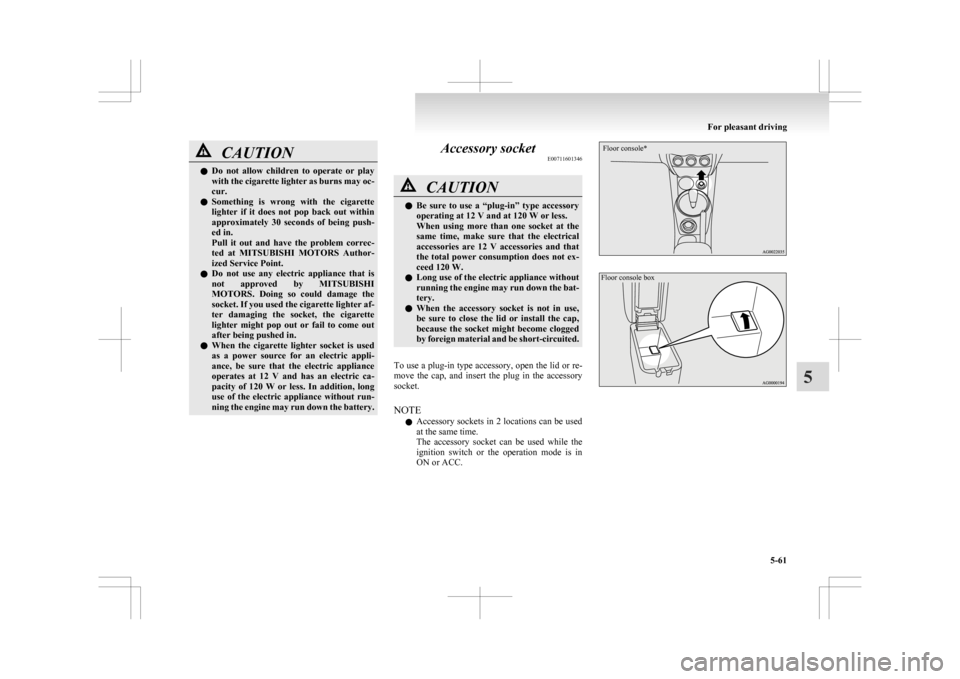
To use a plug-in type accessory, open the lid or re-
move
the cap, and insert the plug in the accessory
socket.
NOTE
l Accessory sockets in 2 locations can be used
at the same time.
The accessory socket can be used while the
ignition switch or the operation mode is in
ON or ACC.
Floor console*
Floor console box For pleasant driving
5-61 5
Page 270 of 368
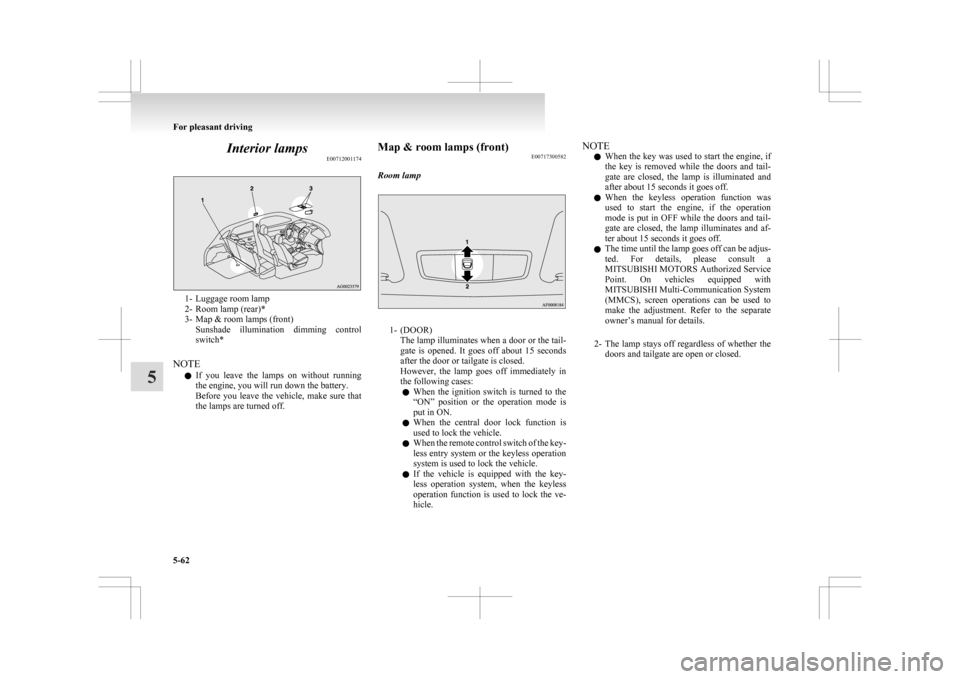
Interior lamps
E007120011741- Luggage room lamp
2-
Room lamp (rear)*
3- Map & room lamps (front) Sunshade illumination dimming control
switch*
NOTE l If you leave the lamps on without running
the engine, you will run down the battery.
Before you leave the vehicle, make sure that
the lamps are turned off. Map & room lamps (front)
E00717300582
Room lamp 1- (DOOR)
The
lamp illuminates when a door or the tail-
gate is opened. It goes off about 15 seconds
after the door or tailgate is closed.
However, the lamp goes off immediately in
the following cases:
l When the ignition switch is turned to the
“ON” position or the operation mode is
put in ON.
l When the central door lock function is
used to lock the vehicle.
l When the remote control switch of the key-
less entry system or the keyless operation
system is used to lock the vehicle.
l If the vehicle is equipped with the key-
less operation system, when the keyless
operation function is used to lock the ve-
hicle. NOTE
l When
the key was used to start the engine, if
the key is removed while the doors and tail-
gate are closed, the lamp is illuminated and
after about 15 seconds it goes off.
l When the keyless operation function was
used to start the engine, if the operation
mode is put in OFF while the doors and tail-
gate are closed, the lamp illuminates and af-
ter about 15 seconds it goes off.
l The time until the lamp goes off can be adjus-
ted. For details, please consult a
MITSUBISHI MOTORS Authorized Service
Point. On vehicles equipped with
MITSUBISHI Multi-Communication System
(MMCS), screen operations can be used to
make the adjustment. Refer to the separate
owner’s manual for details.
2- The lamp stays off regardless of whether the doors and tailgate are open or closed. For pleasant driving
5-62
5
Page 271 of 368
Map lamps
E00765200029
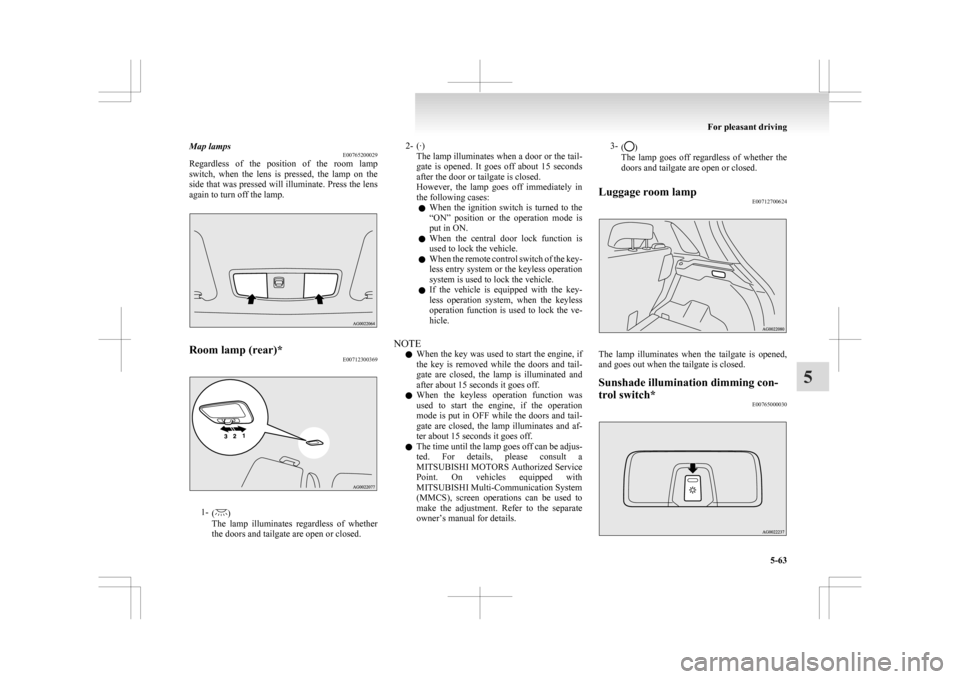
Regardless
of the position of the room lamp
switch, when the lens is pressed, the lamp on the
side that was pressed will illuminate. Press the lens
again to turn off the lamp. Room lamp (rear)*
E007123003691-
( )
The
lamp illuminates regardless of whether
the doors and tailgate are open or closed. 2- (·)
The
lamp illuminates when a door or the tail-
gate is opened. It goes off about 15 seconds
after the door or tailgate is closed.
However, the lamp goes off immediately in
the following cases:
l When the ignition switch is turned to the
“ON” position or the operation mode is
put in ON.
l When the central door lock function is
used to lock the vehicle.
l When the remote control switch of the key-
less entry system or the keyless operation
system is used to lock the vehicle.
l If the vehicle is equipped with the key-
less operation system, when the keyless
operation function is used to lock the ve-
hicle.
NOTE l When the key was used to start the engine, if
the key is removed while the doors and tail-
gate are closed, the lamp is illuminated and
after about 15 seconds it goes off.
l When the keyless operation function was
used to start the engine, if the operation
mode is put in OFF while the doors and tail-
gate are closed, the lamp illuminates and af-
ter about 15 seconds it goes off.
l The time until the lamp goes off can be adjus-
ted. For details, please consult a
MITSUBISHI MOTORS Authorized Service
Point. On vehicles equipped with
MITSUBISHI Multi-Communication System
(MMCS), screen operations can be used to
make the adjustment. Refer to the separate
owner’s manual for details. 3-
( )
The lamp goes off regardless of whether the
doors and tailgate are open or closed.
Luggage room lamp E00712700624 The lamp illuminates when the tailgate is opened,
and goes out when the tailgate is closed.
Sunshade illumination dimming con-
trol switch*
E00765000030 For pleasant driving
5-63 5
Page 272 of 368
The brightness of the sunshade illumination can be
adjusted
to 3 different levels when the ignition
switch or the operation mode is in ON or ACC.
Each time you press the switch, the brightness
switches in sequence from high → middle → low
→ off → high.
NOTE
l The brightness can be adjusted even when
the ignition switch is in the “LOCK” posi-
tion or the operation mode is in OFF, provi-
ded that the sunshade illumination is turned
on.
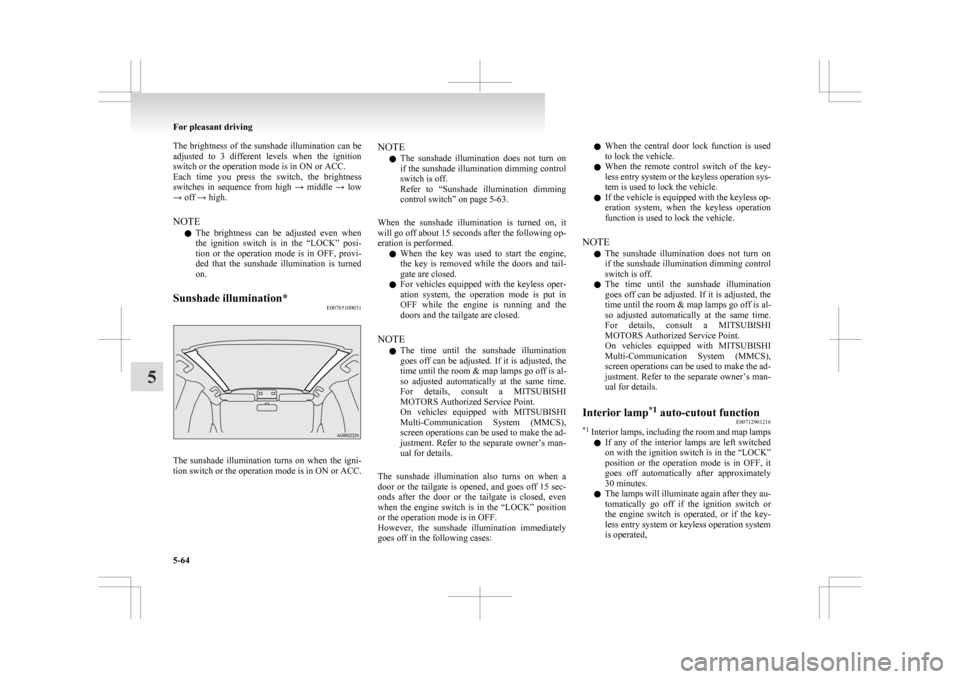
Sunshade illumination* E00765100031The sunshade illumination turns on when the igni-
tion
switch or the operation mode is in ON or ACC. NOTE
l The
sunshade illumination does not turn on
if the sunshade illumination dimming control
switch is off.
Refer to “Sunshade illumination dimming
control switch” on page 5-63.
When the sunshade illumination is turned on, it
will go off about 15 seconds after the following op-
eration is performed. l When the key was used to start the engine,
the key is removed while the doors and tail-
gate are closed.
l For vehicles equipped with the keyless oper-
ation system, the operation mode is put in
OFF while the engine is running and the
doors and the tailgate are closed.
NOTE l The time until the sunshade illumination
goes off can be adjusted. If it is adjusted, the
time until the room & map lamps go off is al-
so adjusted automatically at the same time.
For details, consult a MITSUBISHI
MOTORS Authorized Service Point.
On vehicles equipped with MITSUBISHI
Multi-Communication System (MMCS),
screen operations can be used to make the ad-
justment. Refer to the separate owner’s man-
ual for details.
The sunshade illumination also turns on when a
door or the tailgate is opened, and goes off 15 sec-
onds after the door or the tailgate is closed, even
when the engine switch is in the “LOCK” position
or the operation mode is in OFF.
However, the sunshade illumination immediately
goes off in the following cases: l
When the central door lock function is used
to lock the vehicle.
l When the remote control switch of the key-
less entry system or the keyless operation sys-
tem is used to lock the vehicle.
l If the vehicle is equipped with the keyless op-
eration system, when the keyless operation
function is used to lock the vehicle.
NOTE l The sunshade illumination does not turn on
if the sunshade illumination dimming control
switch is off.
l The time until the sunshade illumination
goes off can be adjusted. If it is adjusted, the
time until the room & map lamps go off is al-
so adjusted automatically at the same time.
For details, consult a MITSUBISHI
MOTORS Authorized Service Point.
On vehicles equipped with MITSUBISHI
Multi-Communication System (MMCS),
screen operations can be used to make the ad-
justment. Refer to the separate owner’s man-
ual for details.
Interior lamp *1
auto-cutout function
E00712901216
*1
Interior lamps, including the room and map lamps
l If any of the interior lamps are left switched
on with the ignition switch is in the “LOCK”
position or the operation mode is in OFF, it
goes off automatically after approximately
30 minutes.
l The lamps will illuminate again after they au-
tomatically go off if the ignition switch or
the engine switch is operated, or if the key-
less entry system or keyless operation system
is operated, For pleasant driving
5-64
5
Page 280 of 368
If the vehicle breaks down
E00800101108
If
the vehicle breaks down on the road, move it to
the shoulder and turn on the hazard warning flash-
ers and set up a warning triangle, flashing lamp, etc.
Refer to “Hazard warning flasher switch” on page
3-50.
If the engine stops/fails
Vehicle operation and control are affected if the en-
gine stops.
Before moving the vehicle to a safe area, be aware
of the following:
l The brake booster becomes inoperative and
the pedal effort will increase. Press down the
brake pedal harder than usual.
l Since the power steering system is no longer
operative, the steering wheel feels heavy
when turning it. Emergency starting
E00800502503
If
the engine cannot be started because the battery
is weak or dead, the battery from another vehicle
can be used with jumper cables to start the engine. WARNING
l To
start the engine using jumper cables
connected to another vehicle, perform the
correct procedures according to the in-
struction below. Incorrect procedures
could result in a fire or explosion or dam-
age to the vehicles. CAUTION
l
Do
not attempt to start the engine by pull-
ing or pushing the vehicle.
It could damage your vehicle.
l Always wear protective eye goggles when
working near the battery.
l Keep the battery out of the reach of chil-
dren.
1. Get
the vehicles close enough so the jumper cables can reach, but be sure the vehicles
aren’t touching each other. CAUTION
l
Check
the other vehicle. It must have a 12-
volt battery.
If the other system isn’t 12-volt, shorting
can damage both vehicles. 2. Turn
off all lamps, heater and other electrical
loads.
3. Set the parking brake firmly on each vehicle. Put an A/T, CVT in “P” (PARK) or a M/T in
“N” (Neutral).
4. Turn the ignition switch to the “LOCK” posi- tion or put the operation mode in OFF. WARNING
l Perform
step 4 on both vehicles before-
hand.
Make sure that the cables or your clothes
cannot be caught by the fan or drive belt.
Personal injury could result.
5. Make
sure battery electrolyte is at the proper level.
Refer to “Battery” on page 8-08. WARNING
l If
electrolyte fluid is not visible, or ap-
pears to be frozen, Do Not Attempt Jump
Starting!
A battery might rupture or explode if the
temperature is below the freezing point
or if it is not filled to the proper level.
6. Connect
one end of one jumper cable to the positive (+) terminal of the discharged bat-
tery (A), and the other end to the positive (+)
terminal of the booster battery (B).
For emergencies
6-02
6
Page 288 of 368
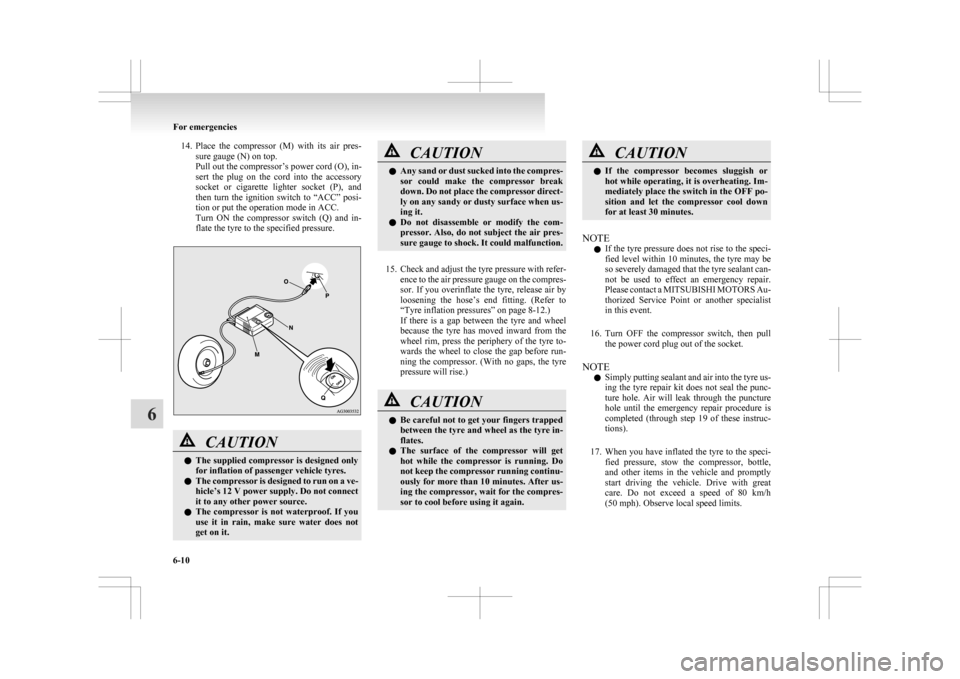
14. Place the compressor (M) with its air pres-
sure gauge (N) on top.
Pull out the compressor’s power cord (O), in-
sert the plug on the cord into the accessory
socket or cigarette lighter socket (P), and
then turn the ignition switch to “ACC” posi-
tion or put the operation mode in ACC.
Turn ON the compressor switch (Q) and in-
flate the tyre to the specified pressure. CAUTION
l
The
supplied compressor is designed only
for inflation of passenger vehicle tyres.
l The compressor is designed to run on a ve-
hicle’s 12 V power supply. Do not connect
it to any other power source.
l The compressor is not waterproof. If you
use it in rain, make sure water does not
get on it. CAUTION
l
Any
sand or dust sucked into the compres-
sor could make the compressor break
down. Do not place the compressor direct-
ly on any sandy or dusty surface when us-
ing it.
l Do not disassemble or modify the com-
pressor. Also, do not subject the air pres-
sure gauge to shock. It could malfunction.
15. Check
and adjust the tyre pressure with refer- ence to the air pressure gauge on the compres-
sor. If you overinflate the tyre, release air by
loosening the hose’s end fitting. (Refer to
“Tyre inflation pressures” on page 8-12.)
If there is a gap between the tyre and wheel
because the tyre has moved inward from the
wheel rim, press the periphery of the tyre to-
wards the wheel to close the gap before run-
ning the compressor. (With no gaps, the tyre
pressure will rise.) CAUTION
l
Be
careful not to get your fingers trapped
between the tyre and wheel as the tyre in-
flates.
l The surface of the compressor will get
hot while the compressor is running. Do
not keep the compressor running continu-
ously for more than 10 minutes. After us-
ing the compressor, wait for the compres-
sor to cool before using it again. CAUTION
l
If
the compressor becomes sluggish or
hot while operating, it is overheating. Im-
mediately place the switch in the OFF po-
sition and let the compressor cool down
for at least 30 minutes.
NOTE l If
the tyre pressure does not rise to the speci-
fied level within 10 minutes, the tyre may be
so severely damaged that the tyre sealant can-
not be used to effect an emergency repair.
Please contact a MITSUBISHI MOTORS Au-
thorized Service Point or another specialist
in this event.
16. Turn OFF the compressor switch, then pull the power cord plug out of the socket.
NOTE l Simply putting sealant and air into the tyre us-
ing the tyre repair kit does not seal the punc-
ture hole. Air will leak through the puncture
hole until the emergency repair procedure is
completed (through step 19 of these instruc-
tions).
17. When you have inflated the tyre to the speci- fied pressure, stow the compressor, bottle,
and other items in the vehicle and promptly
start driving the vehicle. Drive with great
care. Do not exceed a speed of 80 km/h
(50 mph). Observe local speed limits. For emergencies
6-10
6