Page 159 of 426

159 Controls in detail
Audio system
Operational readiness of CD changer
The CD changer is located in the trunk on
the left side.
1CD changer
The CD changer can be operated from the
front control panel of the radio. A loaded
magazine must be installed to play CDs.Loading/unloading a CD magazine
1CD
2CD changer
3CD tray
4CD magazine
�
Slide changer door to the right and
press eject buttong.
The CD magazine4 will be ejected.
�
Remove CD magazine and pull
CD tray3 fully out.
�
Place CD1 in recess of CD tray, label
side up.
�
Push CD tray into CD magazine in
direction of arrow.
�
Push magazine into CD changer2 in
direction of arrow and close sliding
door.
Playing CDs
�
Pressi button.CD will appear in the display.
The last CD listened to will then start play-
ing at the point where it was switched off.
After the last track on a CD has finished,
the next CD is automatically played.
i
CDs which have been inserted improperly or
are unreadable will not be played.
You do not need to place CDs in all six CD trays.
The lowest tray is magazine slot number 1 and
the highest tray is magazine slot number 6.
Page 201 of 426

201 Controls in detail
Open air
Closing the soft top�
Switch on the ignition.
�
Press and hold button4, until the
electrical closing process has been
completed.
While the soft top is closing, the K
symbol and the message
Top In
Operation
appear in the multifunction
display.
An acoustic signal indicates that you
can now lock the soft top.
�
Pull the soft top by means of the handle
down on the windscreen frame.
�
Turn the handle counter-clockwise as
far as it will go.
The soft top is locked.
�
Fold up the handle.
Wind screen
The wind screen is a wind protection
device for driving with the soft top open.
The wind screen is stored on the inside of
the trunk lid.
1Wind screen
2Release
!
Always remove the soft top linkage covers
(
�page 202) before closing the soft top.
You could otherwise damage the covers or the
linkages.
!
Before pulling the soft top down, make sure
that the handle is in the release position. Other-
wise, the locking mechanism could be damaged
when closing the soft top.
!
Do not pull on the wind screen to close the
trunk lid. Otherwise, the wind screen or the trim
panel could be damaged.
Page 202 of 426
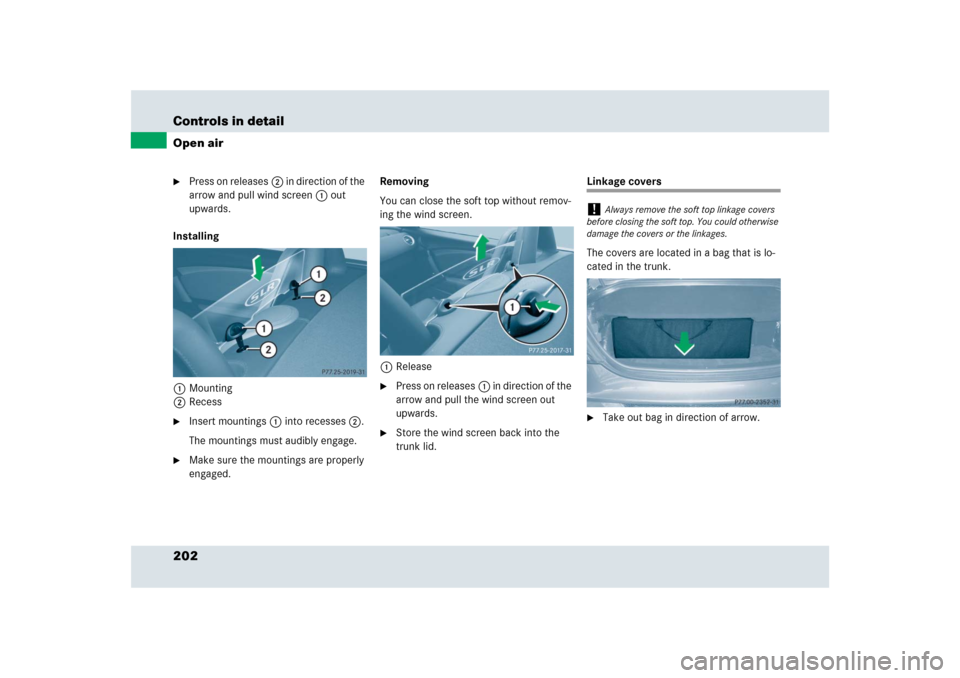
202 Controls in detailOpen air�
Press on releases2 in direction of the
arrow and pull wind screen1 out
upwards.
Installing
1Mounting
2Recess
�
Insert mountings1 into recesses2.
The mountings must audibly engage.
�
Make sure the mountings are properly
engaged.Removing
You can close the soft top without remov-
ing the wind screen.
1Release
�
Press on releases1 in direction of the
arrow and pull the wind screen out
upwards.
�
Store the wind screen back into the
trunk lid.
Linkage covers
The covers are located in a bag that is lo-
cated in the trunk.�
Take out bag in direction of arrow.
!
Always remove the soft top linkage covers
before closing the soft top. You could otherwise
damage the covers or the linkages.
Page 203 of 426
203 Controls in detail
Open air
Installing
The following describes the installation of
the driver’s side cover. The installation of
the passenger-side cover is identical but
mirror-inverted.
1Cover
2Tab
3Bodywork
4Sealing
�
Open the trunk lid.
�
Fit tabs2 of cover1 between
sealing4 and bodywork3.5Lock
6Holder
7Slot
�
Press down on lock5 and turn it
clockwise by 90°.
�
Hold the lock in this position and insert
holder6 into slot7.
�
Press down on the cover and turn the
lock counter-clockwise by 90°.
Warning!
G
Do not use damaged covers. Damaged
covers could come loose while driving and
hit other road users.!
Do not use damaged covers. Damaged
covers could come loose while driving and
damage the vehicle.
��
Page 204 of 426
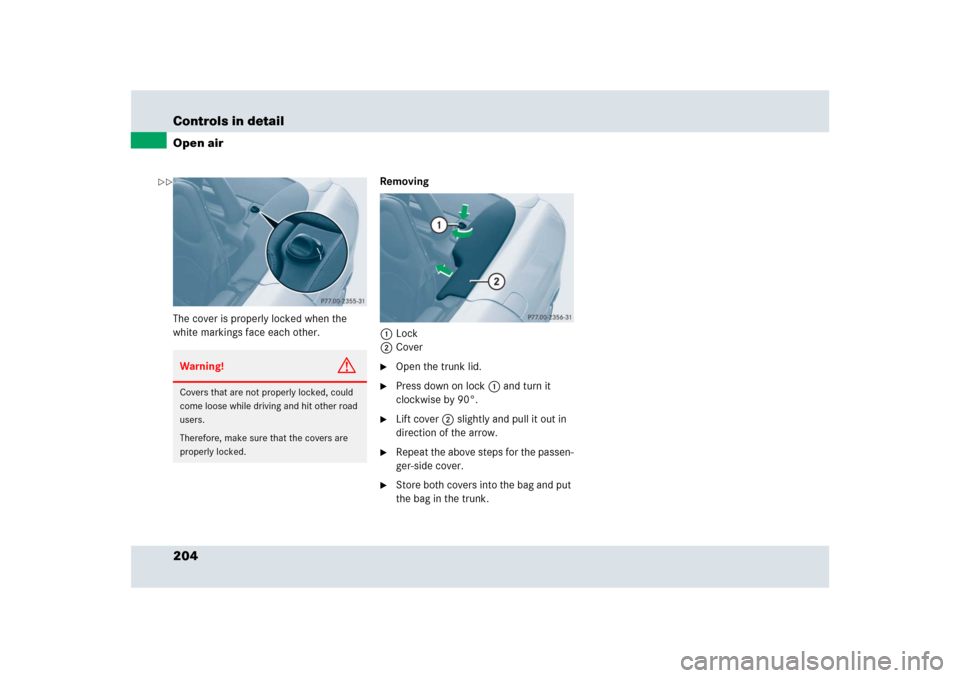
204 Controls in detailOpen airThe cover is properly locked when the
white markings face each other.Removing
1Lock
2Cover
�
Open the trunk lid.
�
Press down on lock1 and turn it
clockwise by 90°.
�
Lift cover2 slightly and pull it out in
direction of the arrow.
�
Repeat the above steps for the passen-
ger-side cover.
�
Store both covers into the bag and put
the bag in the trunk.
Warning!
G
Covers that are not properly locked, could
come loose while driving and hit other road
users.
Therefore, make sure that the covers are
properly locked.
��
Page 209 of 426

209 Controls in detail
Useful features
�Useful features
Map pocket in passenger footwell
Storage compartments Storage compartment under armrest
1Release button
2Armrest
�
Press release button1.
The armrest2 opens automatically.
Warning!
G
Do not place heavy or fragile objects, or ob-
jects having sharp edges in the map pocket.
In an accident, during hard braking or sud-
den maneuvers, they could be thrown
around inside the vehicle, and cause injury
to vehicle occupants.i
Canada only: The compact guide is located
in the map pocket.
Warning!
G
To help avoid personal injury during a colli-
sion or sudden maneuver, exercise care
when storing objects in the vehicle. Put lug-
gage or cargo in the trunk. Do not pile lug-
gage or cargo higher than the seat backs.
Do not place anything on the shelf below the
rear window.
Parcel nets cannot secure hard or heavy
objects.
Keep compartment lids closed. This will help
to prevent stored objects from being thrown
about and injuring vehicle occupants during
an accident.
Page 210 of 426
210 Controls in detailUseful featuresStorage compartment between
the backrests
1Release button
2Cover�
Press release button1.
Cover2 opens automatically.
The Bluetooth
® interface (
�page 213)
is installed in the cover of the storage
compartment.
Parcel net in trunk
There is a net available in the trunk to
secure loads:�
Pull the trunk floor net from the trunk
back wall towards the front over the
luggage.
�
Hang the hooks of the net on the eyes
on the trunk floor.
Ashtray and cigarette lighter
The ashtray and the cigarette lighter are lo-
cated in the storage compartment under
the armrest.
1Cigarette lighter
2Ashtray insert
Page 212 of 426
.
�
Flip up cover and insert electrical p")
212 Controls in detailUseful featuresPower outlet
The power outlet is located on the left side
in the trunk.
1Power outlet�
Switch on the ignition (
�page 40).
�
Flip up cover and insert electrical plug
(cigar lighter type).
Telephone
Your vehicle is equipped with Bluetooth
®.
The Bluetooth
® interface is located in the
storage compartment between the back-
rests (
�page 210).Radio transmitters, such as a portable tele-
phone or a citizens band unit, should only
be used inside the vehicle if they are con-
nected to an antenna that is installed on
the outside of the vehicle.
The external antenna must be approved by
Mercedes-Benz. Please contact an autho-
rized Mercedes-Benz Center for informa-
tion on the installation of an approved
external antenna. Refer to the radio trans-
mitter operation instructions regarding use
of an external antenna.
i
The power outlet can be used to accommo-
date 12V DC electrical accessories (e.g. air
pump, auxiliary lamps) up to a maximum
of 180 W or as a battery charging point
(
�page 371).
Warning!
G
Never operate radio transmitters equipped
with a built-in or attached antenna (i.e. with-
out being connected to an external antenna)
from inside the vehicle while the engine is
running. Doing so could lead to a malfunc-
tion of the vehicle’s electronic system, pos-
sibly resulting in an accident and personal
injury.