2009 MERCEDES-BENZ GL SUV towing
[x] Cancel search: towingPage 212 of 309
Observe the legal requirements in all coun-
tries concerned.
The fire extinguisher is located underneath
the front of the driver's seat. X
Pull tab :upwards.
X Remove fire extinguisher ;. Vehicle tool kit, TIREFIT, jack and
"Minispare" emergency spare
wheel*
The vehicle tool kit, TIREFIT, jack and
"Minispare" emergency spare wheel are in the
stowage space under the luggage compart-
ment floor. G
Risk of injury
The jack is designed only to raise and hold the
vehicle for a short time while a wheel is being
changed.
You must use axle stands if you are carrying
out work on the vehicle.
Make sure that the jack is placed on a firm,
non-slip, level surface. Do not use wooden
blocks or similar objects as a jack underlay.
Otherwise, the jack will not be able to achieve
its load-bearing capacity due to the restricted
height.
Do not start the engine at any time while a
wheel is being changed. Do not lie under the vehicle when it is being
supported by the jack. If you do not raise the
vehicle as described, it could slip off the jack
(e.g. if the engine is started or if a door or the
tailgate is opened or closed) and you could be
seriously injured.
i When using the jack, you should also
observe the safety notes in the "Flat tyre"
section (Y page 262).
X Open the luggage compartment floor
(Y page 208).
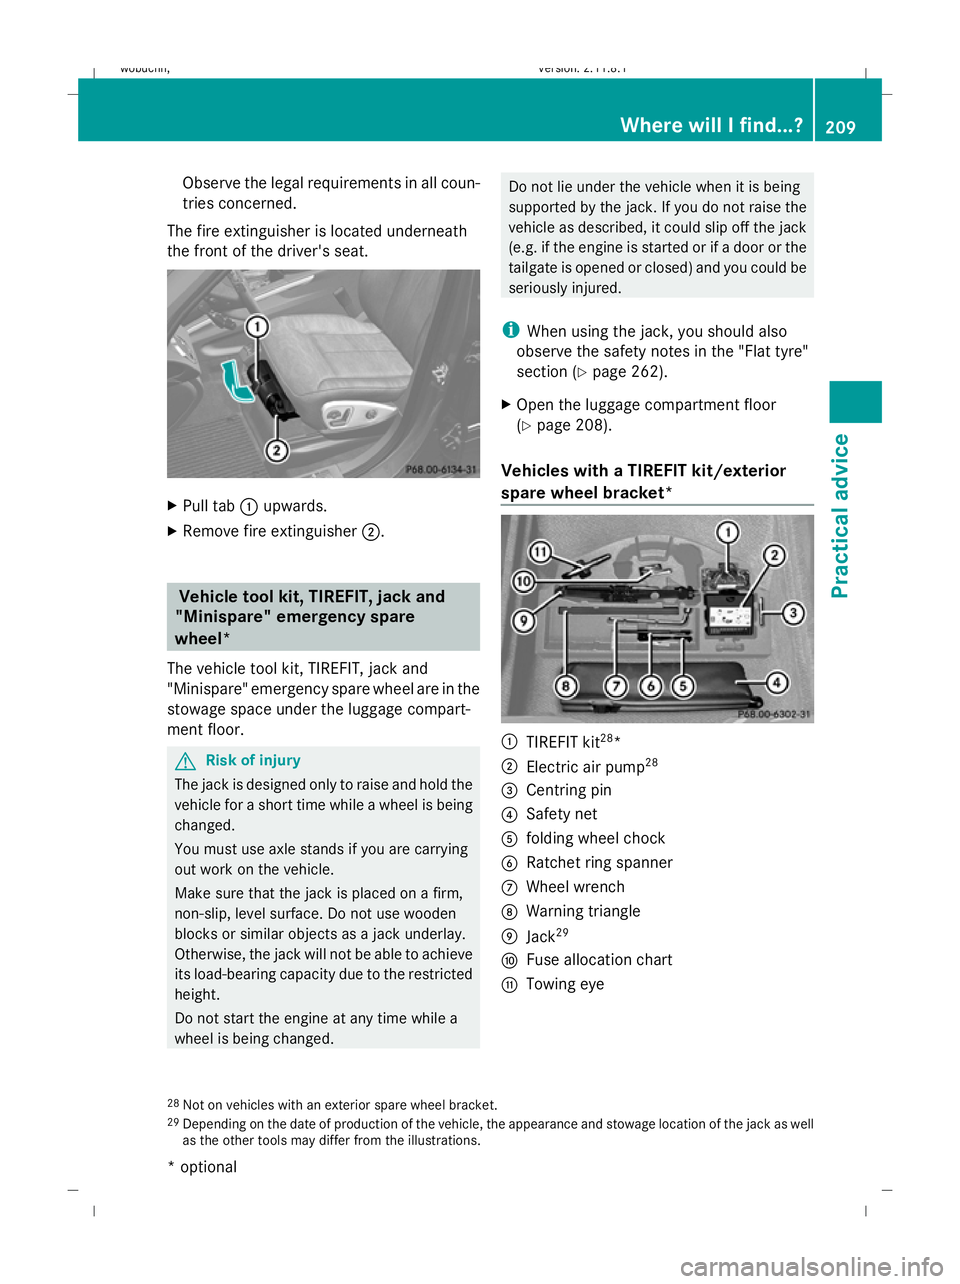
Vehicles with a TIREFIT kit/exterior
spare wheel bracket* :
TIREFIT kit 28
*
; Electric air pump 28
= Centring pin
? Safety net
A folding wheel chock
B Ratchet ring spanner
C Wheel wrench
D Warning triangle
E Jack 29
F Fuse allocation chart
G Towing eye
28 Not on vehicles with an exterior spare wheel bracket.
29 Depending on the date of production of the vehicle, the appearance and stowage location of the jack as well
as the other tools may differ from the illustrations. Where will I find...?
209Practical advice
* optional
X164_AKB; 2; 3, en-GB
wobuchh,
Version: 2.11.8.1 2009-03-31T14:14:58+02:00 - Seite 209 Z
Dateiname: 6515431202_buchblock.pdf; erzeugt am 01. Apr 2009 00:17:56; WK
Page 213 of 309
Exterior spare wheel bracket*
G
Risk of injury
The spare wheel is heavy. Make sure that
nobody is injured as you remove the spare
wheel.
On vehicles with an exterior spare wheel
bracket, the spare wheel is located outside
the vehicle behind the tailgate.
i If the vehicle is fitted with mixed tyres, the
spare wheel is the same type as on the front
wheels. X
Unscrew and remove screws :with the
wheel wrench.
X Remove the spare wheel from the spare
wheel bracket.
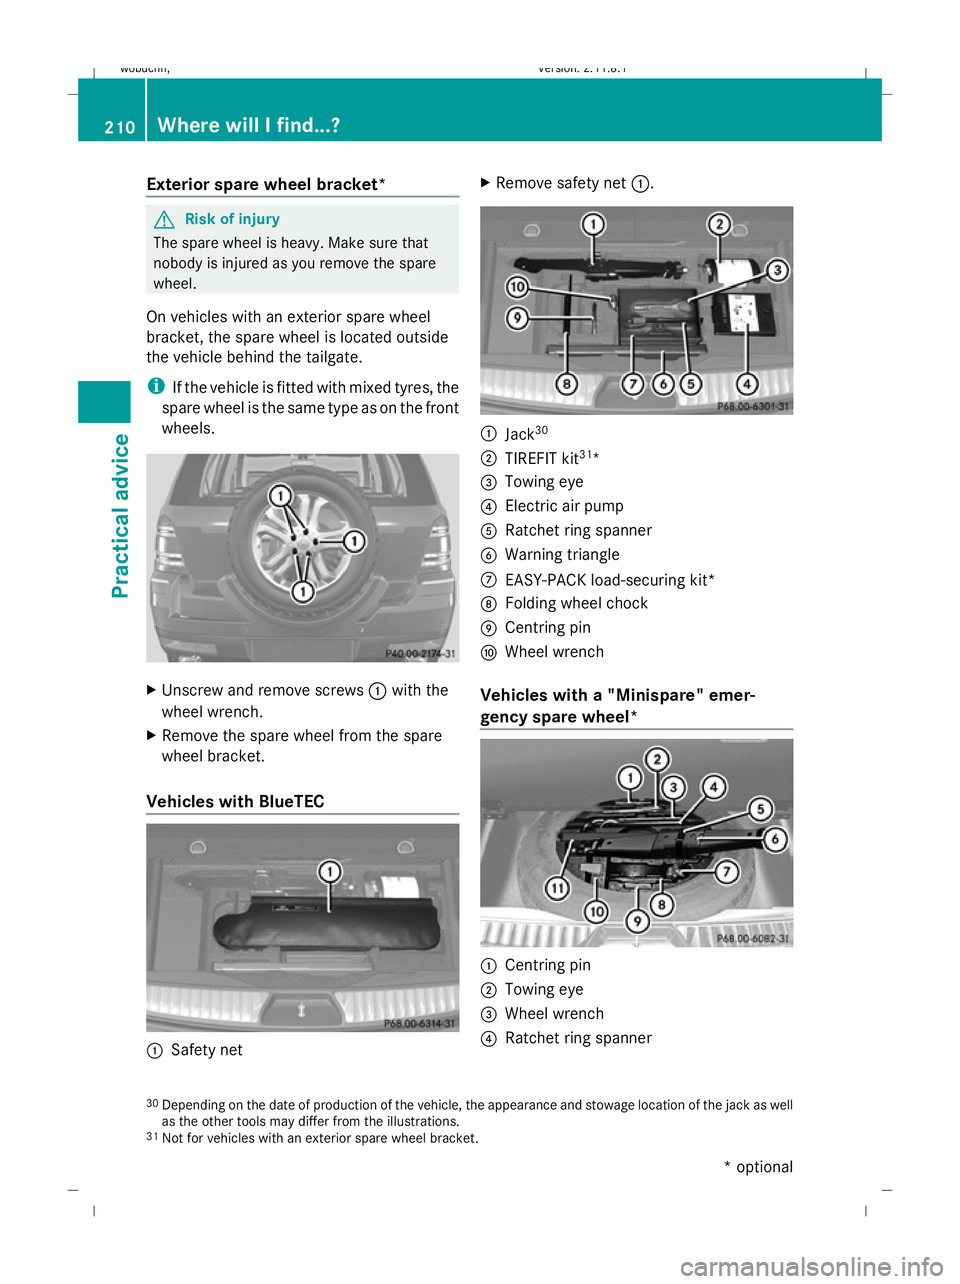
Vehicles with BlueTEC :
Safety net X
Remove safety net :. :
Jack 30
; TIREFIT kit 31
*
= Towing eye
? Electric air pump
A Ratchet ring spanner
B Warning triangle
C EASY-PACK load-securing kit*
D Folding wheel chock
E Centring pin
F Wheel wrench
Vehicles with a "Minispare" emer-
gency spare wheel* :
Centring pin
; Towing eye
= Wheel wrench
? Ratchet ring spanner
30 Depending on the date of production of the vehicle, the appearance and stowage location of the jack as well
as the other tools may differ from the illustrations.
31 Not for vehicles with an exterior spare wheel bracket. 210
Where will I find...?Practical advice
* optional
X164_AKB; 2; 3, en-GB
wobuchh,
Version: 2.11.8.1 2009-03-31T14:14:58+02:00 - Seite 210
Dateiname: 6515431202_buchblock.pdf; erzeugt am 01. Apr 2009 00:17:58; WK
Page 224 of 309
Display messages
Possible causes/consequences and
X
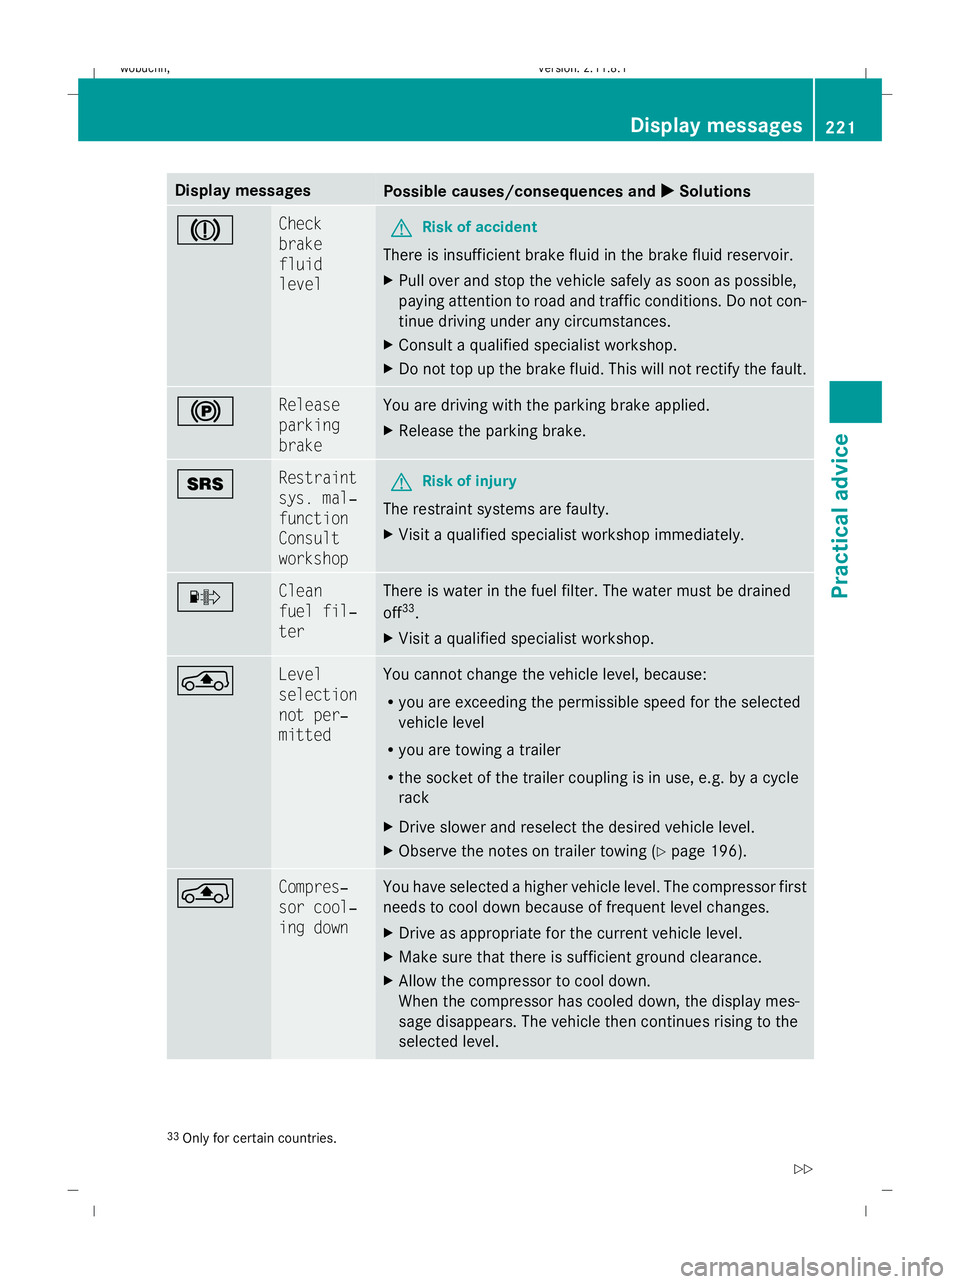
X Solutions J Check
brake
fluid
level
G
Risk of accident
There is insufficient brake fluid in the brake fluid reservoir.
X Pull over and stop the vehicle safely as soon as possible,
paying attention to road and traffic conditions. Do not con-
tinue driving under any circumstances.
X Consult a qualified specialist workshop.
X Do not top up the brake fluid. This will not rectify the fault. ! Release
parking
brake You are driving with the parking brake applied.
X
Release the parking brake. + Restraint
sys. mal‐
function
Consult
workshop
G
Risk of injury
The restraint systems are faulty.
X Visit a qualified specialist workshop immediately. · Clean
fuel fil‐
ter There is water in the fuel filter. The water must be drained
off
33
.
X Visit a qualified specialist workshop. ° Level
selection
not per‐
mitted You cannot change the vehicle level, because:
R
you are exceeding the permissible speed for the selected
vehicle level
R you are towing a trailer
R the socket of the trailer coupling is in use, e.g. by a cycle
rack
X Drive slower and reselect the desired vehicle level.
X Observe the notes on trailer towing (Y page 196).° Compres‐
sor cool‐
ing down You have selected a higher vehicle level. The compressor first
needs to cool down because of frequent level changes.
X
Drive as appropriate for the current vehicle level.
X Make sure that there is sufficient ground clearance.
X Allow the compressor to cool down.
When the compressor has cooled down, the display mes-
sage disappears. The vehicle then continues rising to the
selected level. 33
Only for certain countries. Display
messages
221Practical advice
X164_AKB; 2; 3, en-GB
wobuchh,V ersion: 2.11.8.1
2009-03-31T14:14:58+02:00 - Seite 221 Z
Dateiname: 6515431202_buchblock.pdf; erzeugt am 01. Apr 2009 00:17:59; WK
Page 251 of 309
Problem
Possible causes/consequences and
X XSolutions The engine cannot be
started using the key. The on-board voltage is too low.
X
Switch off non-essential consumers, e.g. seat heating* or inte-
rior lighting, and try to start the engine again.
If this does not work:
X Check the starter battery and charge it if necessary
(Y page 272).
or
X Jump-start the vehicle (Y page 276).
or
X Consult a qualified specialist workshop. The engine cannot be
started using KEYLESS
GO*. The key is in the
vehicle. A door is open. Therefore, the key cannot be detected as easily.
X
Close the door and try to start the vehicle again. There is interference from a powerful source of radio waves.
X
Start your vehicle using the key in the ignition lock. Trailer towing*
Problem
Possible causes/consequences and
X XSolutions The ball coupling can-
not be locked.
The key cannot be
removed from the ball
coupling.
G
Risk of accident
The ball coupling is dirty.
The trailer coupling is damaged.
X Remove the ball coupling and clean it (Y page 203). If the ball
coupling still cannot be locked, remove the ball coupling. It must
no longer be used to tow a trailer, as safe operation is not guar-
anteed.
X Have the entire trailer coupling checked at a qualified specialist
workshop. 248
TroubleshootingPractical advice
* optional
X164_AKB; 2; 3, en-GB
wobuchh,
Version: 2.11.8.1 2009-03-31T14:14:58+02:00 - Seite 248
Dateiname: 6515431202_buchblock.pdf; erzeugt am 01. Apr 2009 00:18:03; WK
Page 280 of 309
X
Shift the transmission to position P.
X Switch off all electrical consumers (e.g.
radio, blower, etc.).
X Open the bonnet (Y page 174). X
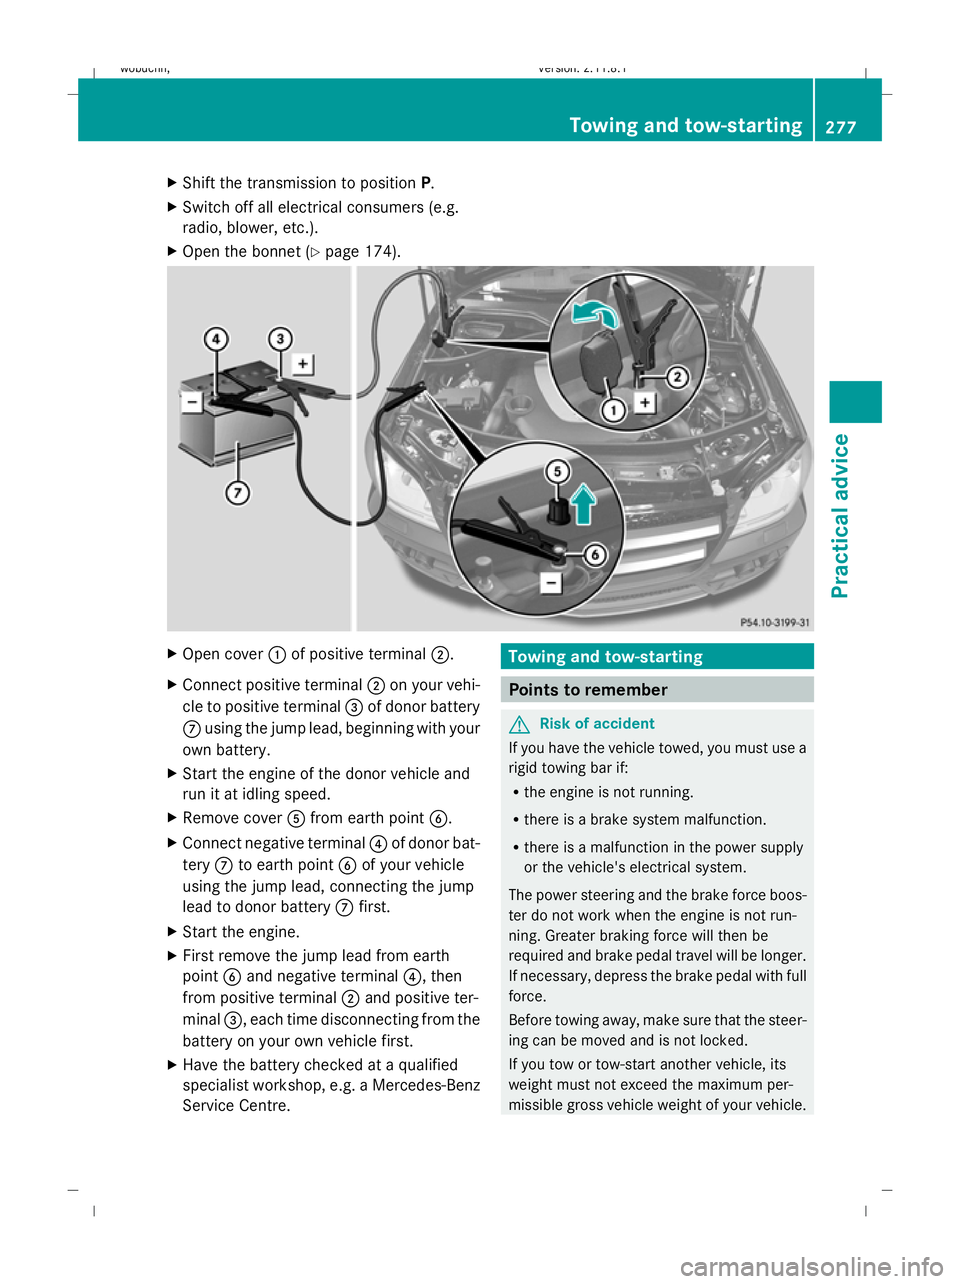
Open cover :of positive terminal ;.
X Connect positive terminal ;on your vehi-
cle to positive terminal =of donor battery
C using the jump lead, beginning with your
own battery.
X Start the engine of the donor vehicle and
run it at idling speed.
X Remove cover Afrom earth point B.
X Connect negative terminal ?of donor bat-
tery Cto earth point Bof your vehicle
using the jump lead, connecting the jump
lead to donor battery Cfirst.
X Start the engine.
X First remove the jump lead from earth
point Band negative terminal ?, then
from positive terminal ;and positive ter-
minal =, each time disconnecting from the
battery on your own vehicle first.
X Have the battery checked at a qualified
specialist workshop, e.g. a Mercedes-Benz
Service Centre. Towing and tow-starting
Points to remember
G
Risk of accident
If you have the vehicle towed, you must use a
rigid towing bar if:
R the engine is not running.
R there is a brake system malfunction.
R there is a malfunction in the power supply
or the vehicle's electrical system.
The power steering and the brake force boos-
ter do not work when the engine is not run-
ning. Greater braking force will then be
required and brake pedal travel will be longer.
If necessary, depress the brake pedal with full
force.
Before towing away, make sure that the steer-
ing can be moved and is not locked.
If you tow or tow-start another vehicle, its
weight must not exceed the maximum per-
missible gross vehicle weight of your vehicle. Towing and tow-starting
277Practical advice
X164_AKB; 2; 3, en-GB
wobuchh, Version: 2.11.8.1 2009-03-31T14:14:58+02:00 - Seite 277 Z
Dateiname: 6515431202_buchblock.pdf; erzeugt am 01. Apr 2009 00:18:19; WK
Page 281 of 309
It is better to have the vehicle transported
than to have it towed.
When towing, observe the legal requirements
in all countries concerned.
! When towing, pull away slowly and
smoothly. If the tractive power is too high,
the vehicles could be damaged.
! Do not use the towing eye for recovery,
as this could damage the vehicle. If in
doubt, recover the vehicle with a crane.
! You may tow the vehicle for a maximum
of 50 km. A towing speed of 50 km/h must
not be exceeded.
For towing distances over 50 km, the entire
vehicle must be lifted up and transported.
! On vehicles with KEYLESS GO*, use the
key instead of the Start/Stop button. Turn
the key to position 2in the ignition lock and
shift the automatic transmission to N. Then
turn the key back to 0and leave it in the
ignition lock.
! Only secure the tow cable or towing bar
to the towing eyes. You could otherwise
damage the vehicle.
R Tow-starting the vehicle is not permitted.
R The vehicle may not be towed with the front
or rear axle raised.
R If the vehicle has suffered transmission
damage, have it carried away on a trans-
porter or trailer.
R If the engine does not start, try jump-start-
ing it (Y page 276).
R If it is not possible to jump-start the vehicle,
have it towed to the nearest qualified spe-
cialist workshop, e.g. a Mercedes-Benz
Service Centre.
R If you are towing the vehicle, move the
automatic transmission selector lever to N
and turn the key to position
2 (Y page 63) in the ignition lock.
R Before towing the vehicle, make sure that
the battery is connected and charged. Oth-
erwise:
- you cannot switch on the ignition.
- you cannot shift the transmission to posi-
tion N.
- you have no support when braking.
i Switch off the automatic locking feature
before the vehicle is towed (Y page 107).
Otherwise, you could be locked out when
pushing or towing the vehicle.
Deactivate tow-away protection*
(Y page 55) before the vehicle is towed. Fitting the towing eye
Vehicles with a trailer tow hitch*: if you
intend to use the vehicle for towing, fit the ball
coupling and connect the towbar to this.
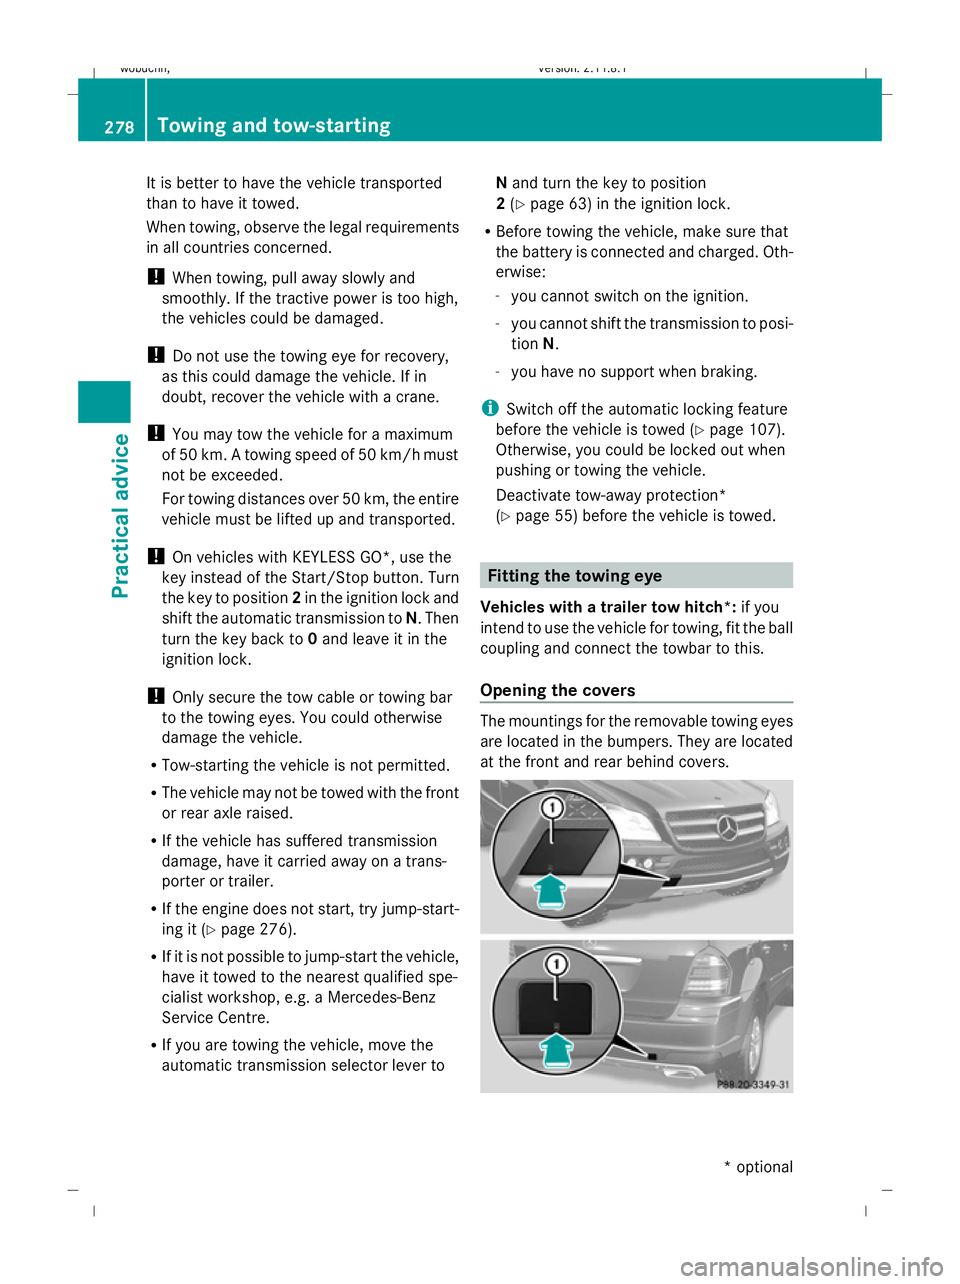
Opening the covers The mountings for the removable towing eyes
are located in the bumpers. They are located
at the front and rear behind covers. 278
Towing and tow-startingPractical advice
* optional
X164_AKB; 2; 3, en-GB
wobuchh,
Version: 2.11.8.1 2009-03-31T14:14:58+02:00 - Seite 278
Dateiname: 6515431202_buchblock.pdf; erzeugt am 01. Apr 2009 00:18:19; WK
Page 282 of 309
X
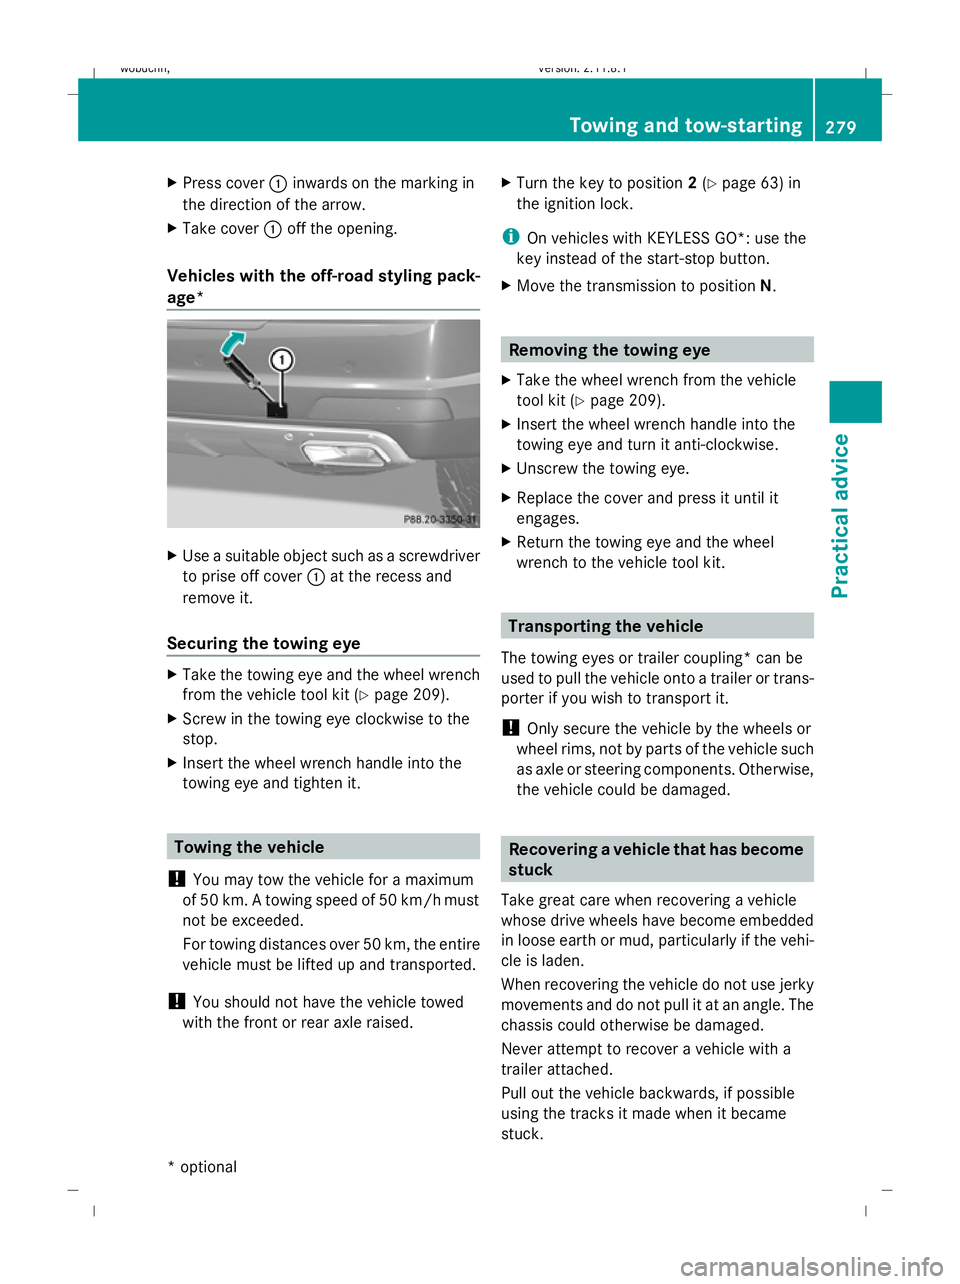
Press cover :inwards on the marking in
the direction of the arrow.
X Take cover :off the opening.
Vehicles with the off-road styling pack-
age* X
Use a suitable object such as a screwdriver
to prise off cover :at the recess and
remove it.
Securing the towing eye X
Take the towing eye and the wheel wrench
from the vehicle tool kit (Y page 209).
X Screw in the towing eye clockwise to the
stop.
X Insert the wheel wrench handle into the
towing eye and tighten it. Towing the vehicle
! You may tow the vehicle for a maximum
of 50 km. A towing speed of 50 km/hm ust
not be exceeded.
For towing distances over 50 km, the entire
vehicle must be lifted up and transported.
! You should not have the vehicle towed
with the front or rear axle raised. X
Turn the key to position 2(Y page 63) in
the ignition lock.
i On vehicles with KEYLESS GO*: use the
key instead of the start-stop button.
X Move the transmission to position N. Removing the towing eye
X Take the wheel wrench from the vehicle
tool kit (Y page 209).
X Insert the wheel wrench handle into the
towing eye and turn it anti-clockwise.
X Unscrew the towing eye.
X Replace the cover and press it until it
engages.
X Return the towing eye and the wheel
wrench to the vehicle tool kit. Transporting the vehicle
The towing eyes or trailer coupling* can be
used to pull the vehicle onto a trailer or trans-
porter if you wish to transport it.
! Only secure the vehicle by the wheels or
wheel rims, not by parts of the vehicle such
as axle or steering components. Otherwise,
the vehicle could be damaged. Recovering a vehicle that has become
stuck
Take great care when recovering a vehicle
whose drive wheels have become embedded
in loose earth or mud, particularly if the vehi-
cle is laden.
When recovering the vehicle do not use jerky
movements and do not pull it at an angle. The
chassis could otherwise be damaged.
Never attempt to recover a vehicle with a
trailer attached.
Pull out the vehicle backwards, if possible
using the tracks it made when it became
stuck. Towing and tow-starting
279Practical advice
* optional
X164_AKB; 2; 3, en-GB
wobuchh,
Version: 2.11.8.1 2009-03-31T14:14:58+02:00 - Seite 279 Z
Dateiname: 6515431202_buchblock.pdf; erzeugt am 01. Apr 2009 00:18:20; WK
Page 283 of 309

Towing in the event of malfunctions
In the event of damage to the transfer
case Have the propeller shafts between the axles
and the transfer case removed.
Have the vehicle towed with the front axle
raised.
In the event of damage to the front axle
Have the propeller shaft between the rear
axle and the transfer case removed.
Have the vehicle towed with the front axle
raised.
In the event of damage to the rear axle Have the propeller shaft between the front
axle and the transfer case removed.
Have the vehicle towed with the rear axle
raised.
! New bolts must always be used when the
propeller shafts are refitted. The specified
tightening torques must be observed.
i Consult a Mercedes-Benz Service Centre.
In the event of damage to the electrical
system If the battery is defective, the automatic
transmission will be locked in position P. To
shift the automatic transmission to neutral,
you must supply power to the vehicle’s elec-
trical system in the same way as jump-start-
ing (Y page 276).
Have the vehicle transported on a transporter
or trailer. Fuses
Notes on changing fuses
The fuses in your vehicle serve to close down
faulty circuits. If a fuse blows, all the compo- nents on the circuit and their functions will
fail.
Blown fuses must be replaced with fuses of
the same rating, which you can recognise by
the colour and value. The fuse ratings are lis-
ted in the fuse allocation chart. A Mercedes-
Benz Service Centre will be happy to advise
you. G
Risk of fire
Only use fuses that have been approved for
Mercedes-Benz vehicles and which have the
required fuse rating for the systems con-
cerned. Do not attempt to repair or bridge
faulty fuses. A circuit overload could other-
wise cause a fire. Have the cause traced and
rectified at a qualified specialist workshop,
e.g. a Mercedes-Benz Service Centre.
If the newly inserted fuse also blows, have the
cause traced and rectified at a qualified spe-
cialist workshop, e.g. a Mercedes-Benz
Service Centre.
! Only use fuses that have been approved
for Mercedes-Benz vehicles and which
have the correct fuse rating for the system
concerned. Otherwise, components or sys-
tems could be damaged.
The fuses are located in various fuse boxes:
R dashboard fuse box on the front-passenger
side
R fuse box in the engine compartment on the
right-hand side of the vehicle
R fuse box in the luggage compartment on
the right-hand side of the vehicle
Fuse allocation chart The fuse allocation chart is located with the
vehicle tool kit (Y
page 209) in the stowage
compartment under the luggage compart-
ment floor. 280
FusesPractical advice
X164_AKB; 2; 3, en-GB
wobuchh
,V ersion: 2.11.8.1
2009-03-31T14:14:58+02:00 - Seite 280
Dateiname: 6515431202_buchblock.pdf; erzeugt am 01. Apr 2009 00:18:20; WK