2009 MERCEDES-BENZ GL SUV warning light
[x] Cancel search: warning lightPage 87 of 309

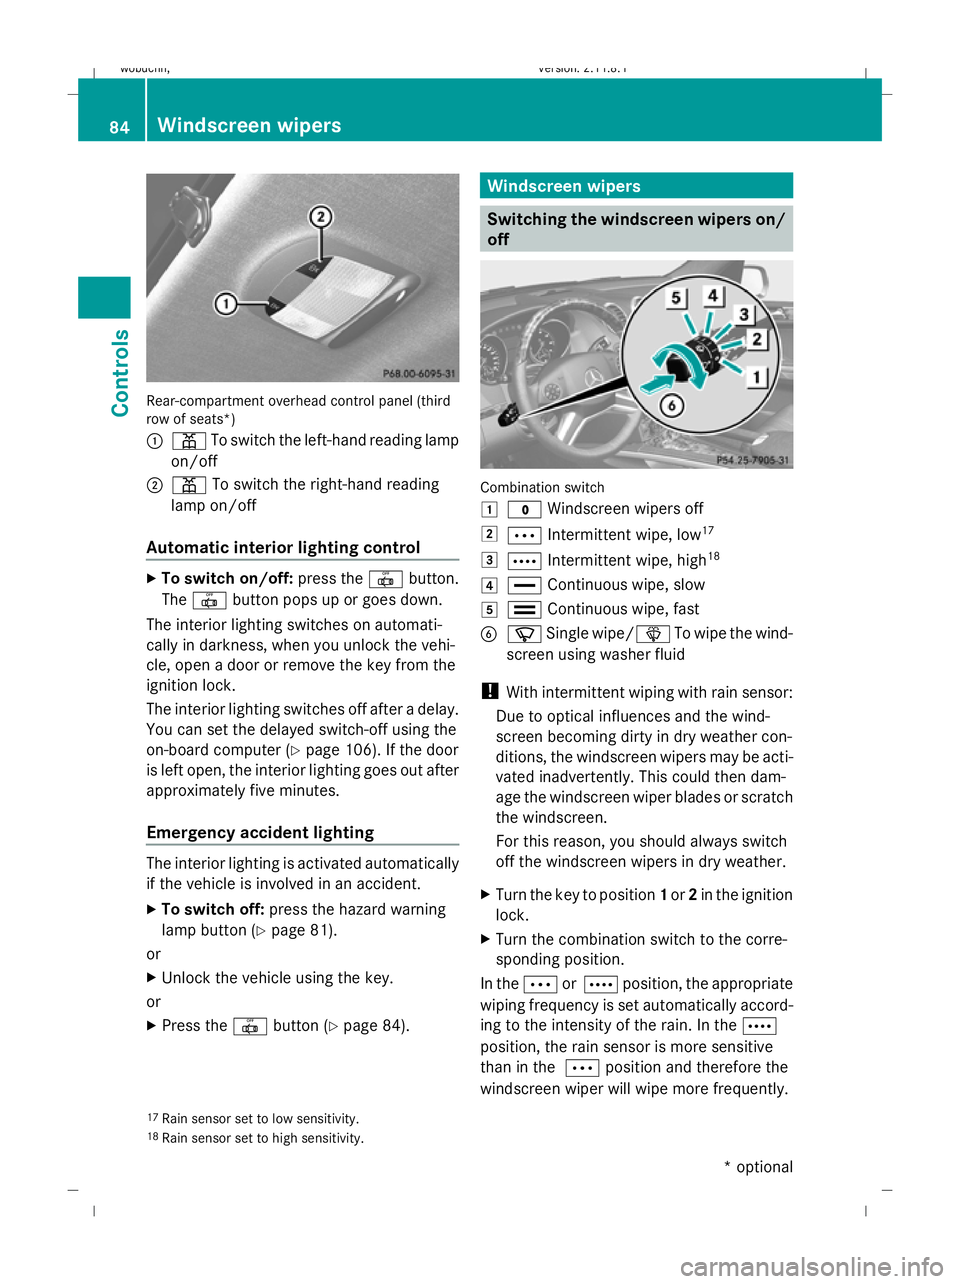
Rear-compartment overhead control panel (third
row of seats*)
:
p To switch the left-hand reading lamp
on/off
; p To switch the right-hand reading
lamp on/off
Automatic interior lighting control X
To switch on/off: press the|button.
The | button pops up or goes down.
The interior lighting switches on automati-
cally in darkness, when you unlock the vehi-
cle, open a door or remove the key from the
ignition lock.
The interior lighting switches off after a delay.
You can set the delayed switch-off using the
on-board computer (Y page 106). If the door
is left open, the interior lighting goes out after
approximately five minutes.
Emergency accident lighting The interior lighting is activated automatically
if the vehicle is involved in an accident.
X To switch off: press the hazard warning
lamp button (Y page 81).
or
X Unlock the vehicle using the key.
or
X Press the |button (Y page 84). Windscreen wipers
Switching the windscreen wipers on/
off Combination switch
1
$ Windscreen wipers off
2 Ä Intermittent wipe, low 17
3 Å Intermittent wipe, high 18
4 ° Continuous wipe, slow
5 ¯ Continuous wipe, fast
B í Single wipe/ îTo wipe the wind-
screen using washer fluid
! With intermittent wiping with rain sensor:
Due to optical influences and the wind-
screen becoming dirty in dry weather con-
ditions, the windscreen wipers may be acti-
vated inadvertently. This could then dam-
age the windscreen wiper blades or scratch
the windscreen.
For this reason, you should always switch
off the windscreen wipers in dry weather.
X Turn the key to position 1or 2in the ignition
lock.
X Turn the combination switch to the corre-
sponding position.
In the ÄorÅ position, the appropriate
wiping frequency is set automatically accord-
ing to the intensity of the rain. In the Å
position, the rain sensor is more sensitive
than in the Äposition and therefore the
windscreen wiper will wipe more frequently.
17 Rain sensor set to low sensitivity.
18 Rain sensor set to high sensitivity. 84
Windscreen wipersCont
rols
* optional
X164_AKB; 2; 3, en-GB
wobuchh,
Version: 2.11.8.1 2009-03-31T14:14:58+02:00 - Seite 84
Dateiname: 6515431202_buchblock.pdf; erzeugt am 01. Apr 2009 00:17:08; WK
Page 94 of 309

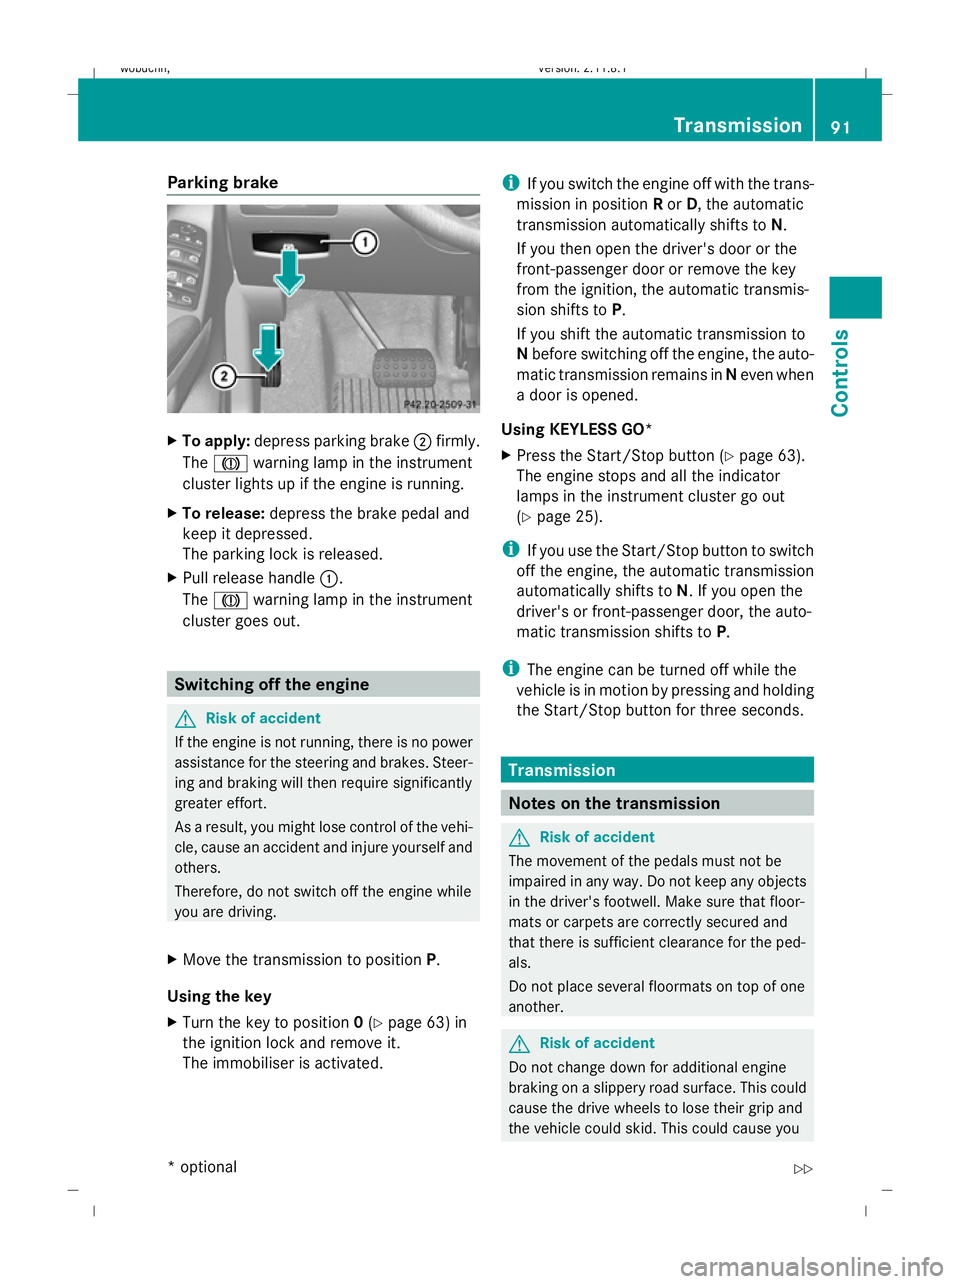
Parking brake
X
To apply: depress parking brake ;firmly.
The J warning lamp in the instrument
cluster lights up if the engine is running.
X To release: depress the brake pedal and
keep it depressed.
The parking lock is released.
X Pull release handle :.
The J warning lamp in the instrument
cluster goes out. Switching off the engine
G
Risk of accident
If the engine is not running, there is no power
assistance for the steering and brakes. Steer-
ing and braking will then require significantly
greater effort.
As a result, you might lose control of the vehi-
cle, cause an accident and injure yourself and
others.
Therefore, do not switch off the engine while
you are driving.
X Move the transmission to position P.
Using the key
X Turn the key to position 0(Y page 63) in
the ignition lock and remove it.
The immobiliser is activated. i
If you switch the engine off with the trans-
mission in position Ror D, the automatic
transmission automatically shifts to N.
If you then open the driver's door or the
front-passenger door or remove the key
from the ignition, the automatic transmis-
sion shifts to P.
If you shift the automatic transmission to
N before switching off the engine, the auto-
matic transmission remains in Neven when
a door is opened.
Using KEYLESS GO*
X Press the Start/Stop button (Y page 63).
The engine stops and all the indicator
lamps in the instrument cluster go out
(Y page 25).
i If you use the Start/Stop button to switch
off the engine, the automatic transmission
automatically shifts to N. If you open the
driver's or front-passenger door, the auto-
matic transmission shifts to P.
i The engine can be turned off while the
vehicle is in motion by pressing and holding
the Start/Stop button for three seconds. Transmission
Notes on the transmission
G
Risk of accident
The movement of the pedals must not be
impaired in any way. Do not keep any objects
in the driver's footwell. Make sure that floor-
mats or carpets are correctly secured and
that there is sufficient clearance for the ped-
als.
Do not place several floormats on top of one
another. G
Risk of accident
Do not change down for additional engine
braking on a slippery road surface. This could
cause the drive wheels to lose their grip and
the vehicle could skid. This could cause you Transmission
91Controls
* optional
X164_AKB; 2; 3, en-GB
wobuchh,
Version: 2.11.8.1 2009-03-31T14:14:58+02:00 - Seite 91 Z
Dateiname: 6515431202_buchblock.pdf; erzeugt am 01. Apr 2009 00:17:11; WK
Page 102 of 309

Menus and submenus
Function
:
Standard display
menu
(Y page 99)
R tyre pressure loss warning
(Y page 182) or tyre pressure mon-
itor* (Y page 183)
R ASSYST PLUS service interval dis-
play
R checking engine oil level*
(Y page 176) ;
Audio/TV*/DVD*
menu
(Y page 100) =
Navigation*
menu (Ypage 102) ?
Off-road*
menu (Ypage 102)
R off-road level (Y page 129)
R compass display (Y page 166)
R differential locks (status indicator)
(Y page 116) A
Distronic*
menu (Ypage 119) Function
B
Message memory
menu19
(Y page 211) C
Settings
menu (Ypage 103) D
Additional functions
menu
(Y page 109) E
Trip computer
menu (Ypage 110) F
Telephone
menu (Ypage 111) The number of menus shown depends on the
optional equipment in the vehicle.
Depending on the audio system fitted, the
Audio, Navigation* and Telephonemenus
are slightly different. The examples given in
this Owner's Manual apply to vehicles equip-
ped with COMAND APS*. Standard display menu
Use the buttons on the multi-function steer-
ing wheel.
19 The menu is only visible when there is a display message. On-board computer
99Controls
* optional
X164_AKB; 2; 3, en-GB
wobuchh,
Version: 2.11.8.1 2009-03-31T14:14:58+02:00 - Seite 99 Z
Dateiname: 6515431202_buchblock.pdf; erzeugt am 01. Apr 2009 00:17:15; WK
Page 119 of 309

An acoustic warning will also sound. The
gear change process has not been comple-
ted. LOW RANGE is in the neutral position.
There is no connection between the engine
and the drive wheels.
! Do not drive any further, otherwise you
could damage the vehicle's drive train.
XStop the vehicle. Take into account the
road and traffic conditions when doing
this.
X Depress the parking brake.
X Carry out the gear change process
again.
If the gear change process has been
carried out, the Stop vehicle. Apply
parking brake message disappears. Differential locks
Differential locks improve the vehicle’s trac-
tion.
Your vehicle is equipped with the following:
R A differential lock for the transfer box: this
controls the balance between the front and
rear axles.
R A differential lock for the rear axle: this
controls the balance between the wheels
and the rear axle.
4ETS (Y page 53) controls the compensation
between the wheels and the front axle.
Engaging the differential locks Automatic mode
Use automatic mode
;for all driving situa-
tions, including driving off-road or when ford-
ing.
In automatic mode, the differential locks are
engaged and disengaged according to driving
requirements. This guarantees sufficient trac-
tion for most driving situations with unrestric-
ted vehicle steerability.
X Start the engine.
The differential locks are in automatic
mode. The indicator lamp in selector
wheel :lights up above symbol for auto-
matic mode ;.
Engaging manually G
Risk of accident
When driving on a firm road surface, only drive
in automatic mode, never with manually
engaged differential locks. If differential locks
have been engaged manually, the vehicle's
steerability is greatly impaired and the risk of
an accident thereby increased.
Do not manually engage or disengage the dif-
ferential locks while cornering. The vehicle
motion could otherwise be jerky. You could
lose control of the vehicle as a result and
cause an accident.
Only engage the differential locks manually if
traction in automatic mode is insufficient.
At speeds of up to 30 km/h, you can engage
the differential locks by hand.
X Start the engine.
X Turn selector wheel :to desired position
= or?.
The indicator lamp in selector wheel :
lights up at the corresponding symbol. 116
Off-road drivingControls
X164_AKB; 2; 3, en-GB
wobuchh
,V ersion: 2.11.8.1
2009-03-31T14:14:58+02:00 - Seite 116
Dateiname: 6515431202_buchblock.pdf; erzeugt am 01. Apr 2009 00:17:20; WK
Page 120 of 309

The engaged differential appears in the multi-
function display:
A
The differential lock for the transfer case
is locked.
The differential locks are not controlled auto-
matically. The steerability of the vehicle is
restricted considerably. Drive carefully and
accelerate gently for optimum traction.
You can switch back to automatic mode at
any time. For safety reasons, the differential
locks disengage automatically at speeds
above 50 km/h. If you stop the vehicle and
switch off the ignition for longer than ten sec-
onds, the differential locks switch back to
automatic mode.
Message in the multi-function display
Diff. lock system overheated.
Wait briefly
The differential lock system has overheated
and briefly disengaged.
X Continue driving.
The differential locks cool off and are soon
available once again. Driving systems
Overview of driving systems
The vehicle's driving systems are described
on the following pages:
R cruise control, Distronic *and Speedtronic,
which are used to control the speed of the
vehicle
R Adaptive damping system (ADS), for indi-
vidual adjustment of suspension tuning R
level control, for individual adjustment of
ground clearance
R PARKTRONIC*, which assists you in park-
ing and manoeuvring
R reversing camera*, which assists you when
parking and manoeuvring
The ABS, BAS, adaptive brake lights, ESP ®
,
EBV and 4ETS driving safety systems and the
distance warning function* are described in
the "Driving safety systems" section
(Y page 49). Cruise control
Cruise control maintains a constant road
speed for you. It brakes automatically in order
to avoid exceeding the set speed. On long and
steep downhill gradients, especially if the
vehicle is laden or towing a trailer, you must
select shift range 1,2or 3in good time. By
doing so, you will make use of the braking
effect of the engine, which relieves the load
on the brake system and prevents the brakes
from overheating and wearing too quickly. G
Risk of accident
Do not change down for additional engine
braking on a slippery road surface. This could
cause the drive wheels to lose their grip and
the vehicle could skid.
Use cruise control only if road and traffic con-
ditions make it appropriate to maintain a
steady speed for a prolonged period. You can
store any road speed above 30 km/h. G
Risk of accident
Cruise control cannot take account of road
and traffic conditions.
Always pay attention to traffic conditions
even when cruise control is activated.
Cruise control is only an aid designed to assist
driving. You are responsible for the vehicle's
speed and for braking in good time. Driving systems
117Controls
* optional
X164_AKB; 2; 3, en-GB
wobuchh
,V ersion: 2.11.8.1
2009-03-31T14:14:58+02:00 - Seite 117 Z
Dateiname: 6515431202_buchblock.pdf; erzeugt am 01. Apr 2009 00:17:20; WK
Page 122 of 309

Storing the current speed or calling up
the last stored speed
G
Risk of accident
Only select a stored speed if you know what
that speed is and whether it is suitable for the
current situation. Otherwise, sudden acceler-
ation or braking could endanger you or others.
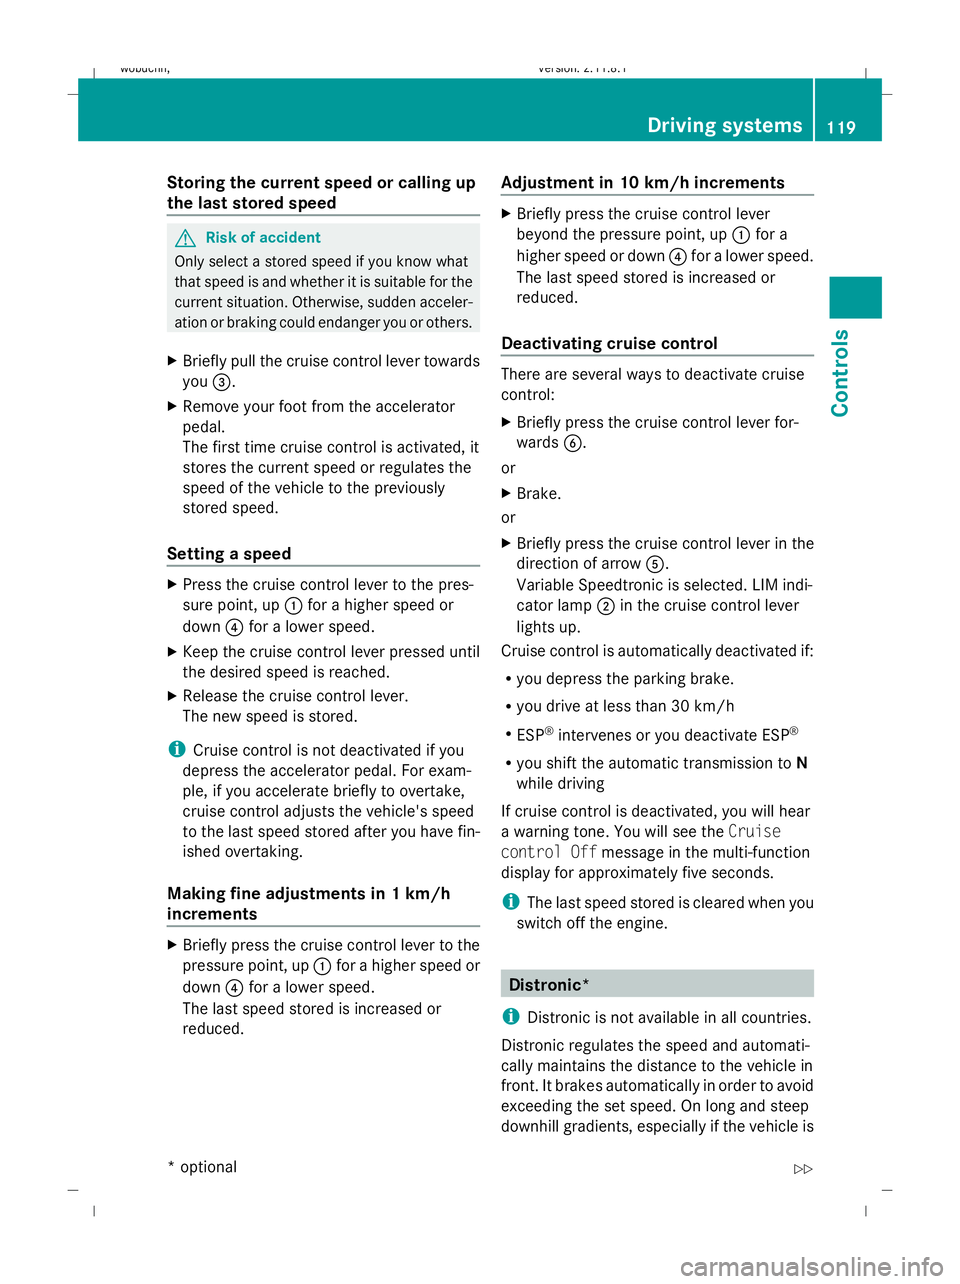
X Briefly pull the cruise control lever towards
you =.
X Remove your foot from the accelerator
pedal.
The first time cruise control is activated, it
stores the current speed or regulates the
speed of the vehicle to the previously
stored speed.
Setting a speed X
Press the cruise control lever to the pres-
sure point, up :for a higher speed or
down ?for a lower speed.
X Keep the cruise control lever pressed until
the desired speed is reached.
X Release the cruise control lever.
The new speed is stored.
i Cruise control is not deactivated if you
depress the accelerator pedal. For exam-
ple, if you accelerate briefly to overtake,
cruise control adjusts the vehicle's speed
to the last speed stored after you have fin-
ished overtaking.
Making fine adjustments in 1 km/h
increments X
Briefly press the cruise control lever to the
pressure point, up :for a higher speed or
down ?for a lower speed.
The last speed stored is increased or
reduced. Adjustment in 10 km/h increments X
Briefly press the cruise control lever
beyond the pressure point, up :for a
higher speed or down ?for a lower speed.
The last speed stored is increased or
reduced.
Deactivating cruise control There are several ways to deactivate cruise
control:
X
Briefly press the cruise control lever for-
wards B.
or
X Brake.
or
X Briefly press the cruise control lever in the
direction of arrow A.
Variable Speedtronic is selected. LIM indi-
cator lamp ;in the cruise control lever
lights up.
Cruise control is automatically deactivated if:
R you depress the parking brake.
R you drive at less than 30 km/h
R ESP ®
intervenes or you deactivate ESP ®
R you shift the automatic transmission to N
while driving
If cruise control is deactivated, you will hear
a warning tone. You will see the Cruise
control Off message in the multi-function
display for approximately five seconds.
i The last speed stored is cleared when you
switch off the engine. Distronic*
i Distronic is not available in all countries.
Distronic regulates the speed and automati-
cally maintains the distance to the vehicle in
front. It brakes automatically in order to avoid
exceeding the set speed. On long and steep
downhill gradients, especially if the vehicle is Driving systems
119Controls
* optional
X164_AKB; 2; 3, en-GB
wobuchh,
Version: 2.11.8.1 2009-03-31T14:14:58+02:00 - Seite 119 Z
Dateiname: 6515431202_buchblock.pdf; erzeugt am 01. Apr 2009 00:17:21; WK
Page 124 of 309

G
Risk of accident
Distronic brakes your vehicle at a maximum
of 4m /s2
, depending on its speed. This cor-
responds to approximately 40% of your vehi-
cle's maximum brake force. You must also
apply the brakes yourself if this braking power
is not sufficient.
If Distronic detects a risk of collision with a
vehicle in front, an intermittent warning tone
sounds. In addition, the ·distance warn-
ing lamp in the instrument cluster lights up.
Brake to avoid a collision.
Cruise control lever You can operate Distronic and variable
Speedtronic with the cruise control lever.
The LIM indicator lamp on the cruise control
lever indicates which system you have selec-
ted:
R LIM indicator lamp off:
Distronic is selected.
R LIM indicator lamp lit:
Variable Speedtronic is selected. :
To store the current speed or a higher
speed
; To adjust the specified distance
= LIM indicator lamp
? To store the current speed or call up the
last stored speed
A To store the current speed or a lower
speed B
To switch between Distronic and variable
Speedtronic
C To deactivate Distronic
Selecting Distronic X
Check whether LIM indicator lamp =is off.
If it is off, Distronic is already selected.
If it is not, press the cruise control lever in
the direction of arrow B.
LIM indicator lamp =in the cruise control
lever goes off. Distronic is selected.
Switching on Distronic, storing and
maintaining the current speed G
Risk of accident
The vehicle can be braked when Distronic is
activated. For this reason, deactivate Dis-
tronic if the vehicle is to be set in motion by
other means (e.g. in a car wash or by towing).
You can activate Distronic in the following
circumstances:
R for about two minutes after the engine is
started
R when the engine is running
R if you do not brake during the journey
R when the parking brake is not applied
R if ESP ®
is activated
R if the automatic transmission is in position
D
R if the bonnet is closed
Activating while driving
When driving at speeds below 30 km/h, you
can only activate Distronic if the vehicle in
front has been detected and is shown in the
multi-function display. If the vehicle in front is
not shown in the multi-function display and is
no longer being detected, because it has
changed lanes, for example, Distronic is
deactivated and you hear a warning tone. Driving systems
121Controls
X164_AKB; 2; 3, en-GB
wobuchh,V ersion: 2.11.8.1
2009-03-31T14:14:58+02:00 - Seite 121 Z
Dateiname: 6515431202_buchblock.pdf; erzeugt am 01. Apr 2009 00:17:21; WK
Page 137 of 309

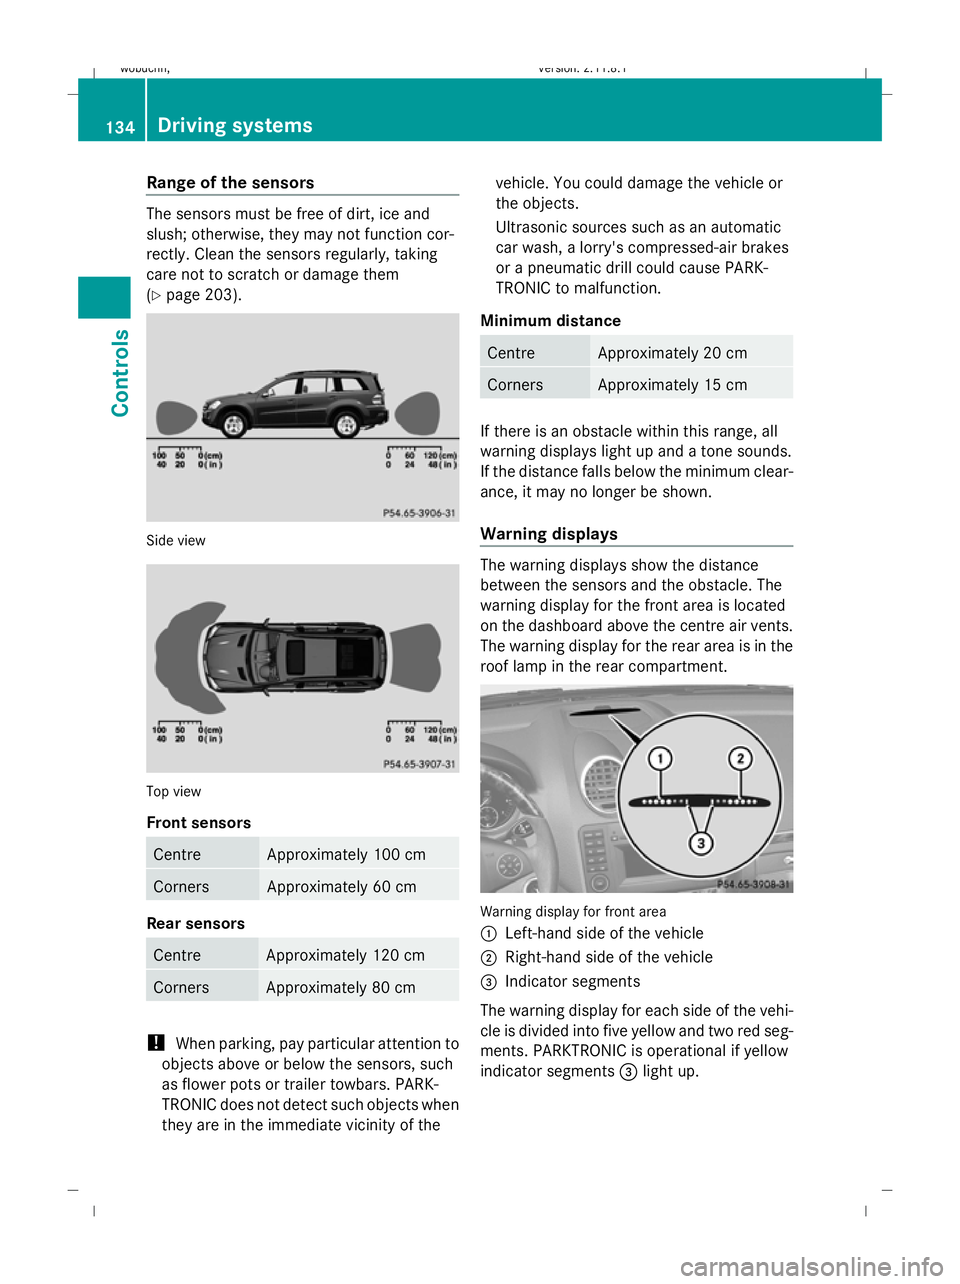
Range of the sensors
The sensors must be free of dirt, ice and
slush; otherwise, they may not function cor-
rectly. Clean the sensors regularly, taking
care not to scratch or damage them
(Y page 203). Side view
Top view
Front sensors
Centre Approximately 100 cm
Corners Approximately 60 cm
Rear sensors
Centre Approximately 120 cm
Corners Approximately 80 cm
!
When parking, pay particular attention to
objects above or below the sensors, such
as flower pots or trailer towbars. PARK-
TRONIC does not detect such objects when
they are in the immediate vicinity of the vehicle. You could damage the vehicle or
the objects.
Ultrasonic sources such as an automatic
car wash, a lorry's compressed-air brakes
or a pneumatic drill could cause PARK-
TRONIC to malfunction.
Minimum distance Centre Approximately 20 cm
Corners Approximately 15 cm
If there is an obstacle within this range, all
warning displays light up and a tone sounds.
If the distance falls below the minimum clear-
ance, it may no longer be shown.
Warning displays The warning displays show the distance
between the sensors and the obstacle. The
warning display for the front area is located
on the dashboard above the centre air vents.
The warning display for the rear area is in the
roof lamp in the rear compartment. Warning display for front area
:
Left-hand side of the vehicle
; Right-hand side of the vehicle
= Indicator segments
The warning display for each side of the vehi-
cle is divided into five yellow and two red seg-
ments. PARKTRONIC is operational if yellow
indicator segments =light up. 134
Driving systemsControls
X164_AKB; 2; 3, en-GB
wobuchh,
Version: 2.11.8.1 2009-03-31T14:14:58+02:00 - Seite 134
Dateiname: 6515431202_buchblock.pdf; erzeugt am 01. Apr 2009 00:17:26; WK