2009 MERCEDES-BENZ GL SUV brake light
[x] Cancel search: brake lightPage 127 of 309
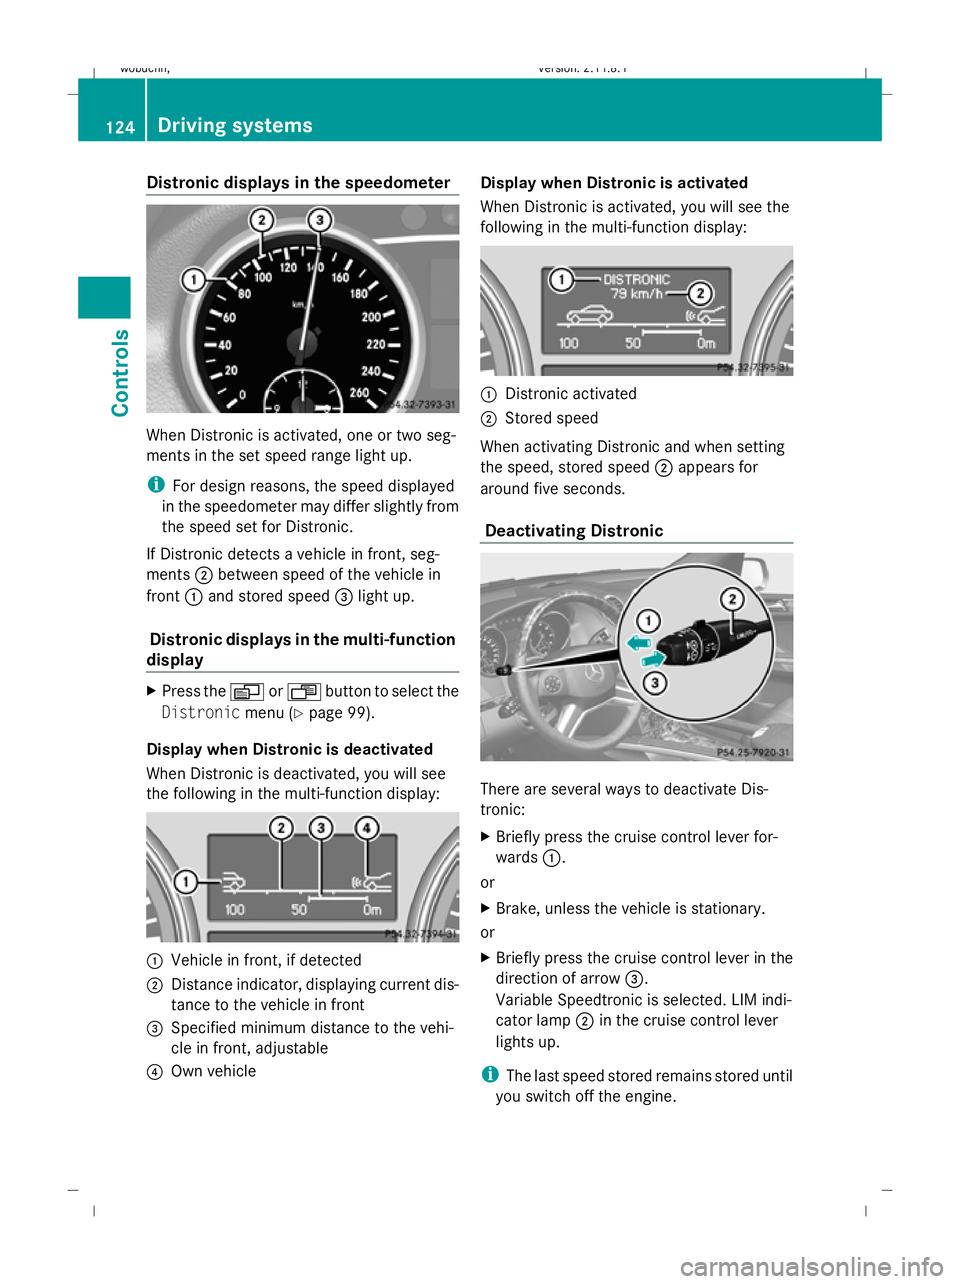
Distronic displays in the speedometer
When Distronic is activated, one or two seg-
ments in the set speed range light up.
i For design reasons, the speed displayed
in the speedometer may differ slightly from
the speed set for Distronic.
If Distronic detects a vehicle in front, seg-
ments ;between speed of the vehicle in
front :and stored speed =light up.
Distronic displays in the multi-function
display X
Press the VorU button to select the
Distronic menu (Ypage 99).
Display when Distronic is deactivated
When Distronic is deactivated, you will see
the following in the multi-function display: :
Vehicle in front, if detected
; Distance indicator, displaying current dis-
tance to the vehicle in front
= Specified minimum distance to the vehi-
cle in front, adjustable
? Own vehicle Display when Distronic is activated
When Distronic is activated, you will see the
following in the multi-function display:
:
Distronic activated
; Stored speed
When activating Distronic and when setting
the speed, stored speed ;appears for
around five seconds.
Deactivating Distronic There are several ways to deactivate Dis-
tronic:
X
Briefly press the cruise control lever for-
wards :.
or
X Brake, unless the vehicle is stationary.
or
X Briefly press the cruise control lever in the
direction of arrow =.
Variable Speedtronic is selected. LIM indi-
cator lamp ;in the cruise control lever
lights up.
i The last speed stored remains stored until
you switch off the engine. 124
Driving syste
msControls
X164_AKB; 2; 3, en-GB
wobuchh, Version: 2.11.8.1 2009-03-31T14:14:58+02:00 - Seite 124
Dateiname: 6515431202_buchblock.pdf; erzeugt am 01. Apr 2009 00:17:22; WK
Page 129 of 309
of its narrow width. The distance to the vehi-
cle in front will be too short.
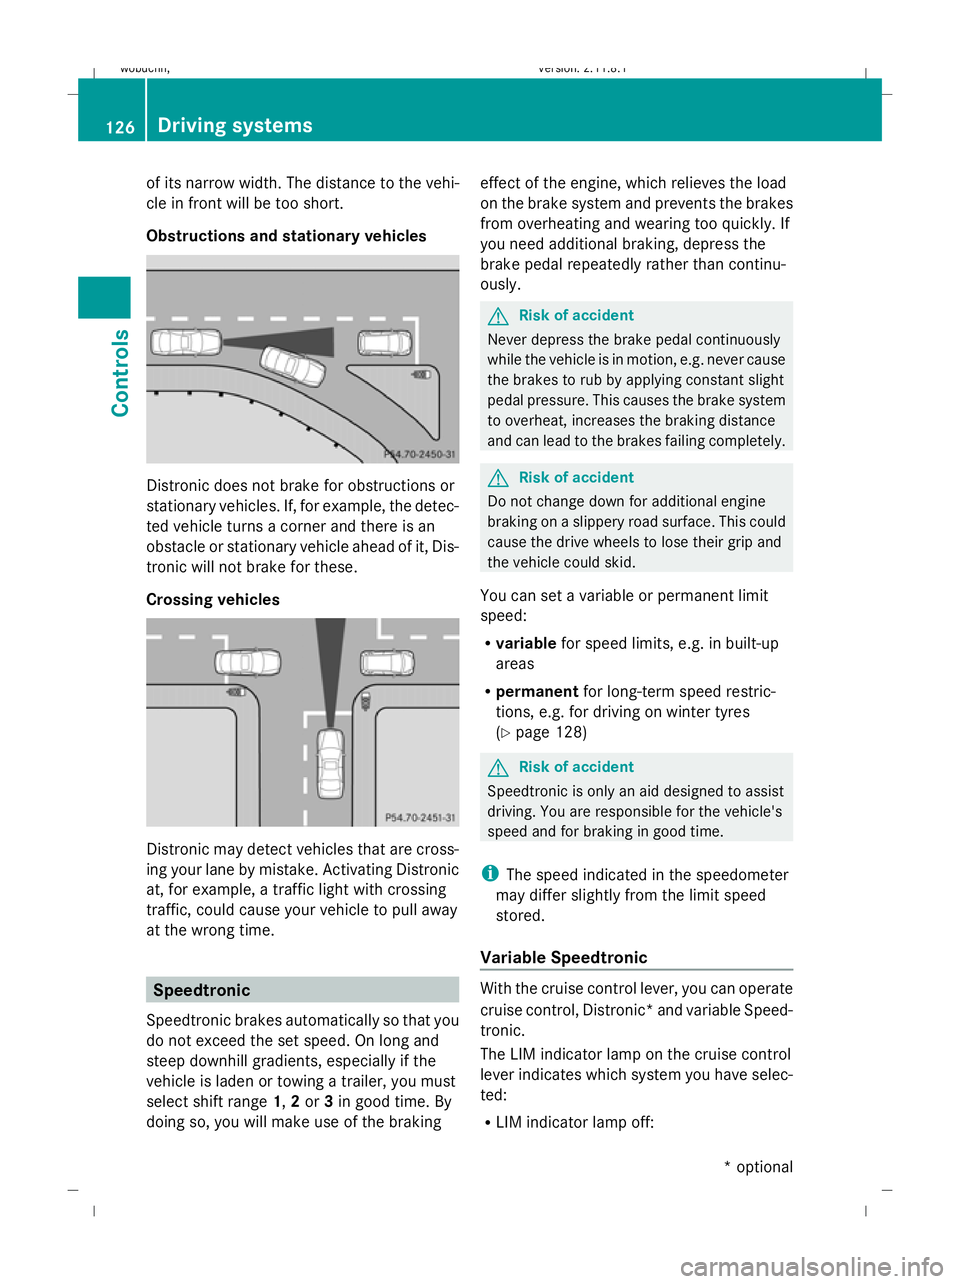
Obstructions and stationary vehicles Distronic does not brake for obstructions or
stationary vehicles. If, for example, the detec-
ted vehicle turns a corner and there is an
obstacle or stationary vehicle ahead of it, Dis-
tronic will not brake for these.
Crossing vehicles Distronic may detect vehicles that are cross-
ing your lane by mistake. Activating Distronic
at, for example, a traffic light with crossing
traffic, could cause your vehicle to pull away
at the wrong time. Speedtronic
Speedtronic brakes automatically so that you
do not exceed the set speed. On long and
steep downhill gradients, especially if the
vehicle is laden or towing a trailer, you must
select shift range 1,2or 3in good time. By
doing so, you will make use of the braking effect of the engine, which relieves the load
on the brake system and prevents the brakes
from overheating and wearing too quickly. If
you need additional braking, depress the
brake pedal repeatedly rather than continu-
ously. G
Risk of accident
Never depress the brake pedal continuously
while the vehicle is in motion, e.g. never cause
the brakes to rub by applying constant slight
pedal pressure. This causes the brake system
to overheat, increases the braking distance
and can lead to the brakes failing completely. G
Risk of accident
Do not change down for additional engine
braking on a slippery road surface. This could
cause the drive wheels to lose their grip and
the vehicle could skid.
You can set a variable or permanent limit
speed:
R variable for speed limits, e.g. in built-up
areas
R permanent for long-term speed restric-
tions, e.g. for driving on winter tyres
(Y page 128) G
Risk of accident
Speedtronic is only an aid designed to assist
driving. You are responsible for the vehicle's
speed and for braking in good time.
i The speed indicated in the speedometer
may differ slightly from the limit speed
stored.
Variable Speedtronic With the cruise control lever, you can operate
cruise control, Distronic* and variable Speed-
tronic.
The LIM indicator lamp on the cruise control
lever indicates which system you have selec-
ted:
R
LIM indicator lamp off: 126
Driving systemsControls
* optional
X164_AKB; 2; 3, en-GB
wobuchh,
Version: 2.11.8.1 2009-03-31T14:14:58+02:00 - Seite 126
Dateiname: 6515431202_buchblock.pdf; erzeugt am 01. Apr 2009 00:17:23; WK
Page 130 of 309

Cruise control or Distronic* is selected.
R LIM indicator lamp lit:
Variable Speedtronic is selected.
You can use the cruise control lever to limit
the speed to any speed above 30 km/h while
the engine is running. :
To store the current speed or a higher
speed
; LIM indicator lamp
= To store the current speed or to call up
the last stored speed
? To store the current speed or a lower
speed
A To switch between cruise control or Dis-
tronic* and variable Speedtronic
B To deactivate variable Speedtronic
Selecting variable Speedtronic X
Check whether LIM indicator lamp ;is on.
If it is on, variable Speedtronic is already
selected.
If it is not, press the cruise control lever in
the direction of arrow A.
LIM indicator lamp ;in the cruise control
lever lights up. Variable Speedtronic is
selected. G
Risk of accident
If there is a change of drivers, advise the new
driver of the limit speed stored.
Only use Speedtronic when you do not have
to accelerate suddenly to a speed higher than the stored limit speed allows. You could, oth-
erwise, cause an accident.
You can only exceed the limit speed stored if
you deactivate variable Speedtronic:
R using the cruise control lever
R by depressing the accelerator pedal
beyond the pressure point (kickdown)
It is not possible to deactivate variable Speed-
tronic by braking. G
Risk of injury
Variable Speedtronic brakes automatically in
order to avoid exceeding the set speed. As it
does so, the brake pedal is depressed. Do not
place your foot under the brake pedal as it
could become trapped.
Storing the current speed You can use the cruise control lever to limit
the speed to any speed above 30 km/h while
the engine is running.
X
Briefly press the cruise control lever
up : or down ?to the pressure point.
The current speed is stored and shown in
the multi-function display.
The LIM indicator lamp in the instrument
cluster lights up.
Storing the current speed or calling up
the last stored speed G
Risk of accident
Only select a stored speed if you know what
that speed is and whether it is suitable for the
current driving and traffic situation. Other-
wise, sudden braking could endanger you or
others.
X Briefly pull the cruise control lever towards
you =. Driving systems
127Controls
* optional
X164_AKB; 2; 3, en-GB
wobuchh,
Version: 2.11.8.1 2009-03-31T14:14:58+02:00 - Seite 127 Z
Dateiname: 6515431202_buchblock.pdf; erzeugt am 01. Apr 2009 00:17:23; WK
Page 137 of 309
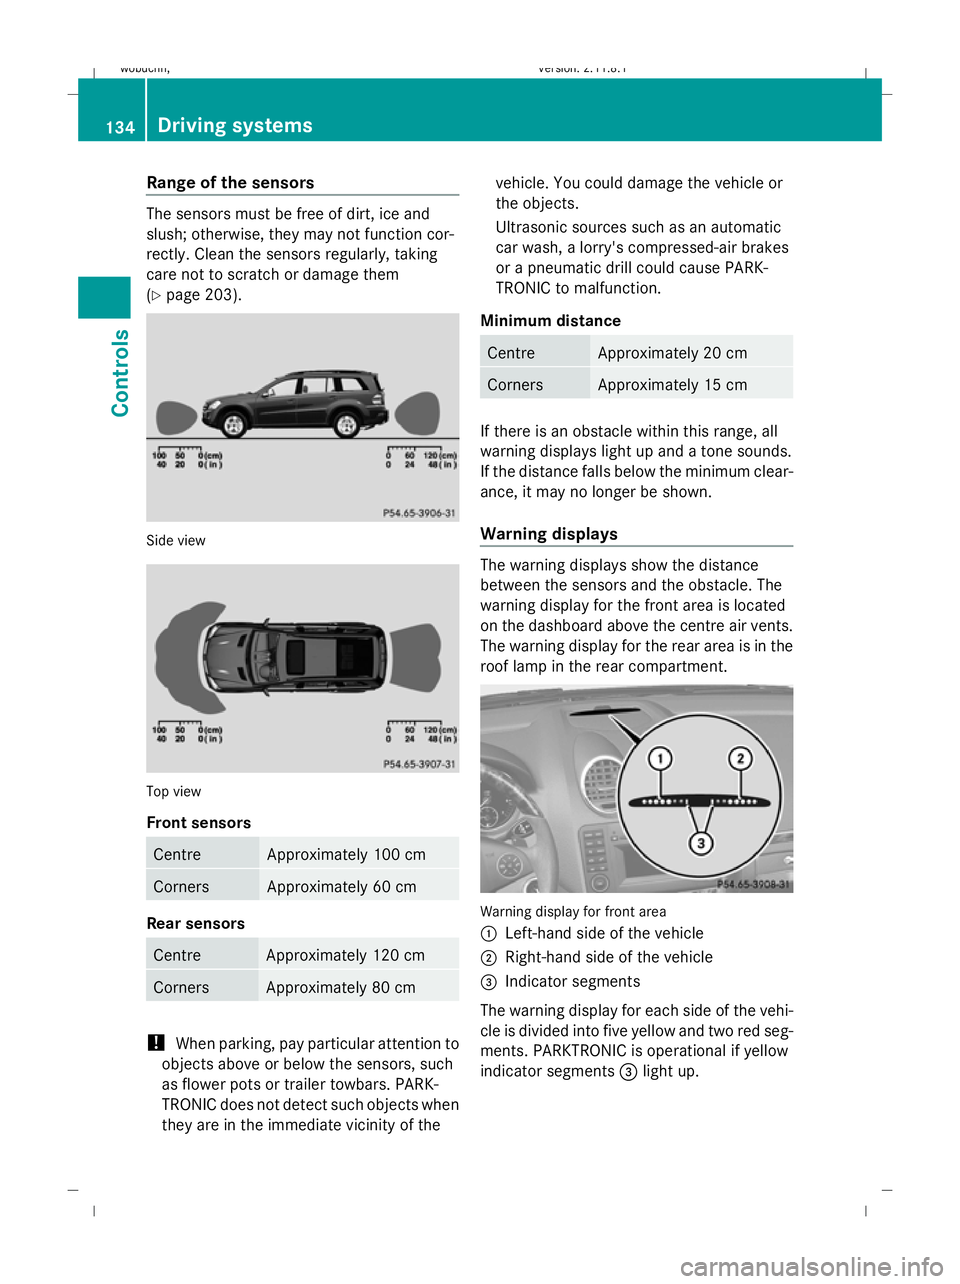
Range of the sensors
The sensors must be free of dirt, ice and
slush; otherwise, they may not function cor-
rectly. Clean the sensors regularly, taking
care not to scratch or damage them
(Y page 203). Side view
Top view
Front sensors
Centre Approximately 100 cm
Corners Approximately 60 cm
Rear sensors
Centre Approximately 120 cm
Corners Approximately 80 cm
!
When parking, pay particular attention to
objects above or below the sensors, such
as flower pots or trailer towbars. PARK-
TRONIC does not detect such objects when
they are in the immediate vicinity of the vehicle. You could damage the vehicle or
the objects.
Ultrasonic sources such as an automatic
car wash, a lorry's compressed-air brakes
or a pneumatic drill could cause PARK-
TRONIC to malfunction.
Minimum distance Centre Approximately 20 cm
Corners Approximately 15 cm
If there is an obstacle within this range, all
warning displays light up and a tone sounds.
If the distance falls below the minimum clear-
ance, it may no longer be shown.
Warning displays The warning displays show the distance
between the sensors and the obstacle. The
warning display for the front area is located
on the dashboard above the centre air vents.
The warning display for the rear area is in the
roof lamp in the rear compartment. Warning display for front area
:
Left-hand side of the vehicle
; Right-hand side of the vehicle
= Indicator segments
The warning display for each side of the vehi-
cle is divided into five yellow and two red seg-
ments. PARKTRONIC is operational if yellow
indicator segments =light up. 134
Driving systemsControls
X164_AKB; 2; 3, en-GB
wobuchh,
Version: 2.11.8.1 2009-03-31T14:14:58+02:00 - Seite 134
Dateiname: 6515431202_buchblock.pdf; erzeugt am 01. Apr 2009 00:17:26; WK
Page 156 of 309
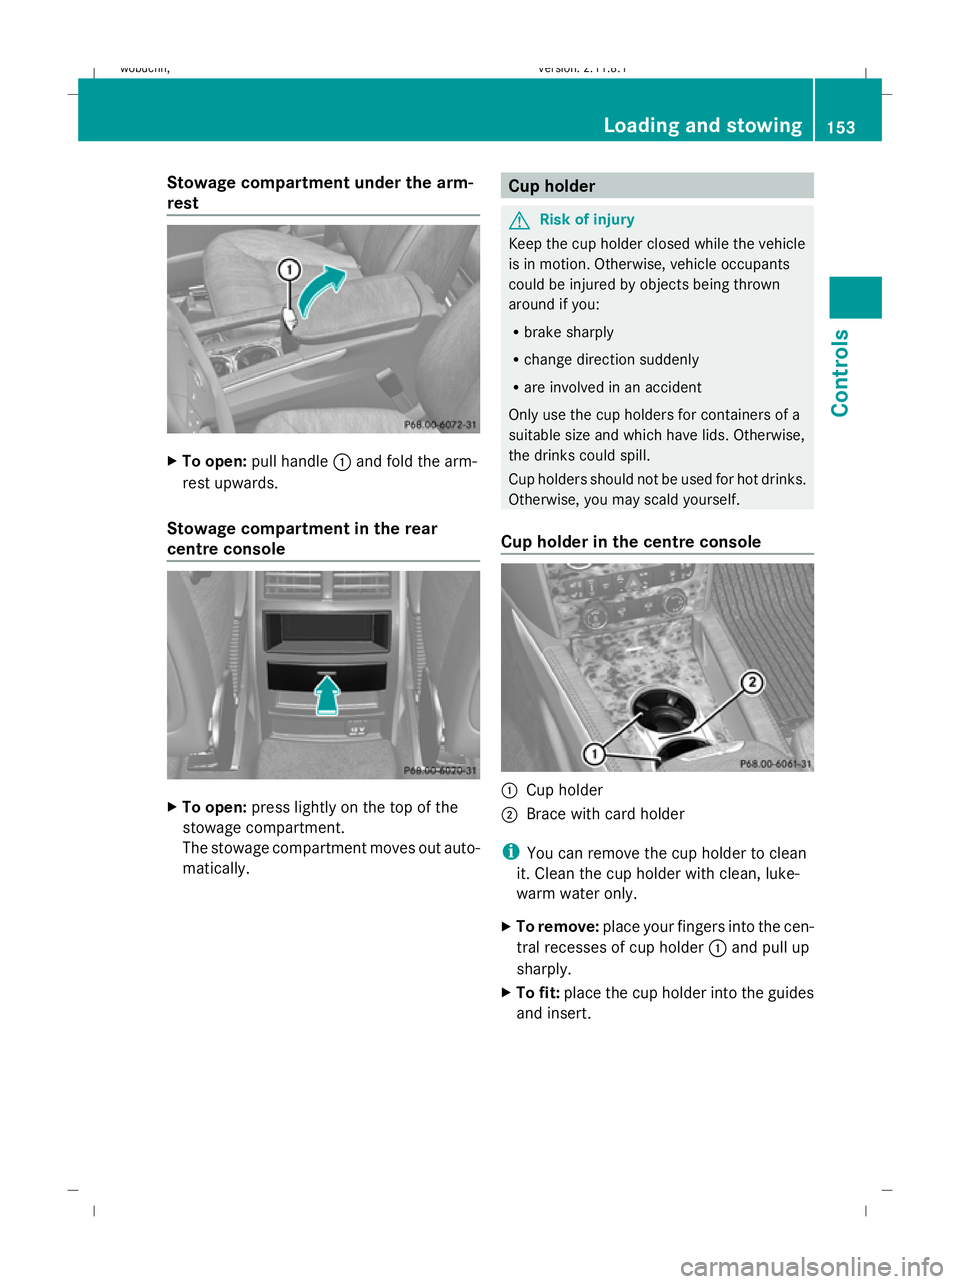
Stowage compartment under the arm-
rest
X
To open: pull handle :and fold the arm-
rest upwards.
Stowage compartment in the rear
centre console X
To open: press lightly on the top of the
stowage compartment.
The stowage compartment moves out auto-
matically. Cup holder
G
Risk of injury
Keep the cup holder closed while the vehicle
is in motion. Otherwise, vehicle occupants
could be injured by objects being thrown
around if you:
R brake sharply
R change direction suddenly
R are involved in an accident
Only use the cup holders for containers of a
suitable size and which have lids. Otherwise,
the drinks could spill.
Cup holders should not be used for hot drinks.
Otherwise, you may scald yourself.
Cup holder in the centre console :
Cup holder
; Brace with card holder
i You can remove the cup holder to clean
it. Clean the cup holder with clean, luke-
warm water only.
X To remove: place your fingers into the cen-
tral recesses of cup holder :and pull up
sharply.
X To fit: place the cup holder into the guides
and insert. Loading and stowing
153Controls
X164_AKB; 2; 3, en-GB
wobuchh, Version: 2.11.8.1 2009-03-31T14:14:58+02:00 - Seite 153 Z
Dateiname: 6515431202_buchblock.pdf; erzeugt am 01. Apr 2009 00:17:34; WK
Page 159 of 309
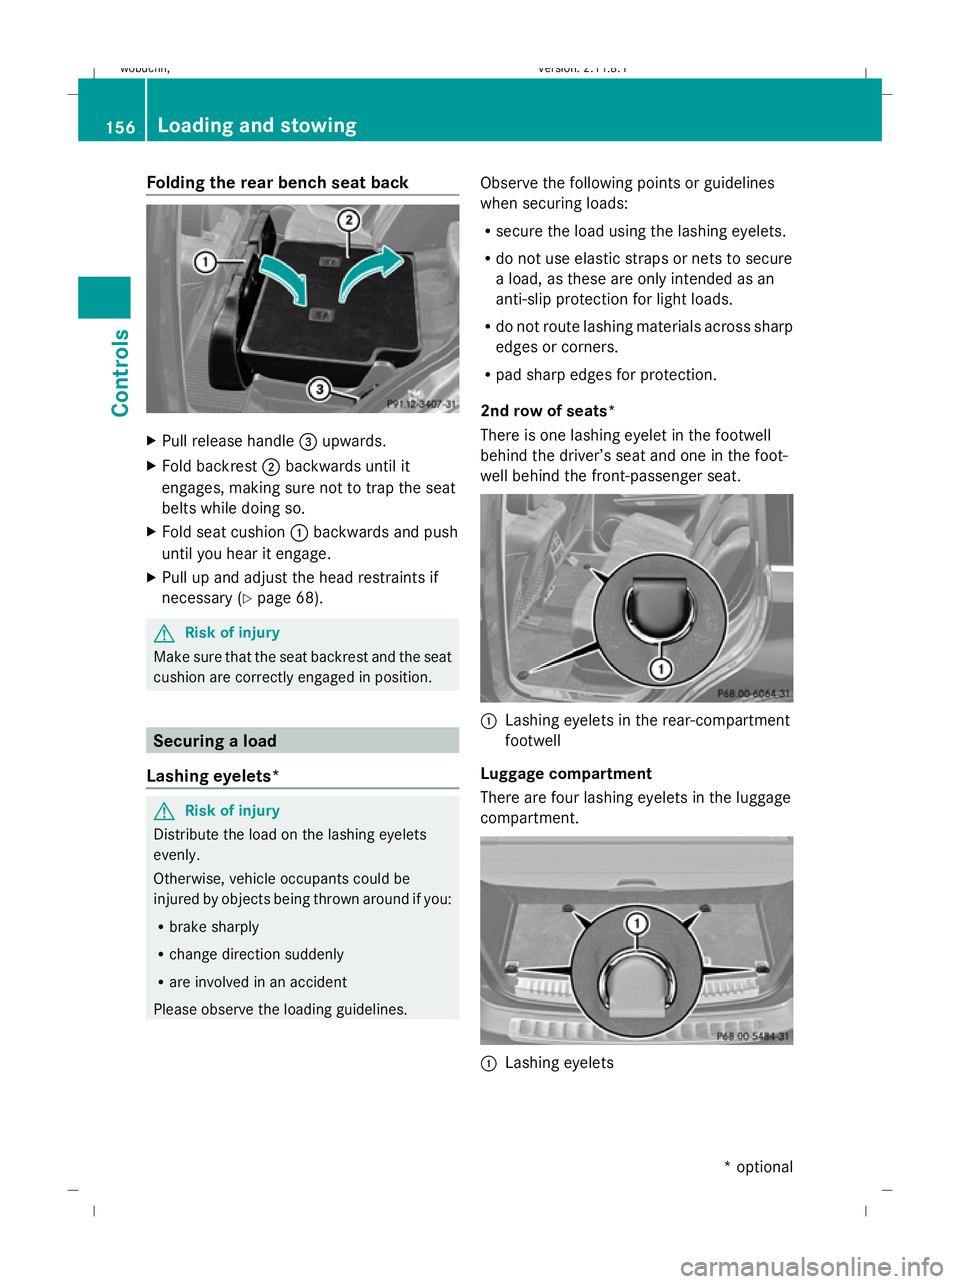
Folding the rear bench seat back
X
Pull release handle =upwards.
X Fold backrest ;backwards until it
engages, making sure not to trap the seat
belts while doing so.
X Fold seat cushion :backwards and push
until you hear it engage.
X Pull up and adjust the head restraints if
necessary (Y page 68). G
Risk of injury
Make sure that the seat backrest and the seat
cushion are correctly engaged in position. Securing a load
Lashing eyelets* G
Risk of injury
Distribute the load on the lashing eyelets
evenly.
Otherwise, vehicle occupants could be
injured by objects being thrown around if you:
R brake sharply
R change direction suddenly
R are involved in an accident
Please observe the loading guidelines. Observe the following points or guidelines
when securing loads:
R
secure the load using the lashing eyelets.
R do not use elastic straps or nets to secure
a load, as these are only intended as an
anti-slip protection for light loads.
R do not route lashing materials across sharp
edges or corners.
R pad sharp edges for protection.
2nd row of seats*
There is one lashing eyelet in the footwell
behind the driver’s seat and one in the foot-
well behind the front-passenger seat. :
Lashing eyelets in the rear-compartment
footwell
Luggage compartment
There are four lashing eyelets in the luggage
compartment. :
Lashing eyelets 156
Loading and stowingCont
rols
* optional
X164_AKB; 2; 3, en-GB
wobuchh,
Version: 2.11.8.1 2009-03-31T14:14:58+02:00 - Seite 156
Dateiname: 6515431202_buchblock.pdf; erzeugt am 01. Apr 2009 00:17:37; WK
Page 190 of 309
You will require considerably more effort to
steer and brake and you could therefore lose
control of the vehicle and cause an accident.
Brakes
G
Risk of accident
Do not change down for additional engine
braking on a slippery road surface. This could
cause the drive wheels to lose their grip and
the vehicle could skid. G
Risk of accident
Make sure that other road users are not
endangered by your braking.
Downhill gradients On long and steep downhill gradients, espe-
cially if the vehicle is laden or towing a trailer,
you must select shift range 1,2or 3in good
time.
i This also applies if you have activated
cruise control, Speedtronic or Distronic*.
This will use the braking effect of the engine,
so less braking will be required to maintain
the speed. This relieves the load on the brake
system and prevents the brakes from over-
heating and wearing too quickly. If you need
additional braking, depress the brake pedal
repeatedly rather than continuously.
Heavy and light loads If the brakes have been subjected to a heavy
load, do not stop the vehicle immediately, but
drive on for a short while. This allows the air-
flow to cool the brakes more quickly. G
Risk of accident
Never depress the brake pedal continuously
while the vehicle is in motion, e.g. never cause
the brakes to rub by applying constant slight
pedal pressure. This causes the brake system
to overheat, increases the braking distance
and can lead to the brakes failing completely. If the brakes have been used only moderately,
you should occasionally test their effective-
ness. To do this, brake more firmly from a
higher speed. This improves the grip of the
brakes.
Wet roads If driving in heavy rain for a prolonged period
of time without braking, there may be a
delayed reaction from the brakes when brak-
ing for the first time. You must brake harder.
You must therefore maintain a greater dis-
tance from the vehicle in front.
After driving on a wet surface, brake firmly
while paying attention to the traffic condi-
tions. This way the brake discs will become
warm, drying more quickly, which will protect
them against corrosion.
Limited braking performance on salted
roads
G
Risk of accident
The layer of salt on the brake discs and the
brake pads/linings may cause a delay in the
braking effect, resulting in a significantly lon-
ger braking distance, which could lead to an
accident.
To avoid this danger, you should:
R occasionally brake carefully, without put-
ting other road users at risk, when you are
driving on salted roads. This helps to
remove any salt that may have started to
build up on the brake discs and the brake
pads/linings.
R maintain a greater distance to the vehicle
ahead and drive with particular care.
R carefully apply the brakes at the end of a
trip and immediately after commencing a
new trip, so that salt residues are removed
from the brake disc. Driving tips
187Operation
* optional
X164_AKB; 2; 3, en-GB
wobuchh
,V ersion: 2.11.8.1
2009-03-31T14:14:58+02:00 - Seite 187 Z
Dateiname: 6515431202_buchblock.pdf; erzeugt am 01. Apr 2009 00:17:49; WK
Page 193 of 309
X
Wheels and tyres: check the tyre tread
depth and tyre pressure.
X Check for damage and remove foreign
objects, e.g. small stones, from the
wheels/tyres.
X Replace any missing valve caps.
X Replace dented or damaged wheels.
Checklist after driving off-road Driving over rough terrain places greater
demands on your vehicle than driving on nor-
mal roads. After driving off-road, check the
vehicle. This allows you to detect damage
promptly and reduce the risk of an accident
to yourself and other road users.
X Deactivate the LOW RANGE off-road gear
(Y page 114).
X Deactivate DSR (Y page 113).
X Set the differential lock setting to AUTO on
the selector wheel (Y page 116).
X Lower the vehicle level again to a level suit-
able to the road conditions, e.g. to the high-
way/high-speed level.
X Clean the headlamps and rear lights and
check for damage.
X Clean the front and rear licence plates.
X Clean the wheels/tyres with a water jet and
remove any foreign objects.
X Clean the wheels, wheel arches and the
vehicle underside with a water jet; check
for foreign objects and damage.
X Check whether twigs or other parts of
plants have become trapped. These
increase the risk of fire and can damage
fuel pipes, brake hoses or the rubber bel-
lows of the axle joints and propeller shafts.
X After the trip, examine without fail the
entire undercarriage, wheels, tyres, brakes,
bodywork structure, steering, chassis and
exhaust system for damage.
X After driving for extended periods across
sand, mud, gravel, water or in similarly dirty
conditions, have the brake discs, wheels, brake pads/l
inings and axle joints checked
and cleaned.
X If you detect strong vibrations after off-road
travel, check for foreign objects in the
wheels and drive train and remove them if
necessary. Foreign objects can disturb the
balance and cause vibrations. Travelling uphill
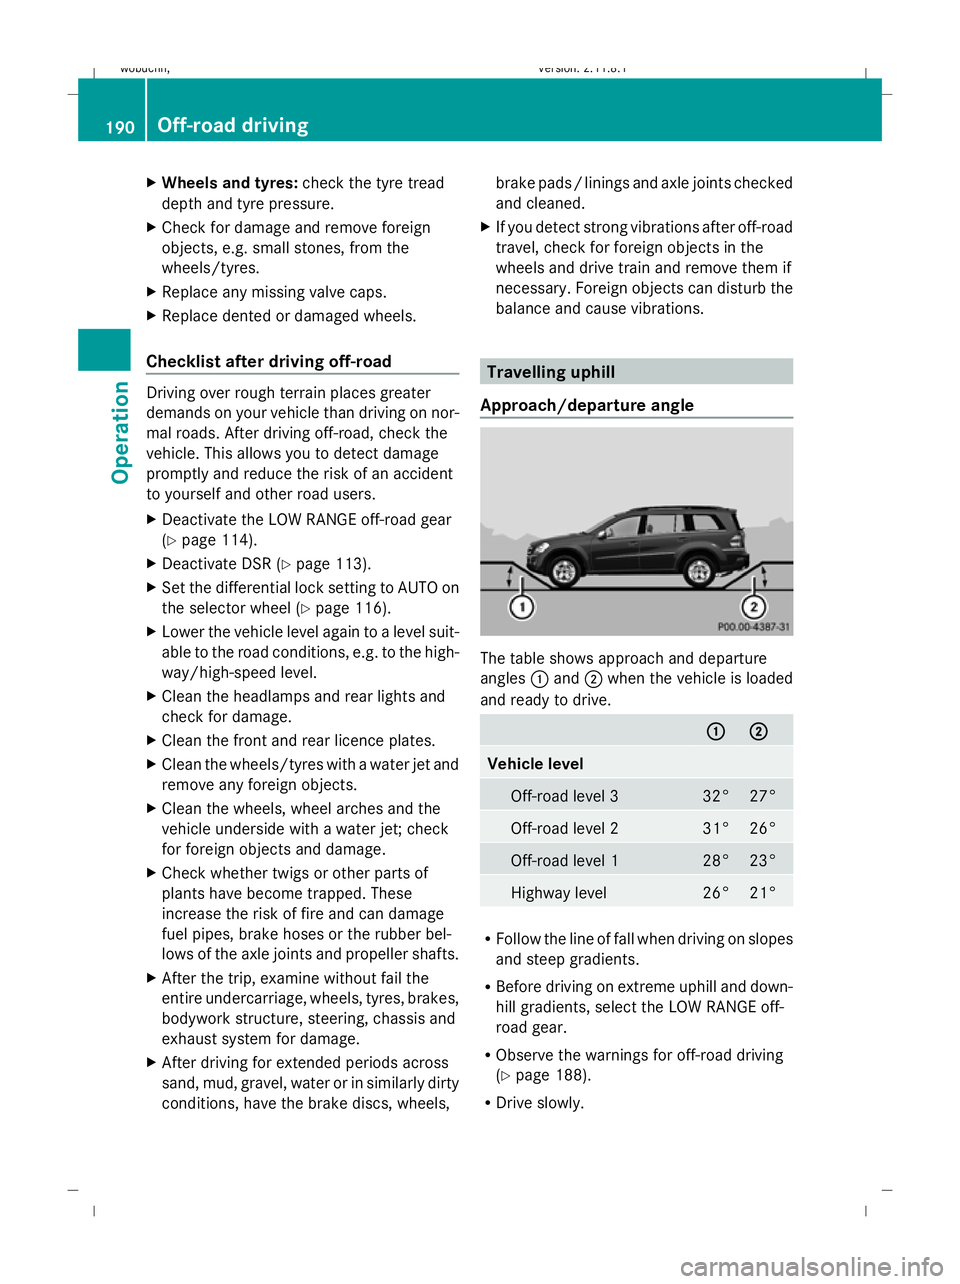
Approach/departure angle The table shows approach and departure
angles
:and ;when the vehicle is loaded
and ready to drive. :
: ;
; Vehicle level
Off-road level 3 32° 27°
Off-road level 2 31° 26°
Off-road level 1 28° 23°
Highway level 26° 21°
R
Follow the line of fall when driving on slopes
and steep gradients.
R Before driving on extreme uphill and down-
hill gradients, select the LOW RANGE off-
road gear.
R Observe the warnings for off-road driving
(Y page 188).
R Drive slowly. 190
Off-road drivingOperation
X164_AKB; 2; 3, en-GB
wobuchh,
Version: 2.11.8.1 2009-03-31T14:14:58+02:00 - Seite 190
Dateiname: 6515431202_buchblock.pdf; erzeugt am 01. Apr 2009 00:17:49; WK