2009 MERCEDES-BENZ GL SUV service indicator
[x] Cancel search: service indicatorPage 197 of 309
X
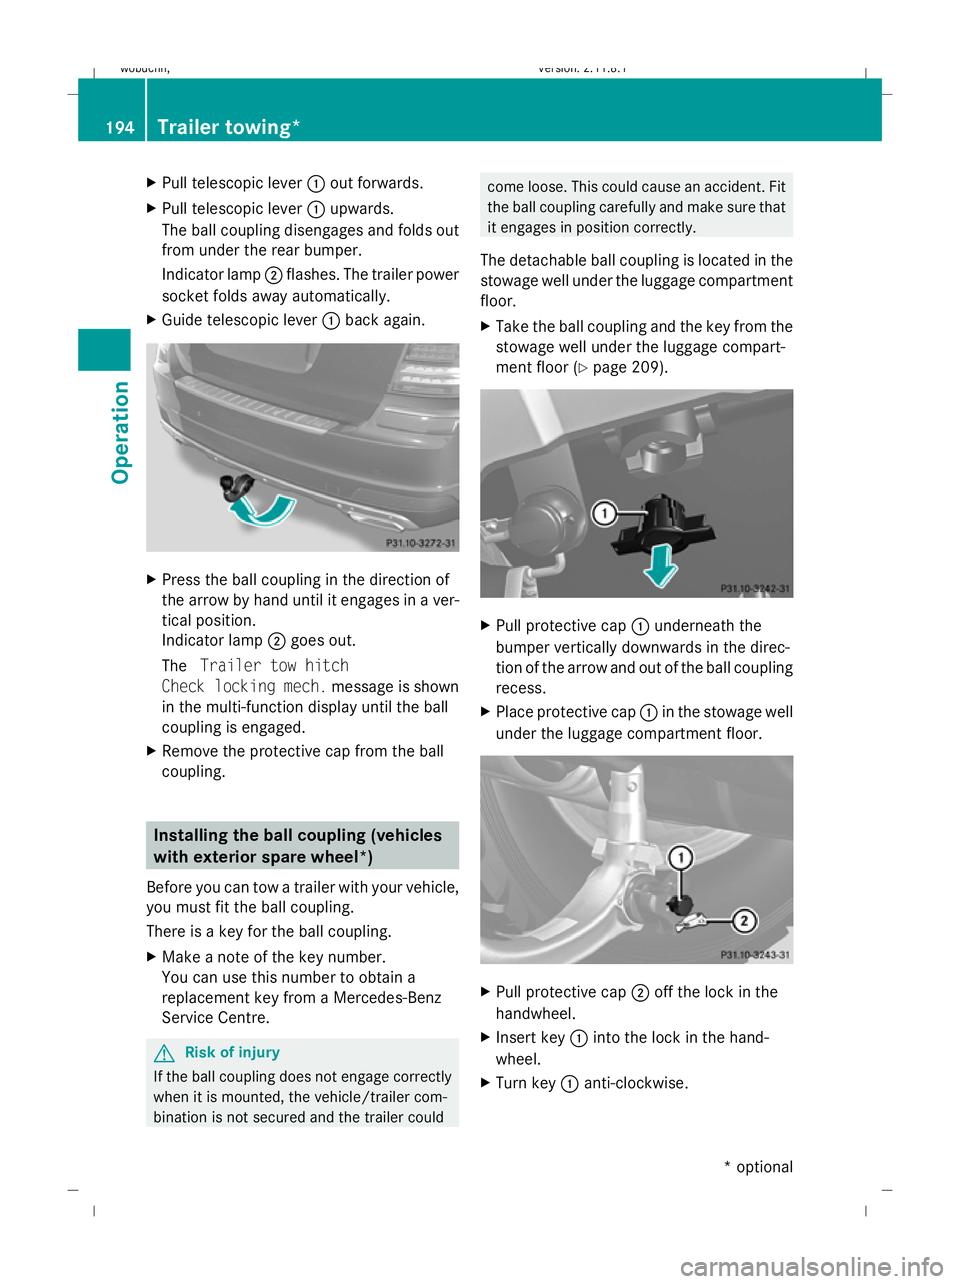
Pull telescopic lever :out forwards.
X Pull telescopic lever :upwards.
The ball coupling disengages and folds out
from under the rear bumper.
Indicator lamp ;flashes. The trailer power
socket folds away automatically.
X Guide telescopic lever :back again. X
Press the ball coupling in the direction of
the arrow by hand until it engages in a ver-
tical position.
Indicator lamp ;goes out.
The Trailer tow hitch
Check locking mech. message is shown
in the multi-function display until the ball
coupling is engaged.
X Remove the protective cap from the ball
coupling. Installing the ball coupling (vehicles
with exterior spare wheel*)
Before you can tow a trailer with your vehicle,
you must fit the ball coupling.
There is a key for the ball coupling.
X Make a note of the key number.
You can use this number to obtain a
replacement key from a Mercedes-Benz
Service Centre. G
Risk of injury
If the ball coupling does not engage correctly
when it is mounted, the vehicle/trailer com-
bination is not secured and the trailer could come loose. This could cause an accident. Fit
the ball coupling carefully and make sure that
it engages in position correctly.
The detachable ball coupling is located in the
stowage well under the luggage compartment
floor.
X Take the ball coupling and the key from the
stowage well under the luggage compart-
ment floor (Y page 209). X
Pull protective cap :underneath the
bumper vertically downwards in the direc-
tion of the arrow and out of the ball coupling
recess.
X Place protective cap :in the stowage well
under the luggage compartment floor. X
Pull protective cap ;off the lock in the
handwheel.
X Insert key :into the lock in the hand-
wheel.
X Turn key :anti-clockwise. 194
Trailer towing*Operation
* optional
X164_AKB; 2; 3, en-GB
wobuchh,
Version: 2.11.8.1 2009-03-31T14:14:58+02:00 - Seite 194
Dateiname: 6515431202_buchblock.pdf; erzeugt am 01. Apr 2009 00:17:51; WK
Page 203 of 309
The letters displayed range from
Afor a short
service duration (approx. 1 hour) to Hfor a
long service duration (approx. 8 hours).
The ASSYST PLUS service interval display
does not take into account any periods of
time during which the battery is disconnec-
ted.
Maintaining the time-dependent service
schedule:
X Note down the service due date displayed
before disconnecting the battery.
or
X Subtract the battery disconnection periods
from the service date shown on the display
after reconnecting the battery.
Hiding a service message X
Press the .reset button on the instru-
ment cluster (Y page 25).
Service overdue A display message is shown in the multi-func-
tion display, for example:
Service A exceeded by .. days
Service A exceeded by .. km
You will also hear a warning tone.
i If you fail to have the service performed
by the specified date, you may be violating
applicable laws. Your warranty may be inva-
lidated and goodwill settlements may be
refused.
Calling up a service due date X
Switch on the ignition.
X Press VorU to select the standard
display menu on the steering wheel
(Y page 99).
X Press &or* to select the service
information.
The multi-function display shows the
¯ symbol and the service due date. AdBlue
®
service indicator
i For Blue-TEC vehicles only.
The BlueTEC exhaust gas aftertreatment
must be operated with a reducing agent
(AdBlue ®
) in order for it to function correctly.
AdBlue ®
is topped up as part of maintenance
work. Under normal operating conditions, a
full tank of AdBlue ®
should last until the next
service due date.
Depending on how and where the vehicle is
used, there may be an increase in the
AdBlue ®
consumption. If the AdBlue ®
supply
does not last until the next service, it will be
necessary to top it up sooner.
The following messages tell you about the
AdBlue ®
supply:
Refill AdBlue at workshop See Own‐
er's Manual
Refill AdBlue at workshop No start
in: ... km
Before taking a trip with your vehicle outside
Europe, have the AdBlue ®
supply checked
and, if necessary, topped up at a qualified
specialist workshop. Before using your vehi-
cle for an extended period in countries out-
side Europe, contact a qualified specialist
workshop.
! Have the AdBlue ®
tank topped up at a
qualified specialist workshop only. The
vehicle may otherwise be damaged or
soiled.
Damage or consequential damage is not
covered by the Mercedes-Benz implied
warranty.
You can obtain general information about
BlueTEC exhaust gas aftertreatment and
AdBlue ®
from any Mercedes-Benz Service
Centre.
Further information about AdBlue ®
(Y page 288). 200
ServiceOperation
X164_AKB; 2; 3, en-GB
wobuchh,
Version: 2.11.8.1 2009-03-31T14:14:58+02:00 - Seite 200
Dateiname: 6515431202_buchblock.pdf; erzeugt am 01. Apr 2009 00:17:53; WK
Page 205 of 309
High-pressure cleaners
G
Risk of accident
Do not use high-pressure cleaners with circu-
lar-jet nozzles (dirt grinders) to clean your
vehicle, in particular the tyres. You could oth-
erwise damage the tyres and cause an acci-
dent.
! Observe the instructions issued by the
equipment manufacturer concerning the
distance to be maintained between the
nozzle of the high-pressure cleaner and the
vehicle (at least 30 cm).
Move the high-pressure cleaner nozzle
around when cleaning your vehicle.
Do not aim directly at any of the following:
R tyres
R door joint
R electrical components
R battery
R connectors
R lights
R seals
R trim elements
R ventilation slots
Damaged seals or electrical components
can lead to failures or leaks.
Cleaning the paintwork Scratches, corrosive deposits, areas affected
by corrosion and damage caused by inade-
quate care cannot always be completely
repaired. In such cases, visit a qualified spe-
cialist workshop immediately, e.g. a
Mercedes-Benz Service Centre.
X Remove the following types of dirt immedi-
ately, whilst avoiding rubbing too hard.
Soak:
R insect remains with insect remover
R bird droppings with water and rinse off the treated surface after-
wards.
Remove:
R
tree resin, oils, fuels and greases by rub-
bing gently with a cloth soaked in petro-
leum ether or lighter fluid.
R tar stain with tar remover
R wax with silicone remover
! Do not affix:
R stickers
R films
R magnetic plates or similar items
to painted surfaces. Otherwise, you could
damage the paintwork.
Cleaning the wheels !
Do not use acidic wheel cleaners to
remove brake dust. This could damage
wheel bolts and brake components.
Cleaning the windows X
Clean the inside and outside of the win-
dows with a damp cloth and a cleaning
product approved and recommended by
Mercedes-Benz.
! Clean the water drainage channels of the
windscreen and the rear window at regular
intervals. Under certain circumstances,
deposits such as leaves, petals and pollen
may prevent water from draining away
leading to corrosion damage.
Cleaning the wiper blades G
Risk of injury
Before cleaning the windscreen or wiper
blades, turn the key to position 0in the igni-
tion lock or press the Start/Stop button* until
all indicator lamps have gone out in the instru-
ment cluster. The windscreen wipers could
otherwise move and cause injury. 202
CareOperation
* optional
X164_AKB; 2; 3, en-GB
wobuchh,
Version: 2.11.8.1 2009-03-31T14:14:58+02:00 - Seite 202
Dateiname: 6515431202_buchblock.pdf; erzeugt am 01. Apr 2009 00:17:53; WK
Page 214 of 309
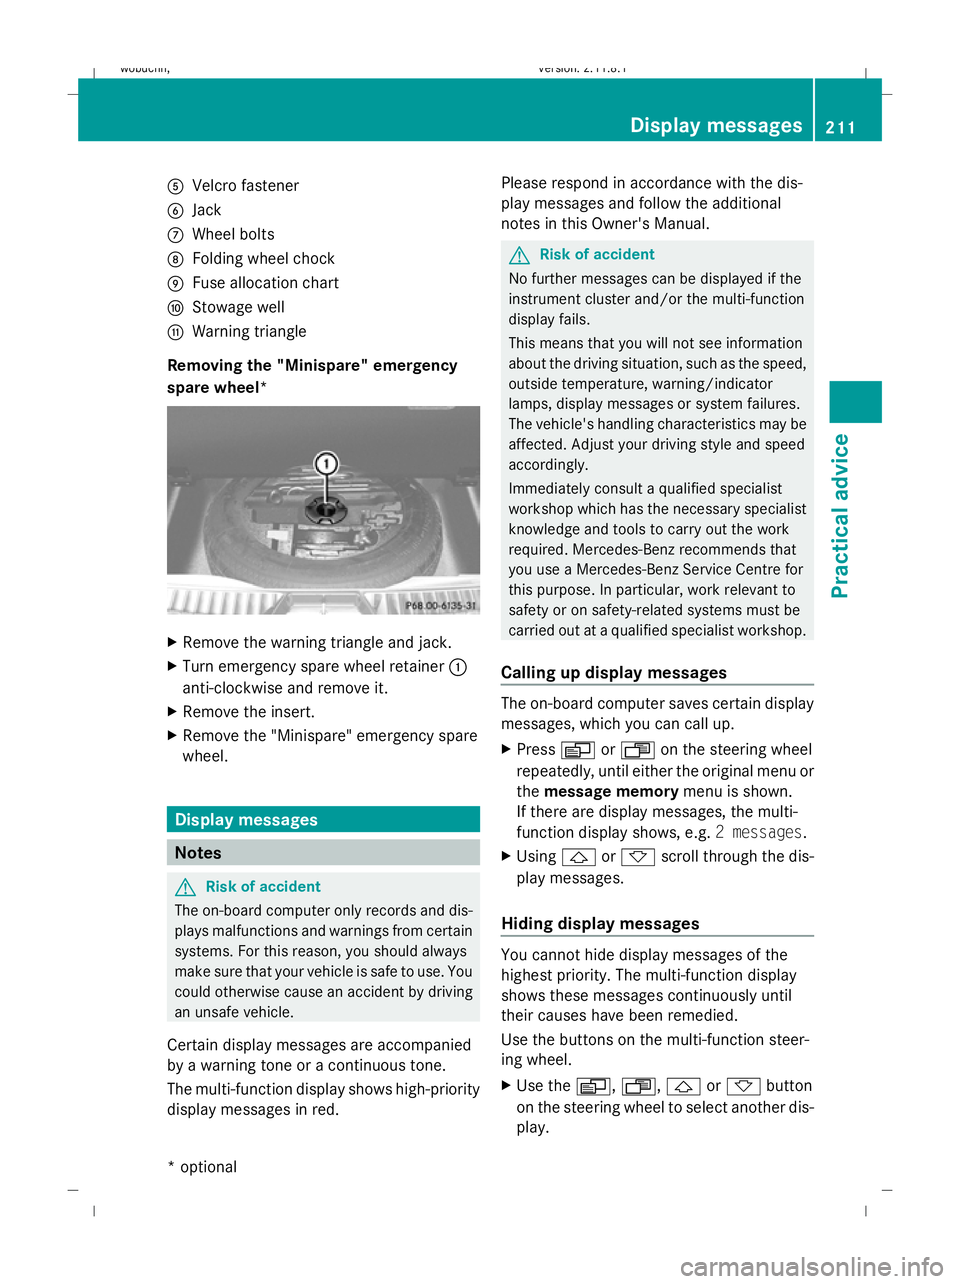
A
Velcro fastener
B Jack
C Wheel bolts
D Folding wheel chock
E Fuse allocation chart
F Stowage well
G Warning triangle
Removing the "Minispare" emergency
spare wheel* X
Remove the warning triangle and jack.
X Turn emergency spare wheel retainer :
anti-clockwise and remove it.
X Remove the insert.
X Remove the "Minispare" emergency spare
wheel. Display messages
Notes
G
Risk of accident
The on-board computer only records and dis-
plays malfunctions and warnings from certain
systems. For this reason, you should always
make sure that your vehicle is safe to use. You
could otherwise cause an accident by driving
an unsafe vehicle.
Certain display messages are accompanied
by a warning tone or a continuous tone.
The multi-function display shows high-priority
display messages in red. Please respond in accordance with the dis-
play messages and follow the additional
notes in this Owner's Manual. G
Risk of accident
No further messages can be displayed if the
instrument cluster and/or the multi-function
display fails.
This means that you will not see information
about the driving situation, such as the speed,
outside temperature, warning/indicator
lamps, display messages or system failures.
The vehicle's handling characteristics may be
affected. Adjust your driving style and speed
accordingly.
Immediately consult a qualified specialist
workshop which has the necessary specialist
knowledge and tools to carry out the work
required. Mercedes-Benz recommends that
you use a Mercedes-Benz Service Centre for
this purpose. In particular, work relevant to
safety or on safety-related systems must be
carried out at a qualified specialist workshop.
Calling up display messages The on-board computer saves certain display
messages, which you can call up.
X
Press VorU on the steering wheel
repeatedly, until either the original menu or
the message memory menu is shown.
If there are display messages, the multi-
function display shows, e.g. 2 messages.
X Using &or* scroll through the dis-
play messages.
Hiding display messages You cannot hide display messages of the
highest priority. The multi-function display
shows these messages continuously until
their causes have been remedied.
Use the buttons on the multi-function steer-
ing wheel.
X
Use the V,U,&or* button
on the steering wheel to select another dis-
play. Display messages
211Practical advice
* optional
X164_AKB; 2; 3, en-GB
wobuchh,
Version: 2.11.8.1 2009-03-31T14:14:58+02:00 - Seite 211 Z
Dateiname: 6515431202_buchblock.pdf; erzeugt am 01. Apr 2009 00:17:58; WK
Page 236 of 309
Troubleshooting
Points to remember
G
Risk of accident and injury
The operating safety of your vehicle could be compromised if service work is carried out improp-
erly. You could lose control of the vehicle and cause an accident. Safety systems may also not
be able to protect you or others as intended.
Always have maintenance work carried out at a qualified specialist workshop. The workshop must
have the necessary specialist knowledge and tools to carry out the work required. Mercedes-
Benz recommends that you use a Mercedes-Benz Service Centre for this purpose. In particular,
work relevant to safety or on safety-related systems must be carried out at a qualified specialist
workshop. Warning and indicator lamps in switches and buttons
Problem
Possible causes/consequences and
X
X Solutions One or all of the indica-
tor lamps in the seat
ventilation* button are
flashing. The seat ven-
tilation* has switched
off automatically. The on-board voltage is too low, because too many consumers are
switched on.
X Switch off consumers that are not required, e.g. rear window
heating or interior lighting.
Once the battery is sufficiently charged, the seat ventilation*
will switch back on automatically. One or all of the indica-
tor lamps in the seat
heating* button are
flashing. The seat heat-
ing* has switched off
automatically. The on-board voltage is too low, because too many consumers are
switched on.
X Switch off consumers that are not required, e.g. rear window
heating or interior lighting.
Once the battery is sufficiently charged, the seat ventilation*
will switch back on automatically. The steering wheel
heating* indicator lamp
on the lower left lever of
the steering column is
flashing. The on-board voltage is too low, because too many consumers are
switched on. The steering wheel heating* has switched off auto-
matically.
X Switch off consumers that are not required, e.g. rear window
heating or interior lighting.
Once the battery is sufficiently charged, the steering wheel
heating* will switch back on automatically. Troubleshooting
233Practical advice
* optional
X164_AKB; 2; 3, en-GB
wobuchh
,V ersion: 2.11.8.1
2009-03-31T14:14:58+02:00 - Seite 233 Z
Dateiname: 6515431202_buchblock.pdf; erzeugt am 01. Apr 2009 00:18:01; WK
Page 256 of 309
X
Press resetting tool :downwards until
you hear the head restraint deployment
mechanism engage.
X Pull out resetting tool :.
X Firmly press back the head restraint cush-
ion until it engages =.
X Repeat this procedure for the second head
restraint. Replacing batteries (key and remote
control) Notes
It is advisable to have the batteries replaced
at a qualified specialist workshop, e.g. at a
Mercedes-Benz Service Centre. G
Risk of poisoning
Batteries contain toxic and caustic substan-
ces. For this reason, keep batteries away from
children.
If a battery is swallowed, consult a doctor
immediately. H
Environmental note
Do not dispose of batteries with the house-
hold rubbish. They contain highly toxic sub-
stances.
Take discharged batteries to a qualified spe-
cialist workshop, e.g. a Mercedes-Benz
Service Centre, or to a special collection point
for old batteries. Key
Checking the batteries X
Press the &or% button.
The batteries are in working order if the
battery charge indicator lamp lights up
briefly. Changing batteries (key with KEYLESS
GO*) You require two CR 2025 3 V cell batteries.
X
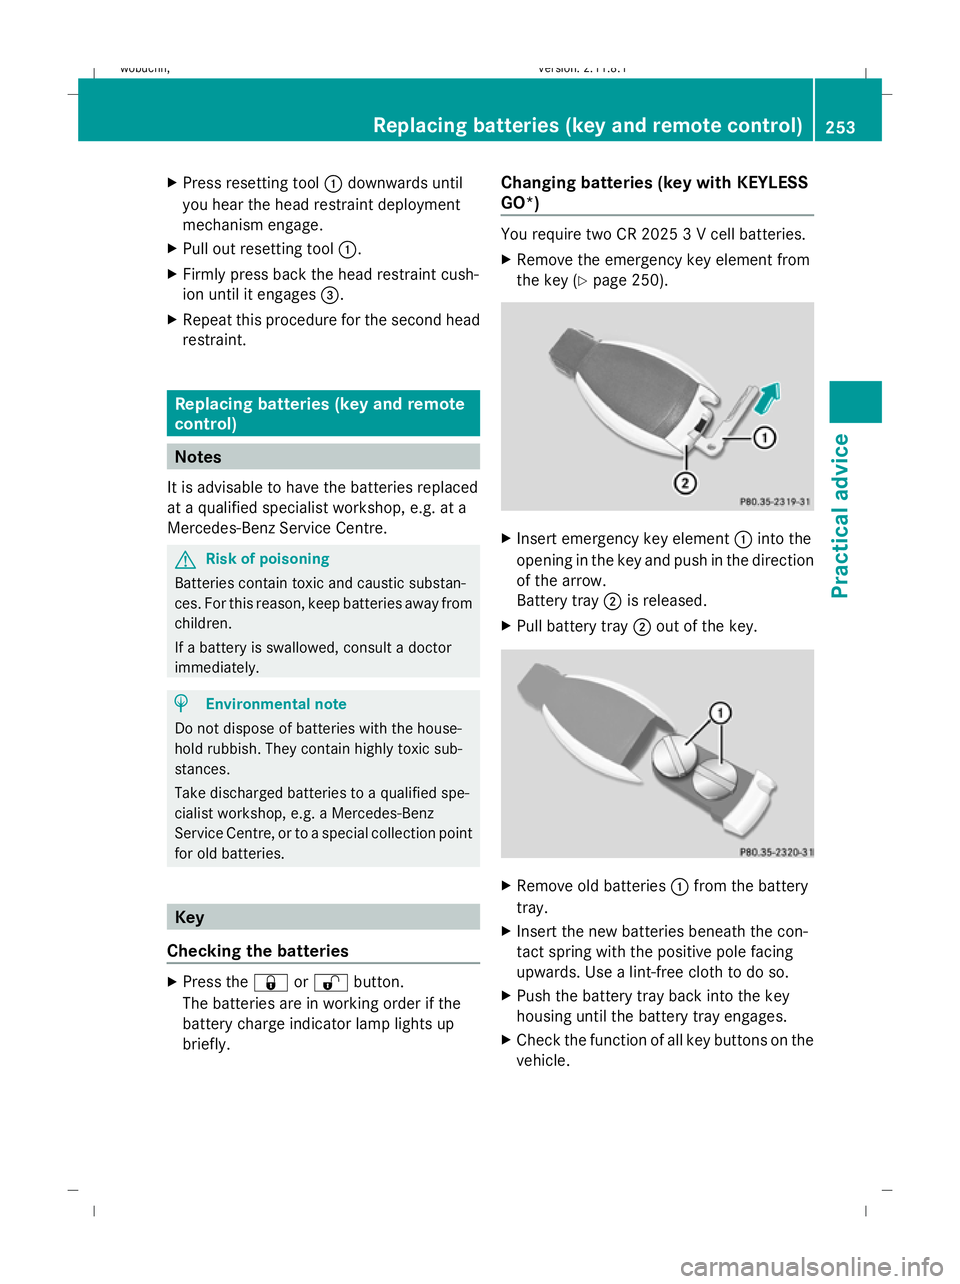
Remove the emergency key element from
the key (Y page 250). X
Insert emergency key element :into the
opening in the key and push in the direction
of the arrow.
Battery tray ;is released.
X Pull battery tray ;out of the key. X
Remove old batteries :from the battery
tray.
X Insert the new batteries beneath the con-
tact spring with the positive pole facing
upwards. Use a lint-free cloth to do so.
X Push the battery tray back into the key
housing until the battery tray engages.
X Check the function of all key buttons on the
vehicle. Replacing batteries (key and remote control)
253Practical advice
X164_AKB; 2; 3, en-GB
wobuchh,Version: 2.11.8.1 2009-03-31T14:14:58+02:00 - Seite 253 Z
Dateiname: 6515431202_buchblock.pdf; erzeugt am 01. Apr 2009 00:18:04; WK
Page 276 of 309
R
never touch the battery first. To discharge
a possible electrostatic charge, step out of
the vehicle first and touch the bodywork.
R do not wipe the battery using a cloth. The
battery may explode as a result of electro-
static charge or due to flying sparks.
! Before loosening the terminal clamps of
the battery, switch off the engine and
remove the key or, on vehicles with KEY-
LESS GO*, make sure that the ignition is
not switched on. In the instrument cluster,
all of the indicator lamps must be out. Oth-
erwise, you may destroy electronic compo-
nents, such as the alternator.
i Mercedes-Benz recommends that you
have work involving the battery, e.g.
removal, charging and replacement, car-
ried out at a qualified specialist workshop,
e.g. a Mercedes-Benz Service Centre.
The battery is located under the front seat on
the right-hand side when viewed in the direc-
tion of travel. Disconnecting the battery
G
Risk of accident
If the battery is disconnected:
R the brake boosting effect will not be avail-
able. Greater braking force will then be
required and brake pedal travel will be lon-
ger. If necessary, depress the brake pedal
with maximum force.
R the transmission is locked in position P
! Always disconnect the battery in
the order described below. Never swap the
battery terminals. You may otherwise dam-
age the vehicle electronics. X
Firmly depress the parking brake and move
the transmission to position P.
X Position the right-hand front seat as far for-
wards as possible.
X Switch off all electrical consumers (e.g.
radio, blower, etc.). X
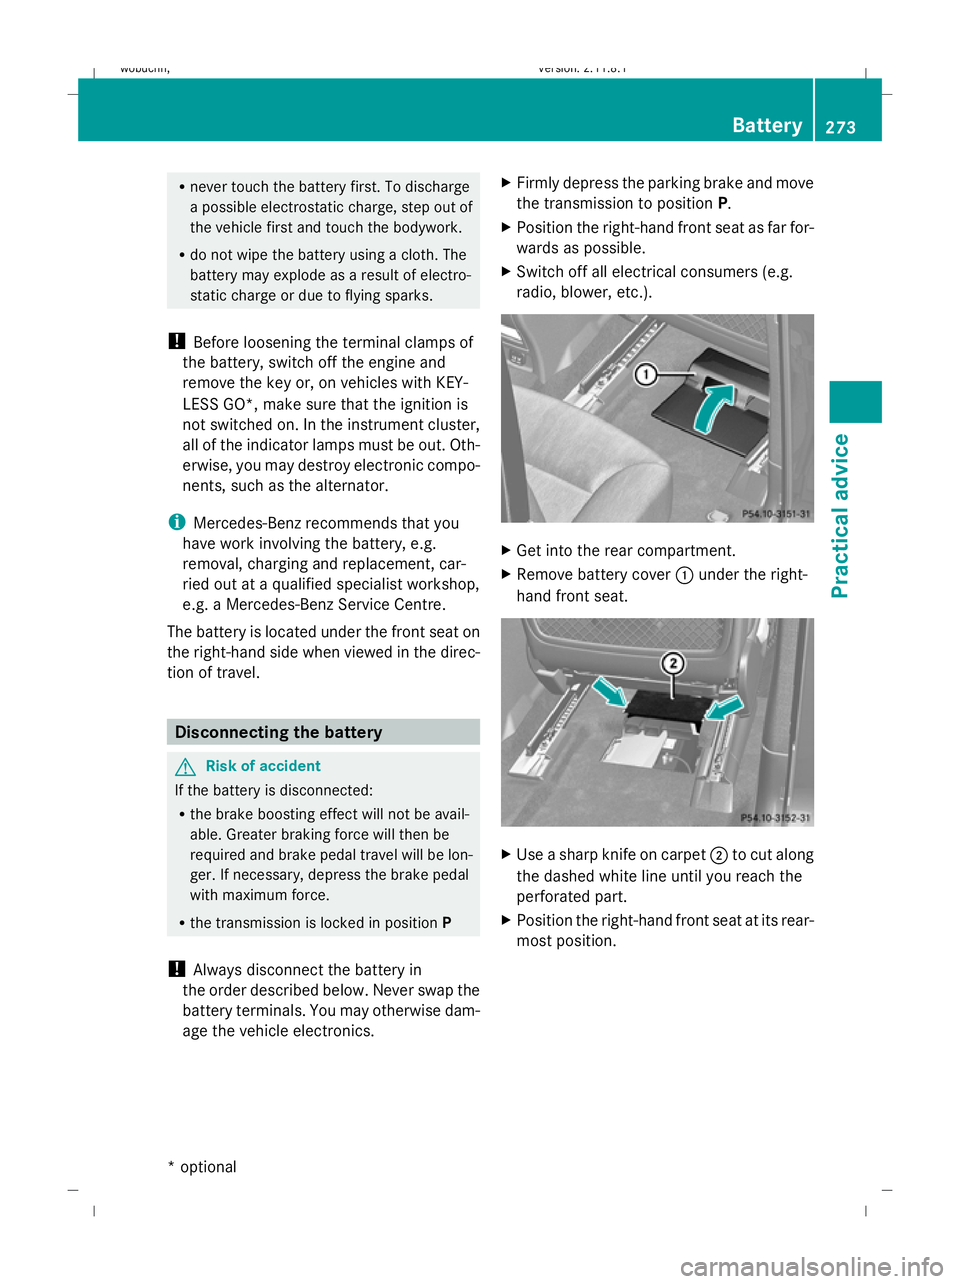
Get into the rear compartment.
X Remove battery cover :under the right-
hand front seat. X
Use a sharp knife on carpet ;to cut along
the dashed white line until you reach the
perforated part.
X Position the right-hand front seat at its rear-
most position. Battery
273Practical advice
* optional
X164_AKB; 2; 3, en-GB
wobuchh,
Version: 2.11.8.1 2009-03-31T14:14:58+02:00 - Seite 273 Z
Dateiname: 6515431202_buchblock.pdf; erzeugt am 01. Apr 2009 00:18:14; WK