2009 MERCEDES-BENZ GL SUV roof
[x] Cancel search: roofPage 59 of 309
R
the sliding/tilting sunroof* is closed.
R there are no objects, e.g. mascots, hang-
ing on the rear-view mirror or on the grab
handles on the roof trim.
This will prevent false alarms.
X Make sure that all the doors and the tail-
gate are closed.
X Lock the vehicle with the key or, on vehicles
with KEYLESS GO*, also using the locking
button on the door handle.
The interior motion sensor is primed after
approximately 40 seconds.
Deactivating the interior motion sensor When you unlock your vehicle using the key
or KEYLESS GO *,the interior motion sensor
is automatically deactivated.
To prevent a false alarm, deactivate the inte-
rior motion sensor if you lock your vehicle
and:
R people or animals remain in the vehicle.
R a side window remains open.
R a hinged side window* remains open.
R the sliding/tilting sunroof* remains open.
It is possible to deactivate the interior motion
sensor using the on-board computer for the
next time the vehicle is locked
(Y page 109). The interior motion sensor
remains deactivated until you unlock and lock
the vehicle again.
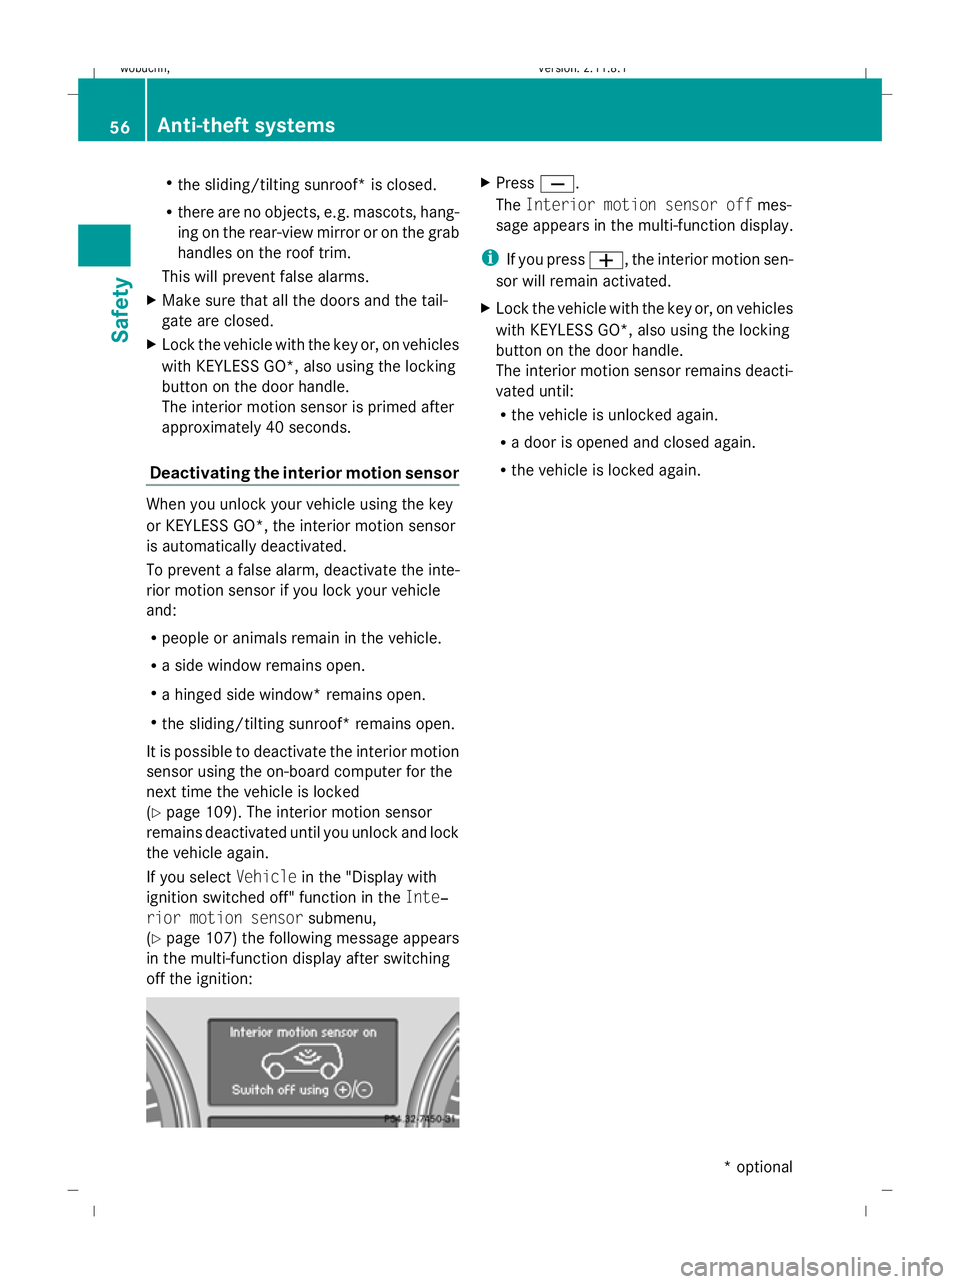
If you select Vehiclein the "Display with
ignition switched off" function in the Inte‐
rior motion sensor submenu,
(Y page 107) the following message appears
in the multi-function display after switching
off the ignition: X
Press X.
The Interior motion sensor off mes-
sage appears in the multi-function display.
i If you press W, the interior motion sen-
sor will remain activated.
X Lock the vehicle with the key or, on vehicles
with KEYLESS GO*, also using the locking
button on the door handle.
The interior motion sensor remains deacti-
vated until:
R
the vehicle is unlocked again.
R a door is opened and closed again.
R the vehicle is locked again. 56
Anti-theft systemsSafety
* optional
X164_AKB; 2; 3, en-GB
wobuchh
,V ersion: 2.11.8.1
2009-03-31T14:14:58+02:00 - Seite 56
Dateiname: 6515431202_buchblock.pdf; erzeugt am 01. Apr 2009 00:16:50; WK
Page 60 of 309
Opening and closing
...........................58
Tailgate ................................................ 60
Key positions ....................................... 63
Seats .................................................... 64
Steering wheel .................................... 70
Mirrors ................................................. 72
Memory functions* .............................74
Seat belts ............................................. 75
Lights ................................................... 78
Windscreen wipers .............................84
Side windows ...................................... 85
Driving and parking ............................88
Transmission ....................................... 91
Instrument cluster ..............................96
On-board computer .............................97
Off-road driving ................................. 112
Driving systems ................................ 117
Air conditioning ................................. 136
Sliding sunroof .................................. 149
Loading and stowing ........................151
Features ............................................. 161 57Controls
X164_AKB; 2; 3, en-GB
wobuchh,
Version: 2.11.8.1 2009-03-31T14:14:58+02:00 - Seite 57
Dateiname: 6515431202_buchblock.pdf; erzeugt am 01. Apr 2009 00:16:51; WK
Page 62 of 309
Individual settings
You can change the setting of the locking
system in such a way that only the driver's
door and the fuel filler flap are unlocked. This
could be useful if you frequently travel on your
own.
X To change the setting: press the%
and & buttons simultaneously for
approximately six seconds until the battery
check lamp flashes twice.
The key now functions as follows:
X To unlock the driver's door: press the
% button once.
X To unlock centrally: press the%but-
ton twice.
X To lock centrally: press the&button.
The KEYLESS GO* function is changed as fol-
lows:
X To unlock the driver's door: touch the
inner surface of the door handle on the
driver's door.
X To unlock centrally: touch the inner sur-
face of the door handle on the front-
passenger door or the rear door.
X To lock centrally: press locking but-
ton :on one of the door handles.
Restoring the factory settings X
Press the %and& buttons simulta-
neously for approximately six seconds until
the battery check lamp flashes twice.
Additional information R
Convenience opening (Y page 87)
R Convenience closing (Y page 87)
R Opening and closing in an emergency
(Y page 250) Opening the doors from the inside
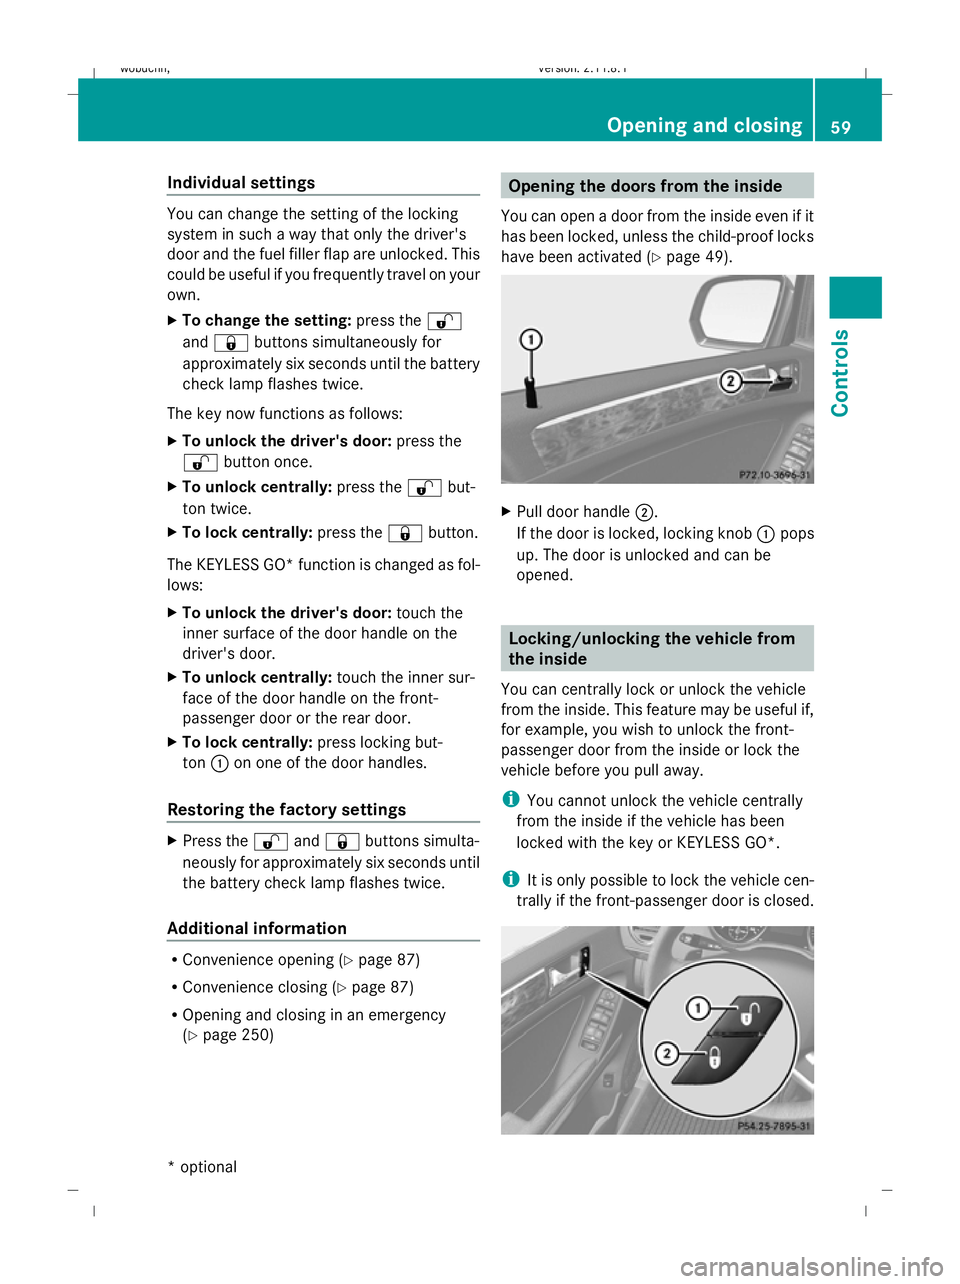
You can open a door from the inside even if it
has been locked, unless the child-proof locks
have been activated ( Ypage 49). X
Pull door handle ;.
If the door is locked, locking knob :pops
up. The door is unlocked and can be
opened. Locking/unlocking the vehicle from
the inside
You can centrally lock or unlock the vehicle
from the inside. This feature may be useful if,
for example, you wish to unlock the front-
passenger door from the inside or lock the
vehicle before you pull away.
i You cannot unlock the vehicle centrally
from the inside if the vehicle has been
locked with the key or KEYLESS GO*.
i It is only possible to lock the vehicle cen-
trally if the front-passenger door is closed. Opening and closing
59Controls
* optional
X164_AKB; 2; 3, en-GB
wobuchh,
Version: 2.11.8.1 2009-03-31T14:14:58+02:00 - Seite 59 Z
Dateiname: 6515431202_buchblock.pdf; erzeugt am 01. Apr 2009 00:16:52; WK
Page 73 of 309
X
Make sure that the key is in position 1or
2 in the ignition lock.
X To switch on: press button:repeatedly
until the required ventilation level is set.
i If you open the side windows and the slid-
ing/tilting sunroof* using the key
(Y page 87), the seat ventilation of the
driver's seat automatically switches to the
highest level.
X To switch off: press button:repeatedly
until all indicator lamps go out.
i If the battery voltage is too low, the seat
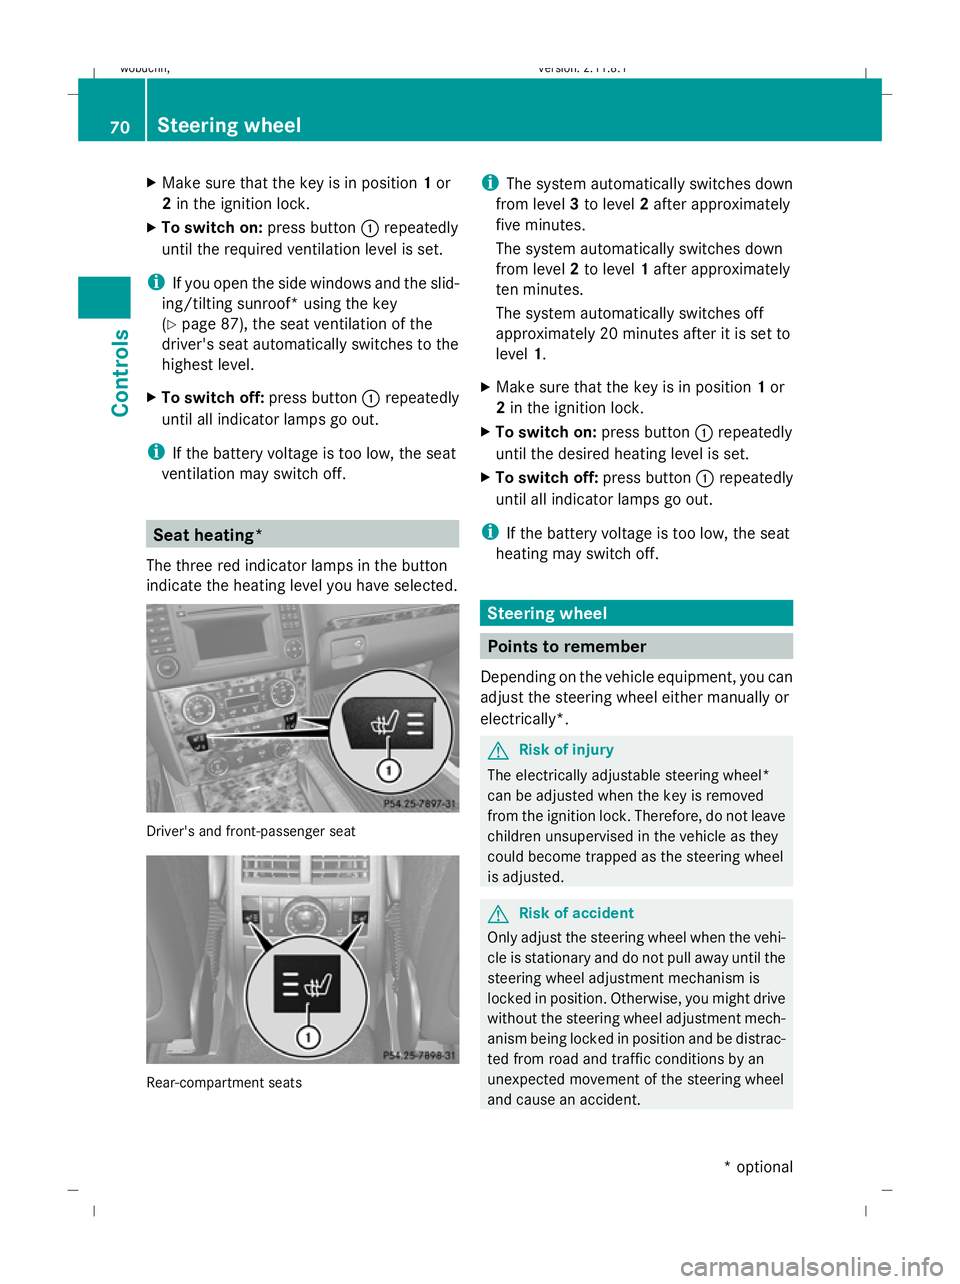
ventilation may switch off. Seat heating*
The three red indicator lamps in the button
indicate the heating level you have selected. Driver's and front-passenger seat
Rear-compartment seats i
The system automatically switches down
from level 3to level 2after approximately
five minutes.
The system automatically switches down
from level 2to level 1after approximately
ten minutes.
The system automatically switches off
approximately 20 minutes after it is set to
level 1.
X Make sure that the key is in position 1or
2 in the ignition lock.
X To switch on: press button:repeatedly
until the desired heating level is set.
X To switch off: press button:repeatedly
until all indicator lamps go out.
i If the battery voltage is too low, the seat
heating may switch off. Steering wheel
Points to remember
Depending on the vehicle equipment, you can
adjust the steering wheel either manually or
electrically*. G
Risk of injury
The electrically adjustable steering wheel*
can be adjusted when the key is removed
from the ignition lock. Therefore, do not leave
children unsupervised in the vehicle as they
could become trapped as the steering wheel
is adjusted. G
Risk of accident
Only adjust the steering wheel when the vehi-
cle is stationary and do not pull away until the
steering wheel adjustment mechanism is
locked in position. Otherwise, you might drive
without the steering wheel adjustment mech-
anism being locked in position and be distrac-
ted from road and traffic conditions by an
unexpected movement of the steering wheel
and cause an accident. 70
Steering wheelControls
* optional
X164_AKB; 2; 3, en-GB
wobuchh,
Version: 2.11.8.1 2009-03-31T14:14:58+02:00 - Seite 70
Dateiname: 6515431202_buchblock.pdf; erzeugt am 01. Apr 2009 00:17:02; WK
Page 88 of 309
Rear window wiper
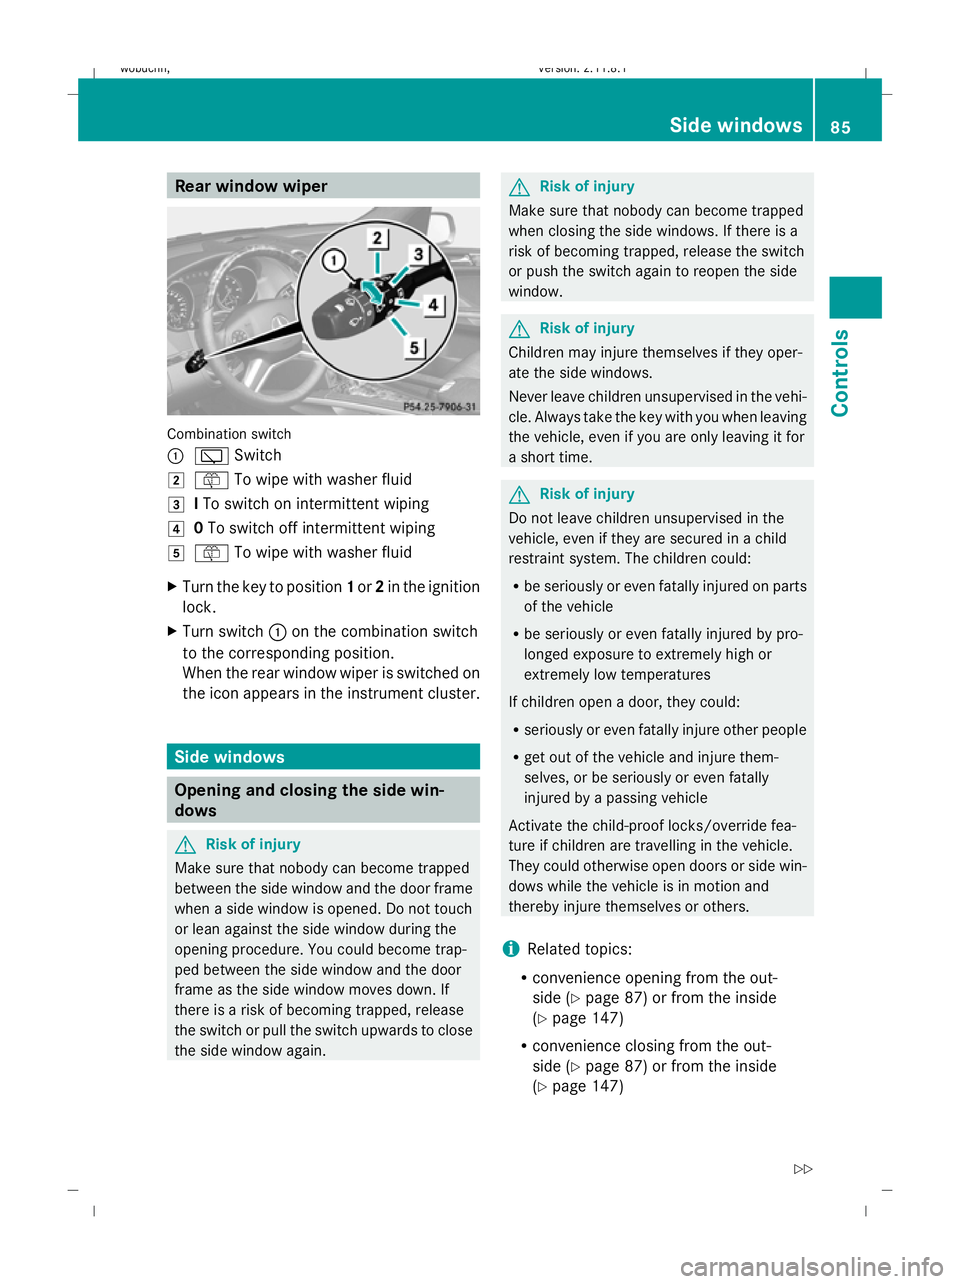
Combination switch
:
è Switch
2 ô To wipe with washer fluid
3 ITo switch on intermittent wiping
4 0To switch off intermittent wiping
5 ô To wipe with washer fluid
X Turn the key to position 1or 2in the ignition
lock.
X Turn switch :on the combination switch
to the corresponding position.
When the rear window wiper is switched on
the icon appears in the instrument cluster. Side windows
Opening and closing the side win-
dows G
Risk of injury
Make sure that nobody can become trapped
between the side window and the door frame
when a side window is opened. Do not touch
or lean against the side window during the
opening procedure. You could become trap-
ped between the side window and the door
frame as the side window moves down. If
there is a risk of becoming trapped, release
the switch or pull the switch upwards to close
the side window again. G
Risk of injury
Make sure that nobody can become trapped
when closing the side windows. If there is a
risk of becoming trapped, release the switch
or push the switch again to reopen the side
window. G
Risk of injury
Children may injure themselves if they oper-
ate the side windows.
Never leave children unsupervised in the vehi-
cle. Always take the key with you when leaving
the vehicle, even if you are only leaving it for
a short time. G
Risk of injury
Do not leave children unsupervised in the
vehicle, even if they are secured in a child
restraint system. The children could:
R be seriously or even fatally injured on parts
of the vehicle
R be seriously or even fatally injured by pro-
longed exposure to extremely high or
extremely low temperatures
If children open a door, they could:
R seriously or even fatally injure other people
R get out of the vehicle and injure them-
selves, or be seriously or even fatally
injured by a passing vehicle
Activate the child-proof locks/override fea-
ture if children are travelling in the vehicle.
They could otherwise open doors or side win-
dows while the vehicle is in motion and
thereby injure themselves or others.
i Related topics:
R convenience opening from the out-
side (Y page 87) or from the inside
(Y page 147)
R convenience closing from the out-
side (Y page 87) or from the inside
(Y page 147) Side windows
85Controls
X164_AKB; 2; 3, en-GB
wobuchh, Version: 2.11.8.1 2009-03-31T14:14:58+02:00 - Seite 85 Z
Dateiname: 6515431202_buchblock.pdf; erzeugt am 01. Apr 2009 00:17:09; WK
Page 90 of 309
G
Risk of injury
Make sure that nobody can become trapped
as you close the hinged side windows. If there
is a risk of becoming trapped, release the
switch or push the switch again to reopen the
side window.
i Related topics:
R convenience opening (Y page 87)
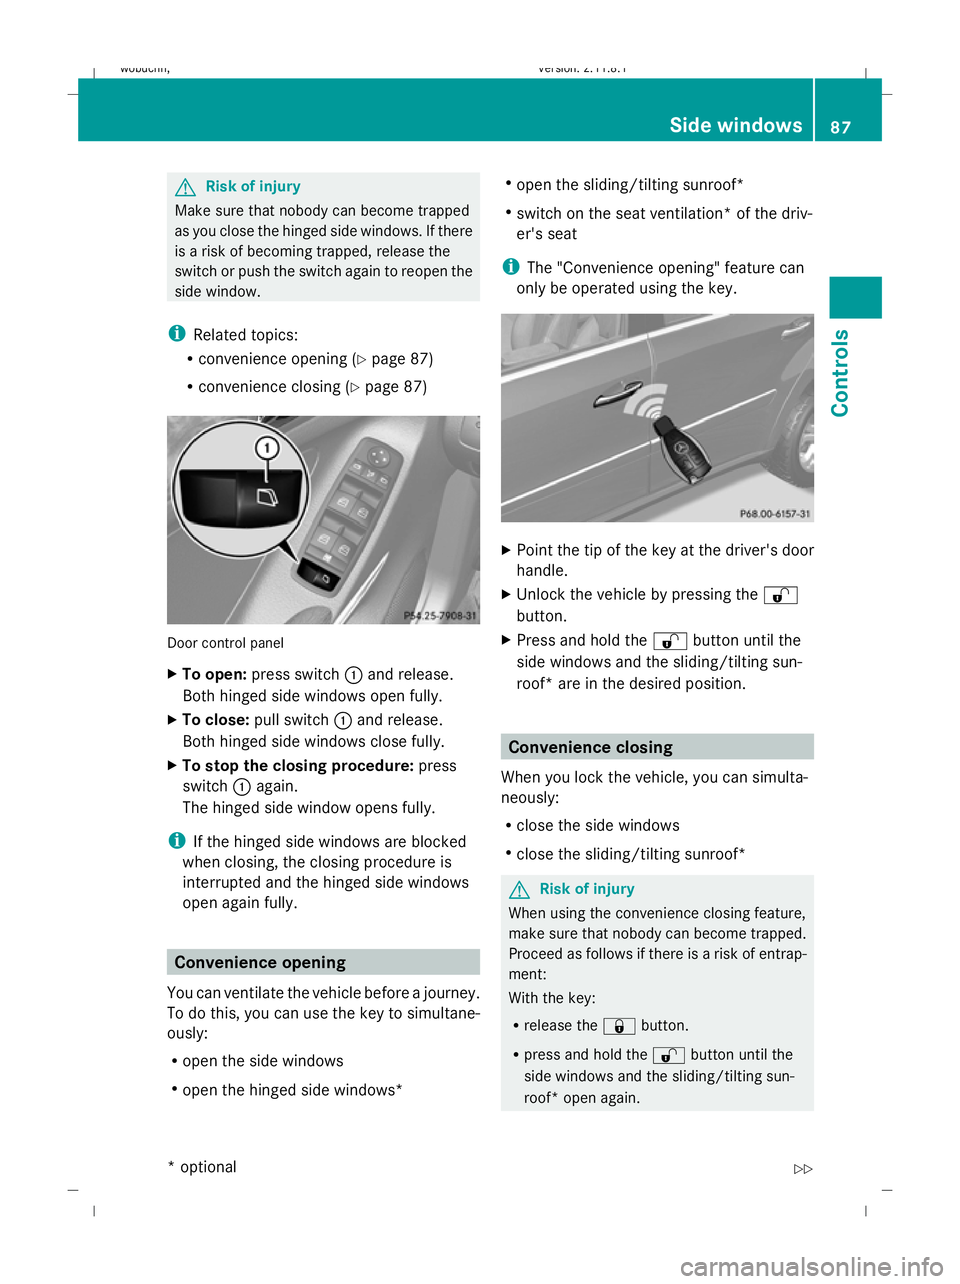
R convenience closing (Y page 87) Door control panel
X
To open: press switch :and release.
Both hinged side windows open fully.
X To close: pull switch :and release.
Both hinged side windows close fully.
X To stop the closing procedure: press
switch :again.
The hinged side window opens fully.
i If the hinged side windows are blocked
when closing, the closing procedure is
interrupted and the hinged side windows
open again fully. Convenience opening
You can ventilate the vehicle before a journey.
To do this, you can use the key to simultane-
ously:
R open the side windows
R open the hinged side windows* R
open the sliding/tilting sunroof*
R switch on the seat ventilation* of the driv-
er's seat
i The "Convenience opening" feature can
only be operated using the key. X
Point the tip of the key at the driver's door
handle.
X Unlock the vehicle by pressing the %
button.
X Press and hold the %button until the
side windows and the sliding/tilting sun-
roof* are in the desired position. Convenience closing
When you lock the vehicle, you can simulta-
neously:
R close the side windows
R close the sliding/tilting sunroof* G
Risk of injury
When using the convenience closing feature,
make sure that nobody can become trapped.
Proceed as follows if there is a risk of entrap-
ment:
With the key:
R release the &button.
R press and hold the %button until the
side windows and the sliding/tilting sun-
roof* open again. Side windows
87Controls
* optional
X164_AKB; 2; 3, en-GB
wobuchh,
Version: 2.11.8.1 2009-03-31T14:14:58+02:00 - Seite 87 Z
Dateiname: 6515431202_buchblock.pdf; erzeugt am 01. Apr 2009 00:17:10; WK
Page 91 of 309
With KEYLESS GO*:
R
release the locking button on the door han-
dle.
R pull the door handle immediately and hold
it.
The side windows and the sliding/tilting
sunroof* open.
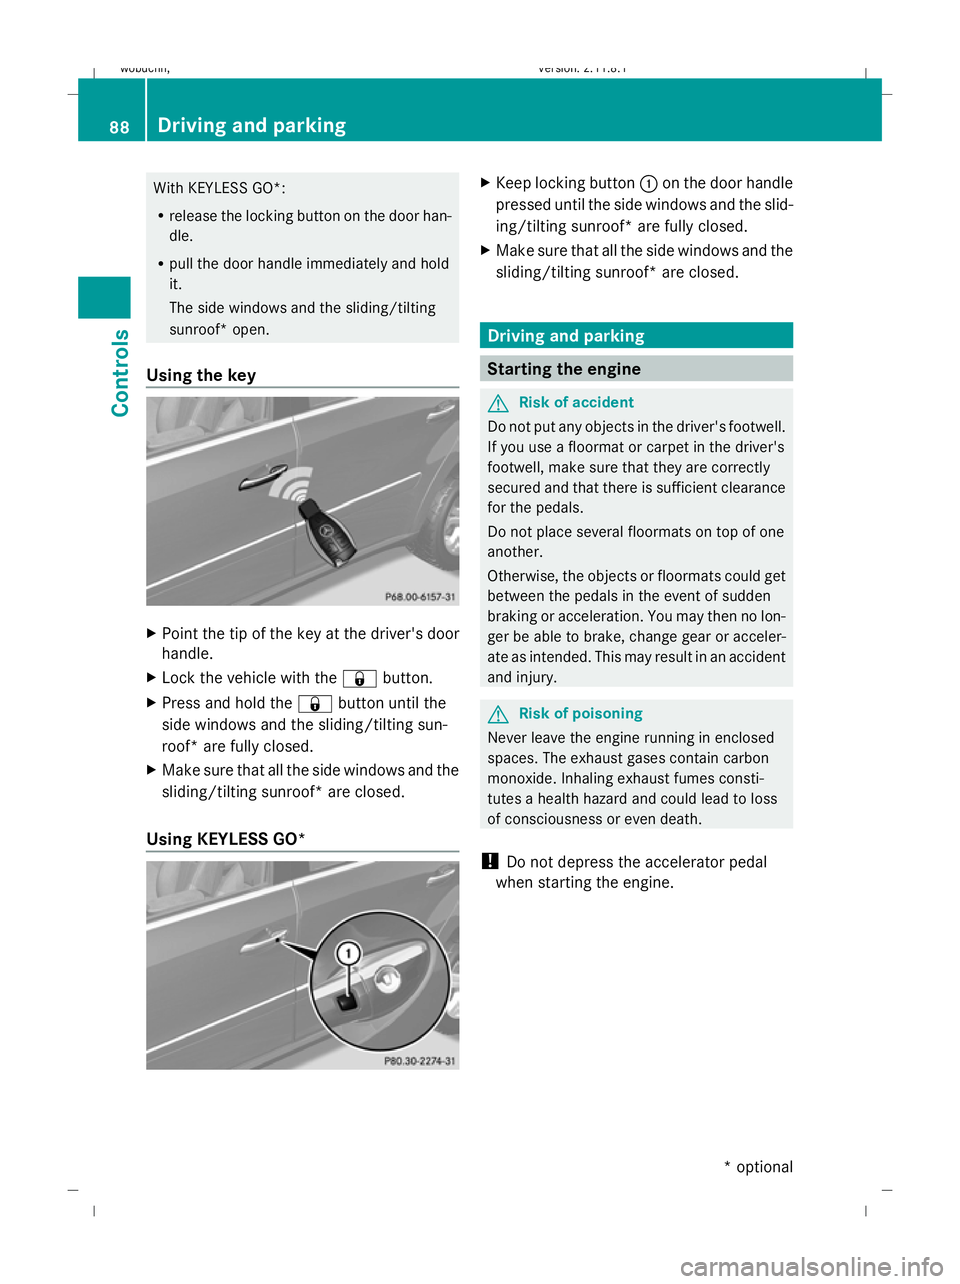
Using the key X
Point the tip of the key at the driver's door
handle.
X Lock the vehicle with the &button.
X Press and hold the &button until the
side windows and the sliding/tilting sun-
roof* are fully closed.
X Make sure that all the side windows and the
sliding/tilting sunroof* are closed.
Using KEYLESS GO* X
Keep locking button :on the door handle
pressed until the side windows and the slid-
ing/tilting sunroof* are fully closed.
X Make sure that all the side windows and the
sliding/tilting sunroof* are closed. Driving and parking
Starting the engine
G
Risk of accident
Do not put any objects in the driver's footwell.
If you use a floormat or carpet in the driver's
footwell, make sure that they are correctly
secured and that there is sufficient clearance
for the pedals.
Do not place several floormats on top of one
another.
Otherwise, the objects or floormats could get
between the pedals in the event of sudden
braking or acceleration. You may then no lon-
ger be able to brake, change gear or acceler-
ate as intended. This may result in an accident
and injury. G
Risk of poisoning
Never leave the engine running in enclosed
spaces. The exhaust gases contain carbon
monoxide. Inhaling exhaust fumes consti-
tutes a health hazard and could lead to loss
of consciousness or even death.
! Do not depress the accelerator pedal
when starting the engine. 88
Driving and parkingControls
* optional
X164_AKB; 2; 3, en-GB
wobuchh,
Version: 2.11.8.1 2009-03-31T14:14:58+02:00 - Seite 88
Dateiname: 6515431202_buchblock.pdf; erzeugt am 01. Apr 2009 00:17:10; WK
Page 137 of 309
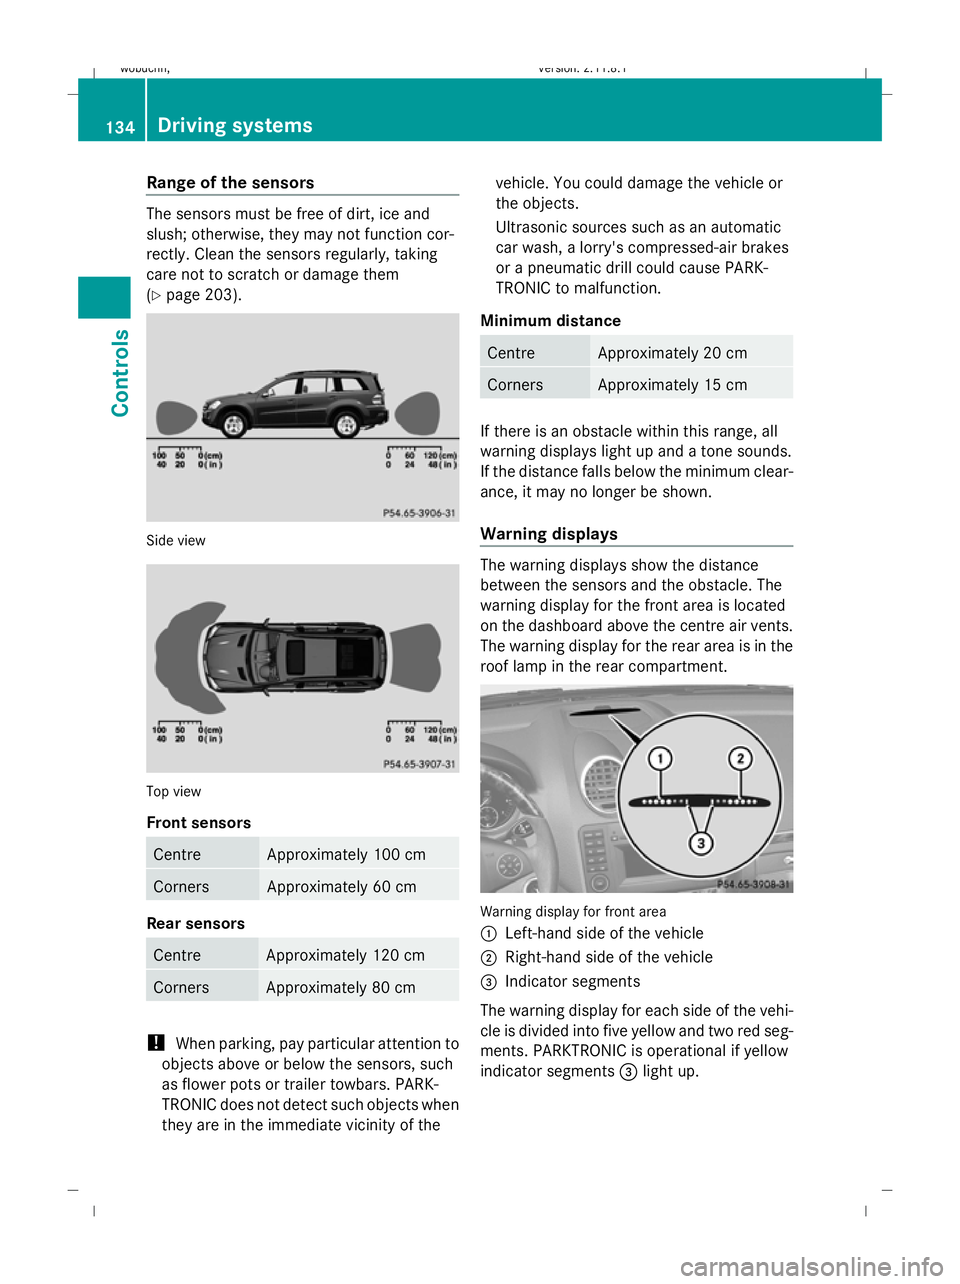
Range of the sensors
The sensors must be free of dirt, ice and
slush; otherwise, they may not function cor-
rectly. Clean the sensors regularly, taking
care not to scratch or damage them
(Y page 203). Side view
Top view
Front sensors
Centre Approximately 100 cm
Corners Approximately 60 cm
Rear sensors
Centre Approximately 120 cm
Corners Approximately 80 cm
!
When parking, pay particular attention to
objects above or below the sensors, such
as flower pots or trailer towbars. PARK-
TRONIC does not detect such objects when
they are in the immediate vicinity of the vehicle. You could damage the vehicle or
the objects.
Ultrasonic sources such as an automatic
car wash, a lorry's compressed-air brakes
or a pneumatic drill could cause PARK-
TRONIC to malfunction.
Minimum distance Centre Approximately 20 cm
Corners Approximately 15 cm
If there is an obstacle within this range, all
warning displays light up and a tone sounds.
If the distance falls below the minimum clear-
ance, it may no longer be shown.
Warning displays The warning displays show the distance
between the sensors and the obstacle. The
warning display for the front area is located
on the dashboard above the centre air vents.
The warning display for the rear area is in the
roof lamp in the rear compartment. Warning display for front area
:
Left-hand side of the vehicle
; Right-hand side of the vehicle
= Indicator segments
The warning display for each side of the vehi-
cle is divided into five yellow and two red seg-
ments. PARKTRONIC is operational if yellow
indicator segments =light up. 134
Driving systemsControls
X164_AKB; 2; 3, en-GB
wobuchh,
Version: 2.11.8.1 2009-03-31T14:14:58+02:00 - Seite 134
Dateiname: 6515431202_buchblock.pdf; erzeugt am 01. Apr 2009 00:17:26; WK