2009 MERCEDES-BENZ GL SUV key battery
[x] Cancel search: key batteryPage 8 of 309

Automatic transmission
DIRECT SELECT lever .......................92
Display mes-
sage .............................. 213, 216, 217
Driving tips ...................................... 94
Emergency running mode ..............244
Gear indicator .................................. 93
Kickdown ......................................... 94
Malfunction ................................... .244
Program selector button ..................95
Shift ranges ..................................... 94
Trailer towing ................................... 94
Transmission positions ....................93
Auxiliary heating ............................... 147
Display message .................... 231, 232
Notes ............................................. 147
Remote control .............................. 148
Setting (on-board computer) .......... 107
Auxiliary ventilation ..........................147 B
Backrest angle Adjusting (2nd row of seats) ............67
Ball coupling
Fitting ............................................ 194
Folding in ....................................... 198
Folding out ..................................... 193
Removing ....................................... 198
BAS (Brake Assist) ............................... 50
Battery Changing (auxiliary heating
remote control) .............................. 254
Charging ........................................ 275
Checking (key) ............................... 253
Check lamp (key )........................... 253
Disconnecting ................................ 273
Display message ............................ 220
Jump-starting ................................. 276
Maintenance (vehicle) .................... 272
Reconnecting ................................. 276
Removing/fitting ........................... 274
Vehicle battery .............................. 272
Belt force limiters
Activation ......................................... 35
Belt height adjustment .......................77
Belt reel (Easy-Pack fix kit) ..............160Belt tensioners
Activation ......................................... 35
Belt warning ......................................... 77
BlueTEC
AdBlue ®
......................................... 288
Bonnet
Bonnet catch ................................. 175
Display message ............................ 219
Opening/closing ........................... 174
Bonnet release lever
Release leve r................................. 175
Boot
Automatic opening ........................... 62
Boot lid
Opening/closing .............................. 60
Brake Assist
See BAS ........................................... 50
Brake fluid .......................................... 291
Display message ............................ 221
Brake lamps
Adaptive .......................................... .51
Display message ............................ 226
Brakes
Parking brake ................................... 91
Warning lamp ........................ 235, 236
Brake system
Display message ............................ 220
Bulbs .................................................. 254
Brake lamp .................................... 260
Dipped-beam headlamps ...............258
Display message ............................ 225
Licence plate lamp ......................... 260
Main-beam headlamps ................... 258
Overview ........................................ 256
Parking lamp .......................... 258, 260
Rear foglamp ................................. 260
Replacing .............................. .258, 259
Reversing lamp .............................. 260
Side lamp ....................................... 258
Tail lamp ........................................ 260
Turn signal lamp ....................258, 260
see Lamp Index
5 X164_AKB; 2; 3, en-GB
wobuchh,
Version: 2.11.8.1
2009-03-31T14:14:58+02:00 - Seite 5Dateiname: 6515431202_buchblock.pdf; erzeugt am 01. Apr 2009 00:16:29; WK
Page 13 of 309

Overview
.......................................... 25
Selecting the language (on-board
computer) ...................................... 104
Instrument lighting .............................25
Intelligent Light System Menu (on-board computer) ............106
Interior lighting
Ambient lighting (on-board com-
puter) ............................................. 106
Automatic control system ................84
Delayed switch-off (on-board
computer) ...................................... 106
Emergency lighting ..........................84
Manual control ................................ .83
Reading lamp ................................... 83
Interior motion sensor ........................55
Activating/deactivating (on-
board computer) ............................ 110
ISOFIX child seat securing system ....47 J
Jack .................................................... .209
Operation ....................................... 268
Jump-starting ..................................... 276
Jump leads ..................................... 276K
Key ........................................................ 58
Checking the battery .....................253
Convenience closing ........................87
Convenience opening ......................87
Display mes-
sage .............................................. 230, 231
Loss ............................................... 247
Malfunction ................................... .247
Modifying the programming .............59
KEYLESS GO
Button .............................................. 63
Changing the battery .....................254
Checking the battery .....................253
Convenience closing ........................88
Locking ............................................ 58
Malfunction ................................... .247
Starting the engine ..........................89
Unlocking ......................................... 58 Key positions
Key .................................................. 63
KEYLESS GO .................................... 63
Kickdown ....................................... 94, 96 L
Lamp see Indicator and warning lamp .....235
Lashing eyelets ................................. 156
Level control ...................................... 129
Licence plate lighting Display message ............................ 227
Lighting
see Lights
Lights
Active light function .........................82
Automatic headlamp mode ..............80
Combination switch .........................78
Daytime driving lights ......................80
Dipped-beam headlamps .................80
Display messages ..........................225
Foglamps ................................... 80, 83
Hazard warning lamps .....................81
Headlamp flasher ............................. 80
Light switch ..................................... 78
Main-beam headlamps ..................... 81
Motorway mode ............................... 82
Rear foglamp ................................... 81
Switching off (display message) ..... 227
Turn signals ..................................... 81
LIM indicator lamp
Cruise control ................................ 118
Distronic ........................................ 121
Variable Speedtronic .....................126
Loading guidelines ............................151
Locking Automatic ........................................ 60
Emergency locking ........................251
From the inside (central locking
button) ............................................. 59
LOW RANGE
Display mes-
sage ............................................... 223
Off-road gear ................................ 114
LOW RANGE off-road gear ................114
Luggage compartment enlarge-
ment ................................................... 15410
Index X164_AKB; 2; 3, en-GB
wobuchh,
Version: 2.11.8.1 2009-03-31T14:14:58+02:00 - Seite 10Dateiname: 6515431202_buchblock.pdf; erzeugt am 01. Apr 2009 00:16:29; WK
Page 14 of 309

Luggage cover
................................... 157
Luggage net Front-passenger footwell ...............154
Front seats (behind) ....................... 154
Lumbar support
4-way ............................................... 66
Luxury head restraint .........................66 M
Main-beam headlamps Display message ............................ 227
Maintenance
Battery ........................................... 272
Making calls
On-board computer .......................111
Memory card ...................................... 101
Operating (on-board computer) .....101
see separate operating instructions
Memory function ................................. 74
Menu Overview of the menus ....................99
Menu (on-board computer) ................. 99
Additional functions .......................109
Audio ............................................. 100
Distronic ........................................ 124
DVD ............................................... 102
Navi ............................................... 102
Off-road ......................................... 102
Resetting to factory settings ..........103
Settings ......................................... 103
Standard displa y.............................. 99
Telephone ...................................... 111
Trip computer ................................ 110
TV .................................................. 101
Message
see Display message .....................211
see Indicator and warning lamp .....235
Minispare emergency spare wheel
Technical data ............................... 297
Mirrors
Sun visor ........................................ 162
see Exterior mirrors or Rear-view mirror
Mobile phone ..................................... 164
Display message .................... 216, 232
Installation ..................................... 285
Operation (on-board computer) .....111 Mobile telephone
see Mobile phone .......................... 164
Modifying the programming
Key .................................................. 59
MP3 .................................................... 101
Operating (on-board computer) .....101
see separate operating instructions
Multicontour seat ................................ 67
Multi-function display .........................98
Setting the display when the igni-
tion is switched off (on-board
computer) ...................................... 107
Multi-function steering wheel ............97
Overview .......................................... 28 N
Navigation .......................................... 102
On-board computer .......................102
see separate operating instructions
NECK-PRO head restraints .................40
Resetting after being triggered ......252
NECK-PRO luxury head restraints ...... 40
Resetting after being triggered ......252
Notes on running in a new vehicle ..172 O
Odometer see Trip meter ............................... 110
Off-road
4MATIC .......................................... 112
Differential locks ............................ 116
DSR ............................................... 113
LOW RANGE off-road gear .............114
Off-road 4ETS .................................. 53
Off-road ABS .................................... 50
Off-road 4ETS ...................................... .53
Off-road ABS ........................................ 50
Off-road driving Checklist ........................................ 189
Information .................................... 189
Off-road ESP ®
....................................... 52
Off-road terrain Off-road ESP .................................... 52
Oil
Consumption ................................. 176
Topping up ..................................... 177 Index
11 X164_AKB; 2; 3, en-GB
wobuchh,
Version: 2.11.8.1
2009-03-31T14:14:58+02:00 - Seite 11Dateiname: 6515431202_buchblock.pdf; erzeugt am 01. Apr 2009 00:16:30; WK
Page 61 of 309

Opening and closing
Key
The key centrally locks/unlocks:
R the doors
R the tailgate
R the fuel filler flap G
Risk of accident
If children are left unsupervised in the vehicle,
they could:
R open a door from the inside at any time,
even if it has been locked
R start the vehicle using a key which has been
left in the vehicle
R release the parking brake
They could thereby endanger themselves and
others. Never leave children unsupervised in
the vehicle. Always take the key with you
when leaving the vehicle, even if you are only
leaving it for a short time. :
& To lock the vehicle
; F To open/close the tailgate*
= Emergency key element
? % To unlock the vehicle
A Battery check lamp
When unlocking, the turn signals flash once.
When locking, they flash three times.
When it is dark, the surround lighting also
comes on if it is activated in the on-board
computer. The vehicle relocks automatically if you do not
open a door or the tailgate within 40 seconds
of unlocking the vehicle.
KEYLESS GO* You can start, lock or unlock the vehicle using
the KEYLESS GO key. To do this, you only
need carry the key with you. When you touch
the surface of the sensors on the vehicle's
door handles, KEYLESS GO establishes a
radio connection between the vehicle and the
key.
The distance to the door handle from which
you wish to lock or unlock the vehicle must
not be greater than 1 m.
When starting the engine and whilst driving,
KEYLESS GO also checks whether a valid key
is in the vehicle by periodically establishing
radio contact. X
To unlock the vehicle: touch the inner
surface of the door handle.
X To lock the vehicle: press locking but-
ton :.
If you pull on the handle of the tailgate, only
the luggage compartment of the vehicle is
unlocked.
i If the vehicle has been parked for a long
time, you must pull the door handle to acti-
vate KEYLESS GO. 58
Opening and closingControls
* optional
X164_AKB; 2; 3, en-GB
wobuchh,
Version: 2.11.8.1 2009-03-31T14:14:58+02:00 - Seite 58
Dateiname: 6515431202_buchblock.pdf; erzeugt am 01. Apr 2009 00:16:51; WK
Page 62 of 309

Individual settings
You can change the setting of the locking
system in such a way that only the driver's
door and the fuel filler flap are unlocked. This
could be useful if you frequently travel on your
own.
X To change the setting: press the%
and & buttons simultaneously for
approximately six seconds until the battery
check lamp flashes twice.
The key now functions as follows:
X To unlock the driver's door: press the
% button once.
X To unlock centrally: press the%but-
ton twice.
X To lock centrally: press the&button.
The KEYLESS GO* function is changed as fol-
lows:
X To unlock the driver's door: touch the
inner surface of the door handle on the
driver's door.
X To unlock centrally: touch the inner sur-
face of the door handle on the front-
passenger door or the rear door.
X To lock centrally: press locking but-
ton :on one of the door handles.
Restoring the factory settings X
Press the %and& buttons simulta-
neously for approximately six seconds until
the battery check lamp flashes twice.
Additional information R
Convenience opening (Y page 87)
R Convenience closing (Y page 87)
R Opening and closing in an emergency
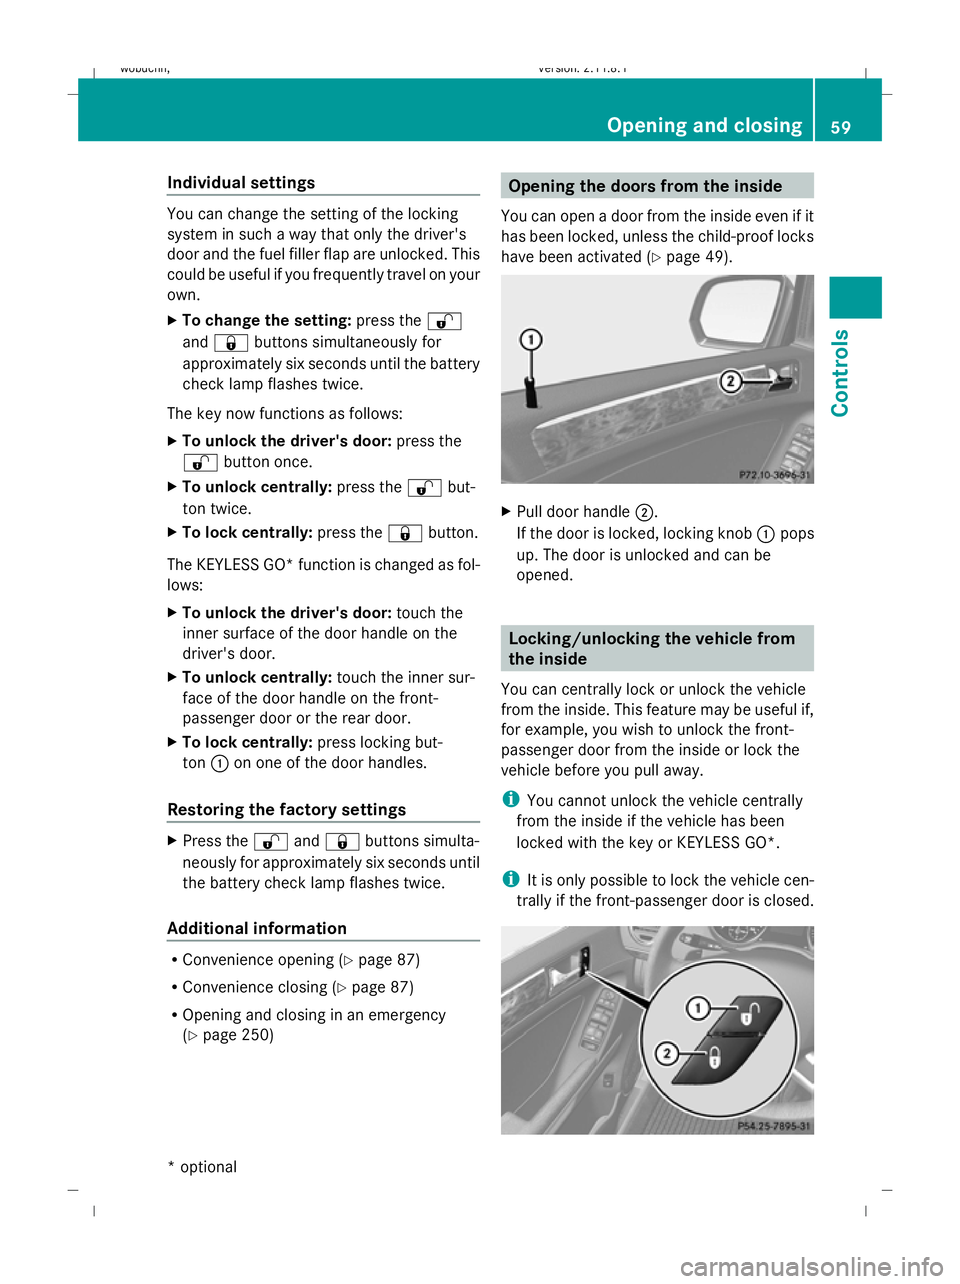
(Y page 250) Opening the doors from the inside
You can open a door from the inside even if it
has been locked, unless the child-proof locks
have been activated ( Ypage 49). X
Pull door handle ;.
If the door is locked, locking knob :pops
up. The door is unlocked and can be
opened. Locking/unlocking the vehicle from
the inside
You can centrally lock or unlock the vehicle
from the inside. This feature may be useful if,
for example, you wish to unlock the front-
passenger door from the inside or lock the
vehicle before you pull away.
i You cannot unlock the vehicle centrally
from the inside if the vehicle has been
locked with the key or KEYLESS GO*.
i It is only possible to lock the vehicle cen-
trally if the front-passenger door is closed. Opening and closing
59Controls
* optional
X164_AKB; 2; 3, en-GB
wobuchh,
Version: 2.11.8.1 2009-03-31T14:14:58+02:00 - Seite 59 Z
Dateiname: 6515431202_buchblock.pdf; erzeugt am 01. Apr 2009 00:16:52; WK
Page 73 of 309

X
Make sure that the key is in position 1or
2 in the ignition lock.
X To switch on: press button:repeatedly
until the required ventilation level is set.
i If you open the side windows and the slid-
ing/tilting sunroof* using the key
(Y page 87), the seat ventilation of the
driver's seat automatically switches to the
highest level.
X To switch off: press button:repeatedly
until all indicator lamps go out.
i If the battery voltage is too low, the seat
ventilation may switch off. Seat heating*
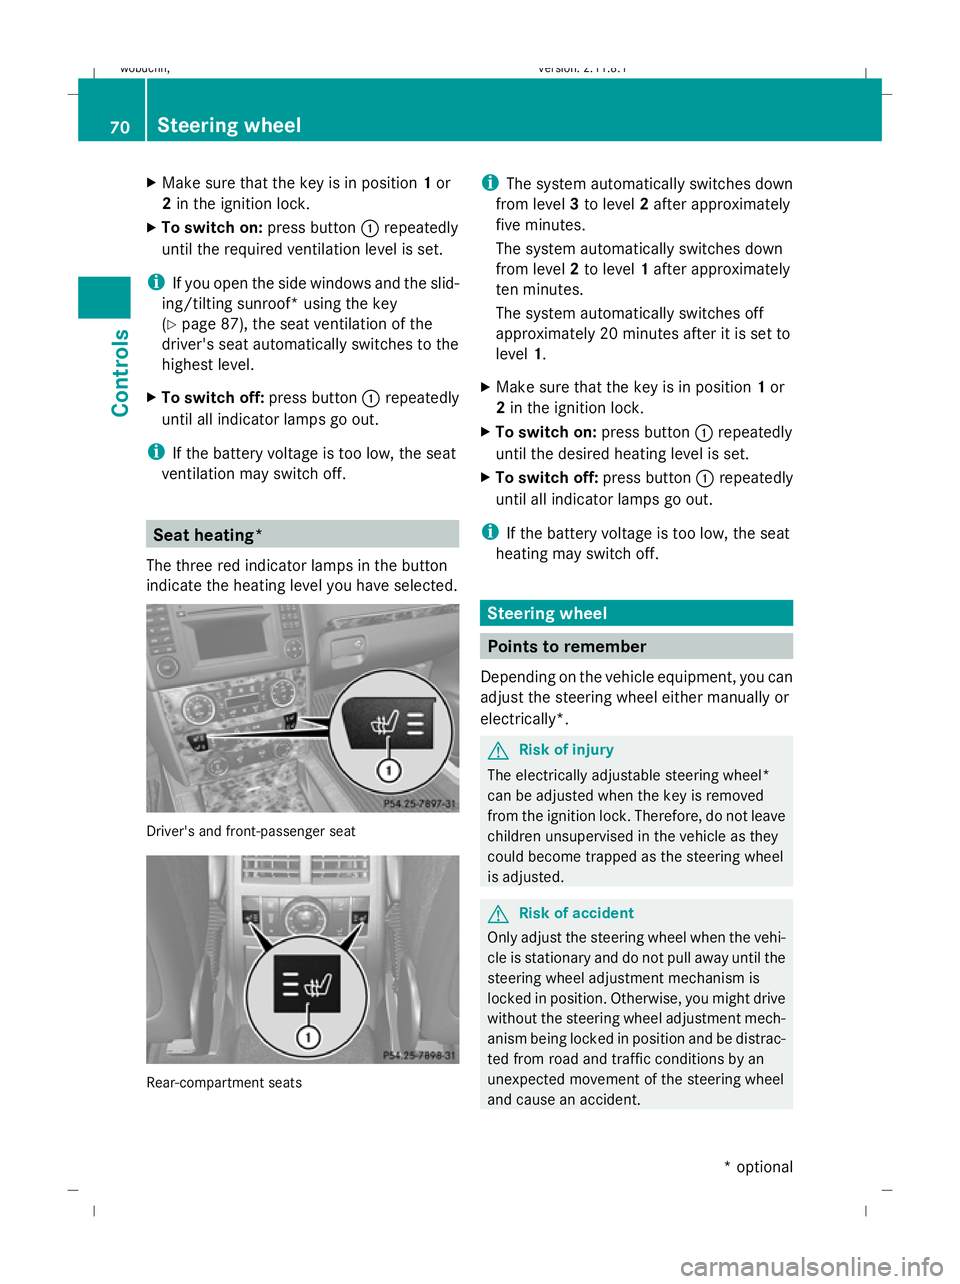
The three red indicator lamps in the button
indicate the heating level you have selected. Driver's and front-passenger seat
Rear-compartment seats i
The system automatically switches down
from level 3to level 2after approximately
five minutes.
The system automatically switches down
from level 2to level 1after approximately
ten minutes.
The system automatically switches off
approximately 20 minutes after it is set to
level 1.
X Make sure that the key is in position 1or
2 in the ignition lock.
X To switch on: press button:repeatedly
until the desired heating level is set.
X To switch off: press button:repeatedly
until all indicator lamps go out.
i If the battery voltage is too low, the seat
heating may switch off. Steering wheel
Points to remember
Depending on the vehicle equipment, you can
adjust the steering wheel either manually or
electrically*. G
Risk of injury
The electrically adjustable steering wheel*
can be adjusted when the key is removed
from the ignition lock. Therefore, do not leave
children unsupervised in the vehicle as they
could become trapped as the steering wheel
is adjusted. G
Risk of accident
Only adjust the steering wheel when the vehi-
cle is stationary and do not pull away until the
steering wheel adjustment mechanism is
locked in position. Otherwise, you might drive
without the steering wheel adjustment mech-
anism being locked in position and be distrac-
ted from road and traffic conditions by an
unexpected movement of the steering wheel
and cause an accident. 70
Steering wheelControls
* optional
X164_AKB; 2; 3, en-GB
wobuchh,
Version: 2.11.8.1 2009-03-31T14:14:58+02:00 - Seite 70
Dateiname: 6515431202_buchblock.pdf; erzeugt am 01. Apr 2009 00:17:02; WK
Page 76 of 309

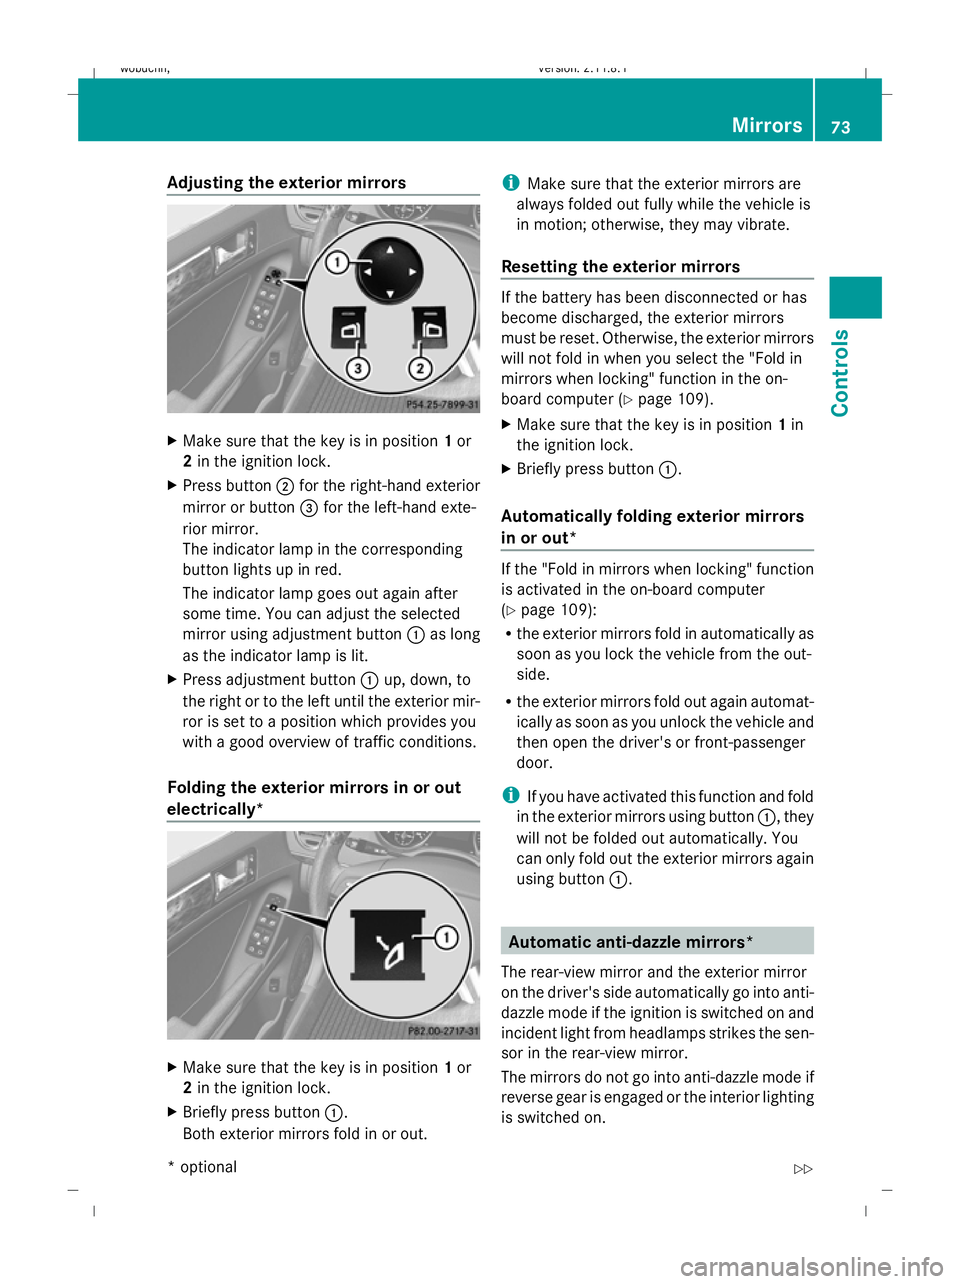
Adjusting the exterior mirrors
X
Make sure that the key is in position 1or
2 in the ignition lock.
X Press button ;for the right-hand exterior
mirror or button =for the left-hand exte-
rior mirror.
The indicator lamp in the corresponding
button lights up in red.
The indicator lamp goes out again after
some time. You can adjust the selected
mirror using adjustment button :as long
as the indicator lamp is lit.
X Press adjustment button :up, down, to
the right or to the left until the exterior mir-
ror is set to a position which provides you
with a good overview of traffic conditions.
Folding the exterior mirrors in or out
electrically* X
Make sure that the key is in position 1or
2 in the ignition lock.
X Briefly press button :.
Both exterior mirrors fold in or out. i
Make sure that the exterior mirrors are
always folded out fully while the vehicle is
in motion; otherwise, they may vibrate.
Resetting the exterior mirrors If the battery has been disconnected or has
become discharged, the exterior mirrors
must be reset. Otherwise, the exterior mirrors
will not fold in when you select the "Fold in
mirrors when locking" function in the on-
board computer (Y
page 109).
X Make sure that the key is in position 1in
the ignition lock.
X Briefly press button :.
Automatically folding exterior mirrors
in or out* If the "Fold in mirrors when locking" function
is activated in the on-board computer
(Y
page 109):
R the exterior mirrors fold in automatically as
soon as you lock the vehicle from the out-
side.
R the exterior mirrors fold out again automat-
ically as soon as you unlock the vehicle and
then open the driver's or front-passenger
door.
i If you have activated this function and fold
in the exterior mirrors using button :, they
will not be folded out automatically. You
can only fold out the exterior mirrors again
using button :. Automatic anti-dazzle mirrors*
The rear-view mirror and the exterior mirror
on the driver's side automatically go into anti-
dazzle mode if the ignition is switched on and
incident light from headlamps strikes the sen-
sor in the rear-view mirror.
The mirrors do not go into anti-dazzle mode if
reverse gear is engaged or the interior lighting
is switched on. Mirrors
73Controls
* optional
X164_AKB; 2; 3, en-GB
wobuchh,
Version: 2.11.8.1 2009-03-31T14:14:58+02:00 - Seite 73 Z
Dateiname: 6515431202_buchblock.pdf; erzeugt am 01. Apr 2009 00:17:03; WK
Page 82 of 309

tries, daytime operation of headlamps varies
due to legal and voluntary requirements. In
these countries, daytime driving lights are
automatically switched on when the engine is
started.
The exterior lighting (except the side lamp/
parking lamp) switches off automatically if
you:
R remove the key from the ignition lock
R open the driver's door when the ignition is
switched off (key in position 0in the igni-
tion lock)
! Switch off the side lamps and parking
lamp when you leave the vehicle. This pre-
vents the battery from discharging.
Notes on driving abroad Converting to symmetrical dipped beam
when driving abroad:
switch the headlamps
to symmetrical dipped beam in countries in which traffic drives on the opposite side of the
road to the country where the vehicle is reg-
istered. This prevents oncoming traffic from
being dazzled
Have the headlamps converted at a qualified
specialist workshop, e.g. a Mercedes-Benz
Service Centre, as close to the border as pos-
sible before driving in these countries. Sym-
metrical lights do not illuminate as large an
area of the edge of the carriageway.
Converting to asymmetrical dipped beam
after returning: have the headlamps conver-
ted back to asymmetrical dipped beam at a
qualified specialist workshop, e.g. a
Mercedes-Benz Service Centre, as soon as
possible after crossing the border and return-
ing to the original country.
Vehicles with Intelligent Light System*: if
the headlamps are converted to symmetrical
dipped beam, not all light functions are avail-
able. "Motorway mode" and the "extended
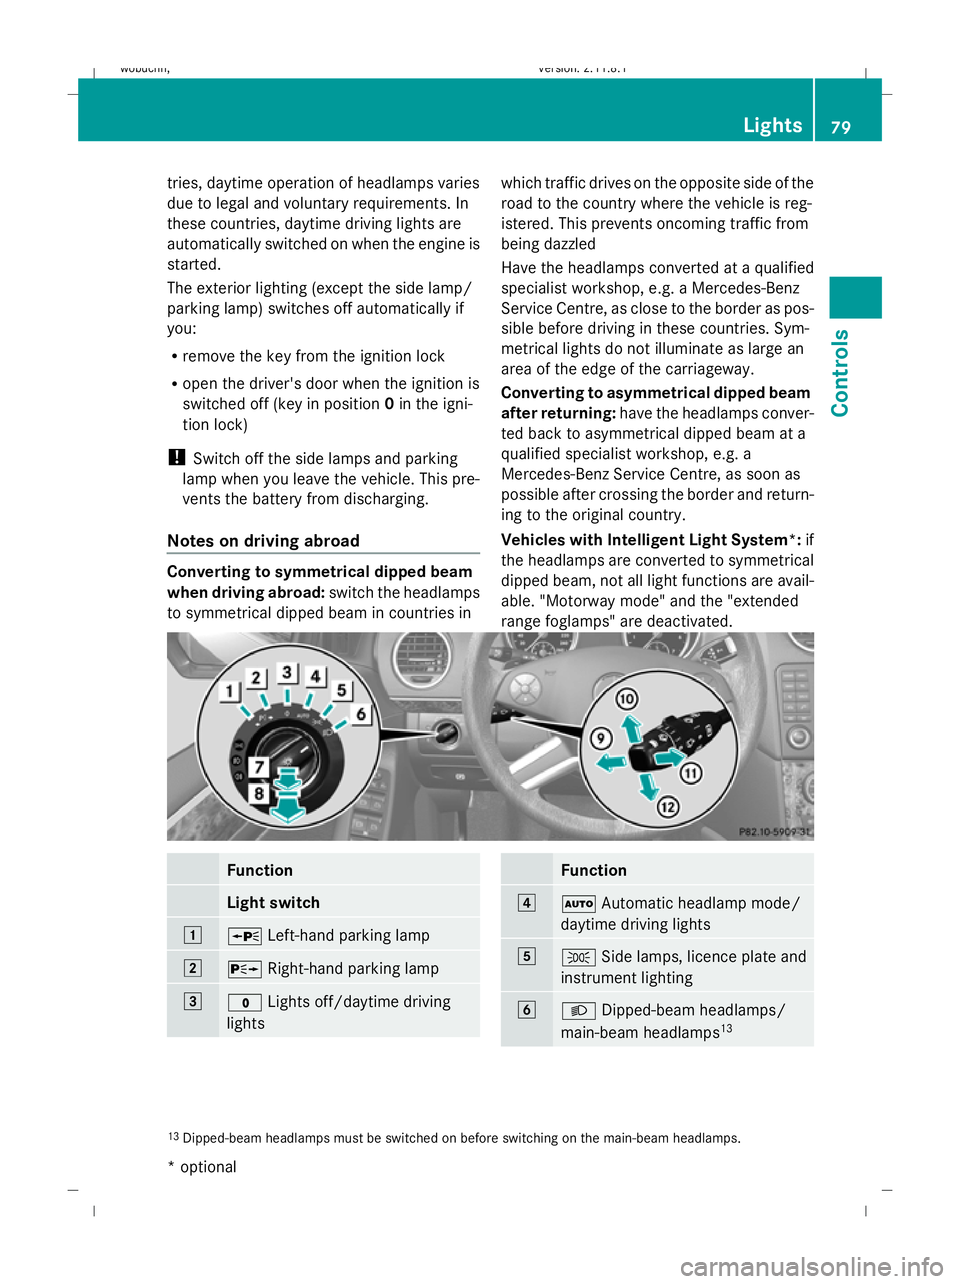
range foglamps" are deactivated. Function
Light switch
1
W
Left-hand parking lamp 2
X
Right-hand parking lamp 3
$
Lights off/daytime driving
lights Function
4
Ã
Automatic headlamp mode/
daytime driving lights 5
T
Side lamps, licence plate and
instrument lighting 6
L
Dipped-beam headlamps/
main-beam headlamps 13 13
Dipped-beam headlamps must be switched on before switching on the main-beam headlamps. Lights
79Controls
* optional
X164_AKB; 2; 3, en-GB
wobuchh
,V ersion: 2.11.8.1
2009-03-31T14:14:58+02:00 - Seite 79 Z
Dateiname: 6515431202_buchblock.pdf; erzeugt am 01. Apr 2009 00:17:06; WK