2009 MERCEDES-BENZ E-CLASS SALOON ESP
[x] Cancel search: ESPPage 200 of 373
X
Vehicles without Memory function*: if nec-
essary, move the driver's or front-
passenger seat forwards.
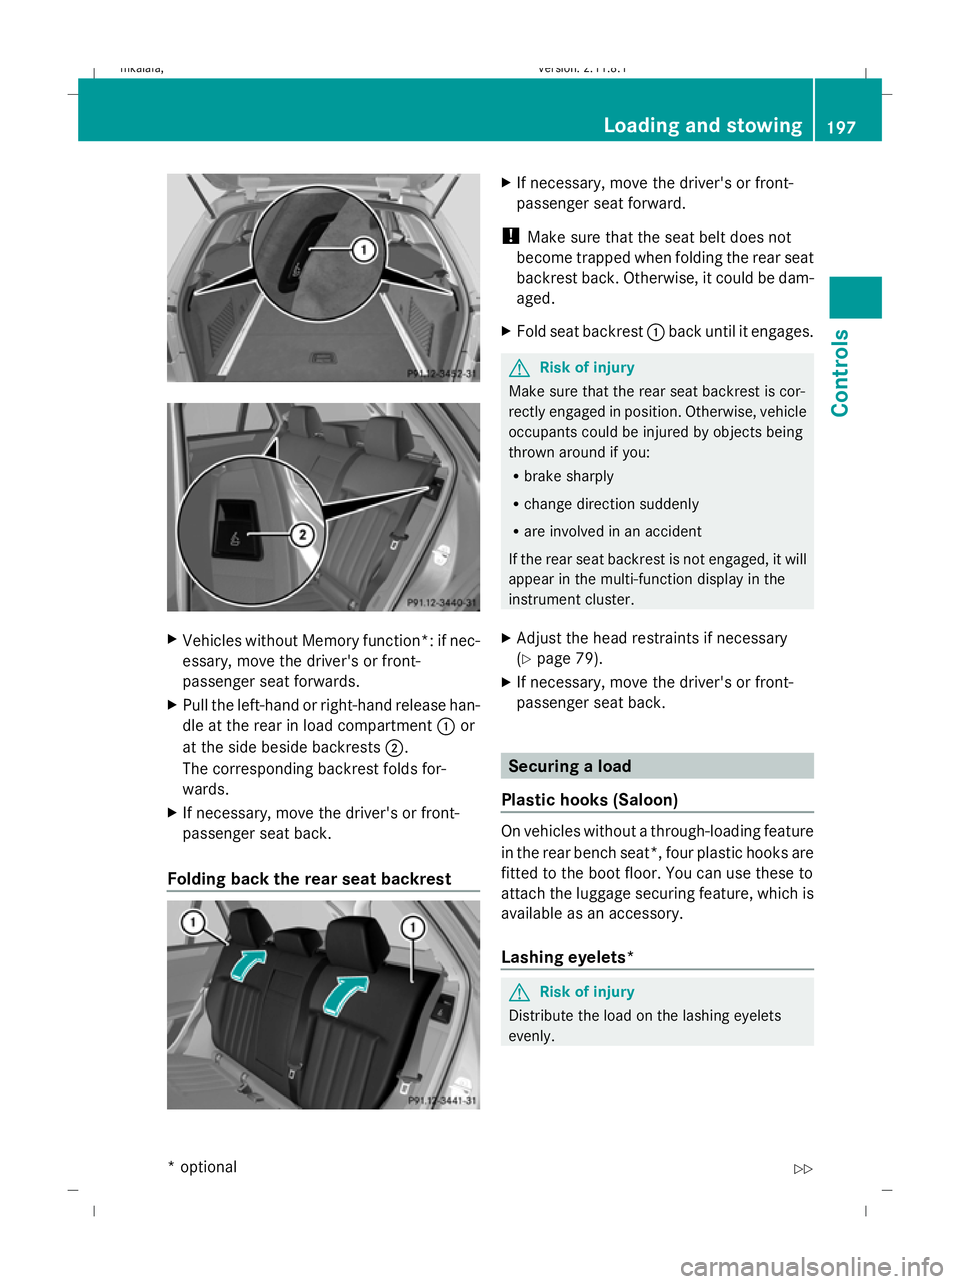
X Pull the left-hand or right-hand release han-
dle at the rear in load compartment :or
at the side beside backrests ;.
The corresponding backrest folds for-
wards.
X If necessary, move the driver's or front-
passenger seat back.
Folding back the rear seat backrest X
If necessary, move the driver's or front-
passenger seat forward.
! Make sure that the seat belt does not
become trapped when folding the rear seat
backrest back. Otherwise, it could be dam-
aged.
X Fold seat backrest :back until it engages. G
Risk of injury
Make sure that the rear seat backrest is cor-
rectly engaged in position. Otherwise, vehicle
occupants could be injured by objects being
thrown around if you:
R brake sharply
R change direction suddenly
R are involved in an accident
If the rear seat backrest is not engaged, it will
appear in the multi-function display in the
instrument cluster.
X Adjust the head restraints if necessary
(Y page 79).
X If necessary, move the driver's or front-
passenger seat back. Securing a load
Plastic hooks (Saloon) On vehicles without a through-loading feature
in the rear bench seat*, four plastic hooks are
fitted to the boot floor. You can use these to
attach the luggage securing feature, which is
available as an accessory.
Lashing eyelets*
G
Risk of injury
Distribute the load on the lashing eyelets
evenly. Loading and stowing
197Controls
* optional
212_AKB; 2; 4, en-GB
mkalafa,
Version: 2.11.8.1 2009-05-05T14:17:16+02:00 - Seite 197 Z
Dateiname: 6515346702_buchblock.pdf; erzeugt am 07. May 2009 14:16:41; WK
Page 206 of 373
Inserting the brackets into the loading
rail X
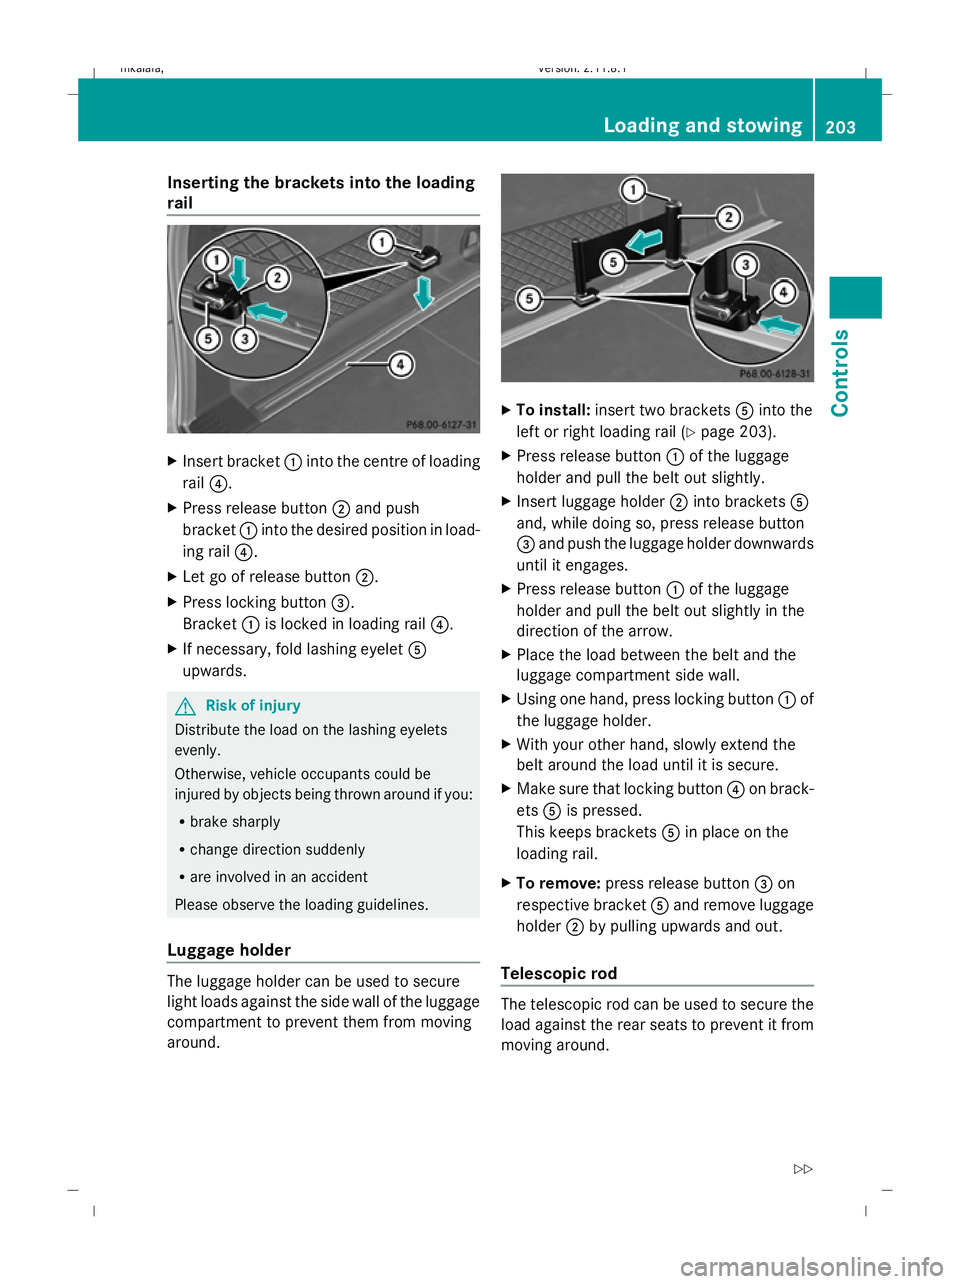
Insert bracket :into the centre of loading
rail ?.
X Press release button ;and push
bracket :into the desired position in load-
ing rail ?.
X Let go of release button ;.
X Press locking button =.
Bracket :is locked in loading rail ?.
X If necessary, fold lashing eyelet A
upwards. G
Risk of injury
Distribute the load on the lashing eyelets
evenly.
Otherwise, vehicle occupants could be
injured by objects being thrown around if you:
R brake sharply
R change direction suddenly
R are involved in an accident
Please observe the loading guidelines.
Luggage holder The luggage holder can be used to secure
light loads against the side wall of the luggage
compartment to prevent them from moving
around. X
To install: insert two brackets Ainto the
left or right loading rail (Y page 203).
X Press release button :of the luggage
holder and pull the belt out slightly.
X Insert luggage holder ;into brackets A
and, while doing so, press release button
= and push the luggage holder downwards
until it engages.
X Press release button :of the luggage
holder and pull the belt out slightly in the
direction of the arrow.
X Place the load between the belt and the
luggage compartment side wall.
X Using one hand, press locking button :of
the luggage holder.
X With your other hand, slowly extend the
belt around the load until it is secure.
X Make sure that locking button ?on brack-
ets Ais pressed.
This keeps brackets Ain place on the
loading rail.
X To remove: press release button =on
respective bracket Aand remove luggage
holder ;by pulling upwards and out.
Telescopic rod The telescopic rod can be used to secure the
load against the rear seats to prevent it from
moving around. Loading and stowing
203Controls
212_AKB; 2; 4, en-GB
mkalafa,V ersion: 2.11.8.1
2009-05-05T14:17:16+02:00 - Seite 203 Z
Dateiname: 6515346702_buchblock.pdf; erzeugt am 07. May 2009 14:16:46; WK
Page 207 of 373
X
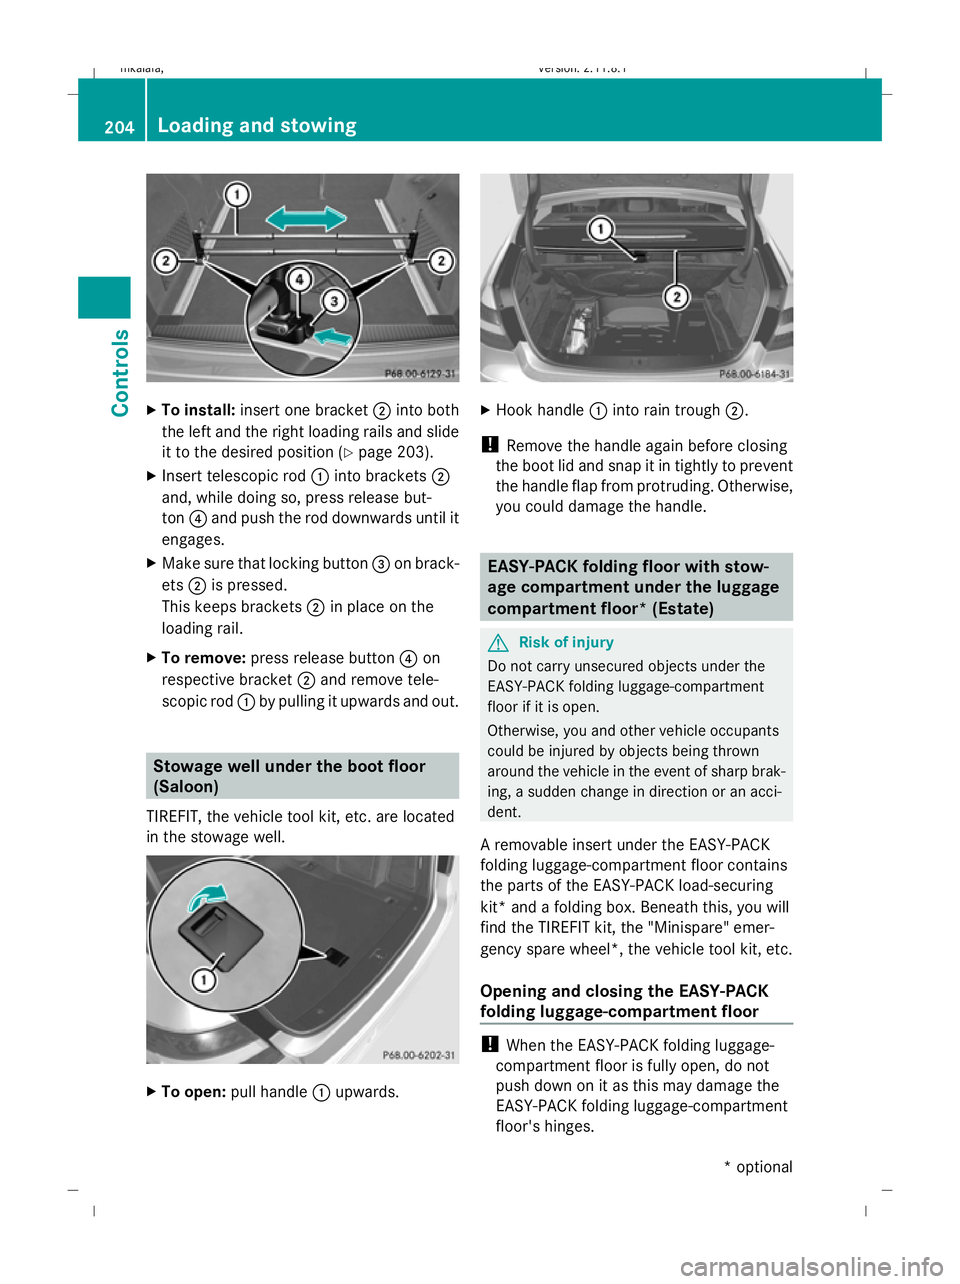
To install: insert one bracket ;into both
the left and the right loading rails and slide
it to the desired position (Y page 203).
X Insert telescopic rod :into brackets ;
and, while doing so, press release but-
ton ?and push the rod downwards until it
engages.
X Make sure that locking button =on brack-
ets ;is pressed.
This keeps brackets ;in place on the
loading rail.
X To remove: press release button ?on
respective bracket ;and remove tele-
scopic rod :by pulling it upwards and out. Stowage well under the boot floor
(Saloon)
TIREFIT, the vehicle tool kit, etc. are located
in the stowage well. X
To open: pull handle :upwards. X
Hook handle :into rain trough ;.
! Remove the handle again before closing
the boot lid and snap it in tightly to prevent
the handle flap from protruding. Otherwise,
you could damage the handle. EASY-PACK folding floor with stow-
age compartment under the luggage
compartment floor* (Estate)
G
Risk of injury
Do not carry unsecured objects under the
EASY-PACK folding luggage-compartment
floor if it is open.
Otherwise, you and other vehicle occupants
could be injured by objects being thrown
around the vehicle in the event of sharp brak-
ing, a sudden change in direction or an acci-
dent.
A removable insert under the EASY-PACK
folding luggage-compartment floor contains
the parts of the EASY-PACK load-securing
kit* and a folding box. Beneath this, you will
find the TIREFIT kit, the "Minispare" emer-
gency spare wheel*, the vehicle tool kit, etc.
Opening and closing the EASY-PACK
folding luggage-compartment floor !
When the EASY-PACK folding luggage-
compartment floor is fully open, do not
push down on it as this may damage the
EASY-PACK folding luggage-compartment
floor's hinges. 204
Loading and stowingControls
* optional
212_AKB; 2; 4, en-GB
mkalafa,
Version: 2.11.8.1 2009-05-05T14:17:16+02:00 - Seite 204
Dateiname: 6515346702_buchblock.pdf; erzeugt am 07. May 2009 14:16:47; WK
Page 220 of 373

require draining of the fuel tank and fuel
lines. Notify a qualified specialist workshop
and have the fuel tank and fuel lines
drained completely.
When you open or close the vehicle with the
key or KEYLESS GO*, the fuel filler flap is
automatically unlocked or locked.
The position of the fuel filler cap is to the rear
on the right. The position of the fuel filler cap
is displayed in the instrument cluster 8.
The arrow next to the filling pump indicates
the side of the vehicle. Saloon (example)
:
To open the fuel filler flap
; To insert the fuel filler cap
= Tyre pressure table
? Fuel type
X To open: press the fuel filler flap in the
direction of arrow :.
The fuel filler flap opens slightly.
X Open the fuel filler flap.
X Turn the fuel filler cap anti-clockwise and
remove it.
X Insert the fuel filler cap into the holder
bracket on the inside of filler flap ;.
X Only fill the tank until the pump nozzle
switches off.
! Overfilling the fuel tank could damage the
fuel system. X
To close: replace the fuel filler cap and turn
it clockwise. The fuel filler cap audibly
engages.
X Press the fuel filler flap closed until it
engages audibly. Petrol (EN 228)
! Refuel using only unleaded, sulphur-free
premium grade petrol with a minimum
octane number of 95 RON/85 MON con-
forming to European standard EN 228.
Otherwise, you could impair engine output
or damage the engine.
i As a temporary measure, only when the
recommended fuel is not available, you
may also use regular unleaded petrol,
91 RON/82.5 MON. This may reduce
engine performance and increase fuel con-
sumption. Avoid driving at full throttle.
In some countries, the fuel grade available
may not be adequate and could cause cok-
ing around the inlet valve. In such cases,
and in consultation with a Mercedes-Benz
Service Centre, the petrol may be mixed
with the additive recommended by
Mercedes-Benz (part no.
A000989254510). You must observe the
notes and mixing ratios specified on the
container.
Further information on "Fuel" (Y page 334).
E 350 CGI BlueEFFICIENCY !
Refuel using only unleaded, sulphur-free
premium grade petrol with a minimum
octane number of 95 RON/85 MON con-
forming to European standard EN 228.
Otherwise, you could impair engine output
or damage the engine.
i In some countries, the available petrol
may not be sufficiently low in sulphur. This
fuel can temporarily produce unpleasant
odours, especially on short journeys. As Refuelling
217Operation
* optional
212_AKB; 2; 4, en-GB
mkalafa,
Version: 2.11.8.1 2009-05-05T14:17:16+02:00 - Seite 217 Z
Dateiname: 6515346702_buchblock.pdf; erzeugt am 07. May 2009 14:16:54; WK
Page 226 of 373
Tyres and wheels
Points to remember
! For safety reasons, Mercedes-Benz rec-
ommends that you only use tyres, wheels
and accessories which have been approved
by Mercedes-Benz specifically for your
vehicle. These tyres have been specially
adapted for use with the control systems,
such as ABS or ESP ®
, and are marked as
follows:
R MO = Mercedes-Benz Original
R MOE = Mercedes-Benz Original Exten-
ded* (tyres with run-flat characteristics)
R MO1 = Mercedes-Benz Original (only
specific AMG tyres)
Only use Mercedes-Benz Original Extended
tyres* on wheels that have been specifi-
cally approved by Mercedes-Benz.
If you use other tyres, wheels and acces-
sories, Mercedes-Benz cannot accept any
responsibility for damage that may result
from this. Further information about tyres,
wheels and approved combinations can be
obtained from any Mercedes-Benz Service
Centre.
! If you fit tyres other than those tested and
recommended by Mercedes-Benz, charac-
teristics such as handling, noise levels and
fuel consumption, etc. may be adversely
affected. In addition, when driving with a
load, tyre dimensional variations could
cause the tyres to come into contact with
the bodywork and axle components. This
could result in damage to the tyres or the
vehicle.
! Retreaded tyres are neither tested nor
recommended by Mercedes-Benz, since
previous damage cannot always be detec-
ted on retreaded tyres. As a result,
Mercedes-Benz cannot guarantee vehicle
safety if retreaded tyres are fitted. Do not
fit used tyres if you have no information
about their previous usage. G
Risk of accident
Tyres, wheels or accessories which have not
been approved by Mercedes-Benz for your
vehicle or are not used as they should be, can
impair driving safety. As a result, you could
cause an accident. Before purchasing and
using them, enquire about their suitability,
legal stipulations and factory recommenda-
tions at a Mercedes-Benz Service Centre.
Modification work on the brake system and
wheels is not permitted, nor is the use of
spacer plates or brake dust shields. This inva-
lidates the General Operating Permit for the
vehicle.
Notes on selecting, fitting and replac-
ing tyres R
Only fit tyres and wheels of the same type
and make.
R Only fit tyres of the correct size onto the
wheels.
R After fitting new tyres, run them in at mod-
erate speeds for the first 100 km as they
only reach their full performance after this
distance.
R Fit new tyres on the front wheels first if
tyres of the same size are required on the
front and rear wheels.
R Replace the tyres after six years at the lat-
est, regardless of wear. This also applies to
the spare wheel*.
R Do not drive with tyres which have too little
tread depth, as this significantly reduces
the traction on wet roads (aquaplaning).
! Store tyres that are not being used in a
cool, dry and preferably dark place. Protect
the tyres against oil, grease, petrol and die-
sel.
Notes on regularly inspecting wheels
and tyres R
Regularly check the wheels and tyres of
your vehicle for damage (e.g. cuts, punctu- Tyres and
wheels
223Operation
* optional
212_AKB; 2; 4, en-GB
mkalafa,
Version: 2.11.8.1 2009-05-05T14:17:16+02:00 - Seite 223 Z
Dateiname: 6515346702_buchblock.pdf; erzeugt am 07. May 2009 14:16:56; WK
Page 229 of 373
dent. Therefore, you should regularly check
the pressure of all the tyres, particularly prior
to long trips, and correct the pressure as nec-
essary.
To test tyre pressure, use a suitable pressure
gauge. The outer appearance of a tyre does
not permit any reliable conclusion about the
tyre pressure. On vehicles fitted with the elec-
tronic tyre pressure monitor*, the tyre pres-
sure can be checked in the on-board com-
puter. G
Risk of accident
Do not fit anything else to the tyre valve other
than the standard valve cap. In particular, ret-
rofitted tyre pressure monitors which are
screwed on to the valve may overload it and
cause it to fail. Due to their design, the valve
is kept open continuously, which may lead to
air loss. G
Risk of accident
Should the tyre pressure drop repeatedly:
R check the tyre for foreign bodies.
R check whether the wheel is losing air or the
valve is leaking.
R make sure that only a valve cap approved
by Mercedes-Benz is fitted on the tyre
valve.
Tyre pressures that are too low have a nega-
tive effect on vehicle safety, which could lead
to your causing an accident.
If possible, you should only correct tyre pres-
sures when the tyres are cold. Depending on
the ambient temperature, the speed you are
driving at and the load on the tyres, the tyre
temperature and thus the tyre pressure may
change by approximately 0.1 bar per 10 †.
Take this into account when checking the
pressure of warm tyres and only correct it if
it is too low for the current operating condi-
tions. Driving with tyre pressure that is too high or
too low can:
R
shorten the service life of the tyres
R increase the likelihood of tyre damage
R have a negative effect on handling charac-
teristics (e.g. by causing aquaplaning)
Also check the pressure of the "Minispare"
emergency spare wheel*. H
Environmental note
Check the tyre pressure regularly, at least
every 14 days.
Speeds up to 210 km/h:
Despite the values stated on the tyre pressure
information label (fuel filler flap), for speeds
up to 210 km/h andwith 16" or 17" tyres,
the values stated can be reduced as follows,
without a reduction in safety:
Saloon: -0.3 bar / (-4 psi)
Estate: -0.2 bar (-3 psi)
This does not apply to vehicles towing a
trailer.
This improves the ride comfort of your vehi-
cle; however, the fuel consumption may
increase slightly. Tyre pressure loss warning
While the vehicle is in motion, the tyre pres-
sure loss warning system monitors the set
tyre pressure using the rotational speed of
the wheels. This enables the system to detect
significant pressure loss in a tyre. If the speed
of rotation of a wheel changes as a result of
a loss of pressure, a corresponding warning
message will appear in the multi-function dis-
play. G
Risk of accident
The tyre pressure loss warning system does
not warn you of an incorrectly set tyre pres-
sure. The table on the inside of the fuel filler
flap will help you decide whether the tyre
pressures should be corrected. 226
Tyres and wheelsOperation
* optional
212_AKB; 2; 4, en-GB
mkalafa,
Version: 2.11.8.1 2009-05-05T14:17:16+02:00 - Seite 226
Dateiname: 6515346702_buchblock.pdf; erzeugt am 07. May 2009 14:16:57; WK
Page 230 of 373

The tyre pressure loss warning system does
not replace the need to regularly check your
vehicle's tyre pressures, since an even loss of
pressure on several tyres at the same time
cannot be detected by the tyre pressure loss
warning system.
The tyre pressure monitor is not able to warn
you of a sudden loss of pressure, e.g. if the
tyre is penetrated by a foreign object.
In the event of a sudden loss of pressure, bring
the vehicle to a halt by braking carefully. Do
not make any sudden steering movements
when doing so.
The function of the tyre pressure loss warning
system is limited or delayed if:
R snow chains are fitted to your vehicle's
tyres.
R road conditions are wintry.
R you are driving on sand or gravel.
R you adopt a very sporty driving style (cor-
nering at high speeds or driving with high
rates of acceleration).
R you are towing a very heavy or large trailer.
R you are driving with a heavy load (in the
vehicle or on the roof).
Restarting the tyre pressure loss warn-
ing system Restart the tyre pressure loss warning system
if you have:
R
changed the tyre pressure
R changed the wheels or tyres
R fitted new wheels or tyres
X Before restarting, consult the table of tyre
pressures on the inside of the fuel filler flap
to ensure that the tyre pressure in all four
tyres is set correctly for the respective
operating conditions.
X Observe the notes in the section on tyre
pressures (Y page 225). G
Risk of accident
The tyre pressure loss warning system can
only give reliable warnings if you have set the
correct tyre pressure.
If an incorrect tyre pressure is set, these
incorrect values will be monitored.
A tyre with insufficient pressure results in
vehicle instability when driving, thus increas-
ing the risk of an accident.
X Make sure that the key is in position 2in
the ignition lock.
In the multi-function display you will see the
standard display (Y page 119).
X Press the =or; button to select the
Service menu.
X Press the 9or: button to select
Tyre pressure.
X Press the abutton.
The multi-function display shows the mes-
sage:
Run Flat Indicator active Restart
with OK
If you wish to confirm the restart:
X Press the abutton.
The multi-function display shows the mes-
sage:
Tyre press. now OK?
X Press the 9or: button to select
Yes.
X Press the abutton.
You will see the following message in the
multi-function display:
Run Flat Indicator restarted
After a teach-in period, the tyre pressure
loss warning system will monitor the set
tyre pressures of all four tyres.
If you wish to cancel the restart:
X Press the %button.
or
X When the Tyre press. now OK? message
appears, press 9or: to select
Cancel. Tyres and wheels
227Operation
212_AKB; 2; 4, en-GB
mkalafa, Version: 2.11.8.1 2009-05-05T14:17:16+02:00 - Seite 227 Z
Dateiname: 6515346702_buchblock.pdf; erzeugt am 07. May 2009 14:16:57; WK
Page 233 of 373
!
On vehicles fitted with a tyre pressure
monitor*, electronic components are loca-
ted in the wheel.
Tyre-fitting tools should not be applied in
the area of the valve, as this could damage
the electronic components.
Always have the wheels interchanged/
changed at a qualified specialist workshop,
e.g. a Mercedes-Benz Service Centre. Winter driving
Points to remember
Have your vehicle winterproofed at a qualified
specialist workshop, e.g. at a Mercedes-Benz
Service Centre, at the onset of winter.
Observe the notes in the "Changing a wheel"
section (Y page 229). Winter tyres
Use winter tyres at temperatures below
+7 ˚C and in wintry road conditions. Only
winter tyres displaying the isnowflake
symbol in addition to the M+S marking pro-
vide optimum grip in wintry road conditions.
Only these tyres will allow the ABS, ESP ®
and
4MATIC* driving systems to function opti-
mally in winter, as these tyres have been
designed specifically for driving in snow.
Use winter tyres of the same make and tread
on all wheels to maintain safe handling char-
acteristics. G
Risk of accident
Winter tyres with a tread depth of less than
4 mm must be replaced immediately. They are
no longer suitable for winter use and can no
longer provide sufficient grip. This could
cause you to lose control of your vehicle and
cause an accident.
Always observe the maximum permissible
speed specified for the winter tyres you have fitted. If you fit winter tyres which have a
lower maximum permissible speed than that
of the vehicle, affix an appropriate warning
sign in the driver's field of vision. This can be
obtained at a qualified specialist workshop,
e.g. from a Mercedes-Benz Service Centre.
Under these circumstances, you should also
restrict the maximum speed of the vehicle
using permanent Speedtronic
39
to the maxi-
mum permissible speed for the winter tyres
(Y page 150).
Once you have fitted the winter tyres:
X Check the tyre pressures (Y page 225).
X Restart the tyre pressure moni-
tor* (Y page 228). G
Risk of accident
If you fit the spare wheel* when driving with
winter tyres, bear in mind that driving stability
will be impaired owing to unstable cornering
characteristics caused by the different tyres.
You should therefore adapt your driving style
and drive carefully.
Have the spare wheel* replaced at the near-
est qualified specialist workshop which has
the necessary specialist knowledge and tools
to carry out the work required. Mercedes-
Benz recommends that you use a Mercedes-
Benz Service Centre for this purpose. In par-
ticular, work relevant to safety or on safety-
related systems must be carried out at a quali-
fied specialist workshop. Snow chains
For safety reasons, Mercedes-Benz recom-
mends that you only use snow chains which
have been specially approved for your vehicle
by Mercedes-Benz, or are of a corresponding
standard of quality.
If you intend to fit snow chains, please bear
the following points in mind:
R you may not attach snow chains to all
wheel-tyre combinations; see the "Tyres
39 Only available for certain countries. 230
Winter drivingOperation
* optional
212_AKB; 2; 4, en-GB
mkalafa,
Version: 2.11.8.1 2009-05-05T14:17:16+02:00 - Seite 230
Dateiname: 6515346702_buchblock.pdf; erzeugt am 07. May 2009 14:16:58; WK