2009 MERCEDES-BENZ E-CLASS SALOON wheel
[x] Cancel search: wheelPage 136 of 373

running. When it is dark, the side lamps and
the dipped-beam headlamps are switched on
automatically.
In countries where daytime driving lights are
legally required, Onis the factory setting.
X Press the =or; button on the steer-
ing wheel to select the Settingsmenu.
X Press the :or9 button to select the
Light submenu.
X Press the abutton to confirm.
X Press the :or9 button to select the
Daytime driving lamps function.
You will see the selected setting: onor
off.
X Press the abutton to save the setting.
Activating/deactivating the Intelligent
Light System*
When you activate the Intell. Light Sys‐
tem: function, you activate the following:
R motorway mode
R active light function
R cornering light function
R extended range foglamps
X Press the =or; button on the steer-
ing wheel to select the Settingsmenu.
X Press the :or9 button to select the
Light submenu.
X Press the abutton to confirm.
X Press the :or9 button to select the
Intell. Light System: function.
You will see the selected setting: onor
off.
X Press the abutton to save the setting.
Tourist mode
This function is only available on vehicles with
the Intelligent Light System.
If you drive in countries in which traffic drives
on the opposite side of the road to the country
where the vehicle is registered, oncoming
traffic may be dazzled by the asymmetrical
dipped-beam headlamps. Have tourist mode activated as close as pos-
sible to the border, before crossing the border
into such countries. This switches the head-
lamps to symmetrical dipped beam. When
using symmetrical beam, the edge of the car-
riageway is not illuminated as widely and as
far ahead as normal. Observe that if tourist
mode is activated not all lighting functions are
available.
If tourist mode is activated, the multi-function
display shows the display message:
Intell. Light System inoperative in
the Light submenu. Motorway mode and the
extended range foglamps are deactivated.
When you are driving back on the same side
of the road as the country where the vehicle
is registered, have tourist mode deactivated
at a qualified specialised workshop as soon
as possible after crossing the border, e.g. at
a Mercedes-Benz Service Centre.
Switching Adaptive Highbeam Assist*
on/off
X Press the =or; button on the steer-
ing wheel to select the Settingsmenu.
X Press the :or9 button to select the
Light submenu.
X Press the abutton to confirm.
X Press the :or9 button to select the
Adaptive Main-beam Assist: function.
You will see the selected setting: onor
off.
X Press the abutton to save the setting.
Setting the ambient lighting
X Press the =or; button on the steer-
ing wheel to select the Settingsmenu.
X Press the :or9 button to select the
Light submenu.
X Press the abutton to confirm.
X Press the :or9 button to select the
Ambient light Brightness: function.
You will see the selected setting.
X Press the abutton to confirm. On-board computer
133Controls
* optional
212_AKB; 2; 4, en-GB
mkalafa,
Version: 2.11.8.1 2009-05-05T14:17:16+02:00 - Seite 133 Z
Dateiname: 6515346702_buchblock.pdf; erzeugt am 07. May 2009 14:16:16; WK
Page 137 of 373

X
Press the :or9 button to set the
brightness.
or
X Press the :button to switch off the
ambient lighting.
X Press the aor% button to save the
setting.
Activating or deactivating the surround
lighting and exterior lighting delayed
switch-off
The Surround lighting: function allows
you to set whether the exterior lighting should
come on when it is dark:
R for 40 seconds after unlocking the vehicle
with the key.
The exterior lighting switches off when you
open the driver’s door.
R for 15 seconds after switching off the
engine and closing the doors.
If the engine is switched off and then none
of the doors are opened, or if an open door
is not closed, the exterior lighting goes out
after 60 seconds.
If you activate the Surround lighting:
function, the following light up:
R the side lamps
R the dipped-beam headlamps 34
R the front foglamps*
R the licence plate lighting
X Press the =or; button on the steer-
ing wheel to select the Settingsmenu.
X Press the :or9 button to select the
Light submenu.
X Press the abutton to confirm.
X Press the :or9 button to select the
Surround lighting: function.
You will see the selected setting: onor
off.
X Press the abutton to save the setting. Deactivating the delayed switch-off tempora-
rily:
X
Before leaving the vehicle, turn the key to
position 0in the ignition lock.
X Turn the key to position 2in the ignition
lock and back to position 0.
The delayed switch-off is deactivated.
Delayed switch-off is reactivated the next
time you start the engine.
Activating/deactivating the interior light-
ing delayed switch-off
When you activate the Interior lighting
delay sw. off: function and remove the
key from the ignition lock, the interior lighting
remains on for around 20 seconds if it is dark.
X Press the =or; button on the steer-
ing wheel to select the Settingsmenu.
X Press the :or9 button to select the
Light submenu.
X Press the abutton to confirm.
X Press the :or9 button to select the
Interior lighting delay sw. off:
function.
You will see the selected setting: onor
off.
X Press the abutton to save the setting.
Vehicle Set permanent Speedtronic with
Limit
speed (winter tyres): (Ypage 150).
Activating/deactivating automatic door
locking
If you select the Automatic door locks:
function, the vehicle is centrally locked above
a speed of around 15 km/h.
For more information on the automatic door
locking feature, see (Y page 72).
X Press the =or; button on the steer-
ing wheel to select the Settingsmenu.
X Press the :or9 button to select the
Vehicle submenu.
34 Only for vehicles without front foglamps*. 134
On-board computerControls
* optional
212_AKB; 2; 4, en-GB
mkalafa,
Version: 2.11.8.1 2009-05-05T14:17:16+02:00 - Seite 134
Dateiname: 6515346702_buchblock.pdf; erzeugt am 07. May 2009 14:16:16; WK
Page 138 of 373

X
Press the abutton to confirm.
X Press the :or9 button to select the
Automatic door locks: function.
You will see the selected setting: onor
off.
X Press the abutton to save the setting.
Activating/deactivating the radar sensor
system*
i You must deactivate the radar sensor sys-
tem in certain countries and near radio
telescope facilities. You will find further
information under "Radar sensor system"
in the index.
Vehicles with a navigation system*: the radar
sensor system is deactivated automatically if
you are close to radio telescope facilities.
The following systems are switched off when
the radar sensor system is deactivated:
R Distronic Plus* (Y page 140)
R BAS PLUS* (Y page 59)
R PRE-SAFE ®
Brake* (Y page 63)
R Blind Spot Assist* (Y page 167)
X Press the =or; button on the steer-
ing wheel to select the Settingsmenu.
X Press the :or9 button to select the
Vehicle submenu.
X Press the abutton to confirm.
X Press the 9or: button to select the
Radar sensor (See Owner's Man.):
You will see the selected setting: onor
off.
X Press the abutton to save the setting.
Heating* Auxiliary heating* departure time
Only vehicles with auxiliary heating have this
submenu.
In the
Heating submenu, you can select a
stored departure time or change a departure time, at which the vehicle is preheated by the
auxiliary heating.
The auxiliary heating timer function calcu-
lates the switch-on time according to the out-
side temperature so that the vehicle is pre-
heated by the departure time. When the
departure time is reached, the auxiliary heat-
ing continues to heat for a further five
minutes and then switches off. The auxiliary
heating adopts the 2-zone Thermatic or the
3-zone Thermotronic *temperature settings.
You can switch off the auxiliary heating by
using the remote control or the auxiliary heat-
ing button on the centre console. G
Risk of poisoning
Exhaust fumes are produced when the auxili-
ary heating is in operation. Inhaling these
exhaust fumes can be poisonous. You should
therefore switch off the auxiliary heating in
confined spaces without an extraction sys-
tem, e.g. a garage. G
Risk of fire
When the auxiliary heating is in operation,
parts of the vehicle can become very hot.
Make sure that the exhaust system does
not under any circumstances come into con-
tact with highly flammable materials such as
dry grass or fuels. The highly flammable mate-
rial could otherwise ignite and set the vehicle
alight. Select your parking space accordingly.
Operating the auxiliary heating is therefore
prohibited at filling stations or when your vehi-
cle is being refuelled. Always switch off the
auxiliary heating at filling stations.
Selecting the departure time or deactivat-
ing a selected departure time
X Press the =or; button on the steer-
ing wheel to select the Settingsmenu.
X Press the :or9 button to select the
Heating submenu.
X Press the abutton to confirm.
You will see the selected setting.
X Press the abutton to confirm. On-board computer
135Controls
* optional
212_AKB; 2; 4, en-GB
mkalafa
,V ersion: 2.11.8.1
2009-05-05T14:17:16+02:00 - Seite 135 Z
Dateiname: 6515346702_buchblock.pdf; erzeugt am 07. May 2009 14:16:16; WK
Page 139 of 373

X
Press the :or9 button to select
one of the three departure times or Timer
off (no timer active).
X Press the abutton to confirm.
When a departure time is selected, the yel-
low indicator lamp lights up on the auxiliary
heating button.
Changing the departure time
X Press the =or; button to select the
Settings menu.
X Press the :or9 button to select the
Heating submenu.
X Press the abutton to confirm.
You will see the selected setting.
X Press the abutton to confirm.
X Press the :or9 button to select
Change A, Bor C.
X Press the abutton to confirm.
You can now change the departure time.
X Press the =or; button to select the
display to be changed: hours, minutes.
X Press the :or9 button to set the
selected display.
X Press the abutton to store the entry.
The yellow indicator lamp on the auxiliary
heating button lights up.
Convenience Activating/deactivating the EASY-
ENTRY/EXIT feature*
You can use the
Easy Entry/Exit: function
to activate or deactivate the easy-entry/exit
feature (Y page 85). G
Risk of injury
The steering wheel moves when the EASY-
ENTRY/EXIT feature is active. There is a risk
of occupants becoming trapped. Before acti-
vating the EASY-ENTRY/EXIT feature, make
sure that nobody can become trapped.
Do not leave children unsupervised in the
vehicle, even if they are secured in a child restraint system. The children could open the
driver's door and thereby unintentionally acti-
vate the EASY-ENTRY/EXIT feature and
become trapped.
X Press the =or; button on the steer-
ing wheel to select the Settingsmenu.
X Press the :or9 button to select the
Convenience submenu.
X Press the abutton to confirm.
X Press the :or9 button to select the
Easy Entry/Exit: function.
You will see the selected setting: onor
off.
X Press the abutton to save the setting.
Switching the belt adjustment on/off
X Press the =or; button on the steer-
ing wheel to select the Settingsmenu.
X Press the :or9 button to select the
Convenience submenu.
X Press the abutton to confirm.
X Press the :or9 button to select the
Belt adjustment: function.
You will see the selected setting: onor
off.
X Press the abutton to save the setting.
Switching the fold in mirrors when lock-
ing* function on/off
If you switch on the Fold mirrors in when
locking: function, the exterior mirrors fold
in when you lock the vehicle. When you
unlock the vehicle and then open the driver's
or front-passenger door, the exterior mirrors
fold out again.
If you have switched the function on and you
fold the exterior mirrors in using the button
on the door (Y page 86), they will not fold out
automatically. The exterior mirrors can then
only be folded out using the button on the
door. 136
On-board computerControls
* optional
212_AKB; 2; 4, en-GB
mkalafa,
Version: 2.11.8.1 2009-05-05T14:17:16+02:00 - Seite 136
Dateiname: 6515346702_buchblock.pdf; erzeugt am 07. May 2009 14:16:16; WK
Page 140 of 373

X
Press the =or; button on the steer-
ing wheel to select the Settingsmenu.
X Press the :or9 button to select the
Convenience submenu.
X Press the abutton to confirm.
X Press the :or9 button to select the
Fold in mirrors when locking: func-
tion.
You will see the selected setting: onor
off.
X Press the abutton to save the setting.
Restoring the factory settings For safety reasons, not all functions are reset:
the Limit Speed (winter tyres): func-
tion in permanent Speedtronic can only be set
in the Vehicle submenu. If you want to reset
the Daytime driving lamps: in theLight
submenu, you must turn the key in the igni-
tion lock to position 1.
X Press the =or; button on the steer-
ing wheel to select the Settingsmenu.
X Press the :or9 button to select the
Factory setting submenu.
X Press the abutton to confirm.
The Reset all settings? message
appears.
X Press the :or9 button to select
Yes orNo.
X Press the abutton to confirm the selec-
tion.
If you have selected Yes, the multi-function
display shows a confirmation message. Driving systems
Overview of driving systems
The vehicle's driving systems are described
on the following pages:
R cruise control, Distronic Plus* and Speed-
tronic, which are used to control the speed
of the vehicle
R HOLD function, which makes pulling away
easier, particularly on steep uphill gradi-
ents
R RACE START (E 63 AMG), which makes pull-
ing away on race tracks easier
R AIRMATIC* (except E 63 AMG), which is
used to adjust the vehicle's suspension
system
R AMG RIDE CONTROL sports suspension
(E 63 AMG), which is used to adjust the
vehicle's suspension system
R 4MATIC* (permanent four-wheel drive), for
optimum traction
R PARKTRONIC* and Parking Guidance*,
which assist you in finding a parking space,
as well as when manoeuvring and parking
R reversing camera*, which assists you when
parking and manoeuvring
R ATTENTION ASSIST, which helps you
detect tiredness or increasing lapses in
concentration
R Speed Limit Assist*, which shows you
speed limits that are detected in the multi-
function display
R Night View Assist Plus*, which assists you
when driving in the dark
R lane package*, which assists you with Blind
Spot Assist when changing lanes and warns
you against leaving your lane unintention-
ally with Lane Keeping Assist
The ABS, BAS, BAS PLUS*, adaptive brake
lights, ESP ®
, EBV and ADAPTIVE BRAKE driv-
ing safety systems and the PRE-SAFE ® Driving systems
137Controls
* optional
212_AKB; 2; 4, en-GB
mkalafa,
Version: 2.11.8.1 2009-05-05T14:17:16+02:00 - Seite 137 Z
Dateiname: 6515346702_buchblock.pdf; erzeugt am 07. May 2009 14:16:16; WK
Page 141 of 373

Brake* are described in the "Driving safety
systems" section (Y page 58). Cruise control
Cruise control maintains a constant road
speed for you. It brakes automatically in order
to avoid exceeding the set speed. On long and
steep downhill gradients, especially if the
vehicle is laden or towing a trailer, you must
shift to a lower gear in good time or select
shift range 1,2or 3on vehicles with auto-
matic transmission*. By doing so, you will
make use of the braking effect of the engine,
which relieves the load on the brake system
and prevents the brakes from overheating
and wearing too quickly. G
Risk of accident
Do not change down for additional engine
braking on a slippery road surface. This could
cause the drive wheels to lose their grip and
the vehicle could skid.
Use cruise control only if road and traffic con-
ditions make it appropriate to maintain a
steady speed for a prolonged period. You can
store any road speed above 30 km/h. G
Risk of accident
Cruise control cannot take account of road
and traffic conditions.
Always pay attention to traffic conditions
even when cruise control is activated.
Cruise control is only an aid designed to assist
driving. You are responsible for the vehicle's
speed and for braking in good time. G
Risk of accident
Do not use cruise control:
R in road and traffic conditions which do not
allow you to maintain a constant speed (e.g. heavy traffic or winding roads). You could
otherwise cause an accident.
R on slippery roads. Braking or accelerating
could cause the drive wheels to lose trac-
tion and the vehicle could then skid.
R when there is poor visibility, e.g. due to fog,
heavy rain or snow
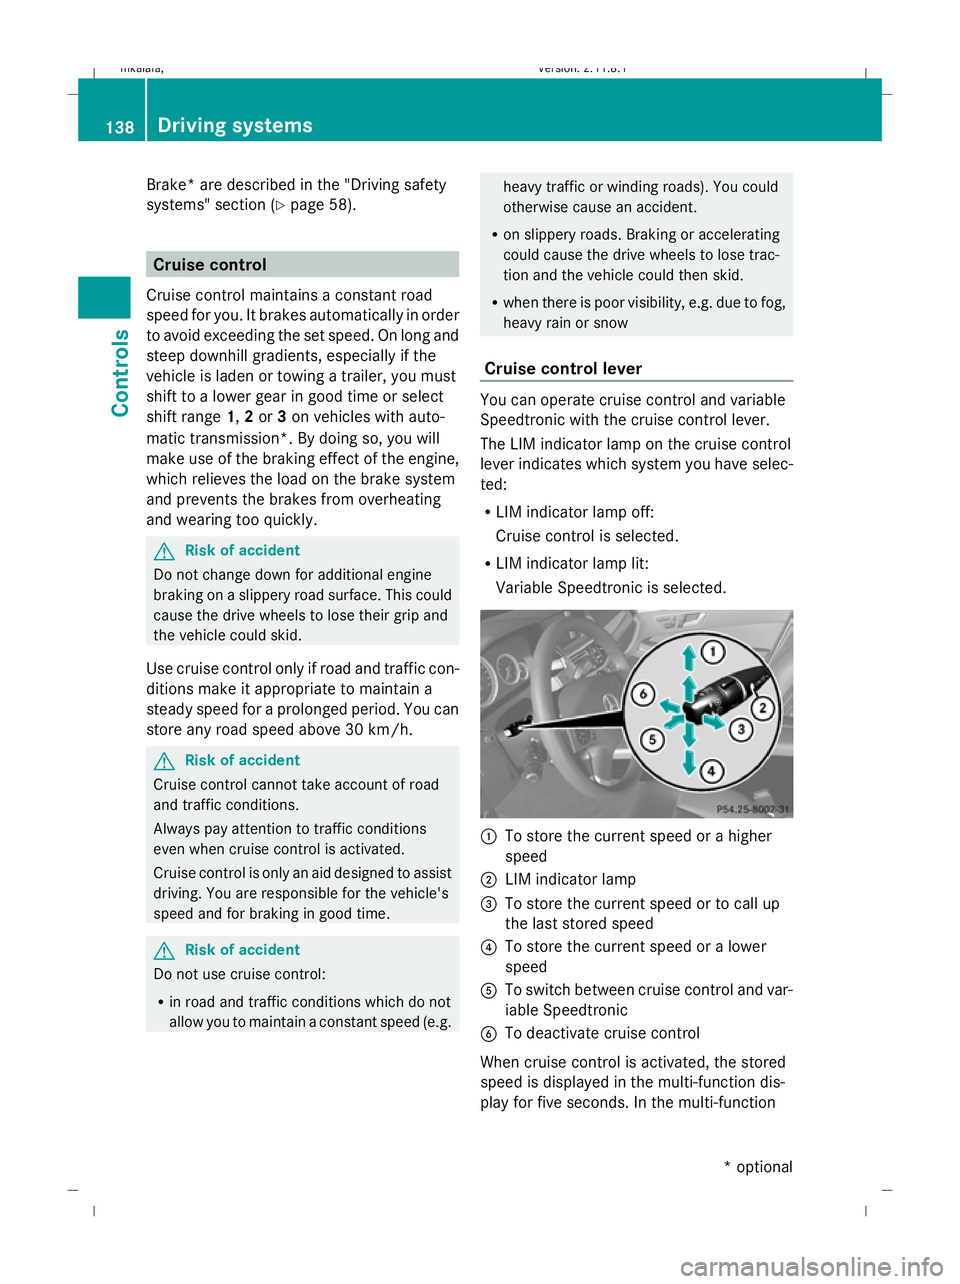
Cruise control lever You can operate cruise control and variable
Speedtronic with the cruise control lever.
The LIM indicator lamp on the cruise control
lever indicates which system you have selec-
ted:
R LIM indicator lamp off:
Cruise control is selected.
R LIM indicator lamp lit:
Variable Speedtronic is selected. :
To store the current speed or a higher
speed
; LIM indicator lamp
= To store the current speed or to call up
the last stored speed
? To store the current speed or a lower
speed
A To switch between cruise control and var-
iable Speedtronic
B To deactivate cruise control
When cruise control is activated, the stored
speed is displayed in the multi-function dis-
play for five seconds. In the multi-function 138
Driving systemsControls
* optional
212_AKB; 2; 4, en-GB
mkalafa
,V ersion: 2.11.8.1
2009-05-05T14:17:16+02:00 - Seite 138
Dateiname: 6515346702_buchblock.pdf; erzeugt am 07. May 2009 14:16:17; WK
Page 143 of 373

Adjustment in 10 km/h increments
X
Briefly press the cruise control lever
beyond the pressure point, up :for a
higher speed or down ?for a lower speed.
The last speed stored is increased or
reduced.
Deactivating cruise control There are several ways to deactivate cruise
control:
X
Briefly press the cruise control lever for-
wards B.
or
X Brake.
or
X Briefly press the cruise control lever in the
direction of arrow A.
Variable Speedtronic is selected. LIM indi-
cator lamp ;in the cruise control lever
lights up.
Cruise control is automatically deactivated if:
R you depress the parking brake.
R you drive at less than 30 km/h
R ESP ®
intervenes or you deactivate ESP ®
R you change into neutral in a vehicle with
manual transmission while driving or if the
clutch is depressed for longer than 6 sec-
onds
R on vehicles with manual transmission, you
shift to a higher gear and as a result the
engine speed is too low
R you move the selector lever to Non vehi-
cles with automatic transmission* while
driving
If cruise control is deactivated, you will hear
a warning tone. You see the Cruise con‐
trol off message in the multi-function dis-
play for approximately five seconds.
i The last speed stored is cleared when you
switch off the engine. Distronic Plus*
i Distronic Plus is not available in all coun-
tries.
Distronic Plus regulates the speed and auto-
matically maintains the distance to the vehi-
cle in front. It brakes automatically in order
to avoid exceeding the set speed. On long and
steep downhill gradients, especially if the
vehicle is laden or towing a trailer, you must
select shift range 1,2or 3in good time. By
doing so, you will make use of the braking
effect of the engine, which relieves the load
on the brake system and prevents the brakes
from overheating and wearing too quickly. G
Risk of accident
Do not change down for additional engine
braking on a slippery road surface. This could
cause the drive wheels to lose their grip and
the vehicle could skid. G
Risk of accident
Distronic Plus is only an aid designed to assist
driving. The driver is fully responsible for the
vehicle's distance from other vehicles, the
vehicle's speed and for braking in good time.
Distronic Plus does not react to:
R pedestrians
R stationary obstacles on the road, e.g. stop-
ped or parked vehicles
R oncoming and crossing traffic
Distronic Plus may not detect narrow vehicles
driving in front, e.g. motorcycles, or vehicles
driving on a different line. Therefore, always
pay attention to traffic conditions even when
Distronic Plus is activated. Otherwise, you
may fail to recognise dangers in time, cause
an accident and injure yourself and others.
If a slower-moving vehicle is detected in front,
Distronic Plus causes your vehicle to brake
and maintain a preset distance to the vehicle
in front. 140
Driving systemsCont
rols
* optional
212_AKB; 2; 4, en-GB
mkalafa
,V ersion: 2.11.8.1
2009-05-05T14:17:16+02:00 - Seite 140
Dateiname: 6515346702_buchblock.pdf; erzeugt am 07. May 2009 14:16:17; WK
Page 144 of 373

G
Risk of accident
Distronic Plus cannot take account of road
and traffic conditions. If Distronic does not
recognise or no longer recognises the vehicle
in front, do not activate Distronic or, if it is
already active, deactivate it. This is especially
the case:
R before corners
R in filter lanes
R when changing to a lane with faster moving
traffic
R in complex driving situations or where the
lanes are diverted, e.g. at motorway/road-
way construction sites
Otherwise, Distronic Plus maintains the cur-
rent speed or accelerates up to the set speed.
Distronic Plus cannot take account of weather
conditions. Deactivate, or do not activate,
Distronic Plus:
R if the roads are slippery, snow-covered or
icy. The wheels could lose their grip when
braking or accelerating. The vehicle could
start to skid.
R if the sensors are dirty or there is poor vis-
ibility, e.g. due to snow, rain or fog. Dis-
tance control may be impaired.
Always pay attention to traffic conditions
even when Distronic Plus is activated. Other-
wise, you may fail to recognise dangers in
time, cause an accident and injure yourself
and others.
The radar sensor system is automatically
deactivated near radio telescope facilities
(Y page 362).
If you want Distronic Plus to assist you, the
radar sensor system must be activated and
operational.
If no car is driving in front of you, Distronic
Plus works like cruise control in the speed
range between 30 km/h and 200 km/h. If a
vehicle is driving in front of you, Distronic Plus
works in the speed range between 0 km/h
and 200 km/h. Do not use Distronic Plus while driving on
roads with steep gradients. G
Risk of accident
Distronic Plus brakes your vehicle at a maxi-
mum of 4m/s2
depending on its speed. This
corresponds to approximately 40% of your
vehicle's maximum brake force. You must
also apply the brakes yourself if this braking
power is not sufficient.
If Distronic Plus detects a risk of collision with
a vehicle in front, an intermittent warning tone
sounds. In addition, the ·distance warn-
ing lamp in the instrument cluster lights up.
Brake to avoid a collision.
Cruise control lever With the cruise control lever you can operate
Distronic Plus and variable Speedtronic.
The LIM indicator lamp on the cruise control
lever indicates which system you have selec-
ted:
R
LIM indicator lamp off:
Distronic Plus is selected.
R LIM indicator lamp lit:
Variable Speedtronic is selected. :
To store the current speed or a higher
speed
; To adjust the specified distance
= LIM indicator lamp
? To store the current speed or call up the
last stored speed
A To store the current speed or a lower
speed Driving systems
141Controls
212_AKB; 2; 4, en-GB
mkalafa,V ersion: 2.11.8.1
2009-05-05T14:17:16+02:00 - Seite 141 Z
Dateiname: 6515346702_buchblock.pdf; erzeugt am 07. May 2009 14:16:17; WK