2009 MERCEDES-BENZ E-CLASS SALOON wheel
[x] Cancel search: wheelPage 72 of 373
Opening and closing
...........................70
Boot/luggage compartment ..............72
Key positions ....................................... 75
Seats .................................................... 76
Steering wheel .................................... 84
Mirrors ................................................. 86
Memory functions* .............................87
Seat belts ............................................. 89
Lights ................................................... 93
Windscreen wipers .............................99
Side windows .................................... 100
Driving and parking ..........................103
Transmission ..................................... 110
Instrument cluster ............................117
On-board computer ..........................118
Driving systems ................................ 137
Air conditioning ................................. 171
Sliding sunroof .................................. 184
Loading and stowing ........................187
Features ............................................. 207 69Controls
212_AKB; 2; 4, en-GB
mkalafa,
Version: 2.11.8.1 2009-05-05T14:17:16+02:00 - Seite 69
Dateiname: 6515346702_buchblock.pdf; erzeugt am 07. May 2009 14:15:46; WK
Page 75 of 373
X
To unlock: press button :.
X To lock: press button ;.
Automatic locking The vehicle will lock automatically once you
have pulled away.
You can also switch the automatic locking
function on and off using the on-board com-
puter (Y page 134).
i The vehicle is locked automatically when
the ignition is switched on and the wheels
begin to turn. There is a risk of being locked
out when the vehicle is being pushed or
tested on a dynamometer.
X To switch off: press and hold button :for
approximately five seconds, until a tone
sounds.
X To switch on: press and hold button ;for
approximately five seconds, until a tone
sounds. Boot/luggage compartment
Points to remember
G
Risk of poisoning
Exhaust fumes could enter the vehicle interior
if the engine is running and the boot lid/tail-
gate is open. This could poison you. There-
fore, you should make sure that the boot lid/
tailgate is always closed when the engine is
running.
! The boot lid/tailgate swings upwards and
to the rear when opened. Therefore, make
sure that there is sufficient clearance
above and behind the boot lid/tailgate.
Do not leave the key in the boot/luggage
compartment. Otherwise, you could lock
yourself out. You can:
R
open and close the boot lid/tailgate man-
ually (Y page 72)
R opened and closed* automatically from
outside (Y page 73)
R opened and closed* automatically from
inside (Y page 74) Opening and closing manually
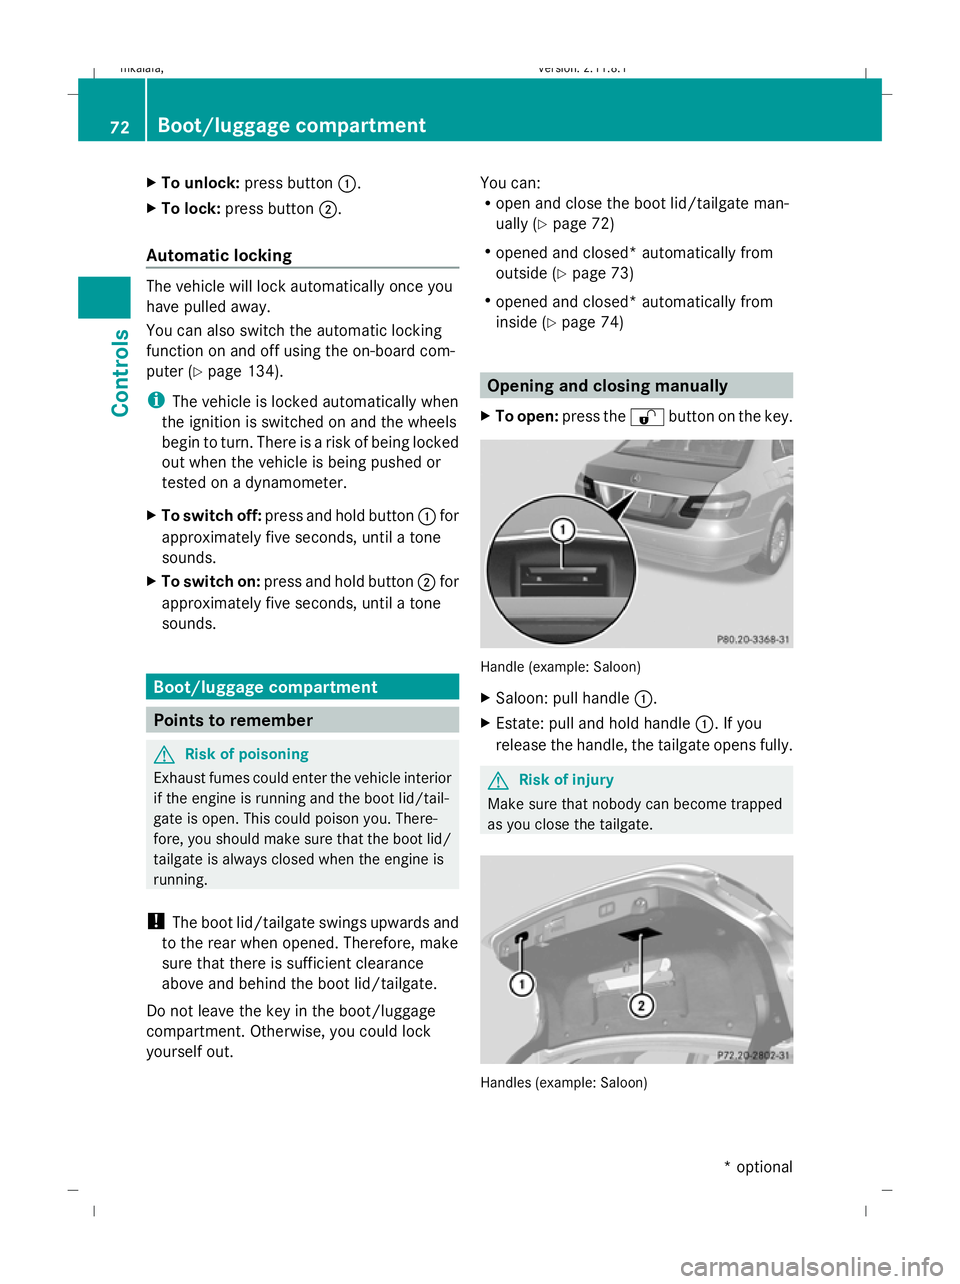
X To open: press the %button on the key. Handle (example: Saloon)
X
Saloon: pull handle :.
X Estate: pull and hold handle :. If you
release the handle, the tailgate opens fully. G
Risk of injury
Make sure that nobody can become trapped
as you close the tailgate. Handles (example: Saloon)72
Boot/luggage compartmentControls
* optional
212_AKB; 2; 4, en-GB
mkalafa,
Version: 2.11.8.1 2009-05-05T14:17:16+02:00 - Seite 72
Dateiname: 6515346702_buchblock.pdf; erzeugt am 07. May 2009 14:15:47; WK
Page 76 of 373
X
To close: pull down the boot lid/tailgate
using recess :or;.
X Lock the vehicle, if necessary, with
the & button on the key.
Opening the tailgate from inside the
vehicle (Estate with a folding bench
seat*) X
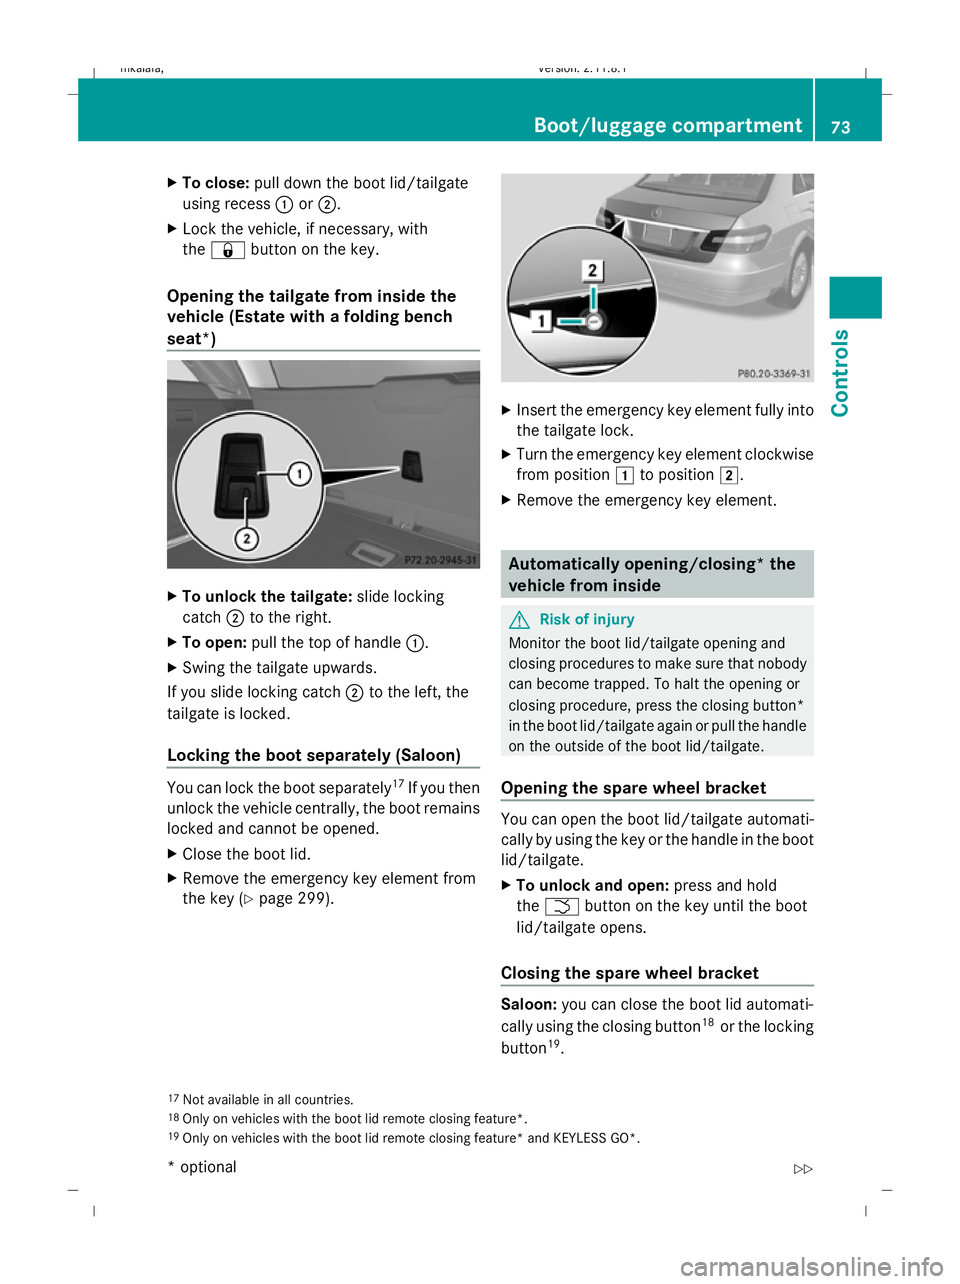
To unlock the tailgate: slide locking
catch ;to the right.
X To open: pull the top of handle :.
X Swing the tailgate upwards.
If you slide locking catch ;to the left, the
tailgate is locked.
Locking the boot separately (Saloon) You can lock the boot separately
17
If you then
unlock the vehicle centrally, the boot remains
locked and cannot be opened.
X Close the boot lid.
X Remove the emergency key element from
the key (Y page 299). X
Insert the emergency key element fully into
the tailgate lock.
X Turn the emergency key element clockwise
from position 1to position 2.
X Remove the emergency key element. Automatically opening/closing* the
vehicle from inside
G
Risk of injury
Monitor the boot lid/tailgate opening and
closing procedures to make sure that nobody
can become trapped. To halt the opening or
closing procedure, press the closing button*
in the boot lid/tailgate again or pull the handle
on the outside of the boot lid/tailgate.
Opening the spare wheel bracket You can open the boot lid/tailgate automati-
cally by using the key or the handle in the boot
lid/tailgate.
X
To unlock and open: press and hold
the F button on the key until the boot
lid/tailgate opens.
Closing the spare wheel bracket Saloon:
you can close the boot lid automati-
cally using the closing button 18
or the locking
button 19
.
17 Not available in all countries.
18 Only on vehicles with the boot lid remote closing feature*.
19 Only on vehicles with the boot lid remote closing feature* and KEYLESS GO*. Boot/luggage compartment
73Controls
* optional
212_AKB; 2; 4, en-GB
mkalafa,
Version: 2.11.8.1 2009-05-05T14:17:16+02:00 - Seite 73 Z
Dateiname: 6515346702_buchblock.pdf; erzeugt am 07. May 2009 14:15:47; WK
Page 87 of 373
!
To prevent damage, you must insert the
head restraints fully into their guides and
engage the belt buckles in their guides. X
Press release catch :and push the head
restraints in fully.
X Fold backrest ;of the folding bench seat
into its original position until it engages. Steering wheel
Points to remember
Depending on the vehicle equipment, you can
adjust the steering wheel either manually or
electrically*. G
Risk of injury
The electrically adjustable steering wheel*
can be adjusted when the key is removed
from the ignition lock. Therefore, do not leave
children unsupervised in the vehicle as they
could become trapped as the steering wheel
is adjusted. G
Risk of accident
Only adjust the steering wheel when the vehi-
cle is stationary and do not pull away until the
steering wheel adjustment mechanism is
locked in position. Otherwise, you might drive
without the steering wheel adjustment mech-
anism being locked in position and be distrac-
ted from road and traffic conditions by an
unexpected movement of the steering wheel
and cause an accident. However, the steerability of the vehicle is not
affected.
When you adjust the steering wheel, make
sure that:
R the steering wheel can be reached with
your arms slightly bent
R you can move your legs freely
R you can see all the displays in the instru-
ment cluster clearly Adjusting the steering wheel man-
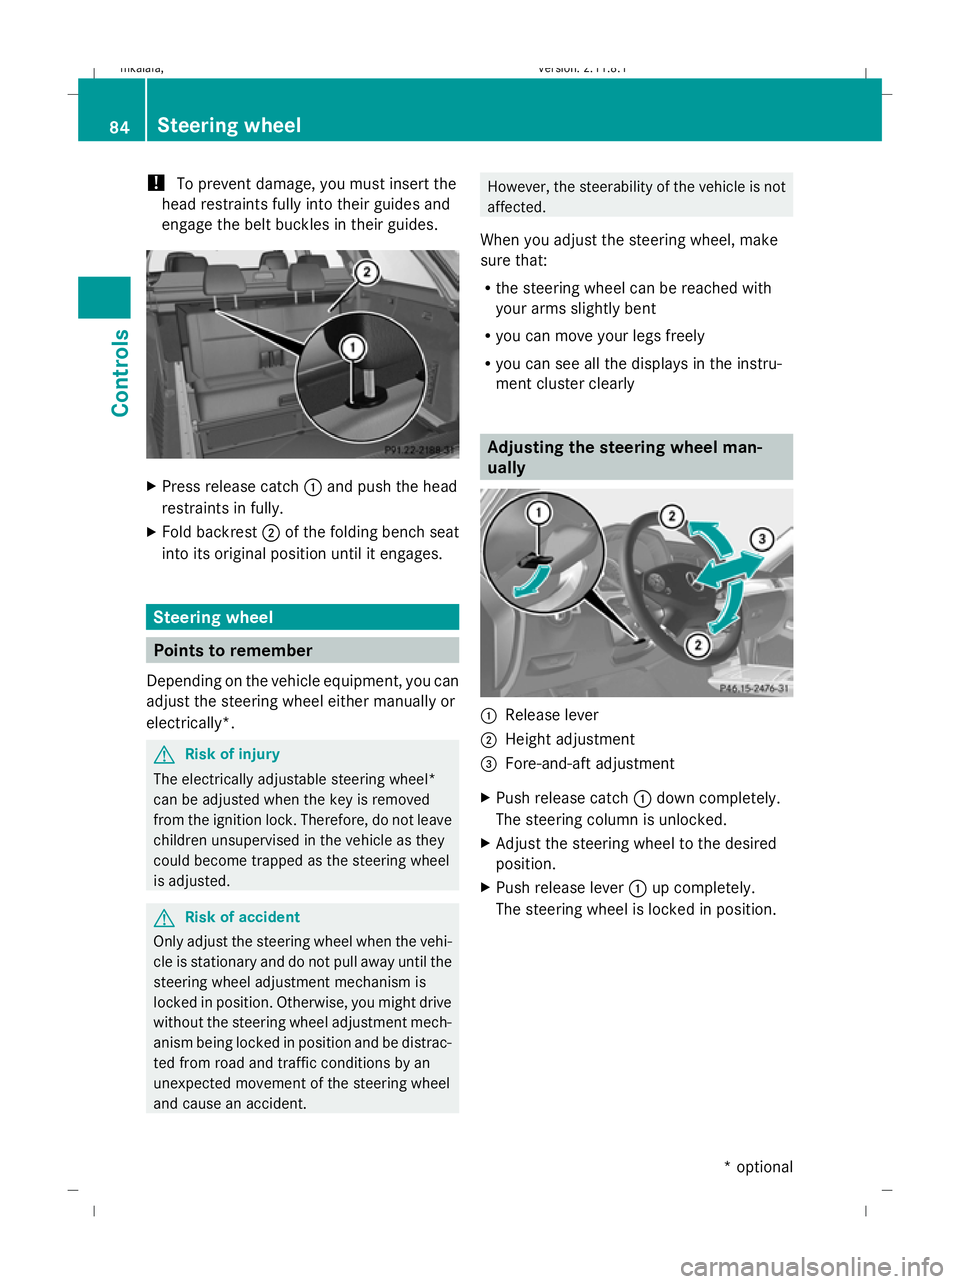
ually
:
Release lever
; Height adjustment
= Fore-and-aft adjustment
X Push release catch :down completely.
The steering column is unlocked.
X Adjust the steering wheel to the desired
position.
X Push release lever :up completely.
The steering wheel is locked in position. 84
Steering wheelControls
* optional
212_AKB; 2; 4, en-GB
mkalafa,
Version: 2.11.8.1 2009-05-05T14:17:16+02:00 - Seite 84
Dateiname: 6515346702_buchblock.pdf; erzeugt am 07. May 2009 14:15:55; WK
Page 88 of 373
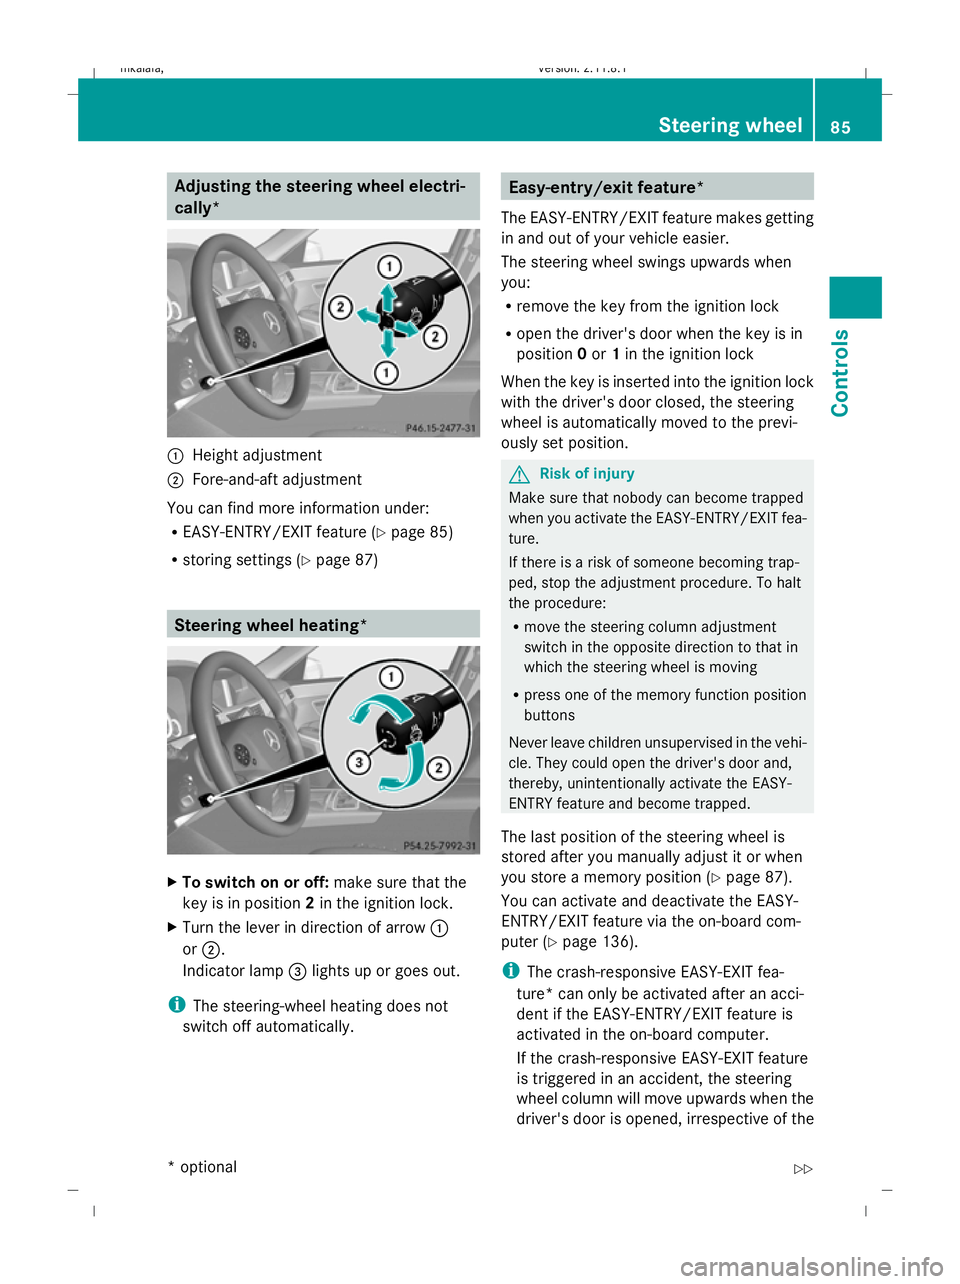
Adjusting the steering wheel electri-
cally*
:
Height adjustment
; Fore-and-aft adjustment
You can find more information under:
R EASY-ENTRY/EXIT feature (Y page 85)
R storing settings (Y page 87) Steering wheel heating*
X
To switch on or off: make sure that the
key is in position 2in the ignition lock.
X Turn the lever in direction of arrow :
or ;.
Indicator lamp =lights up or goes out.
i The steering-wheel heating does not
switch off automatically. Easy-entry/exit feature*
The EASY-ENTRY/EXIT feature makes getting
in and out of your vehicle easier.
The steering wheel swings upwards when
you:
R remove the key from the ignition lock
R open the driver's door when the key is in
position 0or 1in the ignition lock
When the key is inserted into the ignition lock
with the driver's door closed, the steering
wheel is automatically moved to the previ-
ously set position. G
Risk of injury
Make sure that nobody can become trapped
when you activate the EASY-ENTRY/EXIT fea-
ture.
If there is a risk of someone becoming trap-
ped, stop the adjustment procedure. To halt
the procedure:
R move the steering column adjustment
switch in the opposite direction to that in
which the steering wheel is moving
R press one of the memory function position
buttons
Never leave children unsupervised in the vehi-
cle. They could open the driver's door and,
thereby, unintentionally activate the EASY-
ENTRY feature and become trapped.
The last position of the steering wheel is
stored after you manually adjust it or when
you store a memory position (Y page 87).
You can activate and deactivate the EASY-
ENTRY/EXIT feature via the on-board com-
puter (Y page 136).
i The crash-responsive EASY-EXIT fea-
ture* can only be activated after an acci-
dent if the EASY-ENTRY/EXIT feature is
activated in the on-board computer.
If the crash-responsive EASY-EXIT feature
is triggered in an accident, the steering
wheel column will move upwards when the
driver's door is opened, irrespective of the Steering wheel
85Controls
* optional
212_AKB; 2; 4, en-GB
mkalafa
,V ersion: 2.11.8.1
2009-05-05T14:17:16+02:00 - Seite 85 Z
Dateiname: 6515346702_buchblock.pdf; erzeugt am 07. May 2009 14:15:55; WK
Page 90 of 373

i
Make sure that the exterior mirrors are
always folded out fully while the vehicle is
in motion; otherwise, they may vibrate.
Resetting the exterior mirrors If the battery has been disconnected or has
become discharged, the exterior mirrors
must be reset. Otherwise, the exterior mirrors
will not fold in when you select the "Fold in
mirrors when locking" function in the on-
board computer (Y page 136).
X Make sure that the key is in position 1in
the ignition lock.
X Briefly press button :.
Automatically folding exterior mirrors
in or out* If the "Fold in mirrors when locking" function
is activated in the on-board computer
(Y
page 136):
R the exterior mirrors fold in automatically as
soon as you lock the vehicle from the out-
side.
R the exterior mirrors fold out again automat-
ically as soon as you unlock the vehicle and
then open the driver's or front-passenger
door.
i If you have activated this function and fold
in the exterior mirrors using button :, they
will not be folded out automatically. You
can only fold out the exterior mirrors again
using button :. Automatic anti-dazzle mirrors*
The rear-view mirror and the exterior mirror
on the driver's side automatically go into anti-
dazzle mode if the ignition is switched on and
incident light from headlamps strikes the sen-
sor in the rear-view mirror.
The mirrors do not go into anti-dazzle mode if
reverse gear is engaged or the interior lighting
is switched on. G
Risk of accident
If the incident light from headlamps cannot
strike the sensor in the rear-view mirror, for
instance, when the rear window blind* is
extended, the mirror's automatic anti-dazzle
function will not operate.
Incident light could then dazzle you. This may
distract you from the traffic conditions, and
you may, thereby, cause an accident. In this
case, adjust the rear-view mirror manually. Memory functions*
Storing settings
Using the memory button you can store up to
three different settings, e. g. for three differ-
ent people.
The following settings are stored as a single
memory preset:
R position of the seat, backrest and head
restraint
R active multicontour seat*: dynamic func-
tion level
R driver's side: steering wheel position
R driver's side: position of the exterior mir-
rors on the driver's and front-passenger
sides G
Risk of injury
The memory function can still be used when
the key has been removed. For this reason,
children should never be left unsupervised in
the vehicle. Otherwise, they could become
trapped when moving the seat or the steering
wheel. G
Risk of accident
Only use the memory function on the driver’s
side when the vehicle is stationary. Other-
wise, you could be distracted from the traffic
conditions by the steering wheel and seat
moving of their own accord, and as a result
cause an accident. Memory functions*
87Controls
* optional
212_AKB; 2; 4, en-GB
mkalafa,
Version: 2.11.8.1 2009-05-05T14:17:16+02:00 - Seite 87 Z
Dateiname: 6515346702_buchblock.pdf; erzeugt am 07. May 2009 14:15:56; WK
Page 91 of 373
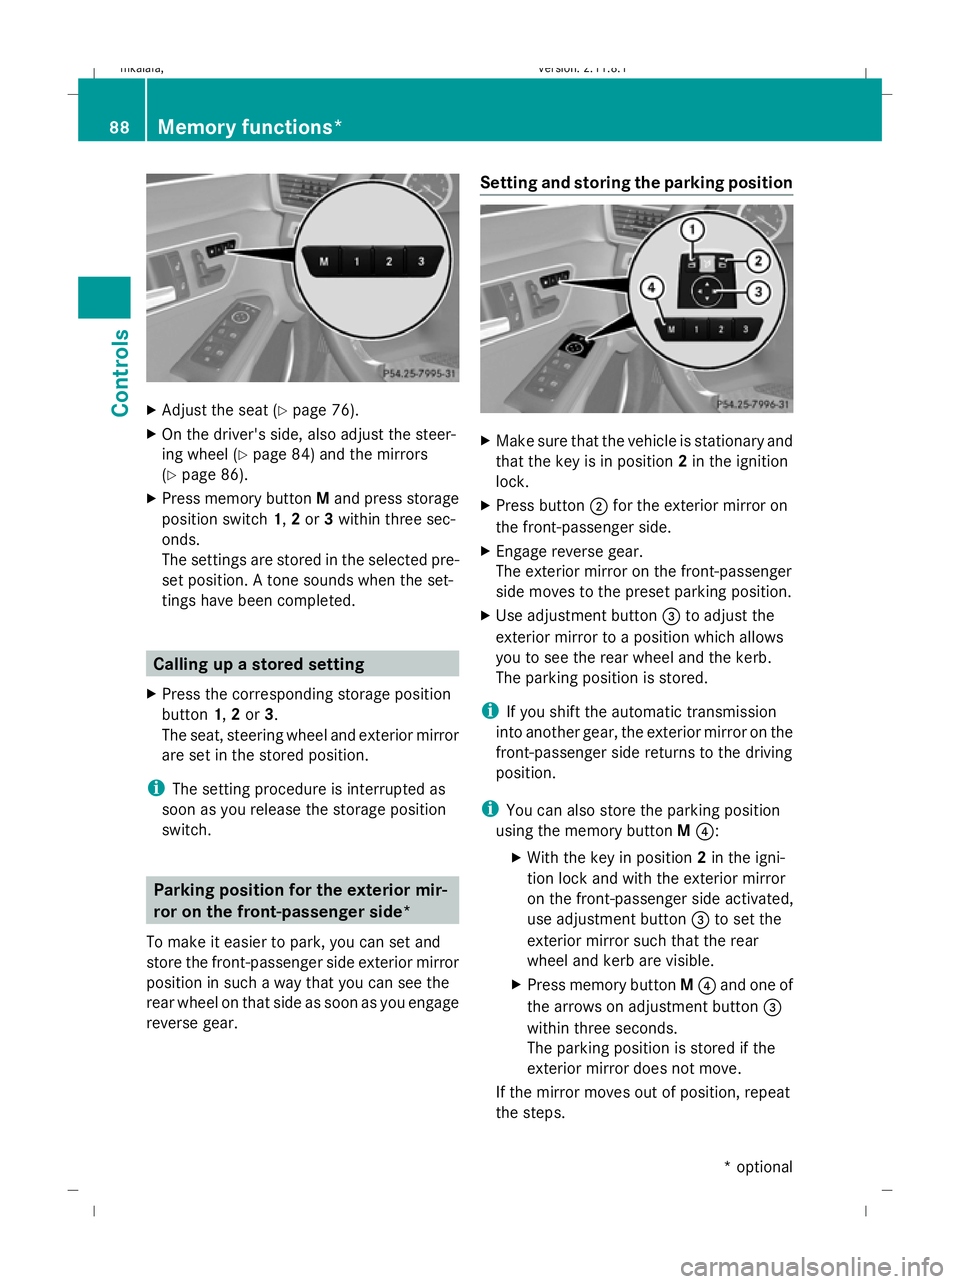
X
Adjust the seat ( Ypage 76).
X On the driver's side, also adjust the steer-
ing wheel (Y page 84) and the mirrors
(Y page 86).
X Press memory button Mand press storage
position switch 1,2or 3within three sec-
onds.
The settings are stored in the selected pre-
set position. A tone sounds when the set-
tings have been completed. Calling up a stored setting
X Press the corresponding storage position
button 1,2or 3.
The seat, steering wheel and exterior mirror
are set in the stored position.
i The setting procedure is interrupted as
soon as you release the storage position
switch. Parking position for the exterior mir-
ror on the front-passenger side*
To make it easier to park, you can set and
store the front-passenger side exterior mirror
position in such a way that you can see the
rear wheel on that side as soon as you engage
reverse gear. Setting and storing the parking position
X
Make sure that the vehicle is stationary and
that the key is in position 2in the ignition
lock.
X Press button ;for the exterior mirror on
the front-passenger side.
X Engage reverse gear.
The exterior mirror on the front-passenger
side moves to the preset parking position.
X Use adjustment button =to adjust the
exterior mirror to a position which allows
you to see the rear wheel and the kerb.
The parking position is stored.
i If you shift the automatic transmission
into another gear, the exterior mirror on the
front-passenger side returns to the driving
position.
i You can also store the parking position
using the memory button M?:
X With the key in position 2in the igni-
tion lock and with the exterior mirror
on the front-passenger side activated,
use adjustment button =to set the
exterior mirror such that the rear
wheel and kerb are visible.
X Press memory button M? and one of
the arrows on adjustment button =
within three seconds.
The parking position is stored if the
exterior mirror does not move.
If the mirror moves out of position, repeat
the steps. 88
Memory functions*Controls
* optional
212_AKB; 2; 4, en-GB
mkalafa,
Version: 2.11.8.1 2009-05-05T14:17:16+02:00 - Seite 88
Dateiname: 6515346702_buchblock.pdf; erzeugt am 07. May 2009 14:15:57; WK
Page 95 of 373
Example: vehicles with a rear bench seat: the pas-
sengers on the left and right rear seats have their
seat belts fastened
You can also cancel the messages immedi-
ately (Y page 252).
i The status indicator for the rear-compart-
ment seat belts is only available for certain
countries. Correct driver's seat position
G
Risk of accident
Only adjust the driver's seat when the vehicle
is stationary. You will otherwise be distracted
from the road and traffic conditions and you
could lose control of the vehicle as a result of
the seat moving. This could cause an acci-
dent. G
Risk of accident
Only adjust the steering wheel when the vehi-
cle is stationary and do not pull away until the
steering wheel adjustment mechanism is
locked in position. Otherwise, you might drive
without the steering wheel adjustment mech-
anism being locked in position and be distrac-
ted from road and traffic conditions by an
unexpected movement of the steering wheel
and cause an accident.
However, the steerability of the vehicle is not
affected.
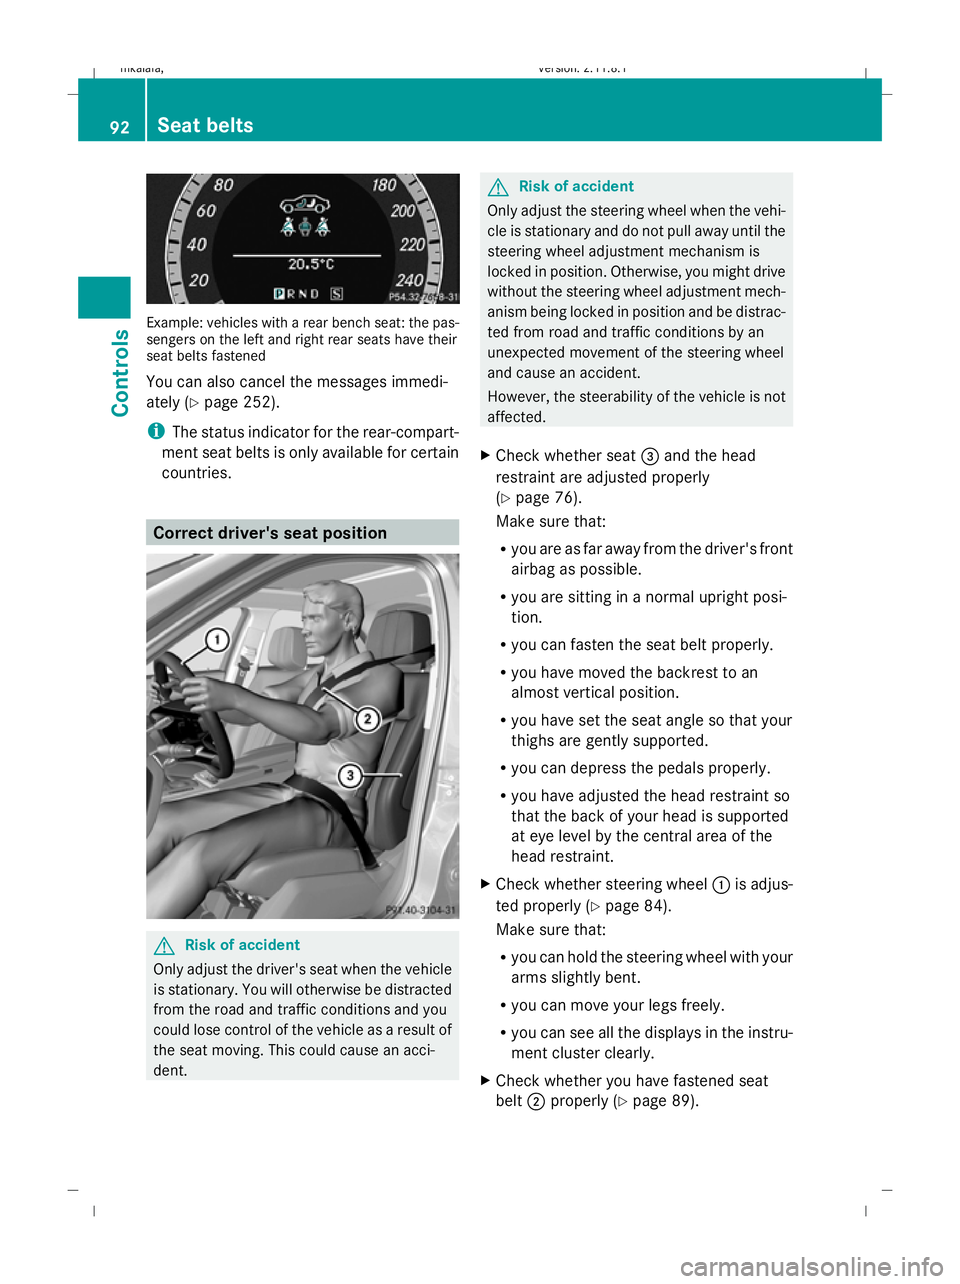
X Check whether seat =and the head
restraint are adjusted properly
(Y page 76).
Make sure that:
R you are as far away from the driver's front
airbag as possible.
R you are sitting in a normal upright posi-
tion.
R you can fasten the seat belt properly.
R you have moved the backrest to an
almost vertical position.
R you have set the seat angle so that your
thighs are gently supported.
R you can depress the pedals properly.
R you have adjusted the head restraint so
that the back of your head is supported
at eye level by the central area of the
head restraint.
X Check whether steering wheel :is adjus-
ted properly (Y page 84).
Make sure that:
R you can hold the steering wheel with your
arms slightly bent.
R you can move your legs freely.
R you can see all the displays in the instru-
ment cluster clearly.
X Check whether you have fastened seat
belt ;properly (Y page 89). 92
Seat beltsControls
212_AKB; 2; 4, en-GB
mkalafa,
Version: 2.11.8.1 2009-05-05T14:17:16+02:00 - Seite 92
Dateiname: 6515346702_buchblock.pdf; erzeugt am 07. May 2009 14:15:58; WK