2009 MERCEDES-BENZ E-CLASS SALOON start stop button
[x] Cancel search: start stop buttonPage 296 of 373

Automatic transmission*
Problem
Possible causes/consequences and
X
X Solutions The transmission has
problems shifting gear. The transmission is losing oil.
X
Have the transmission checked at a qualified specialist work-
shop immediately. The acceleration ability
is deteriorating.
The transmission no
longer changes gear. The transmission is in emergency mode.
It is only possible to shift into
secondgear and reverse gear.
X Stop the vehicle.
X Move the transmission to position P.
X Turn the key in the ignition to position 0(Y page 75) or press
the Start/Stop button* repeatedly until all indicator lamps in
the instrument cluster go out.
X Wait at least 10 seconds before restarting the engine.
X Move the transmission to position Dor R.
If D is selected, the transmission shifts into secondgear; ifRis
selected, the transmission shifts into reverse gear.
X Have the transmission checked at a qualified specialist work-
shop immediately. PARKTRONIC*
Problem
Possible causes/consequences and
X
X Solutions Only the red segments
in the PARKTRONIC
warning display are lit.
You also hear a warning
tone for approximately
two seconds.
PARKTRONIC is deacti-
vated after approx-
imately 20 seconds and
the indicator lamp in
the PARKTRONIC but-
ton lights up. PARKTRONIC has malfunctioned and has switched itself off.
X
If problems persist, have PARKTRONIC checked at a qualified
specialist workshop. Only the red segments
in the PARKTRONIC
warning display are lit.
PARKTRONIC is deacti-
vated after approx-
imately 20 seconds. The PARKTRONIC sensors are dirty or there is interference.
X
Clean the PARKTRONIC sensors (Y page 243).
X Switch the ignition back on. Troubleshooting
293Practical advice
* optional
212_AKB; 2; 4, en-GB
mkalafa,
Version: 2.11.8.1 2009-05-05T14:17:16+02:00 - Seite 293 Z
Dateiname: 6515346702_buchblock.pdf; erzeugt am 07. May 2009 14:17:13; WK
Page 302 of 373

Locking/unlocking in an emergency
Emergency key element
If the vehicle can no longer be locked or
unlocked with the key, use the emergency
key element.
If you use the emergency key element to
unlock and open the driver's door or the boot
lid, the anti-theft alarm system* will be trig-
gered (Y page 65).
There are several ways to turn off the alarm:
X Press the %or& button on the key.
or
X Insert the key into the ignition lock.
or
X Press the start/stop button *in the ignition
lock. The key must be in the vehicle.
or
X Lock or unlock the vehicle using KEYLESS
GO*. The key must be outside the vehicle.
If you unlock the vehicle using the emergency
key element, the fuel filler flap will not be
unlocked automatically.
X To unlock the fuel filler flap: insert the
key in the ignition lock.
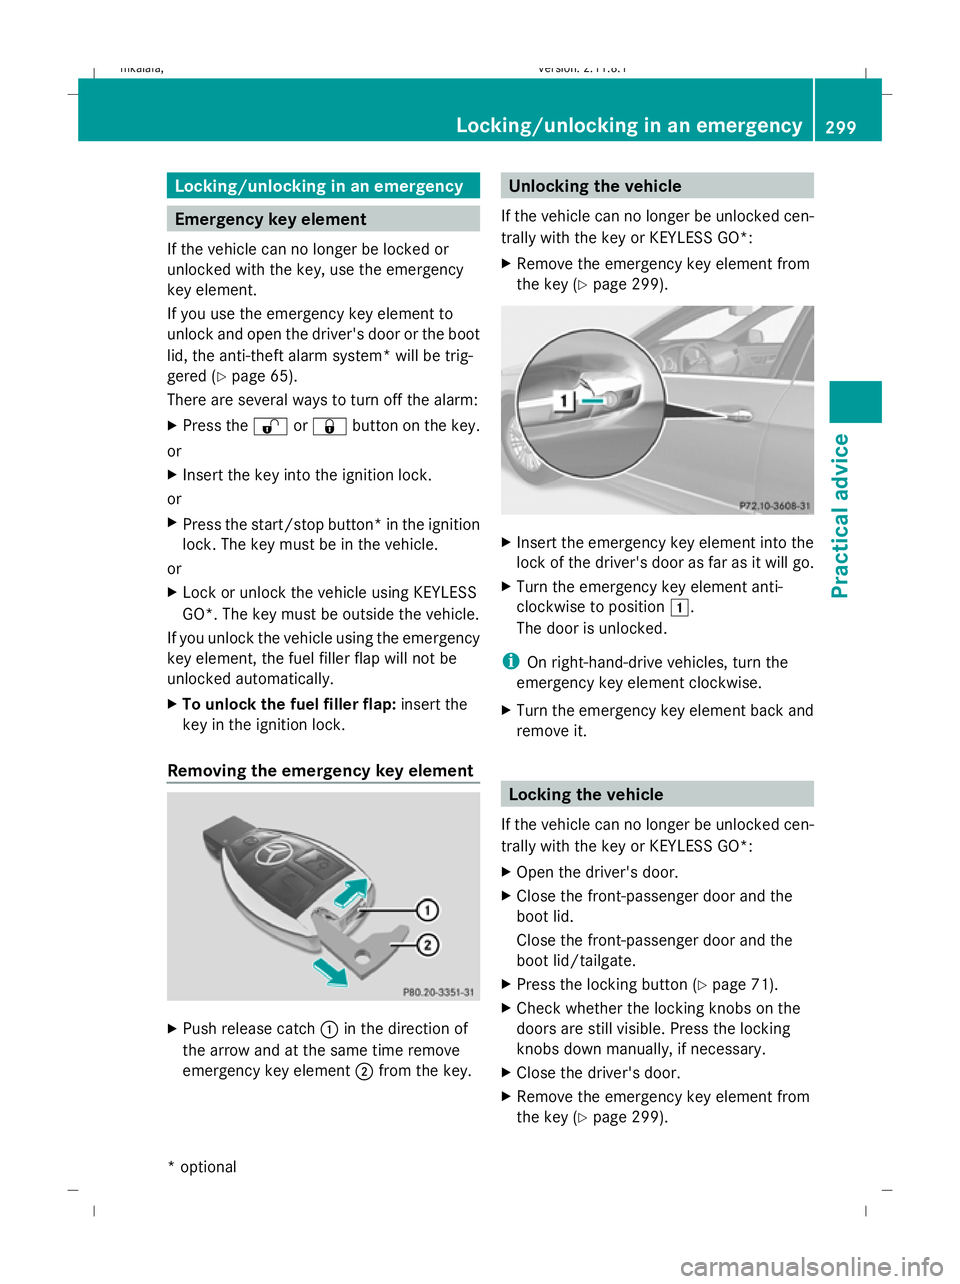
Removing the emergency key element X
Push release catch :in the direction of
the arrow and at the same time remove
emergency key element ;from the key. Unlocking the vehicle
If the vehicle can no longer be unlocked cen-
trally with the key or KEYLESS GO*:
X Remove the emergency key element from
the key (Y page 299). X
Insert the emergency key element into the
lock of the driver's door as far as it will go.
X Turn the emergency key element anti-
clockwise to position 1.
The door is unlocked.
i On right-hand-drive vehicles, turn the
emergency key element clockwise.
X Turn the emergency key element back and
remove it. Locking the vehicle
If the vehicle can no longer be unlocked cen-
trally with the key or KEYLESS GO*:
X Open the driver's door.
X Close the front-passenger door and the
boot lid.
Close the front-passenger door and the
boot lid/tailgate.
X Press the locking button (Y page 71).
X Check whether the locking knobs on the
doors are still visible. Press the locking
knobs down manually, if necessary.
X Close the driver's door.
X Remove the emergency key element from
the key (Y page 299). Locking/unlocking in an emergency
299Practical advice
* optional
212_AKB; 2; 4, en-GB
mkalafa,
Version: 2.11.8.1 2009-05-05T14:17:16+02:00 - Seite 299 Z
Dateiname: 6515346702_buchblock.pdf; erzeugt am 07. May 2009 14:17:15; WK
Page 314 of 373

G
Risk of injury
Comply with the manufacturer's safety
instructions shown on the sticker on the elec-
tric air pump.
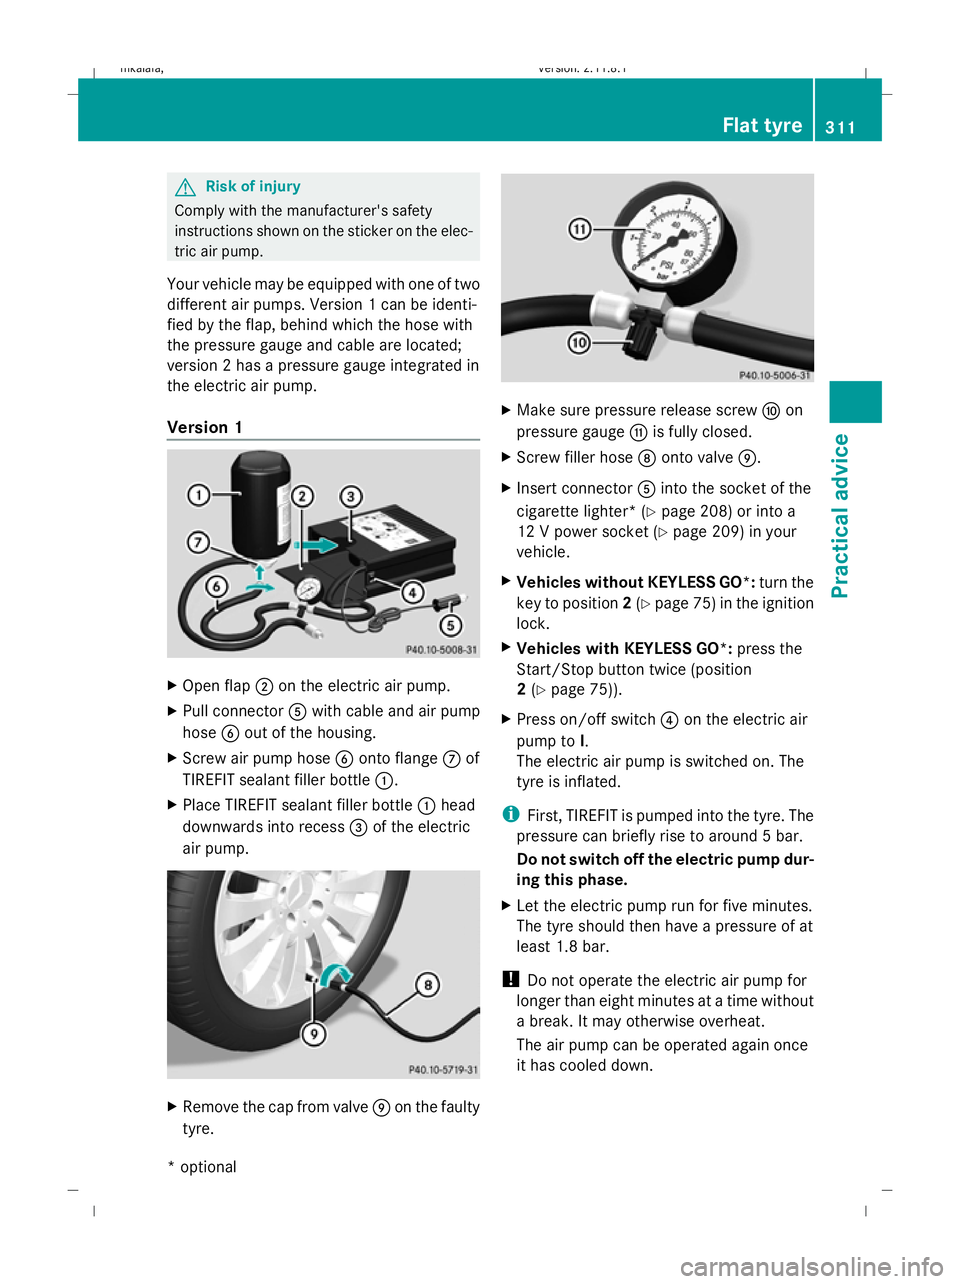
Your vehicle may be equipped with one of two
different air pumps. Version 1 can be identi-
fied by the flap, behind which the hose with
the pressure gauge and cable are located;
version 2 has a pressure gauge integrated in
the electric air pump.
Version 1 X
Open flap ;on the electric air pump.
X Pull connector Awith cable and air pump
hose Bout of the housing.
X Screw air pump hose Bonto flange Cof
TIREFIT sealant filler bottle :.
X Place TIREFIT sealant filler bottle :head
downwards into recess =of the electric
air pump. X
Remove the cap from valve Eon the faulty
tyre. X
Make sure pressure release screw Fon
pressure gauge Gis fully closed.
X Screw filler hose Donto valve E.
X Insert connector Ainto the socket of the
cigarette lighter* (Y page 208) or into a
12 V power socket ( Ypage 209) in your
vehicle.
X Vehicles without KEYLESS GO*: turn the
key to position 2(Y page 75) in the ignition
lock.
X Vehicles with KEYLESS GO*: press the
Start/Stop button twice (position
2 (Y page 75)).
X Press on/off switch ?on the electric air
pump to I.
The electric air pump is switched on. The
tyre is inflated.
i First, TIREFIT is pumped into the tyre. The
pressure can briefly rise to around 5 bar.
Do not switch off the electric pump dur-
ing this phase.
X Let the electric pump run for five minutes.
The tyre should then have a pressure of at
least 1.8 bar.
! Do not operate the electric air pump for
longer than eight minutes at a time without
a break. It may otherwise overheat.
The air pump can be operated again once
it has cooled down. Flat tyre
311Practical advice
* optional
212_AKB; 2; 4, en-GB
mkalafa
,V ersion: 2.11.8.1
2009-05-05T14:17:16+02:00 - Seite 311 Z
Dateiname: 6515346702_buchblock.pdf; erzeugt am 07. May 2009 14:17:21; WK
Page 316 of 373

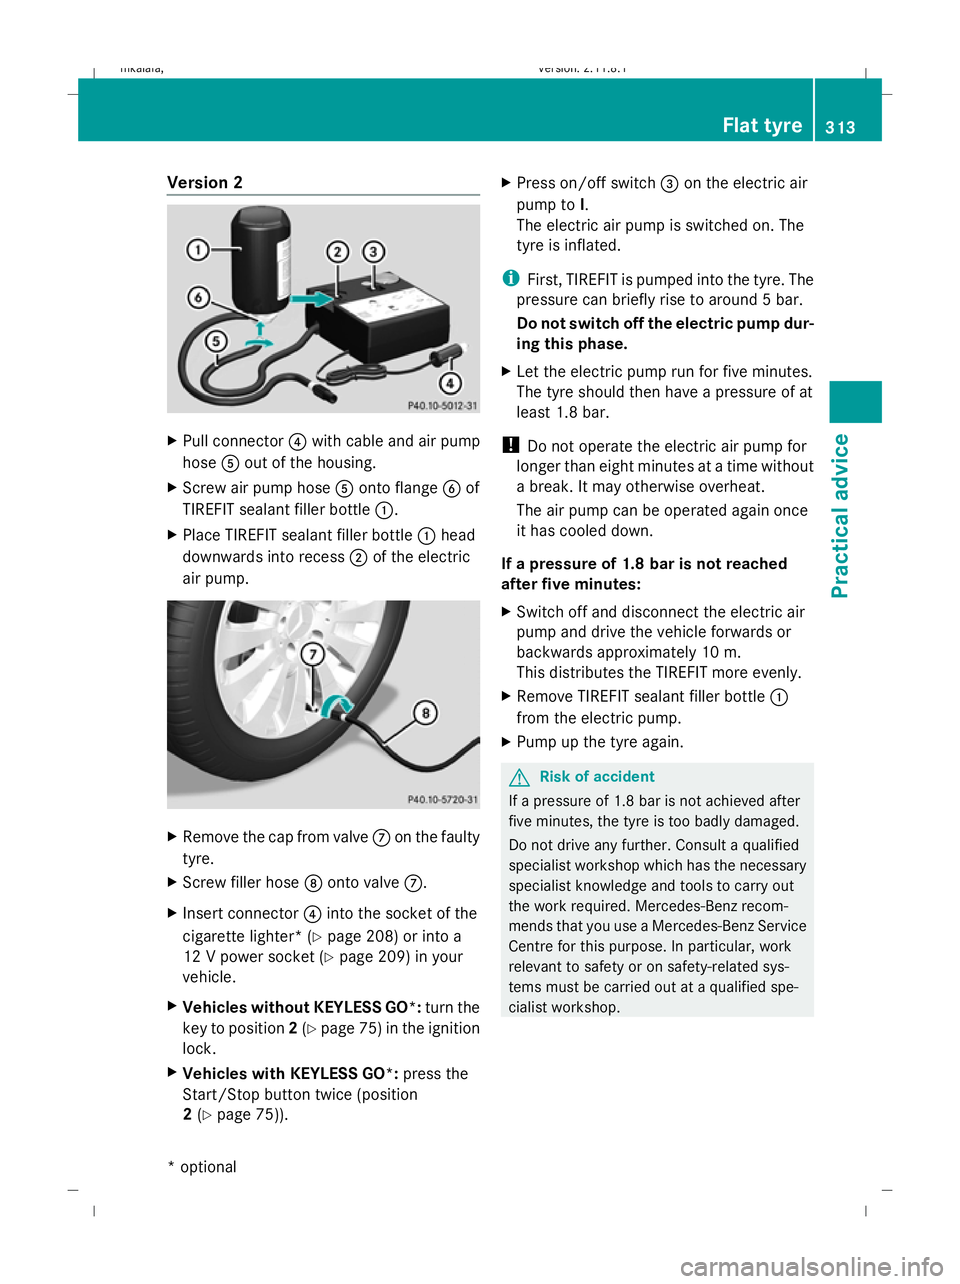
Version 2
X
Pull connector ?with cable and air pump
hose Aout of the housing.
X Screw air pump hose Aonto flange Bof
TIREFIT sealant filler bottle :.
X Place TIREFIT sealant filler bottle :head
downwards into recess ;of the electric
air pump. X
Remove the cap from valve Con the faulty
tyre.
X Screw filler hose Donto valve C.
X Insert connector ?into the socket of the
cigarette lighter* (Y page 208) or into a
12 V power socket ( Ypage 209) in your
vehicle.
X Vehicles without KEYLESS GO*: turn the
key to position 2(Y page 75) in the ignition
lock.
X Vehicles with KEYLESS GO*: press the
Start/Stop button twice (position
2 (Y page 75)). X
Press on/off switch =on the electric air
pump to I.
The electric air pump is switched on. The
tyre is inflated.
i First, TIREFIT is pumped into the tyre. The
pressure can briefly rise to around 5 bar.
Do not switch off the electric pump dur-
ing this phase.
X Let the electric pump run for five minutes.
The tyre should then have a pressure of at
least 1.8 bar.
! Do not operate the electric air pump for
longer than eight minutes at a time without
a break. It may otherwise overheat.
The air pump can be operated again once
it has cooled down.
If a pressure of 1.8 bar is not reached
after five minutes:
X Switch off and disconnect the electric air
pump and drive the vehicle forwards or
backwards approximately 10 m.
This distributes the TIREFIT more evenly.
X Remove TIREFIT sealant filler bottle :
from the electric pump.
X Pump up the tyre again. G
Risk of accident
If a pressure of 1.8 bar is not achieved after
five minutes, the tyre is too badly damaged.
Do not drive any further. Consult a qualified
specialist workshop which has the necessary
specialist knowledge and tools to carry out
the work required. Mercedes-Benz recom-
mends that you use a Mercedes-Benz Service
Centre for this purpose. In particular, work
relevant to safety or on safety-related sys-
tems must be carried out at a qualified spe-
cialist workshop. Flat tyre
313Practical advice
* optional
212_AKB; 2; 4, en-GB
mkalafa,
Version: 2.11.8.1 2009-05-05T14:17:16+02:00 - Seite 313 Z
Dateiname: 6515346702_buchblock.pdf; erzeugt am 07. May 2009 14:17:21; WK
Page 328 of 373

deactivate HOLD and Distronic Plus if the
vehicle is to be towed.
It is better to have the vehicle transported
than to have it towed.
When towing, observe the legal requirements
in all countries concerned.
! When towing, pull away slowly and
smoothly. If the tractive power is too high,
the vehicles could be damaged.
! Do not use the towing eye for recovery,
as this could damage the vehicle. If in
doubt, recover the vehicle with a crane.
! You may tow the vehicle for a maximum
of 50 km. A towing speed of 50 km/ hmust
not be exceeded.
For towing distances over 50 km, the entire
vehicle must be lifted up and transported.
! On vehicles with KEYLESS GO*, use the
key instead of the Start/Stop button. Turn
the key to position 2in the ignition lock and
shift the automatic transmission to N. Then
turn the key back to 0and leave it in the
ignition lock.
! Only secure the tow cable or towing bar
to the towing eyes. You could otherwise
damage the vehicle.
R Vehicles with an automatic transmission*
must not be tow-started.
R Vehicles with 4MATIC* must not be towed
with the front or rear axle raised.
R If you are towing the vehicle over a longer
distance, this must be done with the rear
axle raised.
R The ignition must be switched off if you are
towing the vehicle with the rear axle raised.
Otherwise, intervention by ESP ®
could
damage the brake system.
R If the vehicle has suffered transmission
damage, only tow it with the propeller shaft
disconnected. R
If the engine does not start, try jump-start-
ing it (Y page 323).
R If it is not possible to jump-start the vehicle,
have it towed to the nearest qualified spe-
cialist workshop, e.g. a Mercedes-Benz
Service Centre.
R The automatic transmission must be in
position Nwhen the vehicle is being towed.
R Before towing the vehicle, make sure that
the battery is connected and charged. Oth-
erwise:
-you cannot switch on the ignition.
- you cannot shift the transmission to posi-
tion Non vehicles with automatic trans-
mission*.
- you have no support when braking.
i Switch off the automatic locking feature
before the vehicle is towed (Y page 134).
Otherwise, you could be locked out when
pushing or towing the vehicle. Fitting the towing eye
Vehicles with a trailer tow hitch*: if you
intend to use the vehicle for towing, fold out
the ball coupling and connect the towbar
(Y page 234) to this. Towing and tow-starting
325Practical advice
* optional
212_AKB; 2; 4, en-GB
mkalafa,
Version: 2.11.8.1 2009-05-05T14:17:16+02:00 - Seite 325 Z
Dateiname: 6515346702_buchblock.pdf; erzeugt am 07. May 2009 14:17:27; WK