2009 MERCEDES-BENZ E-CLASS SALOON clock
[x] Cancel search: clockPage 254 of 373

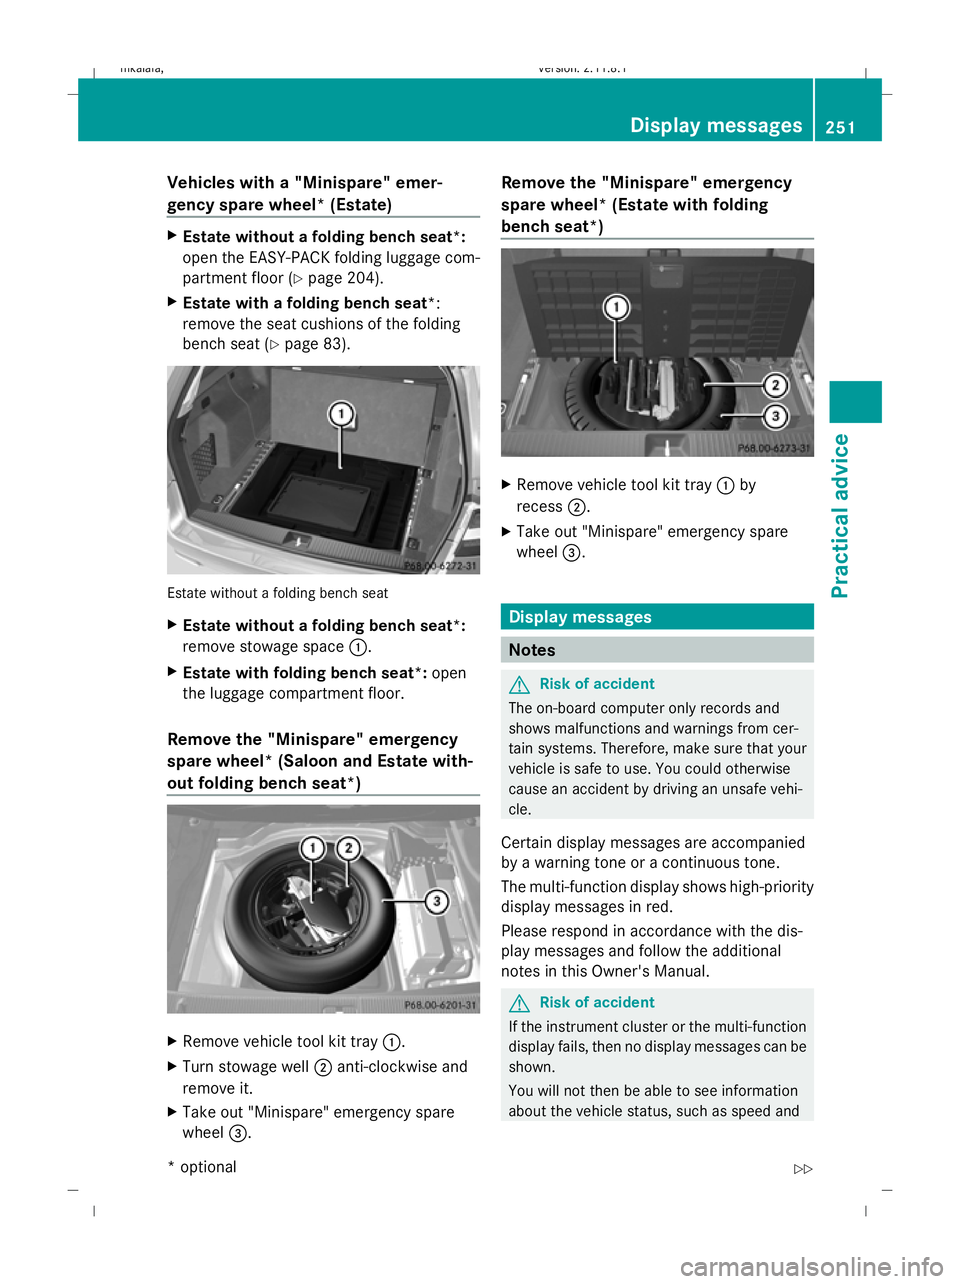
Vehicles with a "Minispare" emer-
gency spare wheel* (Estate)
X
Estate without a folding bench seat*:
open the EASY-PACK folding luggage com-
partment floor ( Ypage 204).
X Estate with a folding bench seat *:
remove the seat cushions of the folding
bench seat (Y page 83). Estate without a folding bench seat
X
Estate without a folding bench seat*:
remove stowage space :.
X Estate with folding bench seat*: open
the luggage compartment floor.
Remove the "Minispare" emergency
spare wheel* (Saloon and Estate with-
out folding bench seat*) X
Remove vehicle tool kit tray :.
X Turn stowage well ;anti-clockwise and
remove it.
X Take out "Minispare" emergency spare
wheel =. Remove the "Minispare" emergency
spare wheel* (Estate with folding
bench seat*)
X
Remove vehicle tool kit tray :by
recess ;.
X Take out "Minispare" emergency spare
wheel =. Display messages
Notes
G
Risk of accident
The on-board computer only records and
shows malfunctions and warnings from cer-
tain systems. Therefore, make sure that your
vehicle is safe to use. You could otherwise
cause an accident by driving an unsafe vehi-
cle.
Certain display messages are accompanied
by a warning tone or a continuous tone.
The multi-function display shows high-priority
display messages in red.
Please respond in accordance with the dis-
play messages and follow the additional
notes in this Owner's Manual. G
Risk of accident
If the instrument cluster or the multi-function
display fails, then no display messages can be
shown.
You will not then be able to see information
about the vehicle status, such as speed and Display messages
251Practical advice
* optional
212_AKB; 2; 4, en-GB
mkalafa,
Version: 2.11.8.1 2009-05-05T14:17:16+02:00 - Seite 251 Z
Dateiname: 6515346702_buchblock.pdf; erzeugt am 07. May 2009 14:17:07; WK
Page 302 of 373

Locking/unlocking in an emergency
Emergency key element
If the vehicle can no longer be locked or
unlocked with the key, use the emergency
key element.
If you use the emergency key element to
unlock and open the driver's door or the boot
lid, the anti-theft alarm system* will be trig-
gered (Y page 65).
There are several ways to turn off the alarm:
X Press the %or& button on the key.
or
X Insert the key into the ignition lock.
or
X Press the start/stop button *in the ignition
lock. The key must be in the vehicle.
or
X Lock or unlock the vehicle using KEYLESS
GO*. The key must be outside the vehicle.
If you unlock the vehicle using the emergency
key element, the fuel filler flap will not be
unlocked automatically.
X To unlock the fuel filler flap: insert the
key in the ignition lock.
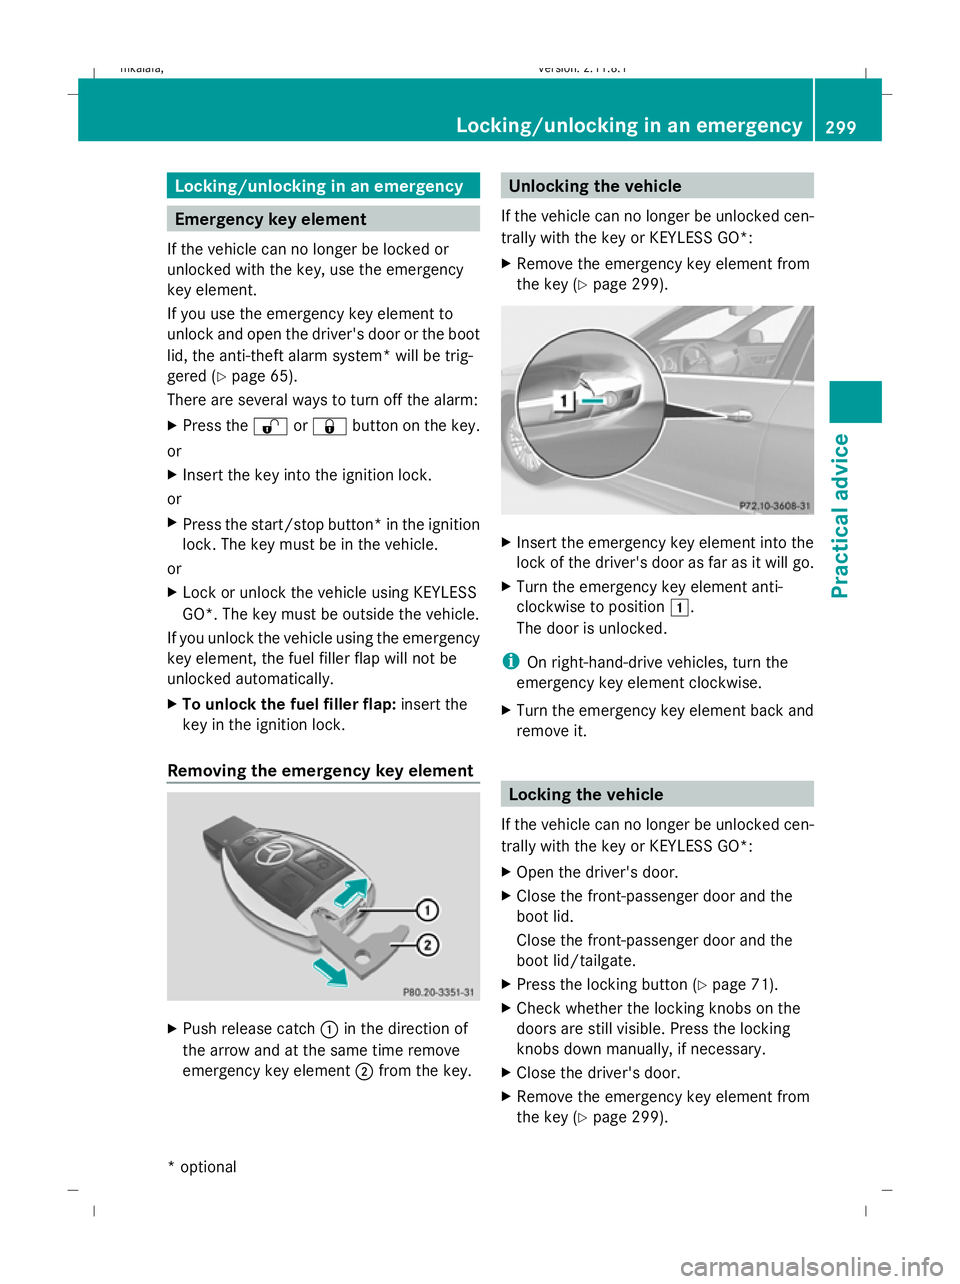
Removing the emergency key element X
Push release catch :in the direction of
the arrow and at the same time remove
emergency key element ;from the key. Unlocking the vehicle
If the vehicle can no longer be unlocked cen-
trally with the key or KEYLESS GO*:
X Remove the emergency key element from
the key (Y page 299). X
Insert the emergency key element into the
lock of the driver's door as far as it will go.
X Turn the emergency key element anti-
clockwise to position 1.
The door is unlocked.
i On right-hand-drive vehicles, turn the
emergency key element clockwise.
X Turn the emergency key element back and
remove it. Locking the vehicle
If the vehicle can no longer be unlocked cen-
trally with the key or KEYLESS GO*:
X Open the driver's door.
X Close the front-passenger door and the
boot lid.
Close the front-passenger door and the
boot lid/tailgate.
X Press the locking button (Y page 71).
X Check whether the locking knobs on the
doors are still visible. Press the locking
knobs down manually, if necessary.
X Close the driver's door.
X Remove the emergency key element from
the key (Y page 299). Locking/unlocking in an emergency
299Practical advice
* optional
212_AKB; 2; 4, en-GB
mkalafa,
Version: 2.11.8.1 2009-05-05T14:17:16+02:00 - Seite 299 Z
Dateiname: 6515346702_buchblock.pdf; erzeugt am 07. May 2009 14:17:15; WK
Page 303 of 373

X
Insert the emergency key element into the
lock of the driver's door as far as it will go.
X Turn the emergency key element clockwise
as far as it will go to position 1.
i On right-hand-drive vehicles, turn the
emergency key element anti-clockwise.
X Turn the emergency key element back and
remove it.
X Check whether the doors and the boot lid/
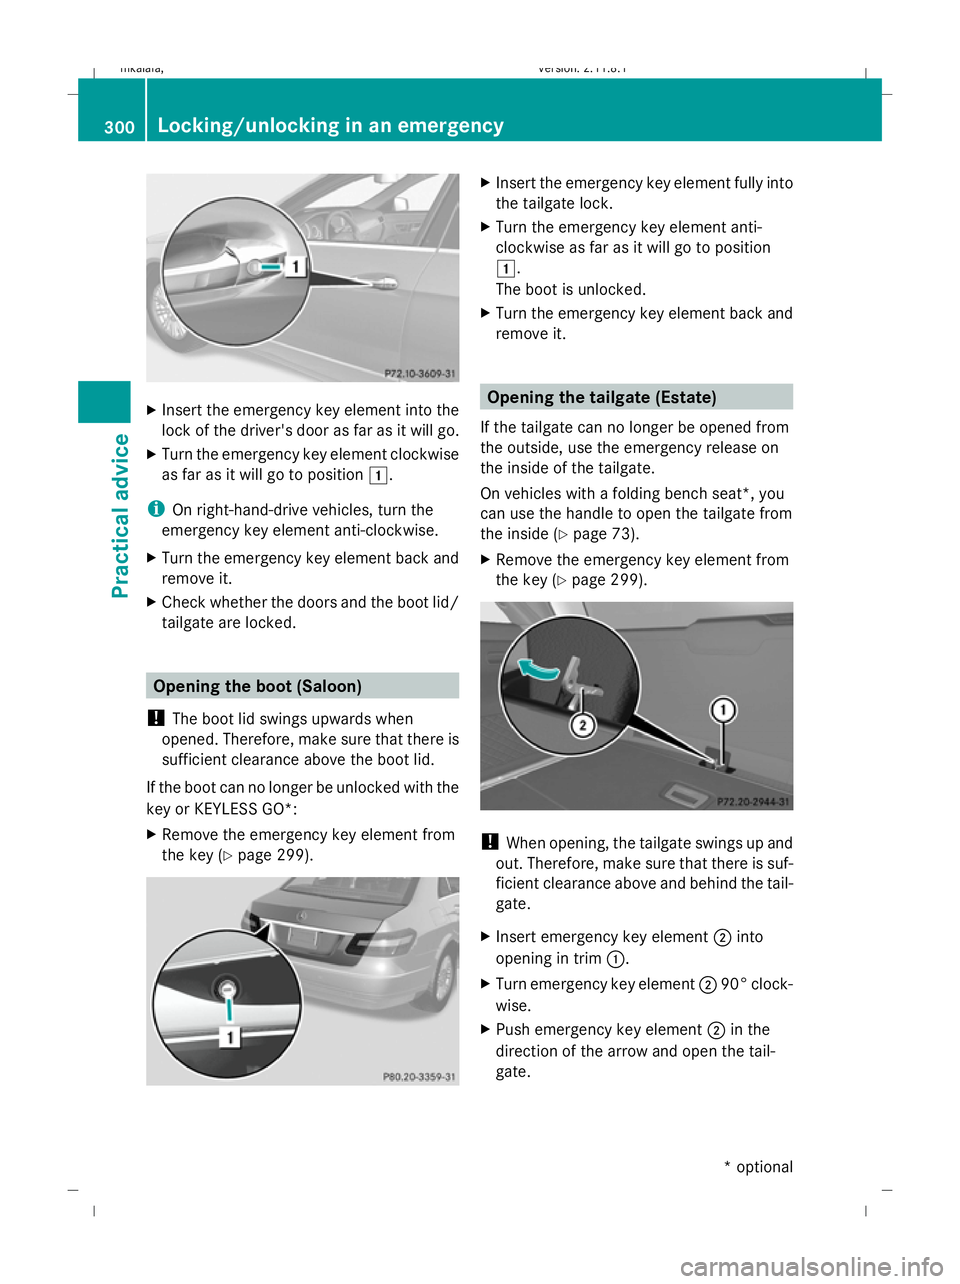
tailgate are locked. Opening the boot (Saloon)
! The boot lid swings upwards when
opened. Therefore, make sure that there is
sufficient clearance above the boot lid.
If the boot can no longer be unlocked with the
key or KEYLESS GO*:
X Remove the emergency key element from
the key (Y page 299). X
Insert the emergency key element fully into
the tailgate lock.
X Turn the emergency key element anti-
clockwise as far as it will go to position
1.
The boot is unlocked.
X Turn the emergency key element back and
remove it. Opening the tailgate (Estate)
If the tailgate can no longer be opened from
the outside, use the emergency release on
the inside of the tailgate.
On vehicles with a folding bench seat*, you
can use the handle to open the tailgate from
the inside (Y page 73).
X Remove the emergency key element from
the key (Y page 299). !
When opening, the tailgate swings up and
out. Therefore, make sure that there is suf-
ficient clearance above and behind the tail-
gate.
X Insert emergency key element ;into
opening in trim :.
X Turn emergency key element ;90° clock-
wise.
X Push emergency key element ;in the
direction of the arrow and open the tail-
gate. 300
Locking/unlocking in an emergencyPractical advice
* optional
212_AKB; 2; 4, en-GB
mkalafa
,V ersion: 2.11.8.1
2009-05-05T14:17:16+02:00 - Seite 300
Dateiname: 6515346702_buchblock.pdf; erzeugt am 07. May 2009 14:17:15; WK
Page 309 of 373

Overview: changing bulbs/bulb types
You can replace the following bulbs: Halogen headlamps Bulb type
:
Dipped-beam headlamps 45
: H7 55 W
; Main-beam headlamp: H7 55 W
= Side lamp/parking lamp: W 5 W
? Turn signal lamp 45
: PY 21 W Bi-xenon headlamps* Bulb type
:
Cornering light*: H7 55 W
; Infrared light* (Night View Assist Plus*):
H11 55 W Changing bulbs
Dipped-beam headlamps (halogen
headlamps) Due to their location, have the bulbs in the
left-hand headlamp changed at a qualified
specialist workshop, e.g. a Mercedes-Benz
Service Centre.
X Switch off the lights.
X Open the bonnet.
X Turn housing cover :anti-clockwise and
remove it.
X Turn bulb holder ;anti-clockwise and
remove it.
X Remove the bulb from bulb holder ;.
X Insert the new bulb into bulb holder ;.
45 Due to their location, have the bulbs in the left-hand headlamp changed at a qualified specialist workshop,
e.g. a Mercedes-Benz Service Centre. 306
Changing bulbsPractical advice
* optional
212_AKB; 2; 4, en-GB
mkalafa,
Version: 2.11.8.1 2009-05-05T14:17:16+02:00 - Seite 306
Dateiname: 6515346702_buchblock.pdf; erzeugt am 07. May 2009 14:17:18; WK
Page 310 of 373

X
Insert bulb holder ;and turn it clockwise.
X Align housing cover :and turn it clock-
wise.
Main-beam headlamps (halogen head-
lamps)/cornering lamp* (Intelligent
Light System*) X
Switch off the lights.
X Open the bonnet.
X Turn housing cover :anti-clockwise and
remove it.
X Turn bulb holder ;anti-clockwise and
remove it.
X Remove the bulb from bulb holder ;.
X Insert the new bulb into bulb holder ;.
X Insert bulb holder ;and turn it clockwise.
X Align housing cover :and turn it clock-
wise.
Side lamp/parking lamp (halogen head-
lamps) X
Switch off the lights.
X Open the bonnet.
X Turn housing cover :anti-clockwise and
remove it.
X Pull out bulb holder ;.
X Remove the bulb from bulb holder ;.
X Insert the new bulb into bulb holder ;.
X Insert bulb holder ;.
X Align housing cover :and turn it clock-
wise.
Infrared light* (Night View Assist
Plus*) X
Switch off the lights.
X Open the bonnet.
X Turn housing cover :anti-clockwise and
remove it.
X Turn bulb ;anti-clockwise and remove it.
X Insert new bulb ;and turn it clockwise.
X Align housing cover :and turn it clock-
wise. Changing bulbs
307Practical advice
* optional
212_AKB; 2; 4, en-GB
mkalafa
,V ersion: 2.11.8.1
2009-05-05T14:17:16+02:00 - Seite 307 Z
Dateiname: 6515346702_buchblock.pdf; erzeugt am 07. May 2009 14:17:19; WK
Page 311 of 373

Turn signal lamp (halogen headlamps)
Due to their location, have the bulbs in the
left-hand headlamp changed at a qualified
specialist workshop, e.g. a Mercedes-Benz
Service Centre.
X Switch off the lights.
X Open the bonnet.
X Turn bulb holder :anti-clockwise and
remove it.
X Turn the bulb anti-clockwise, applying
slight pressure, and remove it from bulb
holder :.
X Insert the new bulb into bulb holder :and
turn it clockwise.
X Insert bulb holder :and turn it clockwise. Replacing the wiper blades
Windscreen wiper blades
G
Risk of accident
The windscreen will no longer be wiped prop-
erly if the wiper blades are worn. This could
prevent you from observing the traffic condi-
tions, thereby causing an accident. Replace
the wiper blades twice a year, ideally in spring
and autumn. G
Risk of accident
The wiper arms could start moving and cause
an injury if you leave the windscreen wipers
switched on. Remove the key from the ignition lock before
replacing the wiper blades.
! To avoid damaging the windscreen wiper
blades, make sure that you touch only the
wiper arm of the windscreen wiper.
To remove X
Remove the key from the ignition lock or
turn the key to position 0(KEYLESS GO).
X Fold the wiper arm away from the wind-
screen until it engages.
X Set the wiper blade at right angles to the
wiper arm. X
Remove the wiper blade from the retainer
on the wiper arm in the direction of the
arrow.
Fitting !
The two wiper blades are different
lengths. If you swap the wiper blades they
may scratch the windscreen. Make sure
that the longer wiper blade is fitted on the
driver's side.
X Compare the lengths of the two new wiper
blades.
X Slide the longer of the two new wiper
blades into the retainer on the wiper arm
on the driver's side in the opposite direc-
tion to the arrow.
X Repeat the same procedure on the front-
passenger's side with the shorter of the two
new wiper blades. 308
Replacing the
wiper bladesPractical advice
212_AKB; 2; 4, en-GB
mkalafa, Version: 2.11.8.1 2009-05-05T14:17:16+02:00 - Seite 308
Dateiname: 6515346702_buchblock.pdf; erzeugt am 07. May 2009 14:17:19; WK
Page 321 of 373

:
Wheel bolts for all wheels supplied by the
factory
X Clean the wheel and wheel hub contact
surfaces. X
Place the emergency spare wheel onto the
centring pin and push it on. X
Tighten the wheel bolts until they are fin-
ger-tight.
X Unscrew the centring pin.
X Tighten the last wheel bolt until it is finger-
tight. Lowering the vehicle X
Lower the vehicle. To do this, turn the crank
of the jack anti-clockwise until the vehicle
is standing firmly on the ground again.
X Place the jack to one side. X
Tighten the wheel bolts evenly in a cross-
wise pattern in the sequence indica-
ted (: toA). The tightening torque is
130 Nm. G
Risk of accident
Have the tightening torque checked immedi-
ately after a wheel is changed. The wheels
could work loose if they are not tightened to
a torque of 130 Nm.
X Turn the jack back to its initial position and
store it and the rest of the vehicle tool kit
in the boot/luggage compartment.
Vehicles with the "Minispare" emergency
spare wheel*:
X Transport the faulty wheel in the boot/lug-
gage compartment.
i When you are driving with the "Minispare"
emergency spare wheel* fitted, the tyre
pressure loss warning system or the tyre
pressure monitor* cannot function reliably. MOExtended run-flat system*
The MOExtended run-flat system may only be
used in conjunction with the tyre pressure 318
Flat tyrePractical advice
* optional
212_AKB; 2; 4, en-GB
mkalafa,
Version: 2.11.8.1 2009-05-05T14:17:16+02:00 - Seite 318
Dateiname: 6515346702_buchblock.pdf; erzeugt am 07. May 2009 14:17:24; WK
Page 329 of 373

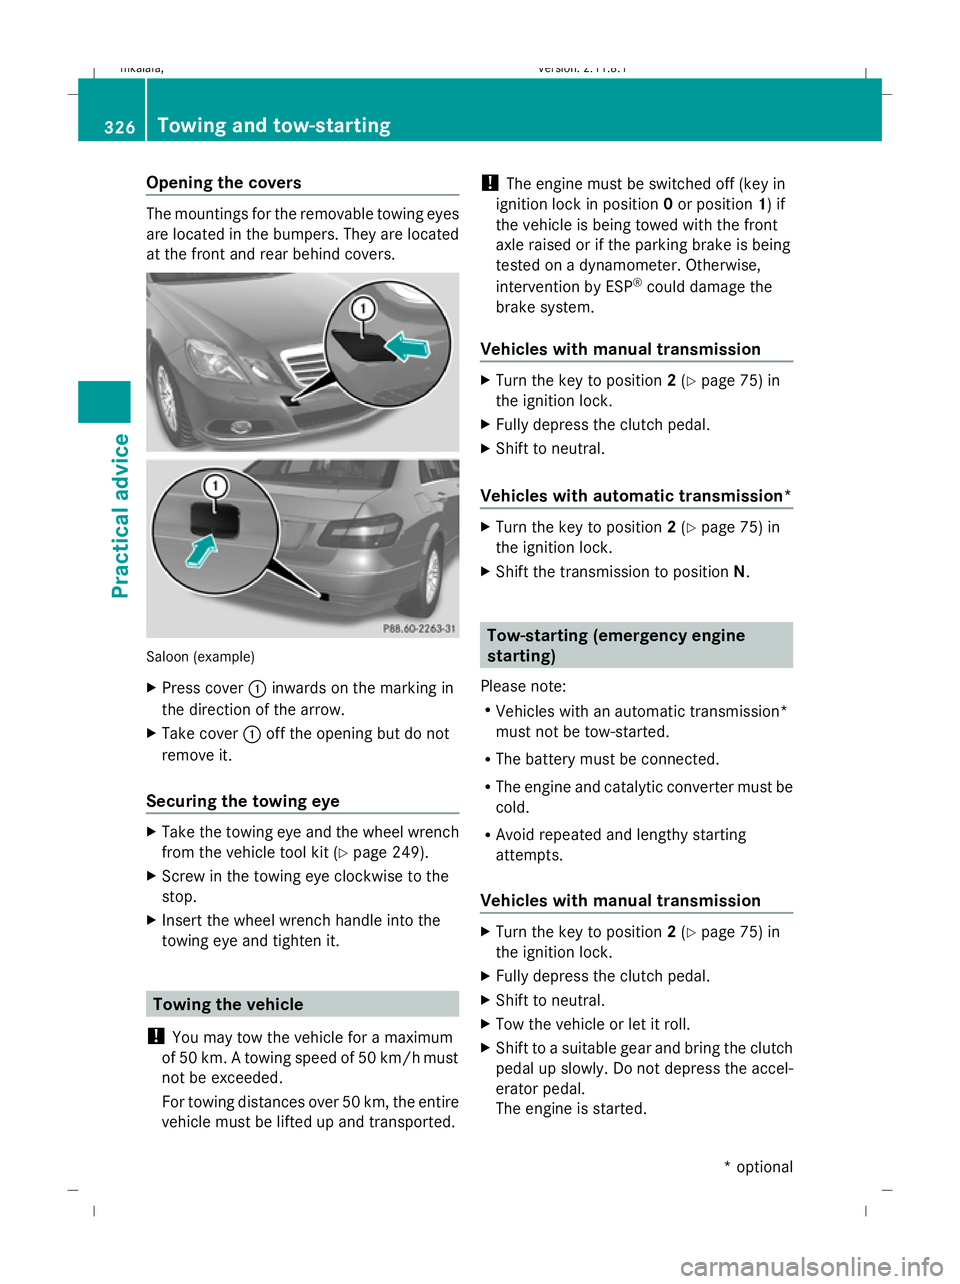
Opening the covers
The mountings for the removable towing eyes
are located in the bumpers. They are located
at the front and rear behind covers. Saloon (example)
X
Press cover :inwards on the marking in
the direction of the arrow.
X Take cover :off the opening but do not
remove it.
Securing the towing eye X
Take the towing eye and the wheel wrench
from the vehicle tool kit (Y page 249).
X Screw in the towing eye clockwise to the
stop.
X Insert the wheel wrench handle into the
towing eye and tighten it. Towing the vehicle
! You may tow the vehicle for a maximum
of 50 km. A towing speed of 50 km/hm ust
not be exceeded.
For towing distances over 50 km, the entire
vehicle must be lifted up and transported. !
The engine must be switched off (key in
ignition lock in position 0or position 1) if
the vehicle is being towed with the front
axle raised or if the parking brake is being
tested on a dynamometer. Otherwise,
intervention by ESP ®
could damage the
brake system.
Vehicles with manual transmission X
Turn the key to position 2(Y page 75) in
the ignition lock.
X Fully depress the clutch pedal.
X Shift to neutral.
Vehicles with automatic transmission* X
Turn the key to position 2(Y page 75) in
the ignition lock.
X Shift the transmission to position N. Tow-starting (emergency engine
starting)
Please note:
R Vehicles with an automatic transmission*
must not be tow-started.
R The battery must be connected.
R The engine and catalytic converter must be
cold.
R Avoid repeated and lengthy starting
attempts.
Vehicles with manual transmission X
Turn the key to position 2(Y page 75) in
the ignition lock.
X Fully depress the clutch pedal.
X Shift to neutral.
X Tow the vehicle or let it roll.
X Shift to a suitable gear and bring the clutch
pedal up slowly. Do not depress the accel-
erator pedal.
The engine is started. 326
Towing and tow-startingPractical advice
* optional
212_AKB; 2; 4, en-GB
mkalafa,
Version: 2.11.8.1 2009-05-05T14:17:16+02:00 - Seite 326
Dateiname: 6515346702_buchblock.pdf; erzeugt am 07. May 2009 14:17:28; WK