2009 MERCEDES-BENZ E-CLASS SALOON rear view mirror
[x] Cancel search: rear view mirrorPage 170 of 373

i
The infrared headlamps only switch on
when the vehicle is driving at speeds of at
least 10 km/h. This means that you do not
have the full visual range while stationary
and cannot check whether Night View
Assist Plus is working.
Pedestrian recognition The Night View Assist Plus recognises pedes-
trians using typical characteristics, i. e. a sil-
houette in the shape of a person.
Pedestrian recognition is activated, if:
R Night View Assist Plus is activated
R you are driving faster than about 10 km/h
R the surroundings are dark, e. g. when driv-
ing outside built-up areas without street
lighting
If pedestrian recognition is active, sym-
bol ?appears. If a pedestrian is now recog-
nised, they are framed =and thereby high-
lighted. If the pedestrian recognition system
has brought a pedestrian to your attention,
look through the windscreen to evaluate the
situation. The actual distance to objects and
pedestrians cannot be gauged accurately by
looking at a screen.
It may be the case that objects are highlighted
as well as pedestrians. G
Risk of accident
Pedestrian recognition may be impaired or
inoperative, if:
R pedestrians are partially or completely
obscured by objects, e. g. by parked vehi-
cles
R the silhouette in the Night View Assist Plus
display is incomplete or interrupted, e. g. by
powerful light reflections
R pedestrians do not contrast with the sur-
roundings
R pedestrians are not in an upright position,
e. g. sitting, squatting or lying i
Animals are not recognised by pedestrian
recognition.
Misted up or dirty windscreen If the windscreen in front of the camera is
misted up or dirty on the inside or outside, the
Night View Assist Plus display is affected.
X To demist: check the automatic air-condi-
tioning settings (Y page 179) and fold
down the camera cover (Y page 245).
X To demist the inside of the wind-
screen: fold down the camera cover and
clean the windscreen (Y page 242). Lane package*
The lane package consists of Blind Spot
Assist and Lane Keeping Assist.
Blind Spot Assist Blind Spot Assist uses a radar sensor system
to monitor the area on both sides of your
vehicle. It supports you when you change
lanes at speeds above 30 km/h. In each case,
a warning lamp appears in the exterior mirror
as soon as a vehicle is detected in the area
monitored. When you switch on the corre-
sponding turn signal prior to changing lanes,
you receive an optical and acoustic collision
warning. For this purpose, Blind Spot Assist
uses sensors in the rear bumper.
G
Risk of accident
Blind Spot Assist is only an aid and may not
detect all vehicles. Blind Spot Assist does not
relieve you of the responsibility of paying
attention.
Always pay attention to traffic conditions and
your surroundings. Otherwise, you may fail to
recognise dangers in time, cause an accident
and injure yourself and others.
The radar sensor system is automatically
deactivated near radio telescope facilities
(Y page 362). Driving systems
167Controls
* optional
212_AKB; 2; 4, en-GB
mkalafa,
Version: 2.11.8.1 2009-05-05T14:17:16+02:00 - Seite 167 Z
Dateiname: 6515346702_buchblock.pdf; erzeugt am 07. May 2009 14:16:26; WK
Page 210 of 373

Features
Sun visors
G
Risk of accident
Keep the mirrors in the sun visors covered
while driving. Otherwise, you could be daz-
zled, impairing your view of traffic conditions.
As a result, you could cause an accident. :
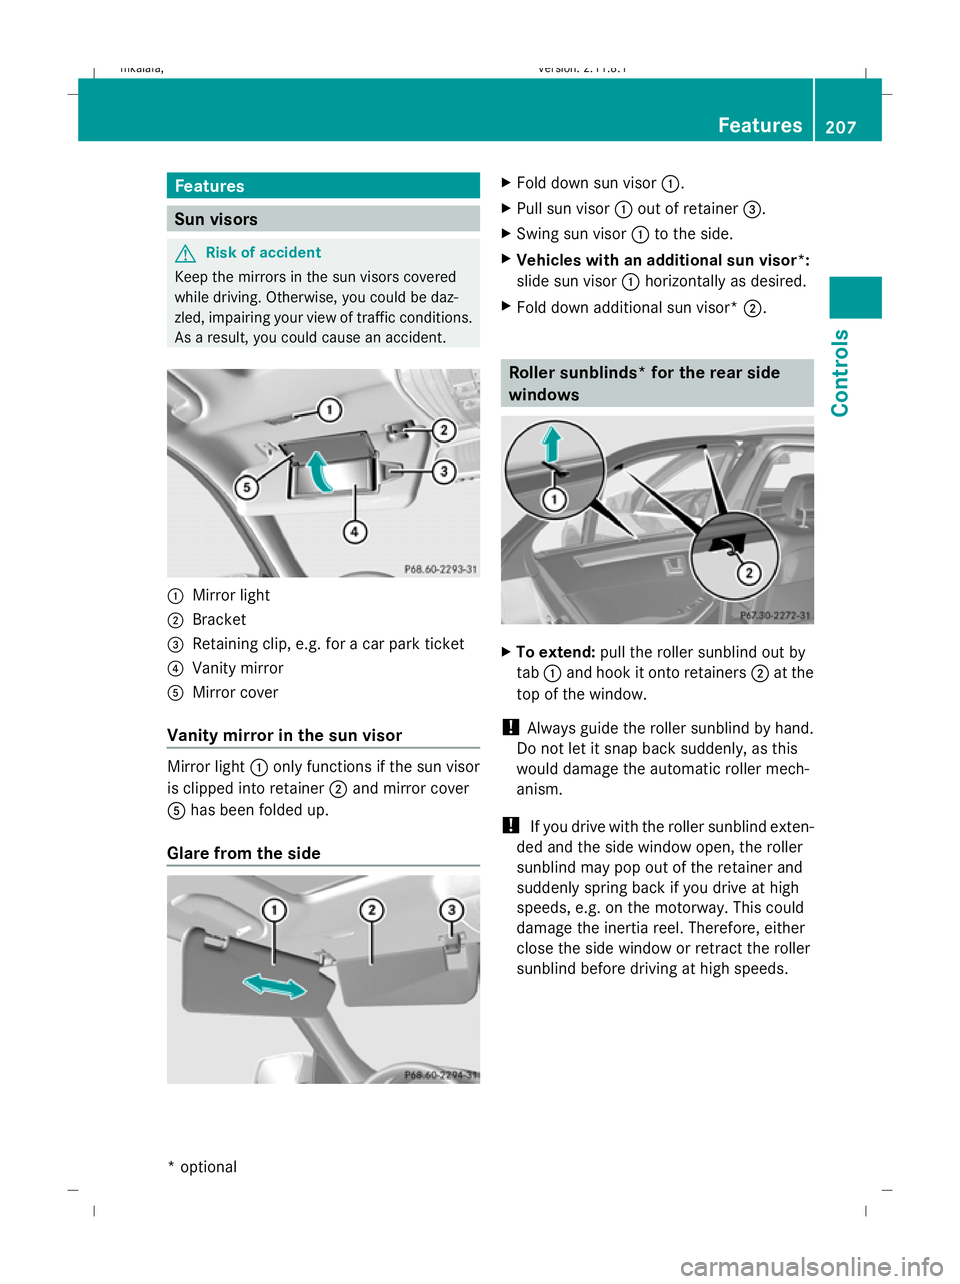
Mirror light
; Bracket
= Retaining clip, e.g. for a car park ticket
? Vanity mirror
A Mirror cover
Vanity mirror in the sun visor Mirror light
:only functions if the sun visor
is clipped into retainer ;and mirror cover
A has been folded up.
Glare from the side X
Fold down sun visor :.
X Pull sun visor :out of retainer =.
X Swing sun visor :to the side.
X Vehicles with an additional sun visor *:
sl ide sun visor :horizontally as desired.
X Fold down additional sun visor* ;. Roller sunblinds* for the rear side
windows
X
To extend: pull the roller sunblind out by
tab :and hook it onto retainers ;at the
top of the window.
! Always guide the roller sunblind by hand.
Do not let it snap back suddenly, as this
would damage the automatic roller mech-
anism.
! If you drive with the roller sunblind exten-
ded and the side window open, the roller
sunblind may pop out of the retainer and
suddenly spring back if you drive at high
speeds, e.g. on the motorway. This could
damage the inertia reel. Therefore, either
close the side window or retract the roller
sunblind before driving at high speeds. Features
207Controls
* optional
212_AKB; 2; 4, en-GB
mkalafa,
Version: 2.11.8.1 2009-05-05T14:17:16+02:00 - Seite 207 Z
Dateiname: 6515346702_buchblock.pdf; erzeugt am 07. May 2009 14:16:49; WK
Page 214 of 373

When you take the key out of the ignition lock,
the mobile phone stays on but you can no
longer use the hands-free system.
If you are making a call and you would like to
take the key out of the ignition lock, first
remove the mobile phone from the bracket.
Otherwise, the call will be ended.
Sliding adapter for the mobile phone
bracket (automatic vehicles with
DIRECT SELECT selector lever*) Certain mobile phone brackets require a slid-
ing adapter so the bracket can be installed
correctly.
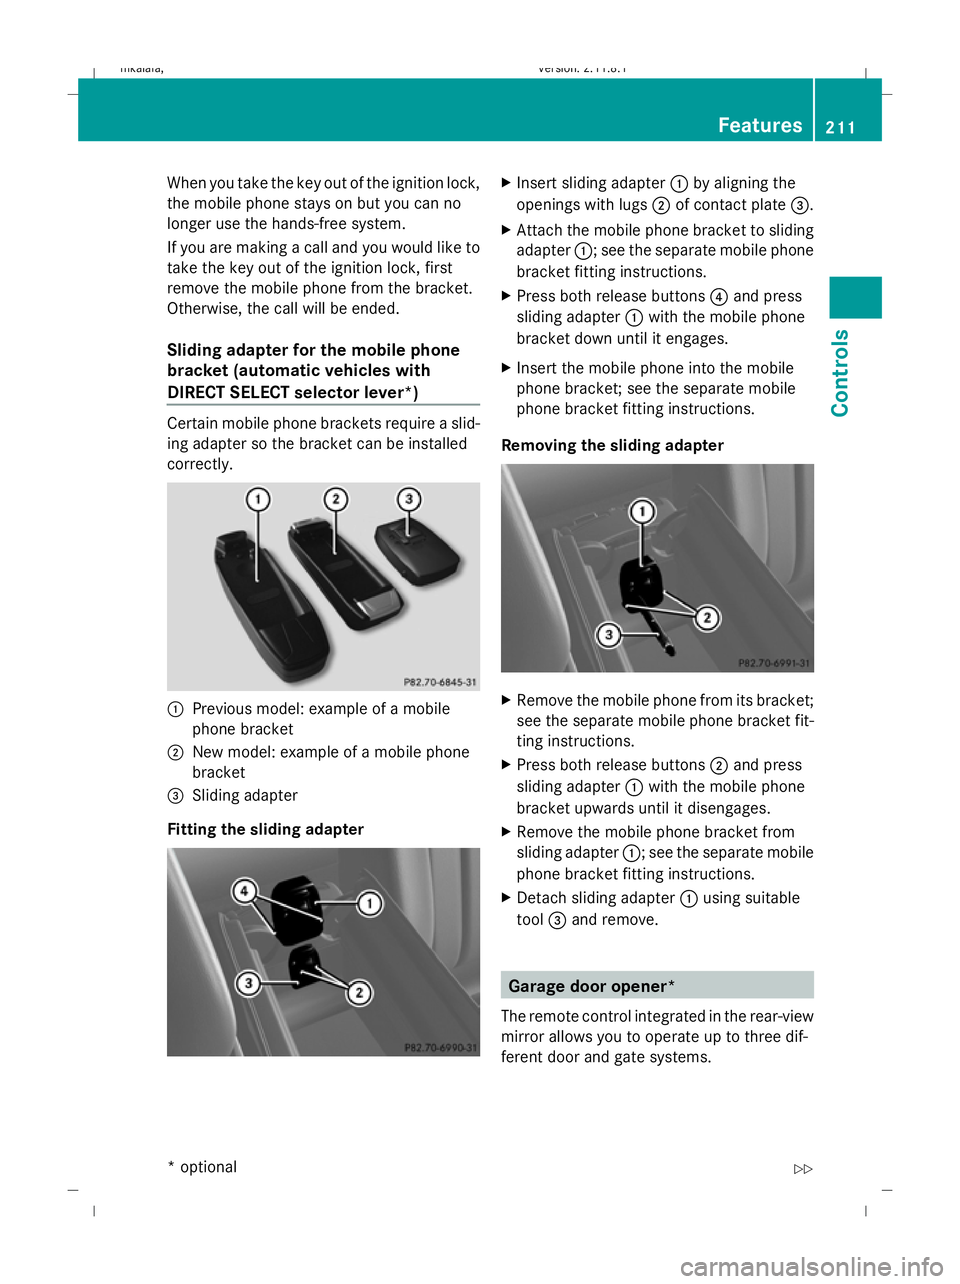
:
Previous model: example of a mobile
phone bracket
; New model: example of a mobile phone
bracket
= Sliding adapter
Fitting the sliding adapter X
Insert sliding adapter :by aligning the
openings with lugs ;of contact plate =.
X Attach the mobile phone bracket to sliding
adapter :; see the separate mobile phone
bracket fitting instructions.
X Press both release buttons 4and press
sliding adapter :with the mobile phone
bracket down until it engages.
X Insert the mobile phone into the mobile
phone bracket; see the separate mobile
phone bracket fitting instructions.
Removing the sliding adapter X
Remove the mobile phone from its bracket;
see the separate mobile phone bracket fit-
ting instructions.
X Press both release buttons ;and press
sliding adapter :with the mobile phone
bracket upwards until it disengages.
X Remove the mobile phone bracket from
sliding adapter :; see the separate mobile
phone bracket fitting instructions.
X Detach sliding adapter :using suitable
tool =and remove. Garage door opener*
The remote control integrated in the rear-view
mirror allows you to operate up to three dif-
ferent door and gate systems. Features
211Controls
* optional
212_AKB; 2; 4, en-GB
mkalafa,
Version: 2.11.8.1 2009-05-05T14:17:16+02:00 - Seite 211 Z
Dateiname: 6515346702_buchblock.pdf; erzeugt am 07. May 2009 14:16:52; WK
Page 215 of 373

i
The garage door opener is only available
for certain countries. Observe the legal
requirements in all countries concerned.
The HomeLink ®
garage door opener is
compatible with most European garage and
gate opener drives. More information on
HomeLink ®
and/or compatible products is
available from:
R any Mercedes-Benz Service Centre
R the HomeLink ®
hotline
(0) 08000 466 354 65 (free of charge) or
+49 (0) 6838 907-277 (charges apply)
R the Internet: www.homelink.com G
Risk of accident
Only press the transmitter button on the inte-
grated remote control if there are no persons
or objects present within the sweep of the
garage door. Persons could otherwise be
injured as the door moves.
Programming the remote control i
You will achieve the best results by insert-
ing new batteries in the garage door's
remote control before programming it.
X Erase the memory of the integrated remote
control (Y page 213) before programming
it for the first time.
X Turn the key to position 2in the ignition
lock. X
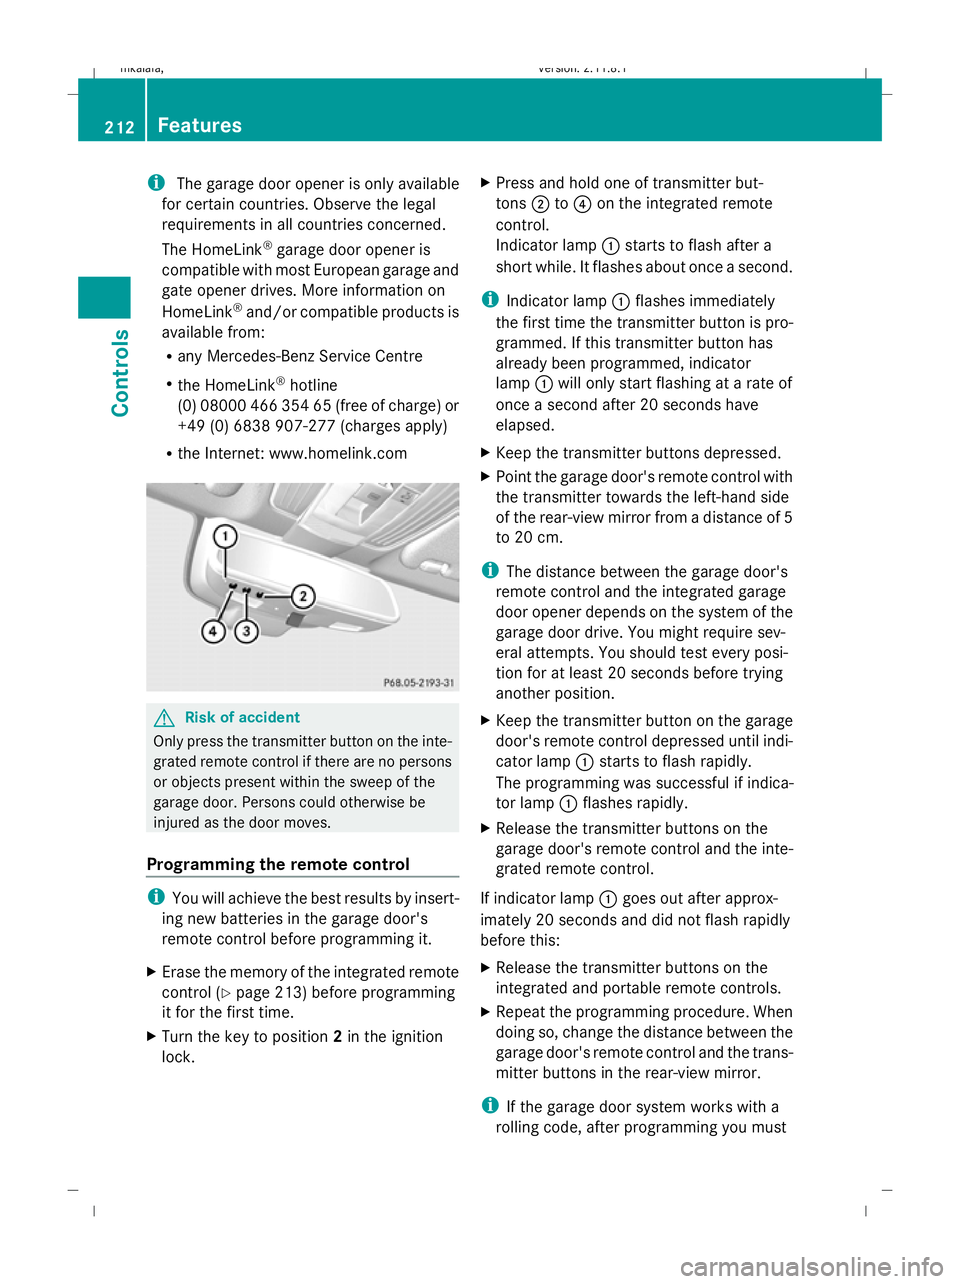
Press and hold one of transmitter but-
tons ;to? on the integrated remote
control.
Indicator lamp :starts to flash after a
short while. It flashes about once a second.
i Indicator lamp :flashes immediately
the first time the transmitter button is pro-
grammed. If this transmitter button has
already been programmed, indicator
lamp :will only start flashing at a rate of
once a second after 20 seconds have
elapsed.
X Keep the transmitter buttons depressed.
X Point the garage door's remote control with
the transmitter towards the left-hand side
of the rear-view mirror from a distance of 5
to 20 cm.
i The distance between the garage door's
remote control and the integrated garage
door opener depends on the system of the
garage door drive. You might require sev-
eral attempts. You should test every posi-
tion for at least 20 seconds before trying
another position.
X Keep the transmitter button on the garage
door's remote control depressed until indi-
cator lamp :starts to flash rapidly.
The programming was successful if indica-
tor lamp :flashes rapidly.
X Release the transmitter buttons on the
garage door's remote control and the inte-
grated remote control.
If indicator lamp :goes out after approx-
imately 20 seconds and did not flash rapidly
before this:
X Release the transmitter buttons on the
integrated and portable remote controls.
X Repeat the programming procedure. When
doing so, change the distance between the
garage door's remote control and the trans-
mitter buttons in the rear-view mirror.
i If the garage door system works with a
rolling code, after programming you must 212
FeaturesControls
212_AKB; 2; 4, en-GB
mkalafa,
Version: 2.11.8.1 2009-05-05T14:17:16+02:00 - Seite 212
Dateiname: 6515346702_buchblock.pdf; erzeugt am 07. May 2009 14:16:52; WK
Page 216 of 373

synchronise the remote control integrated
in the rear-view mirror with the garage door
system receiver.
You will find further information in the
garage door opening system's operating
instructions, e.g. the sections on "Synchro-
nising the transmitter" or "Registering a
new transmitter". You can also call the hot-
line mentioned above.
Opening or closing the garage door Once programmed, the integrated remote
control will assume the function of the garage
door system's remote control. Please read
the operating instructions for the garage door
system.
X Turn the key to position 2in the ignition
lock.
X Press the transmitter button on the rear-
view mirror that you have programmed to
operate the garage door.
Garage door system with fixed code: indi-
cator lamp :lights up continuously.
Garage door system with rolling code: indi-
cator lamp :flashes briefly and then lights
up for approximately two seconds. This is
repeated for up to 20 seconds.
i The transmitter will transmit a signal for
as long as the transmitter button is being
pressed. The transmission will be halted
after a maximum of 20 seconds and indi-
cator lamp :will flash. Press the trans-
mitter button again, if necessary.
Clearing the remote control memory X
Turn the key to position 2in the ignition
lock.
X Press and hold transmitter buttons ;
and ?for approximately 20 seconds until
indicator lamp :flashes rapidly.
The memory is cleared.
i You should clear the remote control mem-
ory before selling the vehicle. Floormat* on the driver's side
G
Risk of accident
Make sure that there is sufficient clearance
around the pedals when floormats are used,
and that the floormats are properly secured.
The floormats must be correctly secured at all
times using retainers and press-studs.
Before you drive off, check the floormats and
secure if necessary. A floormat which is not
properly secured can slip and, thereby, inter-
fere with the movement of the pedals.
Do not place floormats on top of one another. X
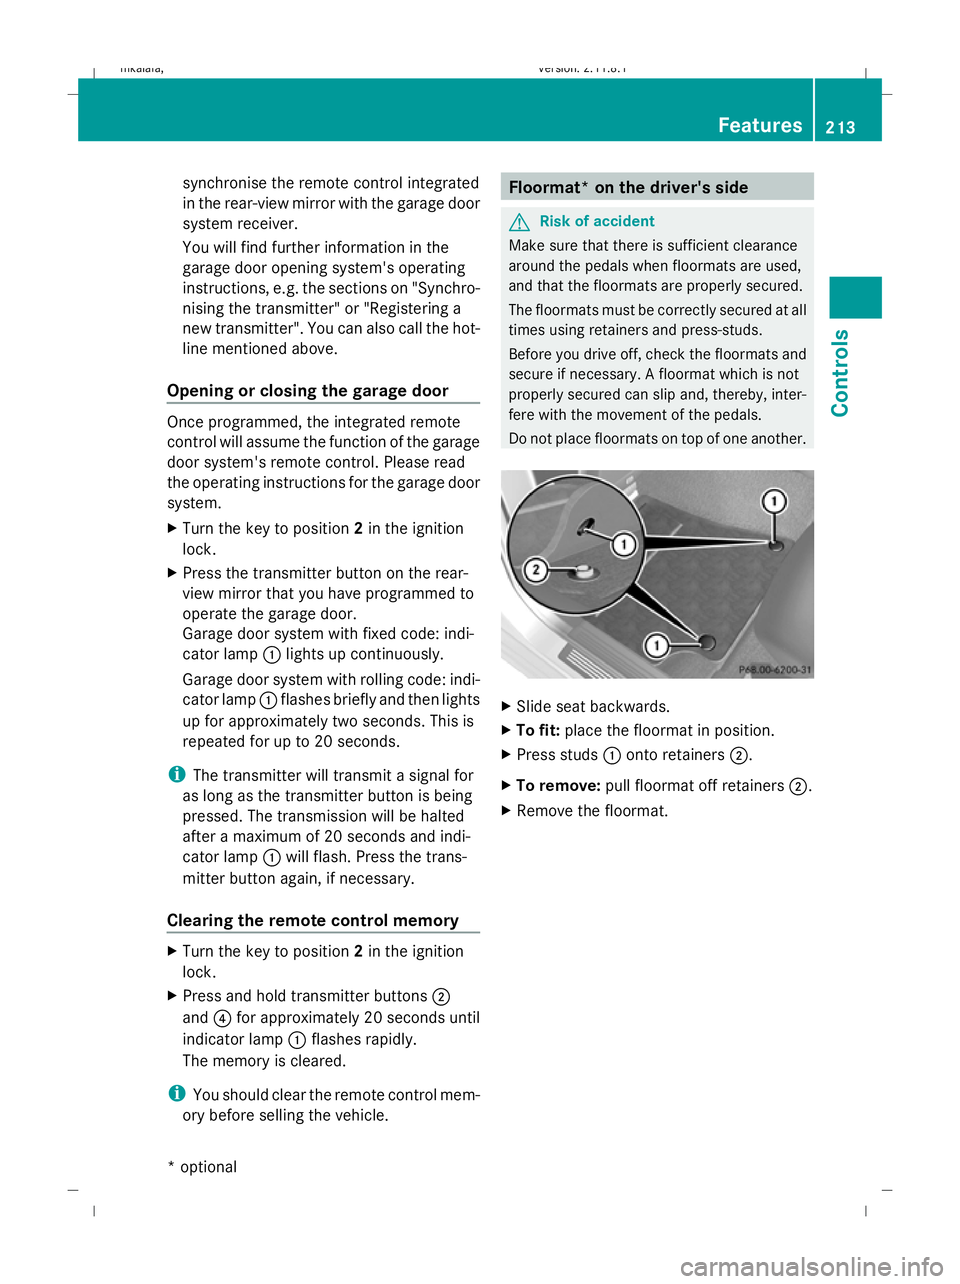
Slide seat backwards.
X To fit: place the floormat in position.
X Press studs :onto retainers ;.
X To remove: pull floormat off retainers ;.
X Remove the floormat. Features
213Controls
* optional
212_AKB; 2; 4, en-GB
mkalafa,
Version: 2.11.8.1 2009-05-05T14:17:16+02:00 - Seite 213 Z
Dateiname: 6515346702_buchblock.pdf; erzeugt am 07. May 2009 14:16:52; WK