2009 MERCEDES-BENZ E-CLASS SALOON height
[x] Cancel search: heightPage 93 of 373
G
Risk of injury
A dirty or damaged seat belt or a seat belt that
has been subjected to a load in an accident
or which has been modified no longer offers
the intended level of protection. Under certain
circumstances, this could cause severe or
even fatal injuries.
For this reason, check regularly that the seat
belts are not damaged or dirty.
Always have damaged seat belts or seat belts
that have been subjected to a load in an acci-
dent replaced at a qualified specialist work-
shop. Consult a qualified specialist workshop
which has the necessary specialist knowledge
and tools to carry out the work required.
Mercedes-Benz recommends that you use a
Mercedes-Benz Service Centre for this pur-
pose.
For safety reasons, Mercedes-Benz recom-
mends that you only use seat belts which have
been approved by Mercedes-Benz for your
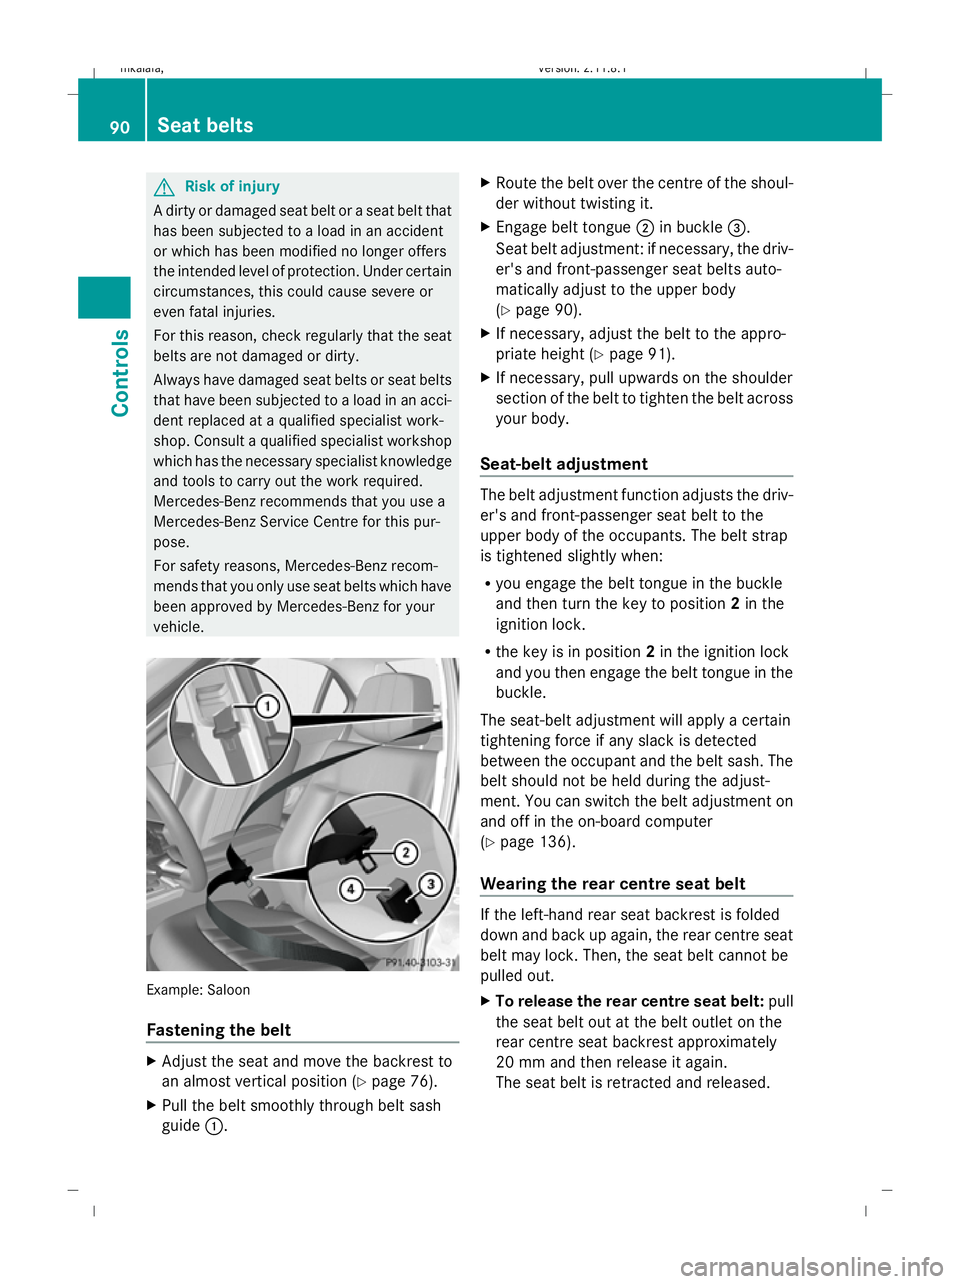
vehicle. Example: Saloon
Fastening the belt
X
Adjust the seat and move the backrest to
an almost vertical position (Y page 76).
X Pull the belt smoothly through belt sash
guide :. X
Route the belt over the centre of the shoul-
der without twisting it.
X Engage belt tongue ;in buckle =.
Seat belt adjustment: if necessary, the driv-
er's and front-passenger seat belts auto-
matically adjust to the upper body
(Y page 90).
X If necessary, adjust the belt to the appro-
priate height (Y page 91).
X If necessary, pull upwards on the shoulder
section of the belt to tighten the belt across
your body.
Seat-belt adjustment The belt adjustment function adjusts the driv-
er's and front-passenger seat belt to the
upper body of the occupants. The belt strap
is tightened slightly when:
R
you engage the belt tongue in the buckle
and then turn the key to position 2in the
ignition lock.
R the key is in position 2in the ignition lock
and you then engage the belt tongue in the
buckle.
The seat-belt adjustment will apply a certain
tightening force if any slack is detected
between the occupant and the belt sash. The
belt should not be held during the adjust-
ment. You can switch the belt adjustment on
and off in the on-board computer
(Y page 136).
Wearing the rear centre seat belt If the left-hand rear seat backrest is folded
down and back up again, the rear centre seat
belt may lock. Then, the seat belt cannot be
pulled out.
X To release the rear centre seat belt: pull
the seat belt out at the belt outlet on the
rear centre seat backrest approximately
20 mm and then release it again.
The seat belt is retracted and released. 90
Seat beltsControls
212_AKB; 2; 4, en-GB
mkalafa
,V ersion: 2.11.8.1
2009-05-05T14:17:16+02:00 - Seite 90
Dateiname: 6515346702_buchblock.pdf; erzeugt am 07. May 2009 14:15:57; WK
Page 94 of 373
Unfastening the belt
X
Press release button ?and guide belt
tongue ;back towards belt sash
guide :. Belt warning for driver and front
passenger
The 7 seat belt warning lamp in the instru-
ment cluster reminds you that all occupants
should fasten their seat belts. It is either lit
continuously or flashes. Additionally, there
may be a warning tone.
The 7 seat belt warning lamp goes out and
the warning tone ceases as soon as the driver
and front passenger have fastened their seat
belts.
For certain countries only: regardless of
whether the driver or the front passenger
already have their seat belt fastened, the
7 seat belt warning lamp lights up for six
seconds after the engine has been started. It
then goes out if both the driver and the front
passenger have fastened their seat belt.
i Further information about the 7seat
belt warning lamp (Y page 286). Belt height adjustment
You can adjust the seat belt height on the
driver's seat and the front-passenger seat.
Estate: you can also adjust the belt height on
the outer rear bench seats.
Adjust the belt to a height that allows it to be
routed across the middle of your shoulder. X
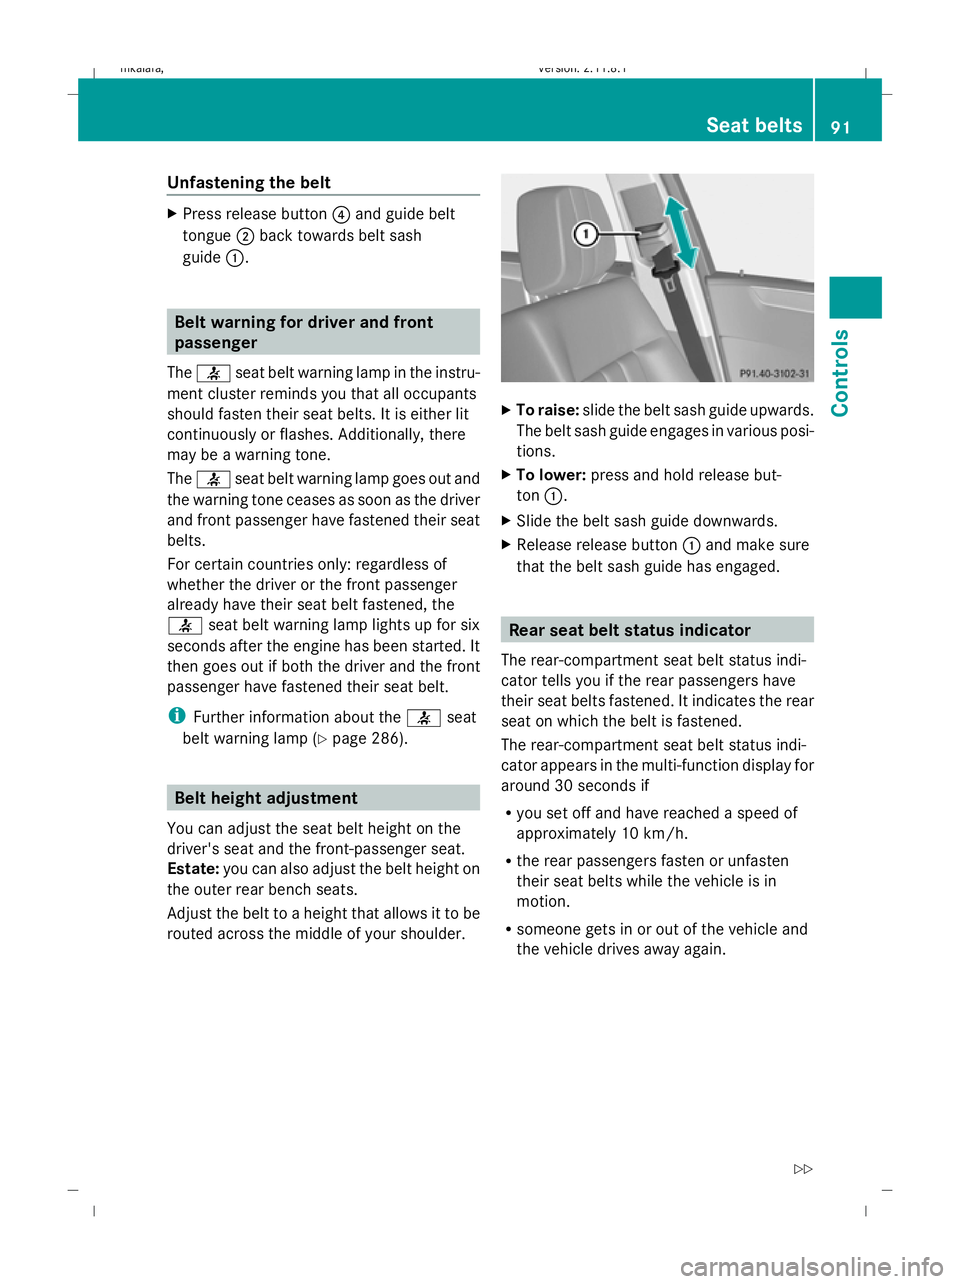
To raise: slide the belt sash guide upwards.
The belt sash guide engages in various posi-
tions.
X To lower: press and hold release but-
ton :.
X Slide the belt sash guide downwards.
X Release release button :and make sure
that the belt sash guide has engaged. Rear seat belt status indicator
The rear-compartment seat belt status indi-
cator tells you if the rear passengers have
their seat belts fastened. It indicates the rear
seat on which the belt is fastened.
The rear-compartment seat belt status indi-
cator appears in the multi-function display for
around 30 seconds if
R you set off and have reached a speed of
approximately 10 km/h.
R the rear passengers fasten or unfasten
their seat belts while the vehicle is in
motion.
R someone gets in or out of the vehicle and
the vehicle drives away again. Seat belts
91Controls
212_AKB; 2; 4, en-GB
mkalafa, Version: 2.11.8.1 2009-05-05T14:17:16+02:00 - Seite 91 Z
Dateiname: 6515346702_buchblock.pdf; erzeugt am 07. May 2009 14:15:57; WK
Page 157 of 373
RACE START is deactivated when the vehicle
reaches a speed of approximately 50 km/h.
Drive program S+is activated. ESP ®
Sport
remains activated.
RACE START is deactivated immediately if
you release the accelerator pedal during a
race start or if any of the activation conditions
are no longer fulfilled. The multi-function dis-
play shows the RACE START not possible
See Owner's Manual message.
i If RACE START is used repeatedly in a
short period of time, it is only available
again after having driven the vehicle a cer-
tain distance. AIRMATIC* (except E 63 AMG)
Vehicle level Your vehicle regulates its height automati-
cally. All-round self-levelling ensures the best
possible suspension and constant ground
clearance, even with a laden vehicle. When
you drive fast, the vehicle is lowered auto-
matically to improve driving safety and to
reduce fuel consumption.
The following vehicle levels are possible:
R normal
R raised: the vehicle is raised by about 25 mm
when compared with the normal level
R lowered: the vehicle is lowered by about
10 mm when compared with the normal
level
The "Normal" and "Raised" vehicle levels can
be set manually.
The "Lowered" vehicle level is set automati-
cally:
R at speeds above 140 km/h
R if you have selected "Sports tuning"
(Y page 155) Setting the vehicle level manually
Select the "Normal" setting for normal road
surfaces and "Raised" for driving with snow
chains or on particularly poor road surfaces.
Your selection remains stored even if you
remove the key from the ignition lock. G
Risk of injury
Make sure that nobody is in the vicinity of the
wheel housing or under the vehicle while low-
ering the vehicle when it is stationary. Other-
wise, limbs could become trapped. Setting the raised level
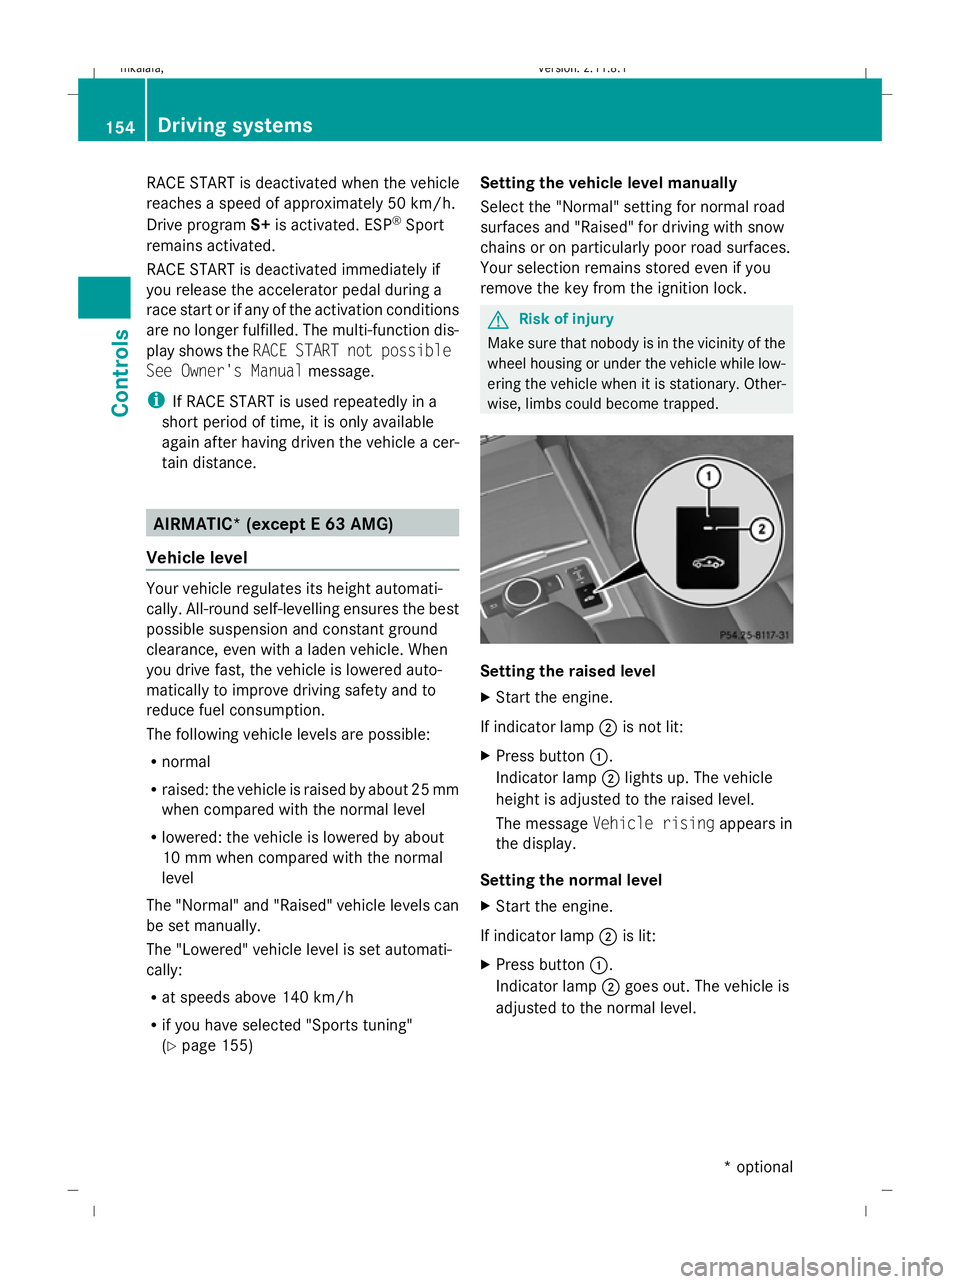
X
Start the engine.
If indicator lamp ;is not lit:
X Press button :.
Indicator lamp ;lights up. The vehicle
height is adjusted to the raised level.
The message Vehicle rising appears in
the display.
Setting the normal level
X Start the engine.
If indicator lamp ;is lit:
X Press button :.
Indicator lamp ;goes out. The vehicle is
adjusted to the normal level. 154
Driving systemsCont
rols
* optional
212_AKB; 2; 4, en-GB
mkalafa
,V ersion: 2.11.8.1
2009-05-05T14:17:16+02:00 - Seite 154
Dateiname: 6515346702_buchblock.pdf; erzeugt am 07. May 2009 14:16:22; WK
Page 162 of 373
One or more segments light up as the vehicle
approaches an obstacle, depending on the
vehicle's distance to the obstacle.
From the:
R
sixth segment onwards, you will hear an
intermittent warning tone for approx-
imately two seconds.
R seventh segment onwards, you will hear a
warning tone for approximately two sec-
onds. You have reached the minimum dis-
tance.
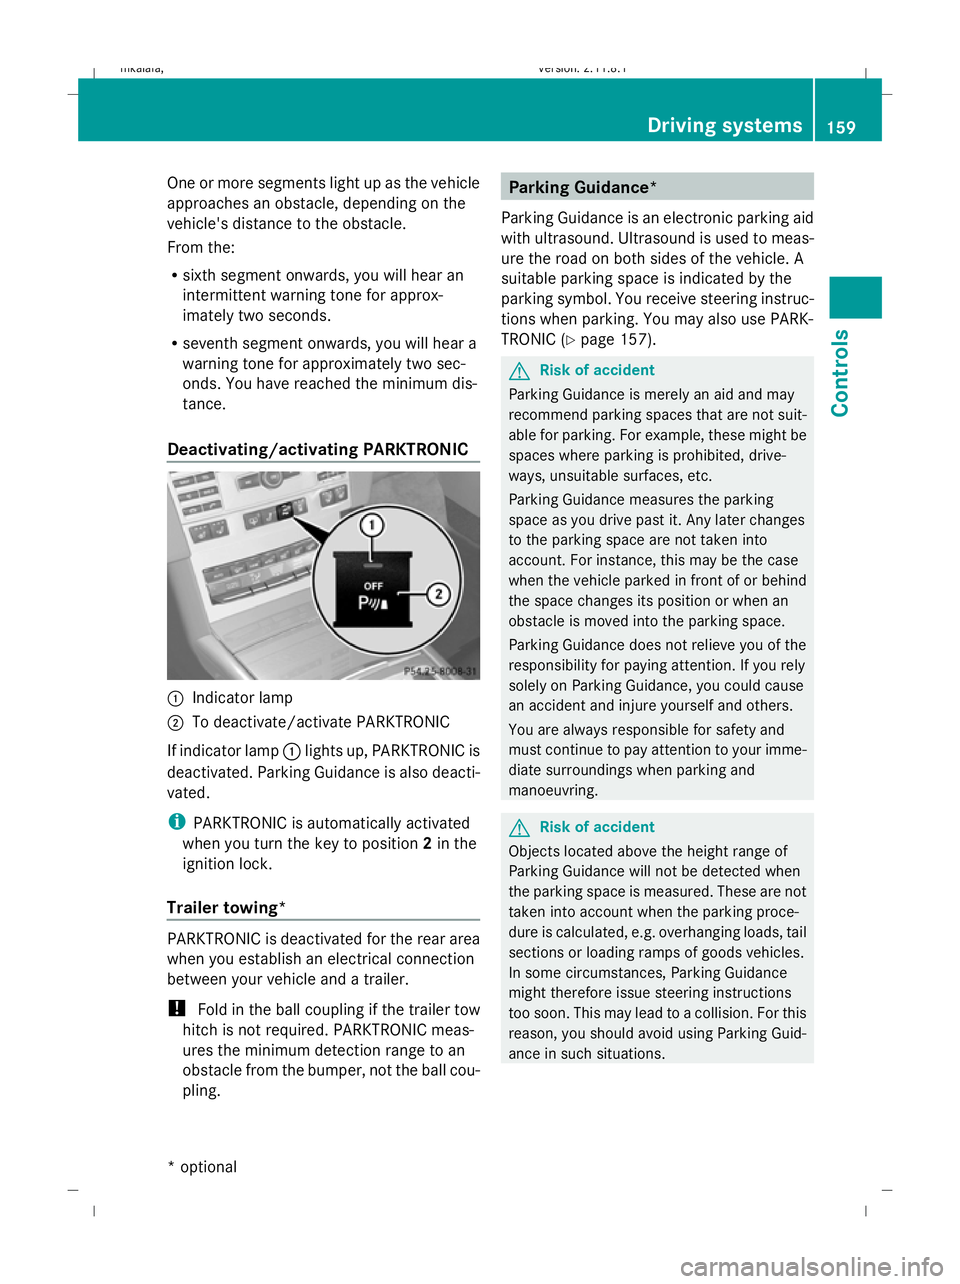
Deactivating/activating PARKTRONIC :
Indicator lamp
; To deactivate/activate PARKTRONIC
If indicator lamp :lights up, PARKTRONIC is
deactivated. Parking Guidance is also deacti-
vated.
i PARKTRONIC is automatically activated
when you turn the key to position 2in the
ignition lock.
Trailer towing* PARKTRONIC is deactivated for the rear area
when you establish an electrical connection
between your vehicle and a trailer.
!
Fold in the ball coupling if the trailer tow
hitch is not required. PARKTRONIC meas-
ures the minimum detection range to an
obstacle from the bumper, not the ball cou-
pling. Parking Guidance*
Parking Guidance is an electronic parking aid
with ultrasound. Ultrasound is used to meas-
ure the road on both sides of the vehicle. A
suitable parking space is indicated by the
parking symbol. You receive steering instruc-
tions when parking. You may also use PARK-
TRONIC (Y page 157). G
Risk of accident
Parking Guidance is merely an aid and may
recommend parking spaces that are not suit-
able for parking. For example, these might be
spaces where parking is prohibited, drive-
ways, unsuitable surfaces, etc.
Parking Guidance measures the parking
space as you drive past it. Any later changes
to the parking space are not taken into
account. For instance, this may be the case
when the vehicle parked in front of or behind
the space changes its position or when an
obstacle is moved into the parking space.
Parking Guidance does not relieve you of the
responsibility for paying attention. If you rely
solely on Parking Guidance, you could cause
an accident and injure yourself and others.
You are always responsible for safety and
must continue to pay attention to your imme-
diate surroundings when parking and
manoeuvring. G
Risk of accident
Objects located above the height range of
Parking Guidance will not be detected when
the parking space is measured. These are not
taken into account when the parking proce-
dure is calculated, e.g. overhanging loads, tail
sections or loading ramps of goods vehicles.
In some circumstances, Parking Guidance
might therefore issue steering instructions
too soon. This may lead to a collision. For this
reason, you should avoid using Parking Guid-
ance in such situations. Driving systems
159Controls
* optional
212_AKB; 2; 4, en-GB
mkalafa,
Version: 2.11.8.1 2009-05-05T14:17:16+02:00 - Seite 159 Z
Dateiname: 6515346702_buchblock.pdf; erzeugt am 07. May 2009 14:16:23; WK
Page 205 of 373
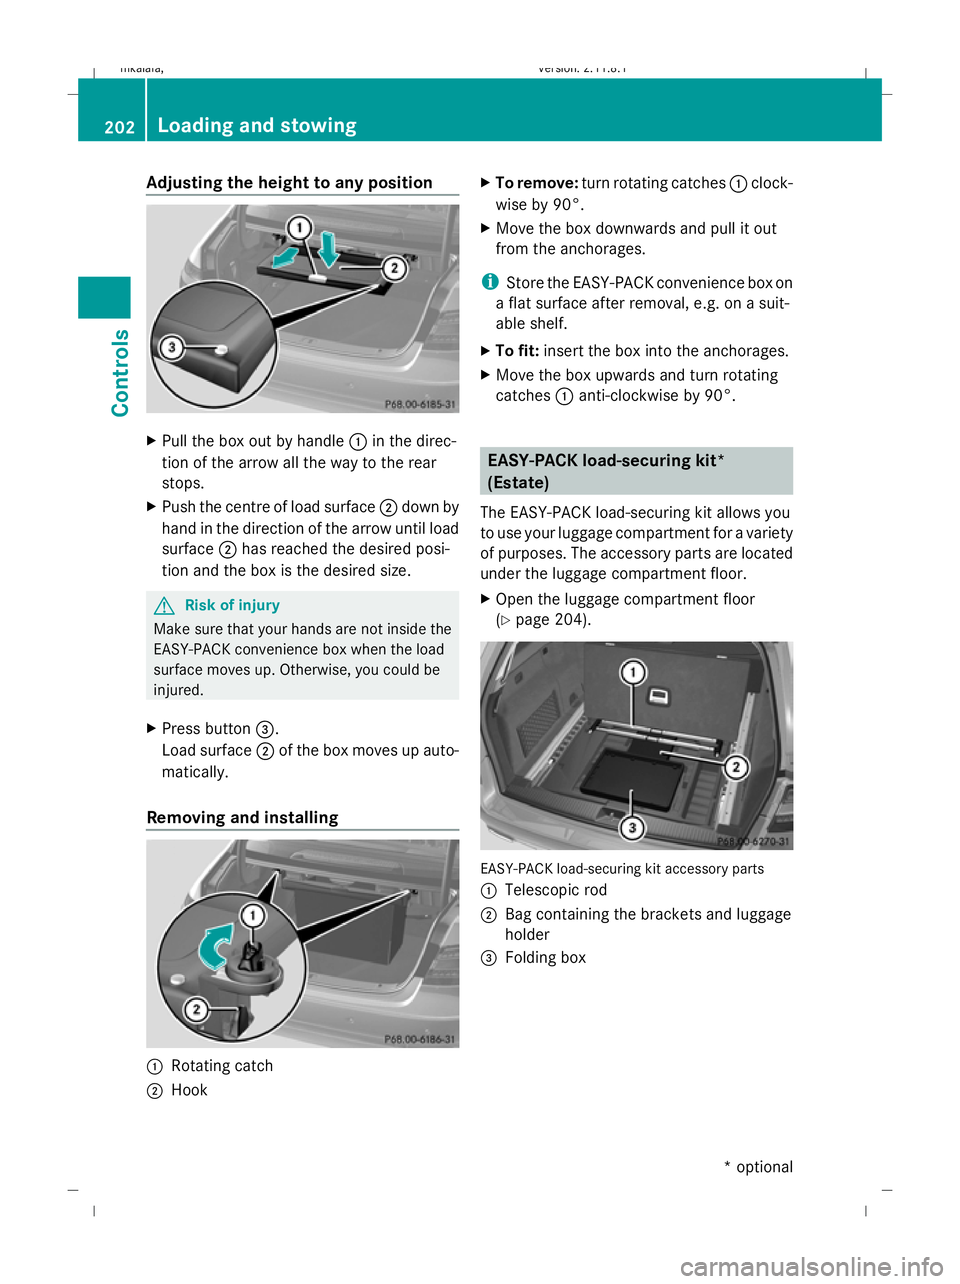
Adjusting the height to any position
X
Pull the box out by handle :in the direc-
tion of the arrow all the way to the rear
stops.
X Push the centre of load surface ;down by
hand in the direction of the arrow until load
surface ;has reached the desired posi-
tion and the box is the desired size. G
Risk of injury
Make sure that your hands are not inside the
EASY-PACK convenience box when the load
surface moves up. Otherwise, you could be
injured.
X Press button =.
Load surface ;of the box moves up auto-
matically.
Removing and installing :
Rotating catch
; Hook X
To remove: turn rotating catches :clock-
wise by 90°.
X Move the box downwards and pull it out
from the anchorages.
i Store the EASY-PACK convenience box on
a flat surface after removal, e.g. on a suit-
able shelf.
X To fit: insert the box into the anchorages.
X Move the box upwards and turn rotating
catches :anti-clockwise by 90°. EASY-PACK load-securing kit*
(Estate)
The EASY-PACK load-securing kit allows you
to use your luggage compartment for a variety
of purposes. The accessory parts are located
under the luggage compartment floor.
X Open the luggage compartment floor
(Y page 204). EASY-PACK load-securing kit accessory parts
:
Telescopic rod
; Bag containing the brackets and luggage
holder
= Folding box 202
Loading and stowingCont
rols
* optional
212_AKB; 2; 4, en-GB
mkalafa
,V ersion: 2.11.8.1
2009-05-05T14:17:16+02:00 - Seite 202
Dateiname: 6515346702_buchblock.pdf; erzeugt am 07. May 2009 14:16:45; WK
Page 223 of 373

X
Make sure that the windscreen wipers are
switched off. G
Risk of injury
The windscreen wipers and wiper linkage
could be set in motion.
When the bonnet is open, you or others could
be injured by the wiper linkage.
Make sure that the windscreen wiper is
switched off. Remove the key or make sure
that no ignition level has been selected on
KEYLESS GO*. In the instrument cluster, all of
the indicator lamps must be out.
The bonnet release lever is located in the
driver's footwell. X
Pull bonnet release lever :.
The bonnet is released.
! Make sure that the windscreen wipers
are not folded out from the windscreen.
You could otherwise damage the wind-
screen wipers or the bonnet.
The handle for opening the bonnet is located
above the radiator grille. X
Reach into the gap, pull bonnet catch han-
dle ;up and lift the bonnet.
Closing G
Risk of injury
Make sure that nobody can become trapped
as you close the bonnet.
X Lower the bonnet and let it fall from a
height of approximately 20 cm.
X Check that the bonnet has engaged prop-
erly.
i If the bonnet can be raised slightly, it is
not properly engaged. Open it again and
close it with a little more force. Engine oil
Depending on driving style, the vehicle con-
sumes up to 0.8 l oil per 1,000 km. The oil
consumption may be higher than this when
the vehicle is new or if you frequently drive at
high engine speeds.
Checking the engine oil level Before checking the engine oil level the fol-
lowing conditions for the vehicle should be
met:
R the vehicle should be parked on level
ground.
R the engine should be switched off for at
least five minutes if the engine is at normal
operating temperature.
R the engine should be switched off for at
least 30 minutes if the engine is not at
operating temperature (i.e. if you only start
the engine briefly).
Depending on the engine, the oil dipstick may
be installed at a different location. 220
Engine compartmentOperation
* optional
212_AKB; 2; 4, en-GB
mkalafa,
Version: 2.11.8.1 2009-05-05T14:17:16+02:00 - Seite 220
Dateiname: 6515346702_buchblock.pdf; erzeugt am 07. May 2009 14:16:55; WK
Page 239 of 373

i
On vehicles without level control, the
height of the ball coupling will alter accord-
ing to the load placed on the vehicle. If nec-
essary, use a trailer with a height-adjusta-
ble drawbar.
Coupling up a trailer G
Risk of injury
Do not disconnect a trailer with an engaged
overrun brake. Otherwise, your hand could
become trapped between the bumper and
trailer drawbar.
! Do not disconnect a trailer with an
engaged overrun brake. Otherwise, your
vehicle could be damaged by the rebound-
ing of the overrun brake.
X Position the trailer level behind the vehicle.
X Couple up the trailer.
X Establish the electrical connection
between the vehicle and the trailer.
Driving tips G
Risk of accident
If the Check trailer hitch locking
mechanism message appears in the multi-
function display while the vehicle is in motion,
pull over immediately and check whether the
ball coupling is correctly engaged.
i Observe the notes on ESP ®
trailer stabi-
lisation (Y page 60).
In Germany, the maximum permissible speed
for vehicle/trailer combinations depends on
the type of trailer and is either 80 km/h or
100 km/h. Before beginning the journey,
check the trailer's documents to see what the
maximum permitted speed is. G
Risk of accident
Always observe the maximum speed permit-
ted in Germany for vehicle/trailer combina-
tions, even in countries where higher speeds are permitted. This lowers the risk of an acci-
dent.
When towing a trailer, your vehicle's handling
characteristics will be different in comparison
to when driving without a trailer.
The vehicle/trailer combination:
R is heavier
R is restricted in its acceleration and gradi-
ent-climbing capability
R has an increased braking distance
R is affected more by strong crosswinds
R demands more sensitive steering
R consumes more fuel
On long and steep downhill gradients you
must select a lower gear in good time, or on
vehicles with automatic transmission*, select
shift range 1,2or 3.
i This also applies if you have activated
cruise control, Speedtronic or Distronic
Plus*.
This will use the braking effect of the engine,
so less braking will be required to maintain
the speed. This relieves the load on the brake
system and prevents the brakes from over-
heating and wearing too quickly. If you need
additional braking, depress the brake pedal
repeatedly rather than continuously. G
Risk of accident
Never depress the brake pedal continuously
while the vehicle is in motion, e.g. never cause
the brakes to rub by applying constant slight
pedal pressure. This causes the brake system
to overheat, increases the braking distance
and can lead to the brakes failing completely. 236
Trailer towingOperation
* optional
212_AKB; 2; 4, en-GB
mkalafa,
Version: 2.11.8.1 2009-05-05T14:17:16+02:00 - Seite 236
Dateiname: 6515346702_buchblock.pdf; erzeugt am 07. May 2009 14:16:59; WK
Page 342 of 373

driving downhill). This would impair braking
efficiency.
Have the brake fluid renewed every two years
with a brake fluid that has been approved by
Mercedes-Benz and have this confirmed in
the Service Booklet.
i There is usually a notice in the engine
compartment to remind you when the next
brake fluid change is due. Windscreen washer system
The headlamp cleaning system* and wind-
screen washer system are both supplied from
the washer fluid reservoir.
Further information on windscreen washer
fluid and its mixing ratio ( Ypage 222). Vehicle data, E 200 CGI BlueEFFI-
CIENCY
Vehicle dimensions
Vehicle length
(ECE)
4868 mm
Vehicle width
including exterior
mirrors
2071 mm
Vehicle height
51 1464 mm
Wheelbase
2874 mm
Vehicle weights
Unladen weight (in accordance with EC
Directive)
Manual transmis-
sion
1615 kg Vehicle weights
Automatic trans-
mission
1615 kg
The unladen weight includes the driver
(68 kg), luggage (7 kg) and all fluids (fuel
tank 90% full). Items of optional equipment
increase the unladen weight and reduce the
maximum payload.
Maximum roof
load
100 kg
Maximum luggage
compartment load
100 kg
You will find weight information specific to
the vehicle on the vehicle identification
plate (Y
page 332). Vehicle data, E 250 CGI BlueEFFI-
CIENCY
Vehicle dimensions
Vehicle length
(ECE)
4868 mm
Vehicle width
including exterior
mirrors
2071 mm
Vehicle height
52 1464 mm
Wheelbase
2874 mm
51
The value specified may differ from the actual value depending on tyres, load, optional equipment and state
of the suspension system.
52 The value specified may differ from the actual value depending on tyres, load, optional equipment and state
of the suspension system. Vehicle data, E 250 CGI BlueEFFICIENCY
339Technical data
* optional
212_AKB; 2; 4, en-GB
mkalafa,
Version: 2.11.8.1 2009-05-05T14:17:16+02:00 - Seite 339 Z
Dateiname: 6515346702_buchblock.pdf; erzeugt am 07. May 2009 14:17:33; WK