2009 MERCEDES-BENZ E-CLASS SALOON wheel
[x] Cancel search: wheelPage 247 of 373

!
Observe the note on care provided by the
trailer manufacturer.
i Maintenance of the ball coupling and
trailer coupling can also be performed by
any Mercedes-Benz Service Centre. H
Environmental note
Dispose of oily and greasy cloths in an envi-
ronmentally-responsible manner. Interior care
Cleaning the steering wheel boss and
dashboard G
Risk of injury
Do not use cleaning agents and cockpit care
spray containing solvents to clean the dash-
board and the steering wheel boss. If cleaning
agents containing solvents are used the sur-
faces become porous, then if an airbag is
deployed the disintegrating plastic parts may
cause serious injury.
X Wipe the dashboard and steering wheel
boss with a damp, lint-free cloth (e.g. a
microfibre cloth) and cleaning agent.
X Heavy soiling: use car care and cleaning
products recommended and approved by
Mercedes-Benz.
Cleaning the COMAND display X
Before cleaning the display, make sure that
it is switched off and has cooled down.
X Clean the display surface using a commer-
cially-available microfibre cloth and TFT/
LCD display cleaner.
X Dry the display surface using a dry micro-
fibre cloth.
! For cleaning, do not use any of the fol-
lowing: R
alcohol-based solvents or petrol
R abrasive cleaning agents
R commercially-available household clean-
ing agents
These may damage the display surface. Do
not exert pressure when cleaning the dis-
play surface as this may lead to irreversible
damage.
Cleaning the seat covers !
Do not use microfibre cloths to clean gen-
uine leather, artificial leather or
Alcantara ®
covers, as these are too aggres-
sive and, if used often, may damage the
cover.
! Clean:
R genuine leather covers with a damp
cloth, then wipe the covers down with a
dry cloth. Make sure that the leather
does not become soaked. For leather
care, use a leather care agent recom-
mended by Mercedes-Benz. You can
obtain information about this from any
Mercedes-Benz Service Centre.
R artificial leather covers with a cloth mois-
tened with a solution containing 1%
detergent (e.g. washing-up liquid).
R cloth covers with a microfibre cloth mois-
tened with a solution containing 1%
detergent (e.g. washing-up liquid). Rub
carefully and always wipe entire seat sec-
tions to avoid leaving visible lines. Leave
the seat to dry afterwards. Cleaning
results depend on the type of dirt and
how long it has been there.
R Alcantara ®
covers with a damp cloth.
Make sure you wipe entire seat sections
to avoid leaving visible lines.
i Note that regular care is essential to
ensure that the quality (both appearance
and comfort) of the covers is retained over
time. 244
CareOperation
212_AKB; 2; 4, en-GB
mkalafa,
Version: 2.11.8.1 2009-05-05T14:17:16+02:00 - Seite 244
Dateiname: 6515346702_buchblock.pdf; erzeugt am 07. May 2009 14:17:02; WK
Page 251 of 373

Where will I find...?
Warning triangle
Saloon The warning triangle is secured on the inside
of the boot lid. X
Turn the catch 90° in the direction of the
arrow and remove warning triangle :.
Estate The warning triangle is located behind the
right-hand side trim panel in the luggage com-
partment.
X Open the right-hand side trim panel. X
Remove warning triangle :.Setting up the warning triangle X
Fold feet =down and out to the side.
X Pull side reflectors ;up to form a triangle
and lock them at the top using press-
stud :. First-aid kit
i Check the expiry date of the first-aid kit
annually, and replace the contents when
necessary.
Saloon The first-aid kit is located in the boot, in the
right-hand side trim panel behind the wheel
arch.
X
Slide down the luggage net.
X Open the stowage compartment. X
Release strap :.
X Remove first-aid kit ;.248
Where will I find...?Practical advice
212_AKB; 2; 4, en-GB
mkalafa,
Version: 2.11.8.1 2009-05-05T14:17:16+02:00 - Seite 248
Dateiname: 6515346702_buchblock.pdf; erzeugt am 07. May 2009 14:17:05; WK
Page 252 of 373

Estate
The first-aid kit is located in the rear of the
luggage compartment on the right-hand side.
Vehicles without a TV tuner
Vehicles with a TV tuner
X On vehicles with a TV tuner: open the
right-hand side trim panel.
X Remove first-aid kit :. Fire extinguisher*
i Have the fire extinguisher refilled after
each use and checked every two years.
Otherwise, it may fail in an emergency.
Observe the legal requirements in all coun-
tries concerned. The fire extinguisher is located underneath
the front of the driver's seat. X
Pull tab :upwards.
X Remove fire extinguisher ;. Vehicle tool kit
*, jack*, TIREFIT kit
and the "Minispare" emergency
spare wheel*
Saloon: the vehicle tool kit, jack, TIREFIT kit
and "Minispare" emergency spare wheel are
in the stowage compartment under the boot
floor (Y page 204).
Estate: the vehicle tool kit, jack, TIREFIT kit
and "Minispare" emergency spare wheel are
in the stowage compartment under the lug-
gage compartment floor (Y page 204). G
Risk of injury
The jack is designed only to raise and hold the
vehicle for a short time while a wheel is being
changed.
You must use axle stands if you are carrying
out work on the vehicle.
Make sure that the jack is placed on a firm,
non-slip, level surface. Do not use wooden
blocks or similar objects as a jack underlay.
The vehicle could otherwise fall off the jack
and seriously injure you.
Do not start the engine at any time while a
wheel is being changed.
Do not lie under the vehicle when it is being
supported by the jack. If you do not raise the
vehicle as described, it could slip off the jack Where will I find...?
249Practical advice
* optional
212_AKB; 2; 4, en-GB
mkalafa,
Version: 2.11.8.1 2009-05-05T14:17:16+02:00 - Seite 249 Z
Dateiname: 6515346702_buchblock.pdf; erzeugt am 07. May 2009 14:17:06; WK
Page 253 of 373
(e.g. if the engine is started or if a door or the
boot lid/tailgate is opened or closed) and you
could be seriously injured.
i When using the jack, you should also
observe the safety notes in the "Flat tyre"
section (Y page 316).
Vehicles with a TIREFIT kit X
Saloon: open the boot floor (Y page 204).
X Estate: open the EASY-PACK folding lug-
gage compartment floor (Y page 204).:
TIREFIT kit
; Folding wheel chock
= Electric air pump
? Towing eye
A Jack
B Centring pin
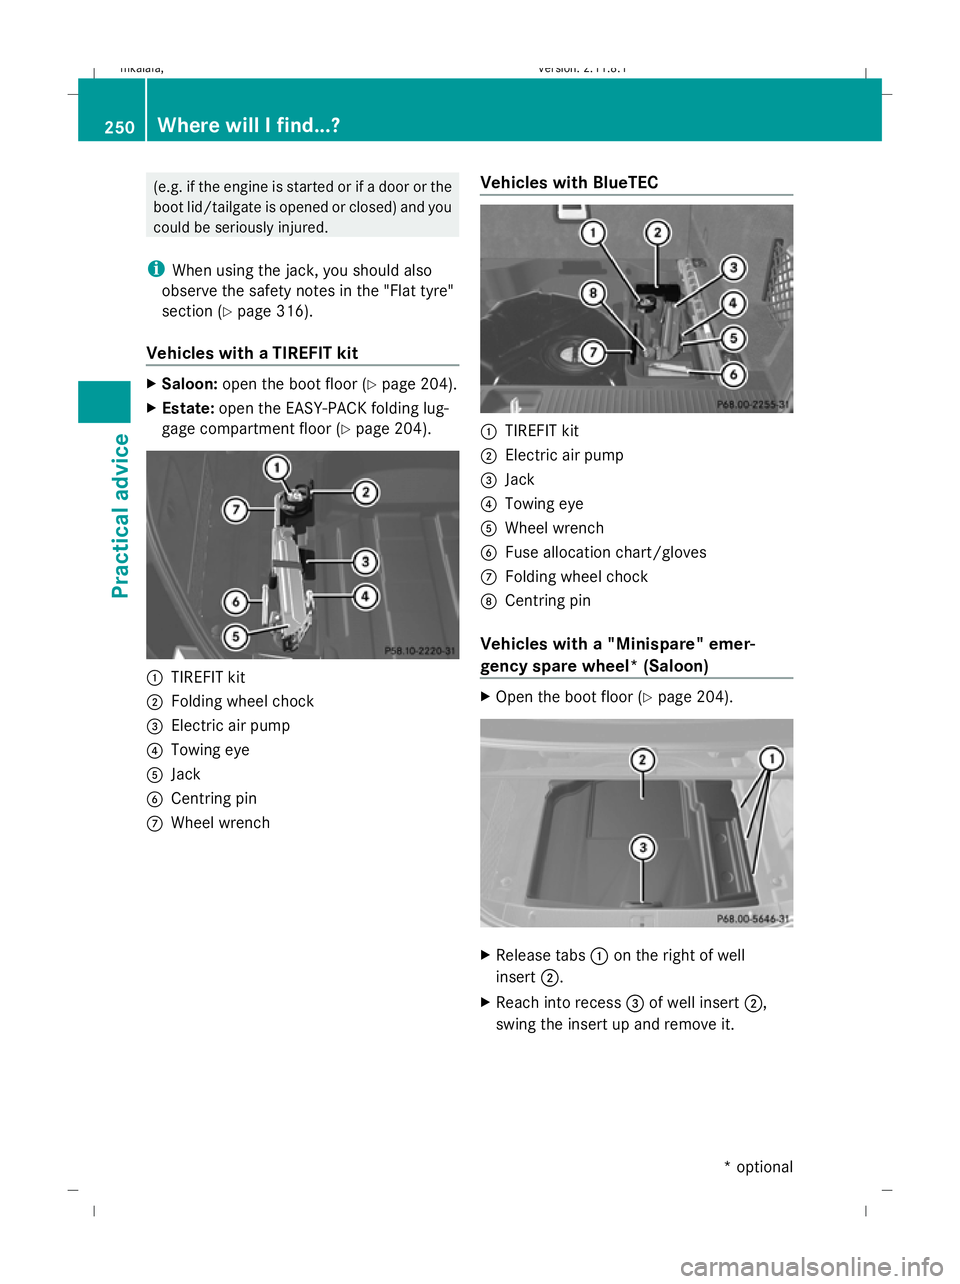
C Wheel wrench Vehicles with BlueTEC :
TIREFIT kit
; Electric air pump
= Jack
? Towing eye
A Wheel wrench
B Fuse allocation chart/gloves
C Folding wheel chock
D Centring pin
Vehicles with a "Minispare" emer-
gency spare wheel* (Saloon) X
Open the boot floor (Y page 204). X
Release tabs :on the right of well
insert ;.
X Reach into recess =of well insert ;,
swing the insert up and remove it. 250
Where will I find...?Practical advice
* optional
212_AKB; 2; 4, en-GB
mkalafa,
Version: 2.11.8.1
2009-05-05T14:17:16+02:00 - Seite 250
Dateiname: 6515346702_buchblock.pdf; erzeugt am 07. May 2009 14:17:06; WK
Page 254 of 373

X
Estate without a folding bench seat*:
open the EASY-PACK folding luggage com-
partment floor ( Ypage 204).
X Estate with a foldi")
Vehicles with a "Minispare" emer-
gency spare wheel* (Estate)
X
Estate without a folding bench seat*:
open the EASY-PACK folding luggage com-
partment floor ( Ypage 204).
X Estate with a folding bench seat *:
remove the seat cushions of the folding
bench seat (Y page 83). Estate without a folding bench seat
X
Estate without a folding bench seat*:
remove stowage space :.
X Estate with folding bench seat*: open
the luggage compartment floor.
Remove the "Minispare" emergency
spare wheel* (Saloon and Estate with-
out folding bench seat*) X
Remove vehicle tool kit tray :.
X Turn stowage well ;anti-clockwise and
remove it.
X Take out "Minispare" emergency spare
wheel =. Remove the "Minispare" emergency
spare wheel* (Estate with folding
bench seat*)
X
Remove vehicle tool kit tray :by
recess ;.
X Take out "Minispare" emergency spare
wheel =. Display messages
Notes
G
Risk of accident
The on-board computer only records and
shows malfunctions and warnings from cer-
tain systems. Therefore, make sure that your
vehicle is safe to use. You could otherwise
cause an accident by driving an unsafe vehi-
cle.
Certain display messages are accompanied
by a warning tone or a continuous tone.
The multi-function display shows high-priority
display messages in red.
Please respond in accordance with the dis-
play messages and follow the additional
notes in this Owner's Manual. G
Risk of accident
If the instrument cluster or the multi-function
display fails, then no display messages can be
shown.
You will not then be able to see information
about the vehicle status, such as speed and Display messages
251Practical advice
* optional
212_AKB; 2; 4, en-GB
mkalafa,
Version: 2.11.8.1 2009-05-05T14:17:16+02:00 - Seite 251 Z
Dateiname: 6515346702_buchblock.pdf; erzeugt am 07. May 2009 14:17:07; WK
Page 255 of 373

outside temperature, warning and indicator
lamps, display messages or the failure of sys-
tems. The vehicle’s handling characteristics
may be affected. Adapt your driving style and
speed accordingly.
Immediately consult a qualified specialist
workshop which has the necessary specialist
knowledge and tools to carry out the work
required. Mercedes-Benz recommends that
you use a Mercedes-Benz Service Centre for
this purpose. In particular, work relevant to
safety or on safety-related systems must be
carried out at a qualified specialist workshop.
When you stop and park the vehicle, please
observe the instructions provided for HOLD
(Y page 151)and parking (Y page 107).
Calling up display messages The on-board computer saves certain display
messages, which you can call up.
X Press =or; on the steering wheel
to select the Servicemenu.
If there are display messages, the multi-
function display shows, e.g. 2 messages.
X Using 9or: select the entry, e.g.
2 messages. X
Confirm with a.
X Using :or9 scroll through the dis-
play messages.
Hiding display messages You cannot hide display messages of the
highest priority. The multi-function display
shows these messages continuously until
their causes have been remedied.
Use the buttons on the multi-function steer-
ing wheel.
X
Use the aor% button on the steer-
ing wheel to hide the display message.
The following tables contain all the display
messages. Text messages
G
Risk of accident and injury
The operating safety of the vehicle can be compromised if maintenance work is carried out
incorrectly. This could cause you to lose control of the vehicle and cause an accident. The safety
systems may also not be able to protect you or others as they are designed to do.
Always have maintenance work carried out at a qualified specialist workshop. The qualified spe-
cialist workshop must have the necessary specialist knowledge and tools to carry out the work
required. Mercedes-Benz recommends that you use a Mercedes-Benz Service Centre for this
purpose. In particular, work relevant to safety or on safety-related systems must be carried out
at a qualified specialist workshop. 252
Display messagesPractical advice
212_AKB; 2; 4, en-GB
mkalafa,
Version: 2.11.8.1 2009-05-05T14:17:16+02:00 - Seite 252
Dateiname: 6515346702_buchblock.pdf; erzeugt am 07. May 2009 14:17:07; WK
Page 261 of 373

Display messages
Possible causes/consequences and
X
X Solutions Lane Keep‐
ing Assist currently
unavaila‐
ble See
Owner's
Manual
Lane Keeping Assist* is deactivated and temporarily inoper-
ative if:
R
the windscreen is dirty in the camera’s field of vision.
R visibility is impaired due to heavy rain, snow, spray or fog.
R there are no lane markings for a longer period.
R the lane markings are worn, dark or covered, for example
by dirt or snow.
Lane Keeping Assist* is operational again and the display
message disappears when:
R the dirt (e.g. slush) drops away while you are driving.
R the system detects that the camera is fully operational
again.
If the display message continues to be shown:
X Clean the windscreen (Y page 242).Lane Keep‐
ing Assist inopera‐
tive
Lane Keeping Assist* has malfunctioned.
X
Visit a qualified specialist workshop. Tyre pres‐
sure Check
tyres
G
Risk of accident
The tyre pressure loss warning system has detected a signif-
icant loss in pressure. A warning tone also sounds.
X Stop the vehicle without making any sudden steering or
braking manoeuvres. Pay attention to traffic conditions as
you do so.
X Check the tyres.
X Check the tyre pressure. If necessary, set the correct tyre
pressure ( Ypage 225).
X If necessary, repair any defective tyres or change the wheel
(Y page 309).
X Restart the tyre pressure loss warning system once the tyre
pressure is correct (Y page 226).Run Flat
Indicator inopera‐
tive The tyre pressure loss warning system is faulty.
X
Visit a qualified specialist workshop. Check
tyre pres‐
sures then
restart
Run Flat
Indicator A display message for the tyre pressure loss warning system
was shown.
X
Set the correct tyre pressure for all tyres (Y page 225).
X Restart the tyre pressure loss warning system
(Y page 226). 258
Display
messagesPractical advice
* optional
212_AKB; 2; 4, en-GB
mkalafa
,V ersion: 2.11.8.1
2009-05-05T14:17:16+02:00 - Seite 258
Dateiname: 6515346702_buchblock.pdf; erzeugt am 07. May 2009 14:17:08; WK
Page 262 of 373

Display messages
Possible causes/consequences and
X
X Solutions Tyre
press.
monitor currently
unavaila‐
ble No sensor signals can be received due to radio interference.
The tyre pressure monitor* has temporarily malfunctioned.
X
Drive on.
The tyre pressure monitor* restarts automatically as soon
as the problem has been solved. Tyre
press.
monitor inopera‐
tive
The tyre pressure monitor* is faulty.
X
Visit a qualified specialist workshop. Tyre
press.
monitor inopera‐
tive No
wheel sen‐
sors The fitted wheels do not have suitable tyre pressure sensors.
X
Fit wheels with suitable tyre pressure sensors.
The tyre pressure monitor* is activated automatically after
driving for a few minutes. Check tyre(s)
G
Risk of accident
Vehicles with tyre pressure monitor*: the tyre pressure has
dropped significantly in one or more of the tyres. The wheel
position is displayed in the instrument cluster. A warning tone
also sounds.
X Stop the vehicle without making any sudden steering or
braking manoeuvres. Pay attention to traffic conditions as
you do so.
X Correct the tyre pressure (Y page 225).
X If necessary, repair any defective tyres or change the wheel
(Y page 309). Caution, tyre
defect
G
Risk of accident
Vehicles with the tyre pressure monitor*: the pressure is
dropping rapidly in one or more of the tyres. The wheel posi-
tion is displayed in the instrument cluster. A warning tone also
sounds.
X Stop the vehicle without making any sudden steering or
braking manoeuvres. Pay attention to traffic conditions as
you do so.
X Repair the faulty tyre or replace the wheel ( Ypage 309). Rectify tyre pres‐
sure
Vehicles with tyre pressure monitor*: the pressure is insuffi-
cient in at least one of the tyres or the pressure difference
between the individual tyres is too great.
X
Check the tyre pressures at the next opportunity. If neces-
sary, correct the tyre pressure (Y page 225). Display
messages
259Practical advice
* optional
212_AKB; 2; 4, en-GB
mkalafa
,V ersion: 2.11.8.1
2009-05-05T14:17:16+02:00 - Seite 259 Z
Dateiname: 6515346702_buchblock.pdf; erzeugt am 07. May 2009 14:17:08; WK