2009 MERCEDES-BENZ E-CLASS SALOON key
[x] Cancel search: keyPage 244 of 373

If the vehicle is very dirty, pre-wash it before
cleaning it in an automatic car wash.
! Make sure that the automatic car wash is
suitable for the size of the vehicle. Fold in
the exterior mirrors before the vehicle is
washed. There is otherwise a risk of dam-
age to the exterior mirrors.
! When washing your vehicle in a tow-
through car wash, make sure that the auto-
matic transmission* is in position N. The
vehicle could otherwise be damaged.
R Vehicles with DIRECT SELECT lever and
key:
Do not remove the key from the ignition
lock. Do not open the driver's or front-
passenger door when the engine is
switched off, as this automatically shifts
the automatic transmission to park posi-
tion Pand locks the wheels, unless you
have previously shifted the automatic
transmission to N.
R Vehicles with DIRECT SELECT lever and
KEYLESS GO*:
Do not open the driver's or front-
passenger door when the engine is
switched off, as this shifts the automatic
transmission to park position Pand locks
the wheels.
! Make sure that the side windows are
closed completely, that the blower for the
ventilation/heating is switched off and that
the windscreen wiper switch is in position
0. The rain/light sensor could otherwise be
activated and thereby cause unintentional
wiping. This could result in damage to the
vehicle.
After using an automatic car wash, wipe off
wax and drying agents from the windscreen
and the wiper blades. This will prevent smears
and reduce wiping noises caused by residue
on the windscreen. High-pressure cleaners G
Risk of accident
Do not use high-pressure cleaners with circu-
lar-jet nozzles (dirt grinders) to clean your
vehicle, in particular the tyres. You could oth-
erwise damage the tyres and cause an acci-
dent.
! Observe the instructions issued by the
equipment manufacturer concerning the
distance to be maintained between the
nozzle of the high-pressure cleaner and the
vehicle (at least 30 cm).
Move the high-pressure cleaner nozzle
around when cleaning your vehicle.
Do not aim directly at any of the following:
R tyres
R door joint
R electrical components
R battery
R connectors
R lights
R seals
R trim elements
R ventilation slots
Damaged seals or electrical components
can lead to failures or leaks.
Care and treatment of matt paint-
work* Your vehicle has a clear matt finish. For this
reason, you should make sure that you
adhere to the following instructions to avoid
damage to paintwork due to improper treat-
ment.
!
Under no circumstances should you pol-
ish the vehicle. Polishing will make the
paintwork shine.
! When caring for your paintwork, do not
use paint cleaner, grinding or polishing Care
241Operation
* optional
212_AKB; 2; 4, en-GB
mkalafa
,V ersion: 2.11.8.1
2009-05-05T14:17:16+02:00 - Seite 241 Z
Dateiname: 6515346702_buchblock.pdf; erzeugt am 07. May 2009 14:17:01; WK
Page 245 of 373

products, or gloss preservers such as wax.
These products are only suitable for high-
gloss finishes. Using them on a vehicle with
a matt finish results in serious damage to
the surface (gleaming, spotted areas).
Always have paintwork repairs carried out
at a qualified specialist workshop, e.g. a
Mercedes-Benz Service Centre.
i From the range of available Mercedes-
Benz care products, use only the insect
remover and the car shampoo.
Cleaning the paintwork Scratches, corrosive deposits, areas affected
by corrosion and damage caused by inade-
quate care cannot always be completely
repaired. In such cases, visit a qualified spe-
cialist workshop immediately, e.g. a
Mercedes-Benz Service Centre.
X Remove the following types of dirt immedi-
ately, whilst avoiding rubbing too hard.
Soak:
R insect remains with insect remover
R bird droppings with water
and rinse off the treated surface after-
wards.
Remove:
R tree resin, oils, fuels and greases by rub-
bing gently with a cloth soaked in petro-
leum ether or lighter fluid.
R tar stain with tar remover
R wax with silicone remover
! Do not affix:
R stickers
R films
R magnetic plates or similar items
to painted surfaces. Otherwise, you could
damage the paintwork. Cleaning the wheels !
Do not use acidic wheel cleaners to
remove brake dust. This could damage
wheel bolts and brake components.
Cleaning the windows X
Clean the inside and outside of the win-
dows with a damp cloth and a cleaning
product approved and recommended by
Mercedes-Benz.
! Clean the water drainage channels of the
windscreen and the rear window at regular
intervals. Under certain circumstances,
deposits such as leaves, petals and pollen
may prevent water from draining away
leading to corrosion damage.
Cleaning the wiper blades G
Risk of injury
Before cleaning the windscreen or wiper
blades, turn the key to position 0in the igni-
tion lock or press the Start/Stop button* until
all indicator lamps have gone out in the instru-
ment cluster. The windscreen wipers could
otherwise move and cause injury.
! Do not clean the wiper blades too often
and do not rub them too hard, as this will
result in damage to the graphite coating.
This could cause wiper noise.
X Fold the wiper arms away from the wind-
screen.
X Clean the wiper blades carefully with a
damp cloth.
X Fold the wiper arms back again before
switching on the ignition.
Cleaning the headlamps X
Clean the plastic lenses of the headlamps
with a wet sponge and windscreen washer
fluid or cleaning cloths. 242
CareOperation
* optional
212_AKB; 2; 4, en-GB
mkalafa,
Version: 2.11.8.1 2009-05-05T14:17:16+02:00 - Seite 242
Dateiname: 6515346702_buchblock.pdf; erzeugt am 07. May 2009 14:17:01; WK
Page 250 of 373
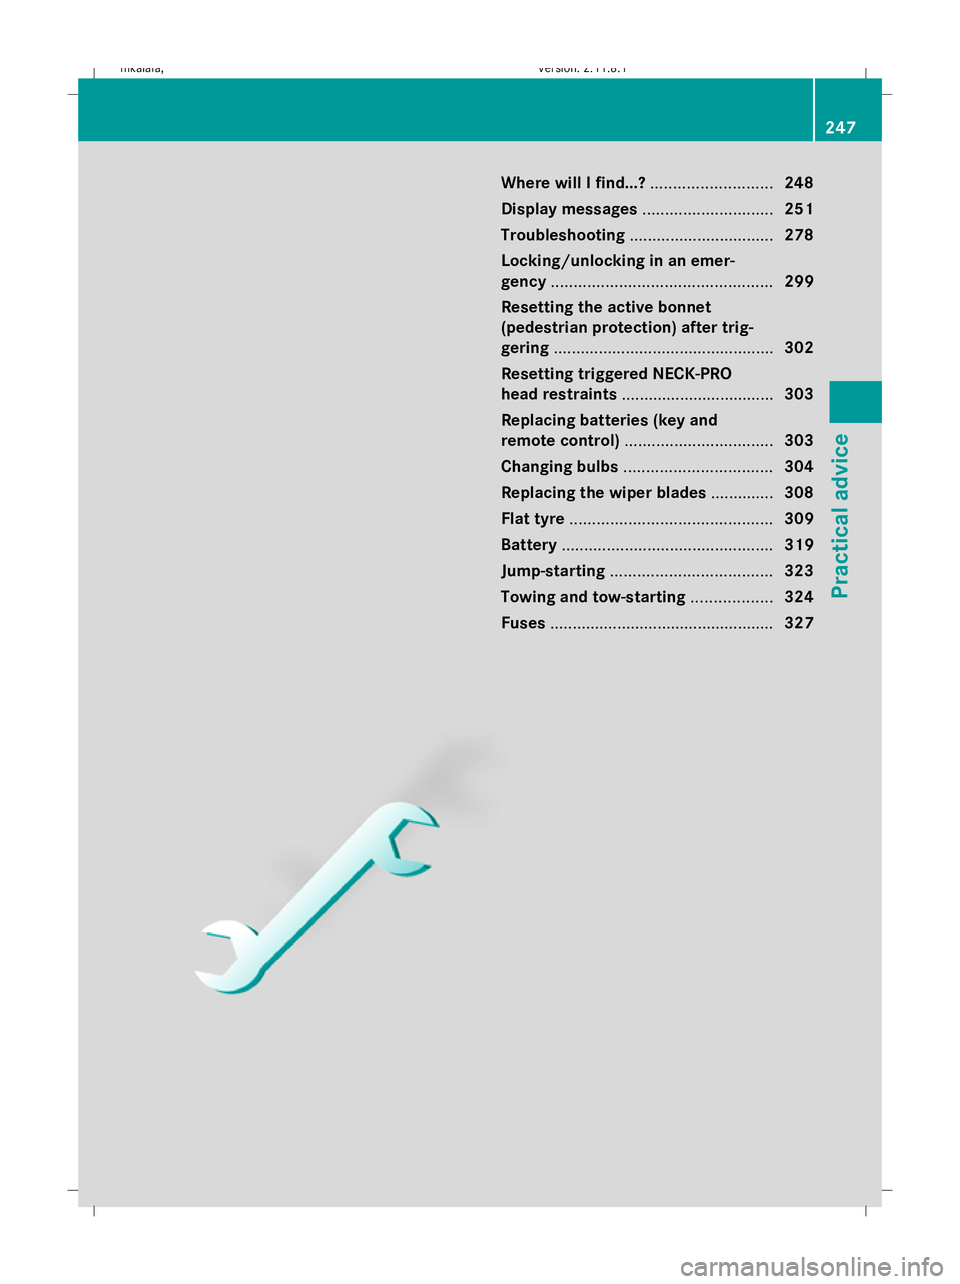
Where will I find...?
...........................248
Display messages ............................. 251
Troubleshooting ................................ 278
Locking/unlocking in an emer-
gency ................................................. 299
Resetting the active bonnet
(pedestrian protection) after trig-
gering ................................................. 302
Resetting triggered NECK-PRO
head restraints .................................. 303
Replacing batteries (key and
remote control) ................................. 303
Changing bulbs ................................. 304
Replacing the wiper blades ..............308
Flat tyre ............................................. 309
Battery ............................................... 319
Jump-starting .................................... 323
Towing and tow-starting ..................324
Fuses .................................................. 327 247Practical advice
212_AKB; 2; 4, en-GB
mkalafa,
Version: 2.11.8.1 2009-05-05T14:17:16+02:00 - Seite 247
Dateiname: 6515346702_buchblock.pdf; erzeugt am 07. May 2009 14:17:04; WK
Page 277 of 373

Display messages
Possible causes/consequences and
X
X Solutions b Malfunc‐
tion See
Owner's
Manual The exterior lighting is faulty.
X
Visit a qualified specialist workshop. Vehicles with trailer coupling*: a fuse may have blown.
X
Check the fuses (Y page 328).
X If necessary, replace the blown fuse. Observe the warning
notes.
If the display message continues to be shown:
X Visit a qualified specialist workshop. ¸ Replace
air
cleaner
The engine air filter is dirty and must be replaced
42
.
X Visit a qualified specialist workshop. 4 Check
eng. oil
lev. when
next refu‐
elling The engine oil level has dropped to a critical level. A warning
tone also sounds.
X
Check the engine oil level ( Ypage 220).
X If necessary, top up the engine oil.
X Have the engine checked for leaks if the engine oil needs
topping up more often than usual. + Change
key bat‐
teries The key batteries are discharged.
X
Change the batteries ( Ypage 304). + Key not
detected
(red display
message)
The KEYLESS GO key* is not in the vehicle. A warning tone
also sounds.
If you switch off the engine, you can no longer centrally lock
the vehicle and no longer start the engine.
X
Pull over and stop the vehicle safely as soon as possible,
paying attention to road and traffic conditions.
X Locate the KEYLESS GO key*. The KEYLESS GO key* is not detected while driving because
a powerful radio transmitter is causing interference. A warn-
ing tone also sounds.
X
Pull over and stop the vehicle safely as soon as possible,
paying attention to road and traffic conditions.
X Remove the Start/Stop button* from the ignition
lock (Y page 75).
X Insert the key into the ignition lock and turn it to the desired
position. 42
Only for certain vehicles. 274
Display
messagesPractical advice
* optional
212_AKB; 2; 4, en-GB
mkalafa
,V ersion: 2.11.8.1
2009-05-05T14:17:16+02:00 - Seite 274
Dateiname: 6515346702_buchblock.pdf; erzeugt am 07. May 2009 14:17:11; WK
Page 278 of 373
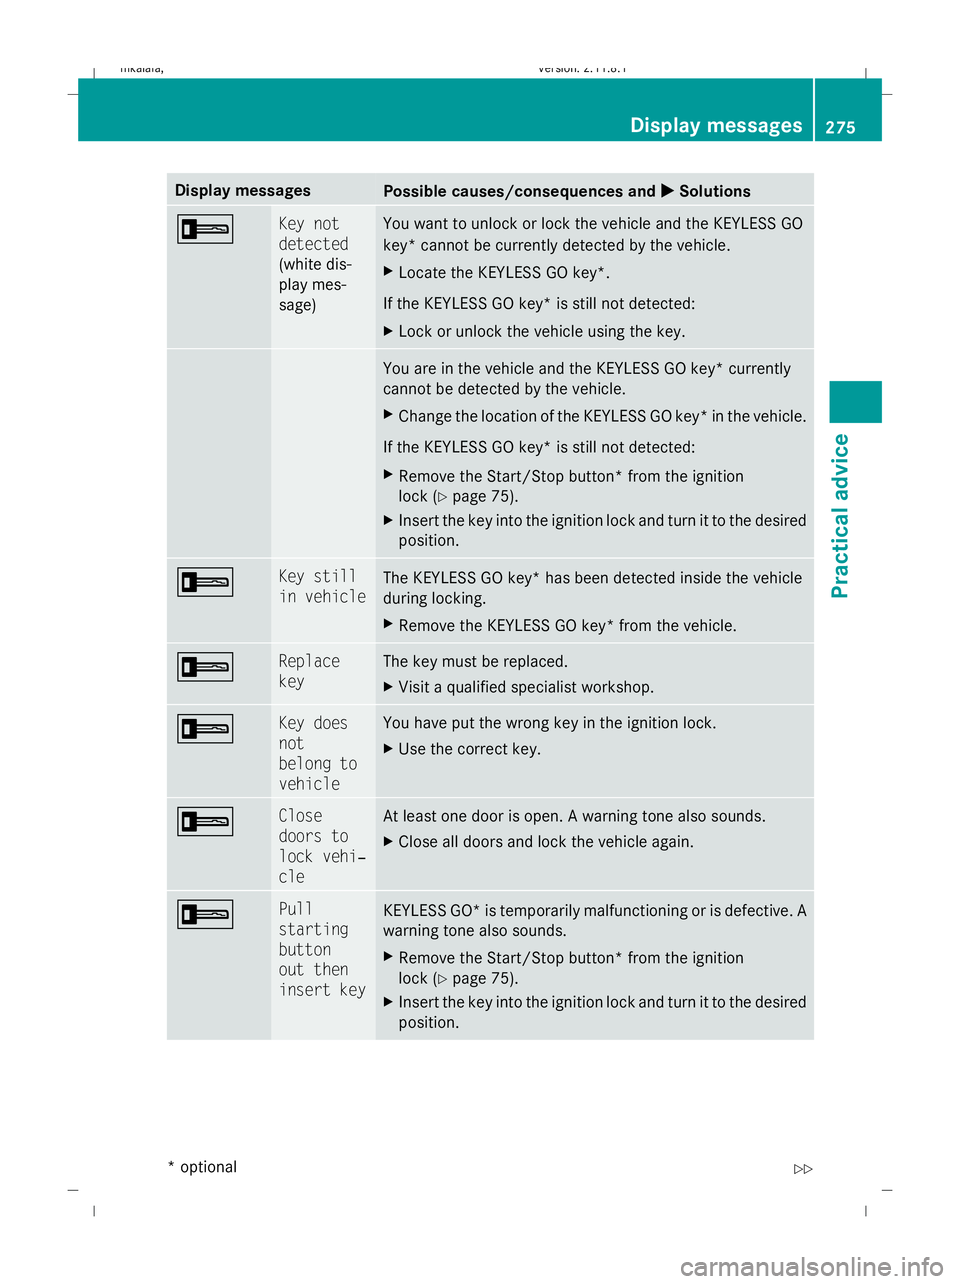
Display messages
Possible causes/consequences and
X
X Solutions + Key not
detected
(white dis-
play mes-
sage) You want to unlock or lock the vehicle and the KEYLESS GO
key* cannot be currently detected by the vehicle.
X
Locate the KEYLESS GO key*.
If the KEYLESS GO key* is still not detected:
X Lock or unlock the vehicle using the key. You are in the vehicle and the KEYLESS GO key* currently
cannot be detected by the vehicle.
X
Change the location of the KEYLESS GO key* in the vehicle.
If the KEYLESS GO key* is still not detected:
X Remove the Start/Stop button* from the ignition
lock (Y page 75).
X Insert the key into the ignition lock and turn it to the desired
position. + Key still
in vehicle
The KEYLESS GO key* has been detected inside the vehicle
during locking.
X
Remove the KEYLESS GO key* from the vehicle. + Replace
key The key must be replaced.
X
Visit a qualified specialist workshop. + Key does
not
belong to
vehicle You have put the wrong key in the ignition lock.
X
Use the correct key. + Close
doors to
lock vehi‐
cle At least one door is open. A warning tone also sounds.
X
Close all doors and lock the vehicle again. + Pull
starting
button
out then
insert key
KEYLESS GO* is temporarily malfunctioning or is defective. A
warning tone also sounds.
X
Remove the Start/Stop button* from the ignition
lock (Y page 75).
X Insert the key into the ignition lock and turn it to the desired
position. Display
messages
275Practical advice
* optional
212_AKB; 2; 4, en-GB
mkalafa
,V ersion: 2.11.8.1
2009-05-05T14:17:16+02:00 - Seite 275 Z
Dateiname: 6515346702_buchblock.pdf; erzeugt am 07. May 2009 14:17:11; WK
Page 284 of 373
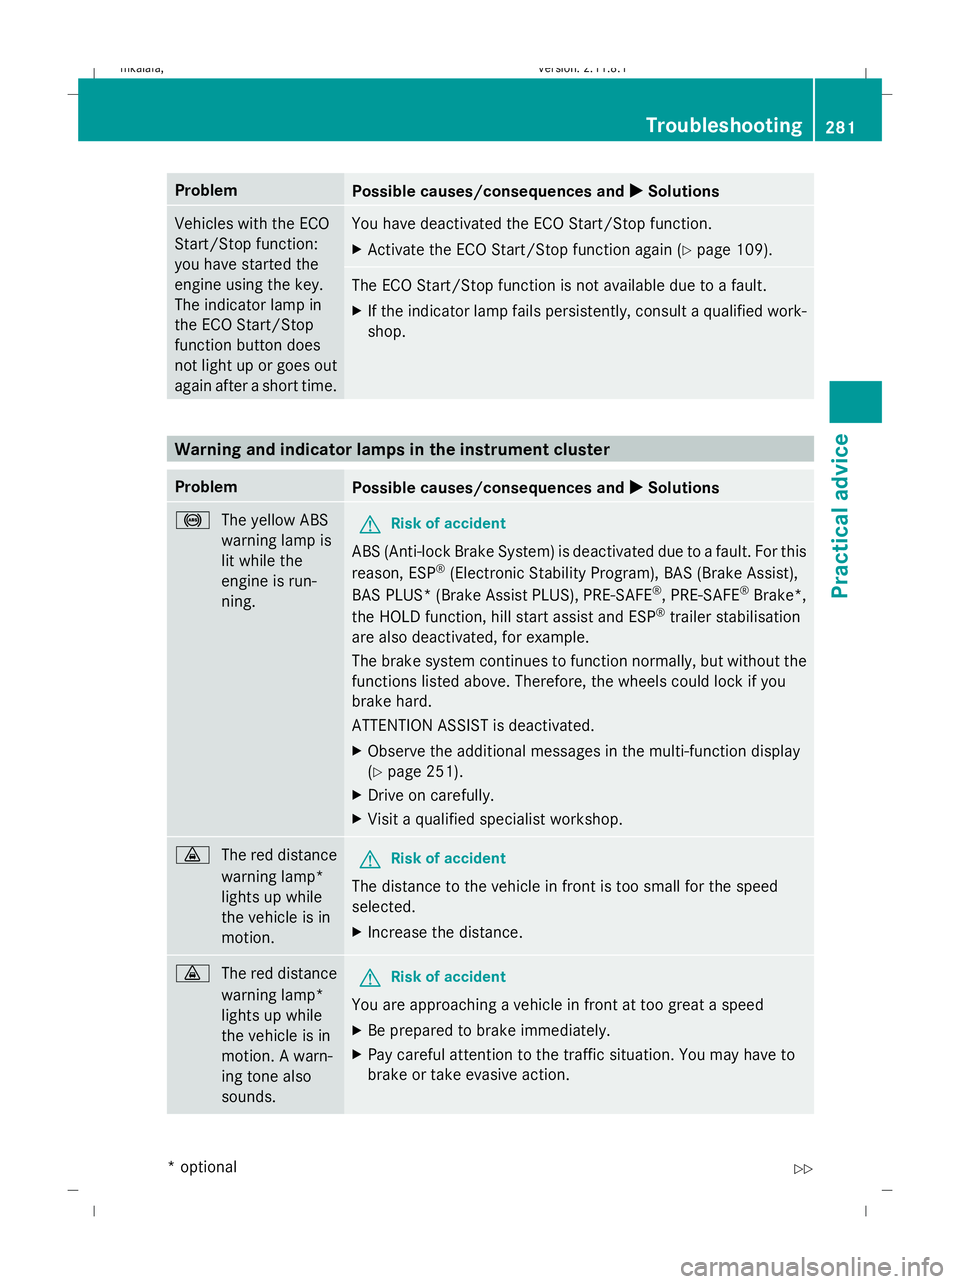
Problem
Possible causes/consequences and
X
X Solutions Vehicles with the ECO
Start/Stop function:
you have started the
engine using the key.
The indicator lamp in
the ECO Start/Stop
function button does
not light up or goes out
again after a short time. You have deactivated the ECO Start/Stop function.
X
Activate the ECO Start/Stop function again (Y page 109). The ECO Start/Stop function is not available due to a fault.
X If the indicator lamp fails persistently, consult a qualified work-
shop. Warning and indicator lamps in the instrument cluster
Problem
Possible causes/consequences and
X
X Solutions !
The yellow ABS
warning lamp is
lit while the
engine is run-
ning. G
Risk of accident
ABS (Anti-lock Brake System) is deactivated due to a fault. For this
reason, ESP ®
(Electronic Stability Program), BAS (Brake Assist),
BAS PLUS* (Brake Assist PLUS), PRE-SAFE ®
, PRE-SAFE ®
Brake*,
the HOLD function, hill start assist and ESP ®
trailer stabilisation
are also deactivated, for example.
The brake system continues to function normally, but without the
functions listed above. Therefore, the wheels could lock if you
brake hard.
ATTENTION ASSIST is deactivated.
X Observe the additional messages in the multi-function display
(Y page 251).
X Drive on carefully.
X Visit a qualified specialist workshop. ·
The red distance
warning lamp*
lights up while
the vehicle is in
motion. G
Risk of accident
The distance to the vehicle in front is too small for the speed
selected.
X Increase the distance. ·
The red distance
warning lamp*
lights up while
the vehicle is in
motion. A warn-
ing tone also
sounds. G
Risk of accident
You are approaching a vehicle in front at too great a speed
X Be prepared to brake immediately.
X Pay careful attention to the traffic situation. You may have to
brake or take evasive action. Troubleshooting
281Practical advice
* optional
212_AKB; 2; 4, en-GB
mkalafa,
Version: 2.11.8.1 2009-05-05T14:17:16+02:00 - Seite 281 Z
Dateiname: 6515346702_buchblock.pdf; erzeugt am 07. May 2009 14:17:12; WK
Page 291 of 373
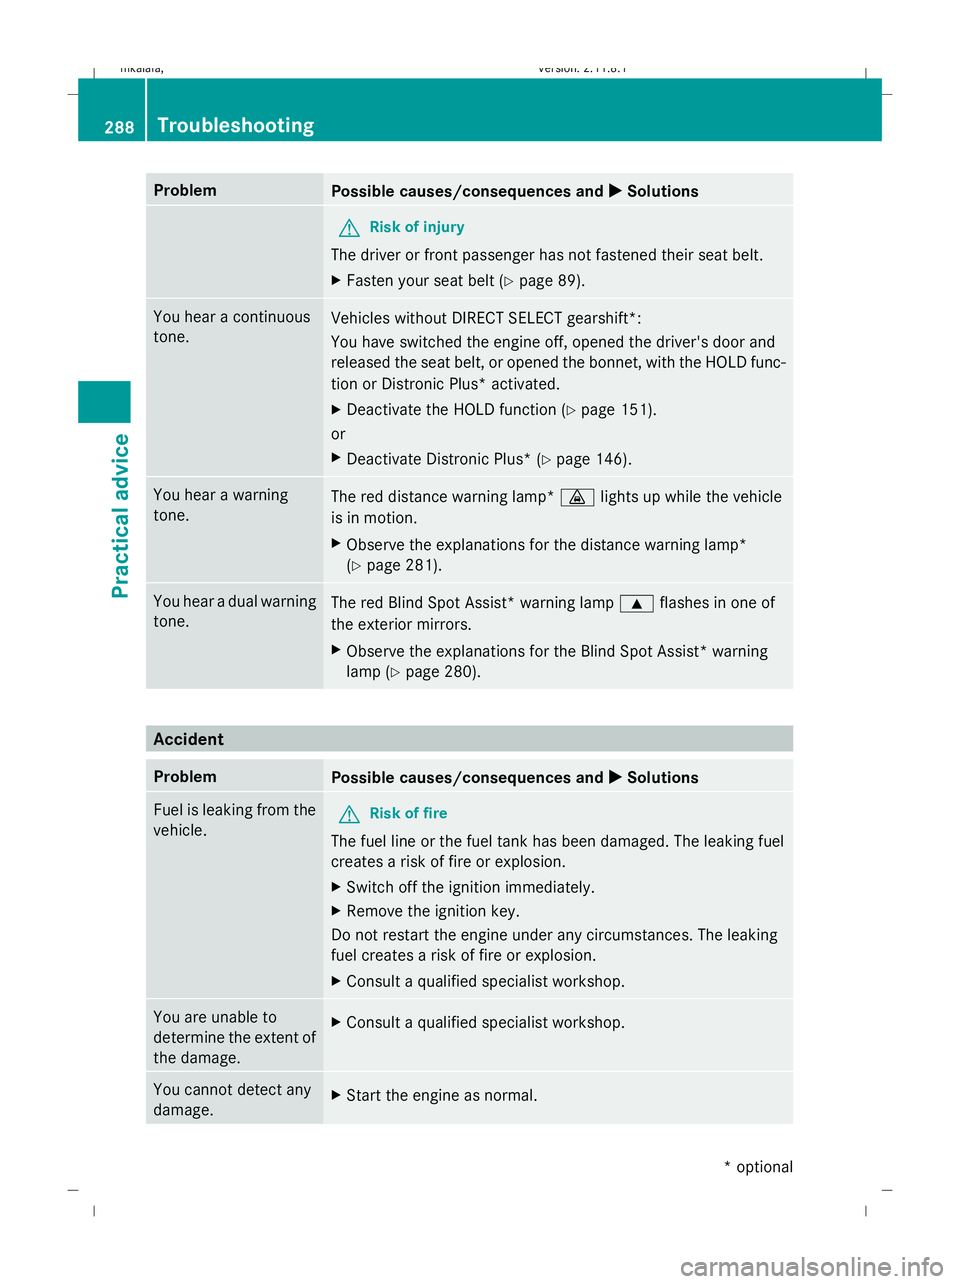
Problem
Possible causes/consequences and
X XSolutions G
Risk of injury
The driver or front passenger has not fastened their seat belt.
X Fasten your seat belt (Y page 89).You hear a continuous
tone.
Vehicles without DIRECT SELECT gearshift*:
You have switched the engine off, opened the driver's door and
released the seat belt, or opened the bonnet, with the HOLD func-
tion or Distronic Plus* activated.
X
Deactivate the HOLD function (Y page 151).
or
X Deactivate Distronic Plus* (Y page 146).You hear a warning
tone.
The red distance warning lamp*
·lights up while the vehicle
is in motion.
X Observe the explanations for the distance warning lamp*
(Y page 281). You hear a dual warning
tone.
The red Blind Spot Assist* warning lamp
9flashes in one of
the exterior mirrors.
X Observe the explanations for the Blind Spot Assist* warning
lamp (Y page 280). Accident
Problem
Possible causes/consequences and
X XSolutions Fuel is leaking from the
vehicle.
G
Risk of fire
The fuel line or the fuel tank has been damaged. The leaking fuel
creates a risk of fire or explosion.
X Switch off the ignition immediately.
X Remove the ignition key.
Do not restart the engine under any circumstances. The leaking
fuel creates a risk of fire or explosion.
X Consult a qualified specialist workshop. You are unable to
determine the extent of
the damage.
X
Consult a qualified specialist workshop. You cannot detect any
damage.
X
Start the engine as normal. 288
TroubleshootingPractical advice
* optional
212_AKB; 2; 4, en-GB
mkalafa,
Version: 2.11.8.1 2009-05-05T14:17:16+02:00 - Seite 288
Dateiname: 6515346702_buchblock.pdf; erzeugt am 07. May 2009 14:17:13; WK
Page 292 of 373
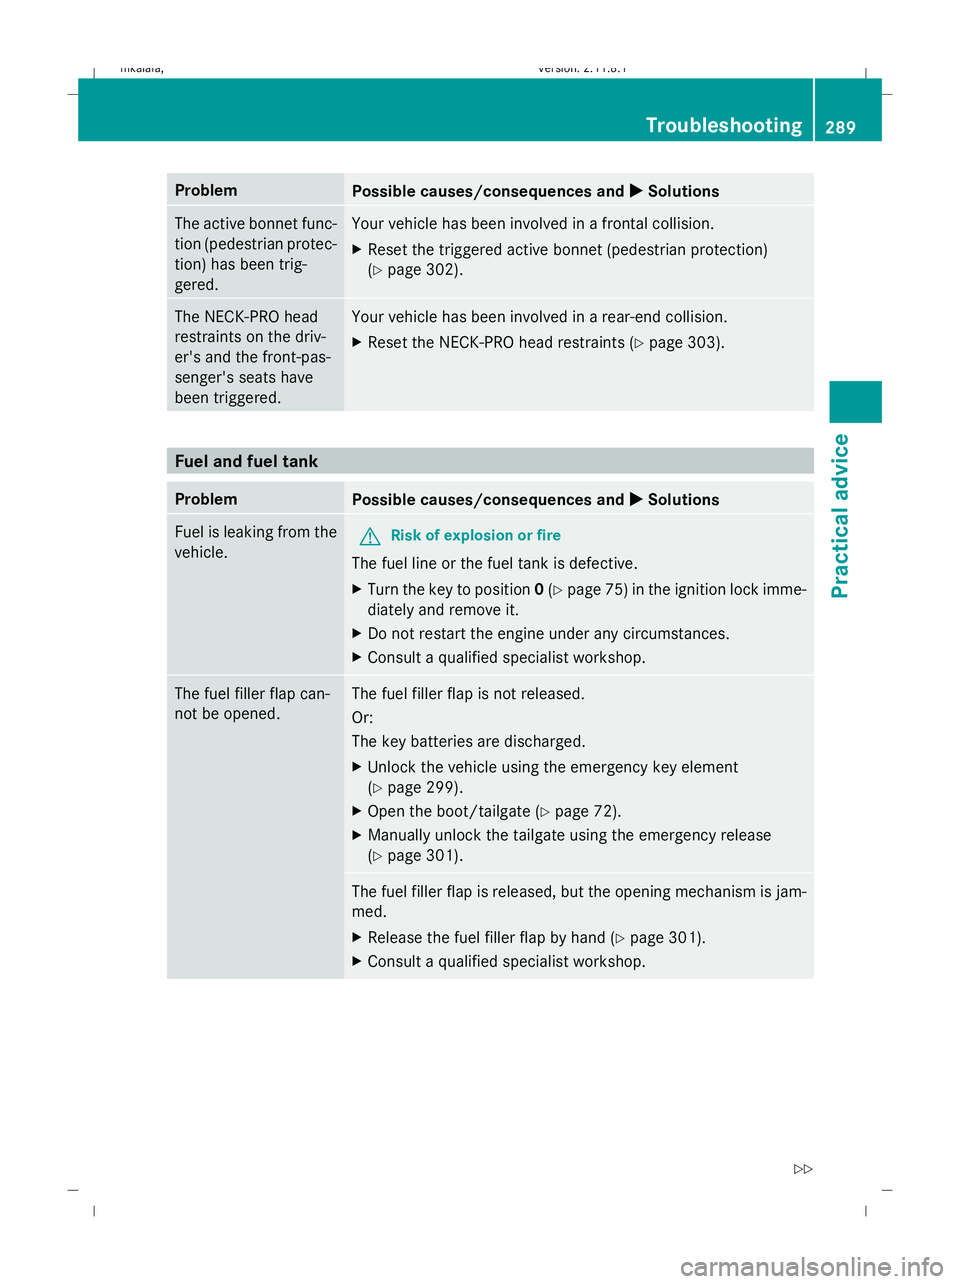
Problem
Possible causes/consequences and
X
X Solutions The active bonnet func-
tion (pedestrian protec-
tion) has been trig-
gered. Your vehicle has been involved in a frontal collision.
X
Reset the triggered active bonnet (pedestrian protection)
(Y page 302). The NECK-PRO head
restraints on the driv-
er's and the front-pas-
senger's seats have
been triggered. Your vehicle has been involved in a rear-end collision.
X
Reset the NECK-PRO head restraints (Y page 303).Fuel and fuel tank
Problem
Possible causes/consequences and
X
X Solutions Fuel is leaking from the
vehicle.
G
Risk of explosion or fire
The fuel line or the fuel tank is defective.
X Turn the key to position 0(Y page 75) in the ignition lock imme-
diately and remove it.
X Do not restart the engine under any circumstances.
X Consult a qualified specialist workshop. The fuel filler flap can-
not be opened. The fuel filler flap is not released.
Or:
The key batteries are discharged.
X
Unlock the vehicle using the emergency key element
(Y page 299).
X Open the boot/tailgate (Y page 72).
X Manually unlock the tailgate using the emergency release
(Y page 301). The fuel filler flap is released, but the opening mechanism is jam-
med.
X
Release the fuel filler flap by hand (Y page 301).
X Consult a qualified specialist workshop. Troubleshooting
289Practical advice
212_AKB; 2; 4, en-GB
mkalafa, Version: 2.11.8.1 2009-05-05T14:17:16+02:00 - Seite 289 Z
Dateiname: 6515346702_buchblock.pdf; erzeugt am 07. May 2009 14:17:13; WK