2009 MERCEDES-BENZ E-CLASS ESTATE wheel bolts
[x] Cancel search: wheel boltsPage 20 of 373
TV
Operating (on-board computer) .....127
Two-way radio
Installation ..................................... 331
Type identification plate
see vehicle identification plate ......332
Tyre grip ............................................. 233
Tyre pressure ................................... .225
Calling up (on-board computer) ....228
Display message .................... 258, 276
Tyre pressure loss warning system
............................................................ 226
Tyre pressure monitor
Warning lamp ................................. 286
Tyres
Direction of rotatio n...................... 224
General notes ................................ 223
Technical data ............................... 350
Tyre tread .......................................... .224 U
Unladen weight ................................. 339
Unlocking Emergency unlocking ..................... 299
From the inside (central unlocking
button) ............................................. 71
Up (display message) ........................ 123 V
Vanity mirror Sun visor ........................................ 207
Variable Speedtronic ........................148
Vehicle Emergency unlocking ..................... 299
Individual settings (on-board com-
puter) ............................................. 131
Leaving parked up .........................298
Towing ........................................... 326
Tow-starting ................................... 326
Transporting .................................. 327
Vehicle battery .................................. 319
Vehicle dimensions ...................339, 348
Vehicle electronics ...........................330
Vehicle identification number
(VIN) .......................................... 332, 333
Vehicle identification plate ..............332Vehicle level
.............................. 154, 155
Display message ............................ 268
Vehicle tool kit .................................. 249
Vehicle weights ................................. 339 W
Warning and indicator lamp ESP ®
Sport .................................... 283
Warning and indicator lamps
ABS (yellow) ................................... 281
Blind Spot Assist ............................ 280
Distronic Plus (red) ........................281
ESP ®
........................................ 60, 282
ESP ®
OFF ....................................... 282
LIM (cruise control) ........................ 138
LIM (Distronic Plus) .......................141
LIM (variable Speedtronic) .............149
Malfunction indicator lamp ............279
Tyre pressure monitor ...................286
Warning lamps
see Warning and indicator lamps
Warning tone ..................................... 287
Warning triangle ................................ 248
Washer fluid Display message ............................ 278
Washer fluid reservoir ..............222, 339
Filling capacity ............................... 339
Wearing seat belts .............................. 89
Wheel bolts Tightening torque ........................... 318
Wheel chock
Use ................................................ 315
Wheels
Cleaning ......................................... 242
General notes ................................ 223
Interchanging ................................. 229
Technical data ............................... 350
Windowbag .......................................... 42
Windowbags Display message ............................ 278
Windows
Cleaning ......................................... 242
see Side windows
Windscreen washer fluid ..................339
Topping up ..................................... 222
Windscreen washer system .....222, 339 Index
17 212_AKB; 2; 4, en-GB
mkalafa,
Version: 2.11.8.1 2009-05-05T14:17:16+02:00 - Seite 17Dateiname: 6515346702_buchblock.pdf; erzeugt am 07. May 2009 14:15:27; WK
Page 232 of 373
X
Use the table on the inside of the fuel filler
flap to ensure that the tyre pressure is set
correctly in all four tyres for the current
operating conditions.
Also observe the notes in the section on
tyre pressures (Y page 225).
X Make sure that the key is in position 2in
the ignition lock.
X Press the =or; button to select the
Service menu.
X Press the 9or: button to select
Tyre press..
X Press the abutton.
The current pressure in each individual tyre
is displayed, or the following message
appears:
Tyre pressures will be displayed
after a few minutes of driving
X Press the :button.
The multi-function display shows the mes-
sage:
Use current pressures as new ref‐
erence values
X Press the abutton.
The multi-function display shows the mes-
sage:
Tyre press. monitor restarted
After a few minutes of driving, the current
pressures are adopted as the new monitor-
ing values.
Cancelling the restart X
Press the %button.
or
X Press the 9button to leave the menu.
Other messages in the multi-function
display If in multi-function display the following mes-
sage appears:
Please correct tyre pressure
X
Check the tyre pressure on all four wheels
and correct it if necessary. i
If the wheel positions on the vehicle are
interchanged, the tyre pressures may be
displayed for the wrong positions for a
short time. This is rectified after a few
minutes of driving, and the tyre pressures
are displayed for the correct positions. Interchanging the wheels
G
Risk of accident
Interchange the front and rear wheels only if
they have the same dimensions: for example
size, offset, etc.
After a wheel is changed, have the tightening
torque checked at a specialist workshop that
has the necessary specialist knowledge and
tools to carry out the work required.
Mercedes-Benz recommends that you use a
Mercedes-Benz Service Centre for this pur-
pose. In particular, work relevant to safety or
on safety-related systems must be carried out
at a qualified specialist workshop.
The wheels could work loose if they are not
tightened to a torque of 130 Nm.
For safety reasons, Mercedes-Benz recom-
mends that you only use wheel bolts of the
correct size which have been approved for
Mercedes-Benz vehicles.
The wear patterns on the front and rear tyres
differ, depending on the operating conditions.
Interchange the wheels before a clear wear
pattern has formed on the tyres. Front tyres
typically wear more on the shoulders and the
rear tyres in the centre.
On vehicles that have the same size front and
rear wheels you can interchange the wheels
every 5,000 km to 10,000 km depending on
the degree of tyre wear. Do not reverse the
direction of tyre rotation.
Clean the contact surfaces of the wheel and
the brake disc thoroughly every time a wheel
is interchanged. Check the tyre pressure and,
if necessary, restart the tyre pressure loss
warning system or the tyre pressure moni-
tor*. Tyres and wheels
229Operation
* optional
212_AKB; 2; 4, en-GB
mkalafa,
Version: 2.11.8.1 2009-05-05T14:17:16+02:00 - Seite 229 Z
Dateiname: 6515346702_buchblock.pdf; erzeugt am 07. May 2009 14:16:58; WK
Page 245 of 373
products, or gloss preservers such as wax.
These products are only suitable for high-
gloss finishes. Using them on a vehicle with
a matt finish results in serious damage to
the surface (gleaming, spotted areas).
Always have paintwork repairs carried out
at a qualified specialist workshop, e.g. a
Mercedes-Benz Service Centre.
i From the range of available Mercedes-
Benz care products, use only the insect
remover and the car shampoo.
Cleaning the paintwork Scratches, corrosive deposits, areas affected
by corrosion and damage caused by inade-
quate care cannot always be completely
repaired. In such cases, visit a qualified spe-
cialist workshop immediately, e.g. a
Mercedes-Benz Service Centre.
X Remove the following types of dirt immedi-
ately, whilst avoiding rubbing too hard.
Soak:
R insect remains with insect remover
R bird droppings with water
and rinse off the treated surface after-
wards.
Remove:
R tree resin, oils, fuels and greases by rub-
bing gently with a cloth soaked in petro-
leum ether or lighter fluid.
R tar stain with tar remover
R wax with silicone remover
! Do not affix:
R stickers
R films
R magnetic plates or similar items
to painted surfaces. Otherwise, you could
damage the paintwork. Cleaning the wheels !
Do not use acidic wheel cleaners to
remove brake dust. This could damage
wheel bolts and brake components.
Cleaning the windows X
Clean the inside and outside of the win-
dows with a damp cloth and a cleaning
product approved and recommended by
Mercedes-Benz.
! Clean the water drainage channels of the
windscreen and the rear window at regular
intervals. Under certain circumstances,
deposits such as leaves, petals and pollen
may prevent water from draining away
leading to corrosion damage.
Cleaning the wiper blades G
Risk of injury
Before cleaning the windscreen or wiper
blades, turn the key to position 0in the igni-
tion lock or press the Start/Stop button* until
all indicator lamps have gone out in the instru-
ment cluster. The windscreen wipers could
otherwise move and cause injury.
! Do not clean the wiper blades too often
and do not rub them too hard, as this will
result in damage to the graphite coating.
This could cause wiper noise.
X Fold the wiper arms away from the wind-
screen.
X Clean the wiper blades carefully with a
damp cloth.
X Fold the wiper arms back again before
switching on the ignition.
Cleaning the headlamps X
Clean the plastic lenses of the headlamps
with a wet sponge and windscreen washer
fluid or cleaning cloths. 242
CareOperation
* optional
212_AKB; 2; 4, en-GB
mkalafa,
Version: 2.11.8.1 2009-05-05T14:17:16+02:00 - Seite 242
Dateiname: 6515346702_buchblock.pdf; erzeugt am 07. May 2009 14:17:01; WK
Page 319 of 373
X
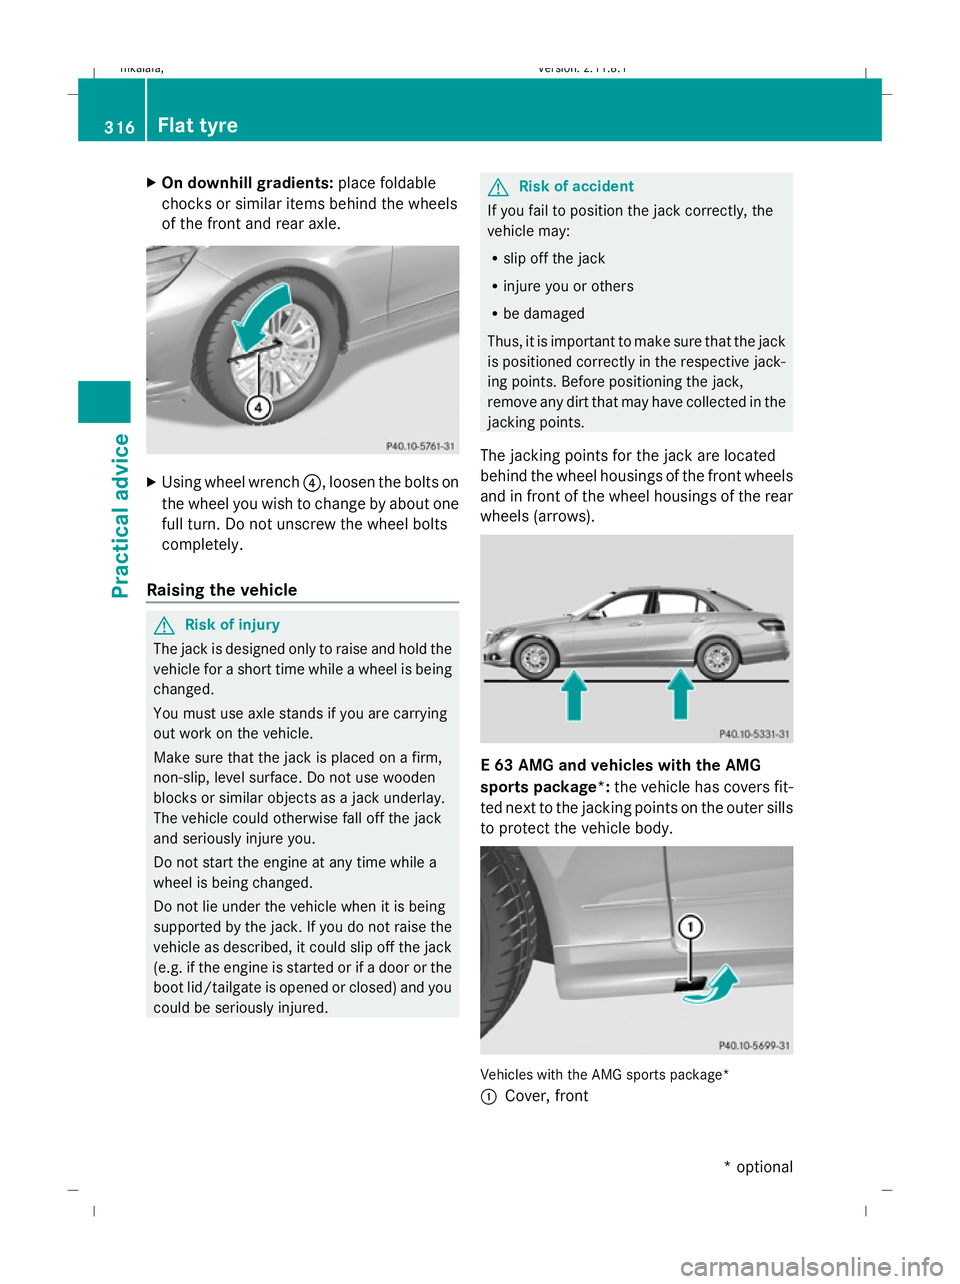
On downhill gradients: place foldable
chocks or similar items behind the wheels
of the front and rear axle. X
Using wheel wrench ?, loosen the bolts on
the wheel you wish to change by about one
full turn. Do not unscrew the wheel bolts
completely.
Raising the vehicle G
Risk of injury
The jack is designed only to raise and hold the
vehicle for a short time while a wheel is being
changed.
You must use axle stands if you are carrying
out work on the vehicle.
Make sure that the jack is placed on a firm,
non-slip, level surface. Do not use wooden
blocks or similar objects as a jack underlay.
The vehicle could otherwise fall off the jack
and seriously injure you.
Do not start the engine at any time while a
wheel is being changed.
Do not lie under the vehicle when it is being
supported by the jack. If you do not raise the
vehicle as described, it could slip off the jack
(e.g. if the engine is started or if a door or the
boot lid/tailgate is opened or closed) and you
could be seriously injured. G
Risk of accident
If you fail to position the jack correctly, the
vehicle may:
R slip off the jack
R injure you or others
R be damaged
Thus, it is important to make sure that the jack
is positioned correctly in the respective jack-
ing points. Before positioning the jack,
remove any dirt that may have collected in the
jacking points.
The jacking points for the jack are located
behind the wheel housings of the front wheels
and in front of the wheel housings of the rear
wheels (arrows). E 63 AMG and vehicles with the AMG
sports package*:
the vehicle has covers fit-
ted next to the jacking points on the outer sills
to protect the vehicle body. Vehicles with the AMG sports package*
:
Cover, front 316
Flat tyrePractical advice
* optional
212_AKB; 2; 4, en-GB
mkalafa,
Version: 2.11.8.1 2009-05-05T14:17:16+02:00 - Seite 316
Dateiname: 6515346702_buchblock.pdf; erzeugt am 07. May 2009 14:17:23; WK
Page 320 of 373
X
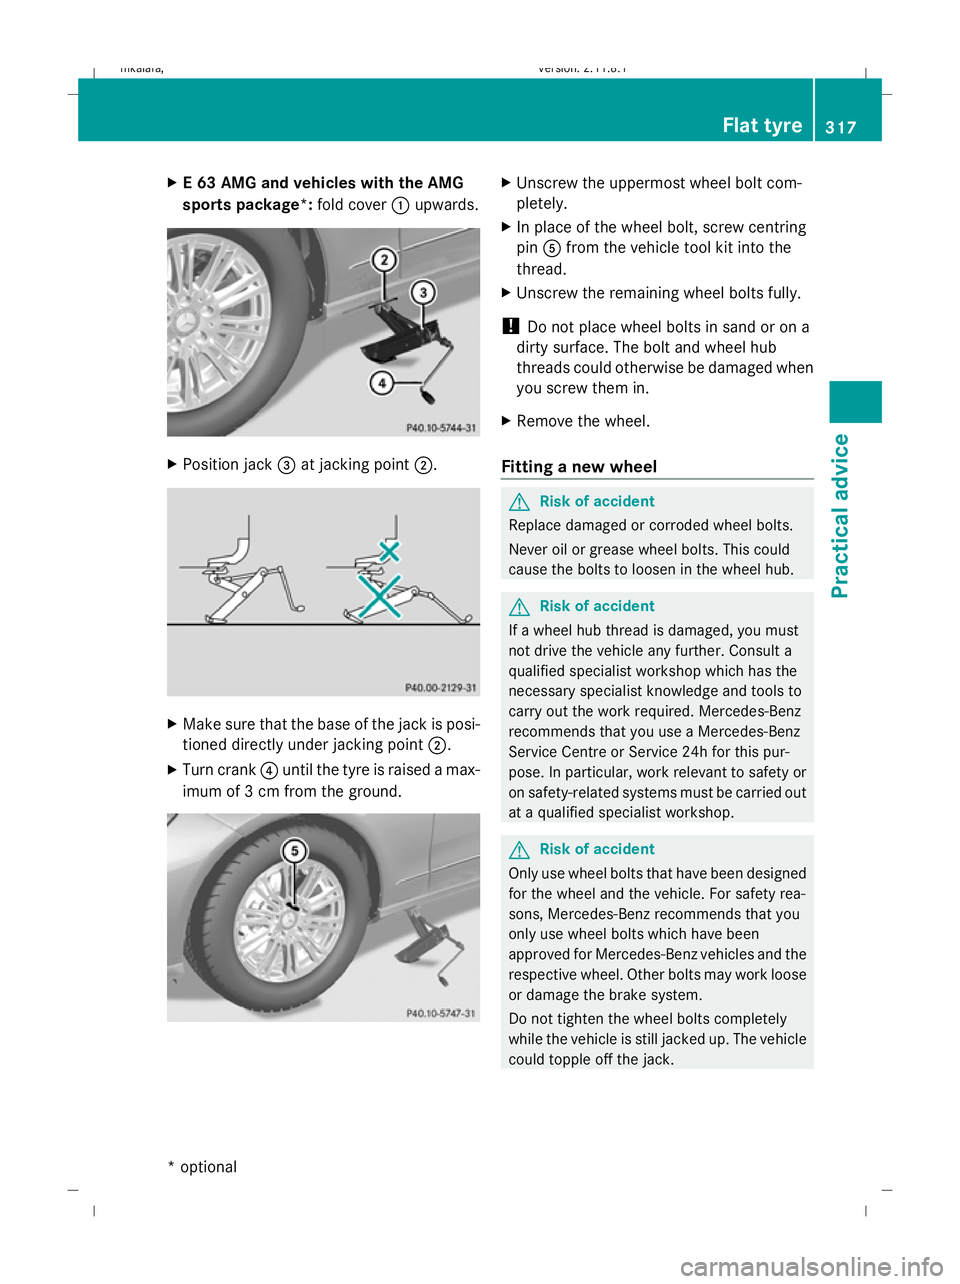
E 63 AMG and vehicles with the AMG
sports package*: fold cover:upwards. X
Position jack =at jacking point ;. X
Make sure that the base of the jack is posi-
tioned directly under jacking point ;.
X Turn crank ?until the tyre is raised a max-
imum of 3 cm from the ground. X
Unscrew the uppermost wheel bolt com-
pletely.
X In place of the wheel bolt, screw centring
pin Afrom the vehicle tool kit into the
thread.
X Unscrew the remaining wheel bolts fully.
! Do not place wheel bolts in sand or on a
dirty surface. The bolt and wheel hub
threads could otherwise be damaged when
you screw them in.
X Remove the wheel.
Fitting a new wheel G
Risk of accident
Replace damaged or corroded wheel bolts.
Never oil or grease wheel bolts. This could
cause the bolts to loosen in the wheel hub. G
Risk of accident
If a wheel hub thread is damaged, you must
not drive the vehicle any further. Consult a
qualified specialist workshop which has the
necessary specialist knowledge and tools to
carry out the work required. Mercedes-Benz
recommends that you use a Mercedes-Benz
Service Centre or Service 24h for this pur-
pose. In particular, work relevant to safety or
on safety-related systems must be carried out
at a qualified specialist workshop. G
Risk of accident
Only use wheel bolts that have been designed
for the wheel and the vehicle. For safety rea-
sons, Mercedes-Benz recommends that you
only use wheel bolts which have been
approved for Mercedes-Benz vehicles and the
respective wheel. Other bolts may work loose
or damage the brake system.
Do not tighten the wheel bolts completely
while the vehicle is still jacked up. The vehicle
could topple off the jack. Flat tyre
317Practical advice
* optional
212_AKB; 2; 4, en-GB
mkalafa,
Version: 2.11.8.1 2009-05-05T14:17:16+02:00 - Seite 317 Z
Dateiname: 6515346702_buchblock.pdf; erzeugt am 07. May 2009 14:17:23; WK
Page 321 of 373
:
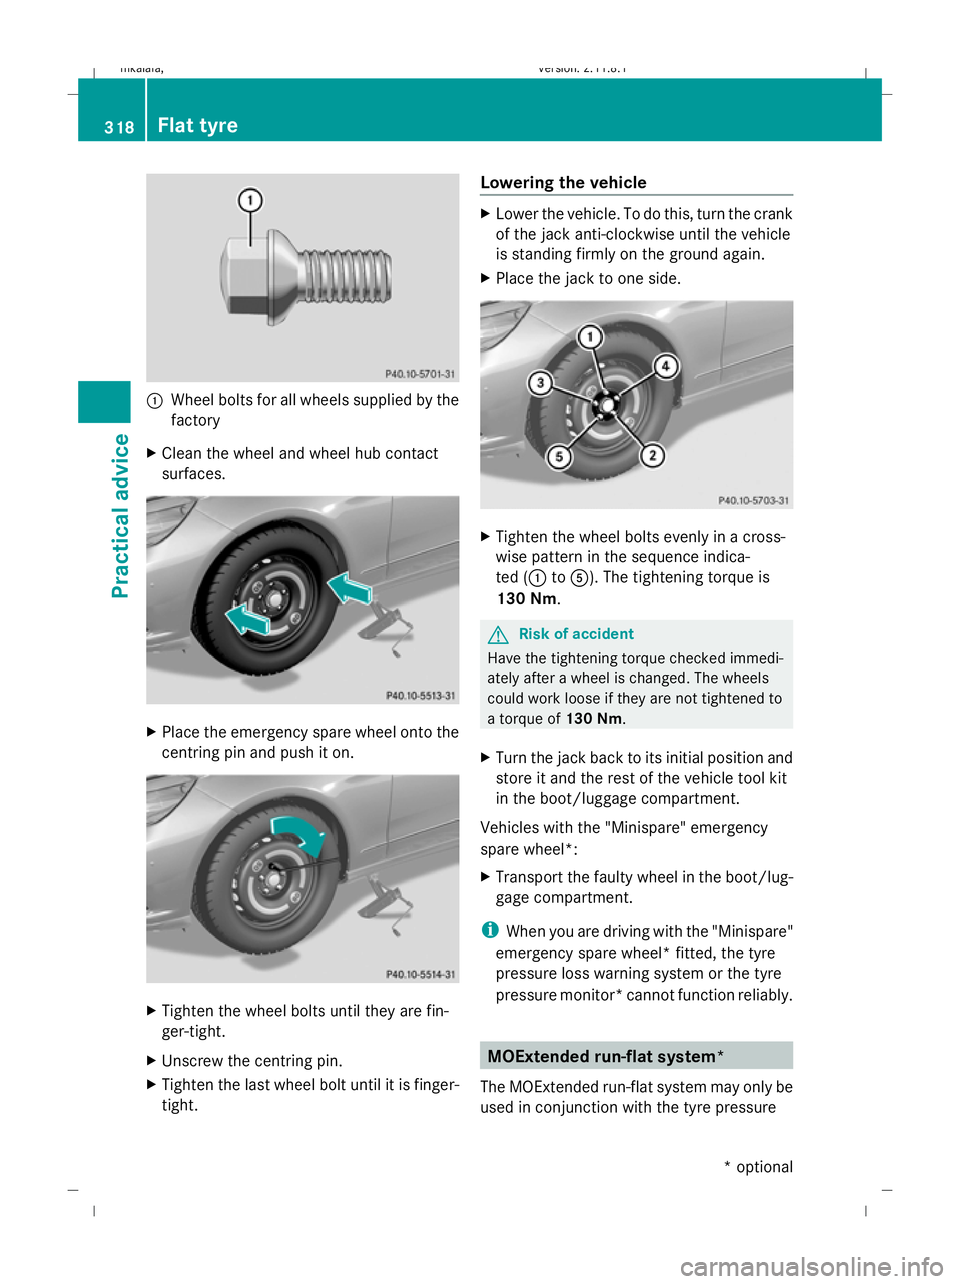
Wheel bolts for all wheels supplied by the
factory
X Clean the wheel and wheel hub contact
surfaces. X
Place the emergency spare wheel onto the
centring pin and push it on. X
Tighten the wheel bolts until they are fin-
ger-tight.
X Unscrew the centring pin.
X Tighten the last wheel bolt until it is finger-
tight. Lowering the vehicle X
Lower the vehicle. To do this, turn the crank
of the jack anti-clockwise until the vehicle
is standing firmly on the ground again.
X Place the jack to one side. X
Tighten the wheel bolts evenly in a cross-
wise pattern in the sequence indica-
ted (: toA). The tightening torque is
130 Nm. G
Risk of accident
Have the tightening torque checked immedi-
ately after a wheel is changed. The wheels
could work loose if they are not tightened to
a torque of 130 Nm.
X Turn the jack back to its initial position and
store it and the rest of the vehicle tool kit
in the boot/luggage compartment.
Vehicles with the "Minispare" emergency
spare wheel*:
X Transport the faulty wheel in the boot/lug-
gage compartment.
i When you are driving with the "Minispare"
emergency spare wheel* fitted, the tyre
pressure loss warning system or the tyre
pressure monitor* cannot function reliably. MOExtended run-flat system*
The MOExtended run-flat system may only be
used in conjunction with the tyre pressure 318
Flat tyrePractical advice
* optional
212_AKB; 2; 4, en-GB
mkalafa,
Version: 2.11.8.1 2009-05-05T14:17:16+02:00 - Seite 318
Dateiname: 6515346702_buchblock.pdf; erzeugt am 07. May 2009 14:17:24; WK