2009 MERCEDES-BENZ E-CLASS ESTATE transmission
[x] Cancel search: transmissionPage 161 of 373
Front sensors
Centre Approximately 100 cm
Corners Approximately 60 cm
Rear sensors
Centre Approximately 120 cm
Corners Approximately 80 cm
!
When parking, pay particular attention to
objects above or below the sensors, such
as flower pots or trailer towbars. PARK-
TRONIC does not detect such objects when
they are in the immediate vicinity of the
vehicle. You could damage the vehicle or
the objects.
Ultrasonic sources such as an automatic
car wash, a lorry's compressed-air brakes
or a pneumatic drill could cause PARK-
TRONIC to malfunction.
Minimum distance Centre Approximately 20 cm
Corners Approximately 15 cm
If there is an obstacle within this range, all
warning displays light up and a tone sounds.
If the distance falls below the minimum clear-
ance, it may no longer be shown.
Warning displays
The warning displays show the distance
between the sensors and the obstacle. The
warning display for the front area is located
on the dashboard above the centre air vents.
The warning display for the rear area is loca-
ted on the roof lining in the rear compart-
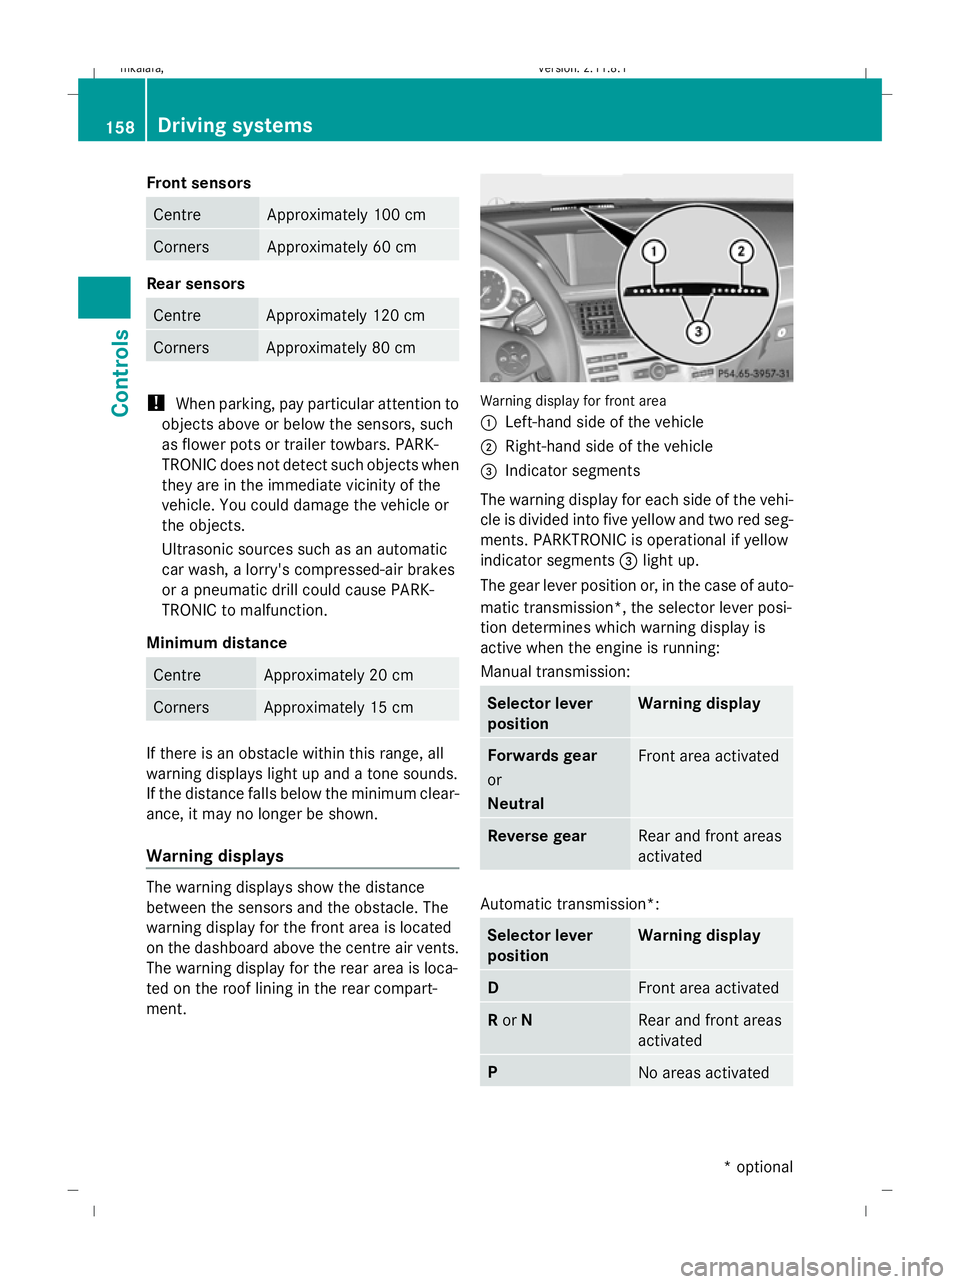
ment. Warning display for front area
:
Left-hand side of the vehicle
; Right-hand side of the vehicle
= Indicator segments
The warning display for each side of the vehi-
cle is divided into five yellow and two red seg-
ments. PARKTRONIC is operational if yellow
indicator segments =light up.
The gear lever position or, in the case of auto-
matic transmission*, the selector lever posi-
tion determines which warning display is
active when the engine is running:
Manual transmission: Selector lever
position Warning display
Forwards gear
or
Neutral
Front area activated
Reverse gear
Rear and front areas
activated
Automatic transmission*:
Selector lever
position Warning display
D
Front area activated
R
or N Rear and front areas
activated
P
No areas activated158
Driving systemsControls
* optional
212_AKB; 2; 4, en-GB
mkalafa
,V ersion: 2.11.8.1
2009-05-05T14:17:16+02:00 - Seite 158
Dateiname: 6515346702_buchblock.pdf; erzeugt am 07. May 2009 14:16:23; WK
Page 163 of 373

G
Risk of injury
Make sure that no persons or animals are in
the manoeuvring range. Otherwise, they
could be injured.
When PARKTRONIC is deactivated, Parking
Guidance is also unavailable.
Use Parking Guidance for parking spaces:
R that are parallel to the direction of travel
R that are on straight roads, not bends
R that are on the same level as the road, i.e.
not on the pavement
Parking tips:
R On narrow roads, drive as close to the park-
ing space as possible.
R Parking spaces which are littered, over-
grown or partially occupied by trailer draw-
bars might be identified incorrectly or not
at all.
R Snowfall or heavy rain may lead to a parking
space being measured inaccurately.
R Pay attention to the PARKTRONIC warning
messages during the parking procedure
(Y page 157).
R When transporting a load which protrudes
from your vehicle, you must not use Parking
Guidance.
R Never use Parking Guidance with snow
chains or an emergency spare wheel* fit-
ted.
R The way your vehicle is positioned in the
parking space after parking is dependent
on various factors. These include the posi-
tion and shape of the vehicles parked in
front and behind it and the conditions of the
location. In some cases, Parking Guidance
may guide you too far or not far enough into
a parking space. In some cases, it may also
lead you across or onto the kerb. If neces-
sary, cancel the parking procedure with
Parking Guidance. !
If unavoidable, you should drive over
obstacles such as kerbs slowly and not at
a sharp angle. Otherwise, you may damage
the wheels or tyres.
Detecting parking spaces Vehicles with automatic transmission* and selec-
tor lever (example)
:
Detected parking space on the left
; Parking symbol
= Detected parking space on the right
Parking Guidance is automatically activated
when you drive forwards. The system is
operational at speeds of up to approximately
35 km/h. While in operation, the system inde-
pendently locates and measures parking
spaces on both sides of the vehicle. At a
speed below 30 km/h, you will see parking
symbol ;as the status indicator in the
instrument cluster. If a parking space has
been detected, an arrow pointing to the right
= or left :is also displayed. Parking Guid-
ance only displays parking spaces on the
front-passenger side as standard. Parking
spaces on the driver's side are displayed as
soon as the turn signal on the driver's side is
activated. To park on the driver's side, you
must leave the driver's side turn signal
switched on until you have engaged reverse
gear.
Parking Guidance will only detect parking
spaces:
R that are parallel to the direction of travel
R that are at least 1.5 m wide
R that are at least 1.3 m longer than your
vehicle 160
Driving systemsControls
* optional
212_AKB; 2; 4, en-GB
mkalafa
,V ersion: 2.11.8.1
2009-05-05T14:17:16+02:00 - Seite 160
Dateiname: 6515346702_buchblock.pdf; erzeugt am 07. May 2009 14:16:24; WK
Page 164 of 373

A parking space is displayed while you are
driving past it, and until you are approx-
imately 15 m away from it.
Parking G
Risk of accident
PARKTRONIC and Parking Guidance are
merely parking aids and may not detect all
obstacles. They do not relieve you of the
responsibility of paying attention.
You are always responsible for safety and
must continue to pay attention to your imme-
diate surroundings when parking and
manoeuvring. You could otherwise endanger
yourself and others.
X Stop the vehicle when the parking space
symbol shows the desired parking space in
the instrument cluster.
X Vehicles with manual transmission: shift to
reverse gear.
Vehicles with automatic transmission*:
move the selector lever to R.
The multi-function display shows the
Check vehicle surroundings Con‐
firm with OK message.
X Press aon the multi-function steering
wheel to confirm.
The multi-function display switches to
Parking Guidance.
Depending on your distance from the park-
ing space, the Please drive backwards
message will appear in the multi-function
display. Vehicles with automatic transmission* and selec-
tor lever (example) X
If necessary, reverse towards the parking
space. This is indicated by an arrow point-
ing backwards.
Continue reversing until you hear an acous-
tic signal. Stop – the parking position has
been reached. The arrow is white.
The Please steer to the right or
Please steer to the left message
appears in the multi-function display. Vehicles with automatic transmission* and selec-
tor lever (example)
X
While the vehicle is stationary, turn the
steering wheel in the specified direction
until the arrow is white and a warning tone
sounds.
X To reverse into the parking space: keep
the steering wheel turned in that direction
and reverse carefully.
X Stop as soon as you hear a signal –
The vehicle has reached the position in
which you need to countersteer.
The Please steer to the left or
Please steer to the right message
appears in the multi-function display.
X To countersteer: while the vehicle is sta-
tionary, turn the steering wheel in the
specified direction until the arrow is white
and a warning tone sounds.
X To reverse into the parking space: keep
the steering wheel turned in that direction
and reverse carefully.
X Stop as soon as you hear a signal – at the
latest when PARKTRONIC sounds the con-
tinuous warning tone.
The Parking Guidance finished mes-
sage appears in the multi-function display
and a tone sounds. You may be asked to Driving systems
161Controls
* optional
212_AKB; 2; 4, en-GB
mkalafa,
Version: 2.11.8.1 2009-05-05T14:17:16+02:00 - Seite 161 Z
Dateiname: 6515346702_buchblock.pdf; erzeugt am 07. May 2009 14:16:24; WK
Page 167 of 373
Warning and display messages in the
multi-function display Example: vehicles with automatic transmission
with a selector lever*
X Activate ATTENTION ASSIST with the on-
board computer (Y page 130).
Symbol :appears in the multi-function
display.
If ATTENTION ASSIST is active, it will not warn
you until at least 20 minutes after your jour-
ney has begun. You then hear an intermittent
warning tone and the Attention Assist:
Time for a break? message appears in the
multi-function display.
X If necessary, take a break.
X Press ato confirm the message.
On long journeys, take regular breaks in good
time to allow yourself to rest properly. If you
do not take a break and ATTENTION ASSIST
still detects fatigue or increasing inattentive-
ness, you will see a warning again after
15 minutes at the earliest.
ATTENTION ASSIST is reset when you con-
tinue your journey and starts judging your
tiredness anew if:
R you switch off the engine.
R you take off your seat belt and open the
driver's door, e.g. for a change of drivers or
to take a break. Speed Limit Assist*
i Speed Limit Assist is not operational in all
countries.
Speed Limit Assist, in conjunction with your
navigation system*, shows you speed limits it has detected in the multi-function display.
The display appears when traffic signs stating
the speed limit have been detected.
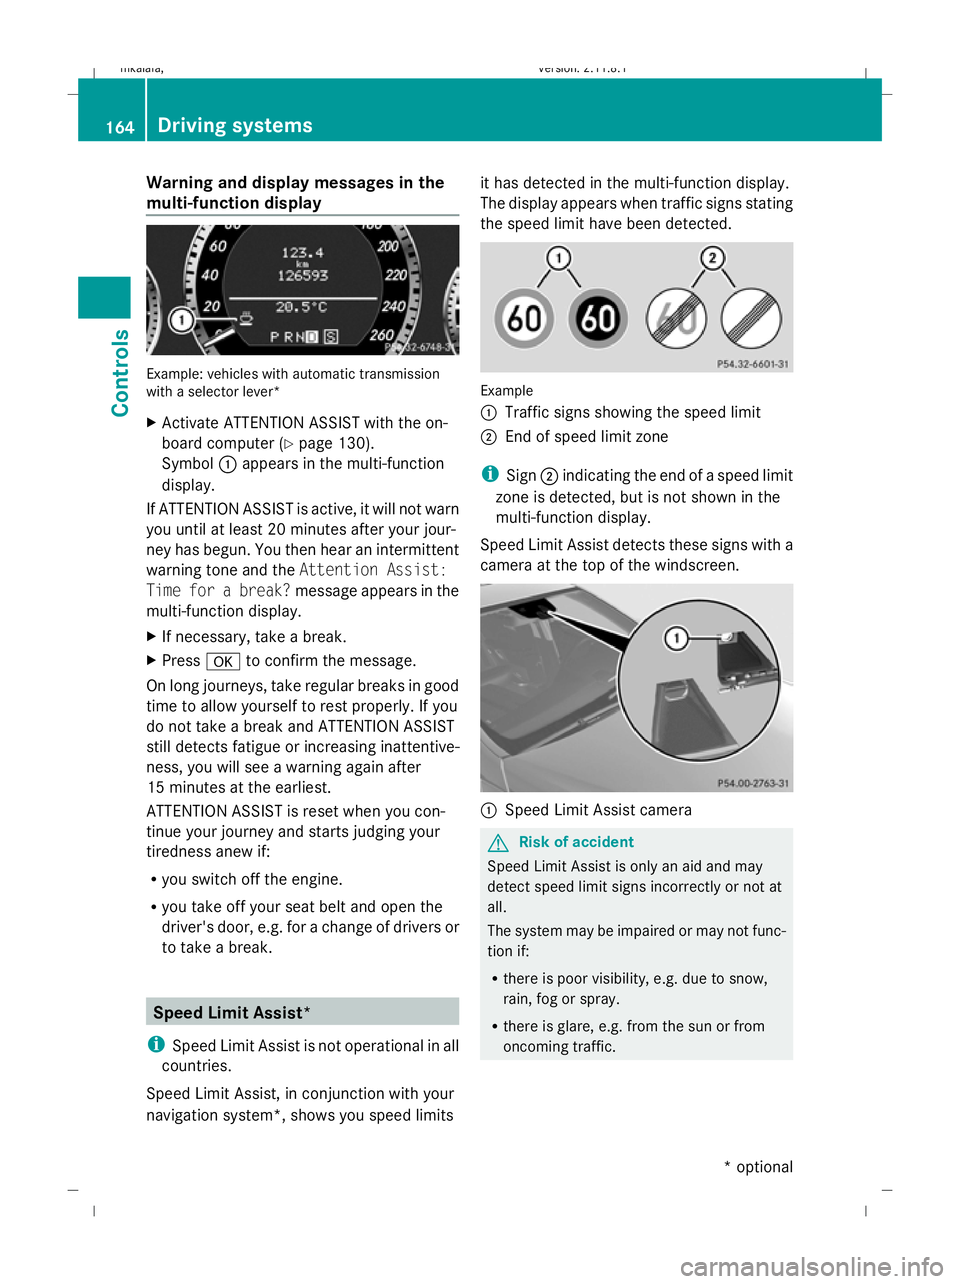
Example
:
Traffic signs showing the speed limit
; End of speed limit zone
i Sign ;indicating the end of a speed limit
zone is detected, but is not shown in the
multi-function display.
Speed Limit Assist detects these signs with a
camera at the top of the windscreen. :
Speed Limit Assist camera G
Risk of accident
Speed Limit Assist is only an aid and may
detect speed limit signs incorrectly or not at
all.
The system may be impaired or may not func-
tion if:
R there is poor visibility, e.g. due to snow,
rain, fog or spray.
R there is glare, e.g. from the sun or from
oncoming traffic. 164
Driving systemsControls
* optional
212_AKB; 2; 4, en-GB
mkalafa,
Version: 2.11.8.1 2009-05-05T14:17:16+02:00 - Seite 164
Dateiname: 6515346702_buchblock.pdf; erzeugt am 07. May 2009 14:16:25; WK
Page 168 of 373
R
the windscreen is dirty, misted up or cov-
ered, for instance by a sticker, in the vicinity
of the camera.
R the traffic signs are covered, for instance
by dirt, snow or trees.
R the traffic signs are poorly illuminated.
R there are ambiguous traffic signs, for
instance near roadworks or on multi-lane
roads.
Traffic signs always have priority over the
Speed Limit Assist display. Speed Limit Assist
cannot detect road and traffic conditions. It is
not a substitute for attentive driving.
Always pay attention to traffic conditions and
your surroundings. Otherwise, you may fail to
recognise dangers in time, cause an accident
and injure yourself and others.
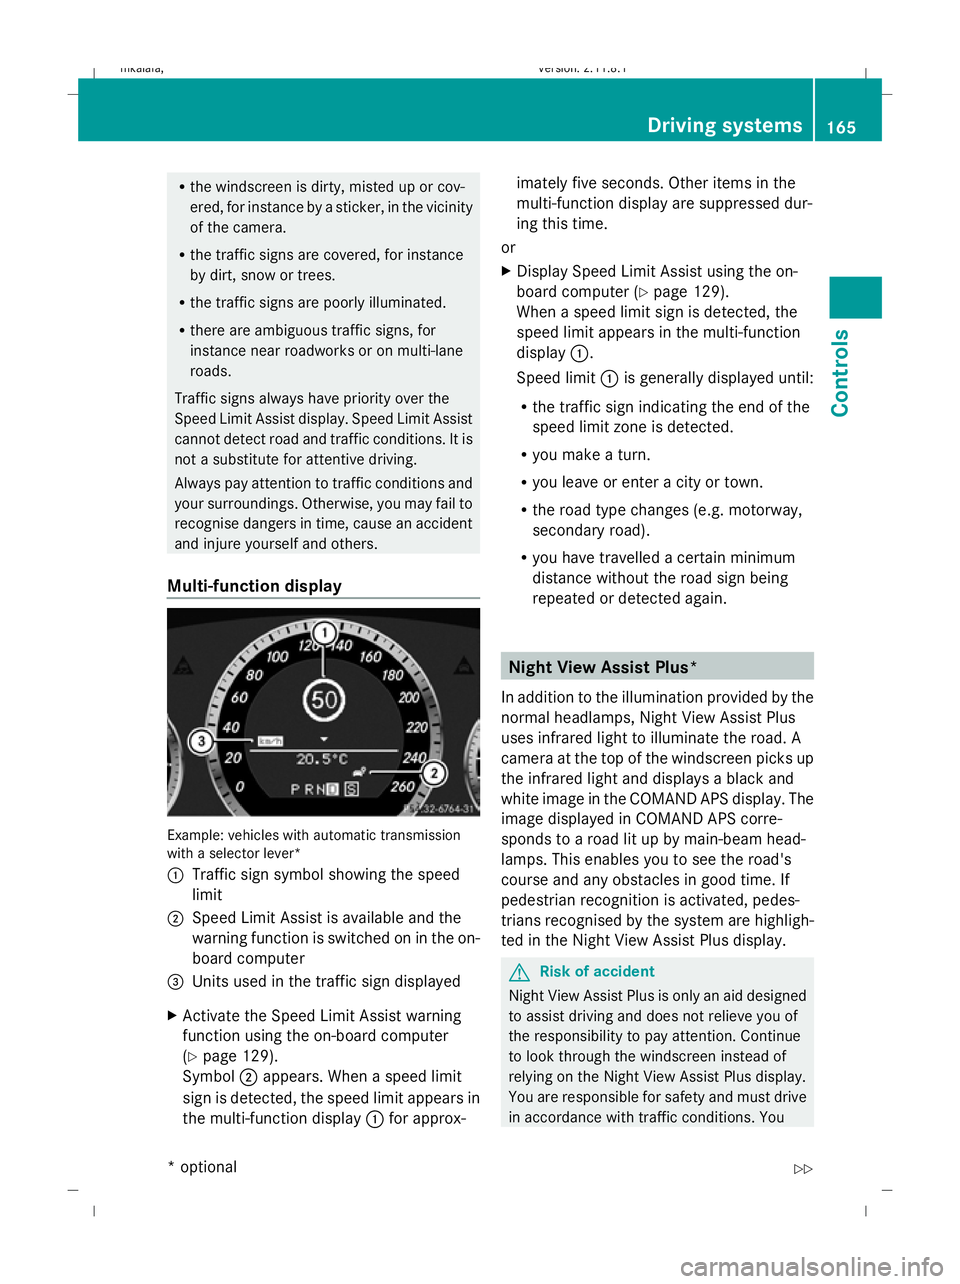
Multi-function display Example: vehicles with automatic transmission
with a selector lever*
:
Traffic sign symbol showing the speed
limit
; Speed Limit Assist is available and the
warning function is switched on in the on-
board computer
= Units used in the traffic sign displayed
X Activate the Speed Limit Assist warning
function using the on-board computer
(Y page 129).
Symbol ;appears. When a speed limit
sign is detected, the speed limit appears in
the multi-function display :for approx- imately five seconds. Other items in the
multi-function display are suppressed dur-
ing this time.
or
X Display Speed Limit Assist using the on-
board computer (Y page 129).
When a speed limit sign is detected, the
speed limit appears in the multi-function
display :.
Speed limit :is generally displayed until:
R the traffic sign indicating the end of the
speed limit zone is detected.
R you make a turn.
R you leave or enter a city or town.
R the road type changes (e.g. motorway,
secondary road).
R you have travelled a certain minimum
distance without the road sign being
repeated or detected again. Night View Assist Plus*
In addition to the illumination provided by the
normal headlamps, Night View Assist Plus
uses infrared light to illuminate the road. A
camera at the top of the windscreen picks up
the infrared light and displays a black and
white image in the COMAND APS display. The
image displayed in COMAND APS corre-
sponds to a road lit up by main-beam head-
lamps. This enables you to see the road's
course and any obstacles in good time. If
pedestrian recognition is activated, pedes-
trians recognised by the system are highligh-
ted in the Night View Assist Plus display. G
Risk of accident
Night View Assist Plus is only an aid designed
to assist driving and does not relieve you of
the responsibility to pay attention. Continue
to look through the windscreen instead of
relying on the Night View Assist Plus display.
You are responsible for safety and must drive
in accordance with traffic conditions. You Driving systems
165Controls
* optional
212_AKB; 2; 4, en-GB
mkalafa
,V ersion: 2.11.8.1
2009-05-05T14:17:16+02:00 - Seite 165 Z
Dateiname: 6515346702_buchblock.pdf; erzeugt am 07. May 2009 14:16:25; WK
Page 173 of 373

Lane Keeping Assist monitors the area in
front of your vehicle by means of a camera at
the top of the windscreen. :
Lane Keeping Assist camera
In order that you are warned only when nec-
essary and in good time if you cross the lane
marking, the system recognises certain con-
ditions and warns you accordingly.
The warning occurs earlier if:
R you cut a corner on the outside.
R the road has very wide lanes, e.g. a motor-
way.
R the system recognises solid lane markings,
as crossing these often results in a critical
situation, e.g. in the case of hard shoulders
or crash barriers.
The warning occurs later if:
R the road has narrow lanes.
R you cut a corner on the inside.
No warning occurs if:
R you actively steer, brake or depress the
accelerator pedal, e.g. when changing lane,
overtaking, accelerating or leaving the
motorway.
R you cut the corner on a sharp bend.
R you drive around a very sharp bend.
R you switch on the turn signals. In this event
the warnings are suppressed for a certain
period of time.
R a driving safety system intervenes, such as
ABS, BAS or ESP ®
. G
Risk of accident
Lane Keeping Assist does not keep your vehi-
cle in its lane. It is only an aid and may detect
the lane markings on the road incorrectly or
not at all.
The system may be impaired or may not func-
tion if:
R there is poor visibility, e.g. due to snow,
rain, fog or spray.
R there is glare, e.g. from the sun or from
oncoming traffic.
R the windscreen is dirty, misted up or cov-
ered, for instance by a sticker, in the vicinity
of the camera.
R there are no lane markings.
R the lane markings are worn away, dark or
covered up, e.g. by dirt or snow.
R the distance to the vehicle in front is too
short.
R there are ambiguous lane markings on the
road, e.g. near roadworks.
R there are short-term changes to the mark-
ings, e.g. filter lanes or motorway exits.
R the road is narrow and winding.
Lane Keeping Assist cannot detect road and
traffic conditions. It is not a substitute for
attentive driving.
Always pay attention to traffic conditions and
your surroundings. Otherwise, you may fail to
recognise dangers in time, cause an accident
and injure yourself and others.
Activating Lane Keeping Assist Example: vehicles with automatic transmission
with a selector lever* 170
Driving systemsControls
* optional
212_AKB; 2; 4, en-GB
mkalafa
,V ersion: 2.11.8.1
2009-05-05T14:17:16+02:00 - Seite 170
Dateiname: 6515346702_buchblock.pdf; erzeugt am 07. May 2009 14:16:27; WK
Page 216 of 373
synchronise the remote control integrated
in the rear-view mirror with the garage door
system receiver.
You will find further information in the
garage door opening system's operating
instructions, e.g. the sections on "Synchro-
nising the transmitter" or "Registering a
new transmitter". You can also call the hot-
line mentioned above.
Opening or closing the garage door Once programmed, the integrated remote
control will assume the function of the garage
door system's remote control. Please read
the operating instructions for the garage door
system.
X Turn the key to position 2in the ignition
lock.
X Press the transmitter button on the rear-
view mirror that you have programmed to
operate the garage door.
Garage door system with fixed code: indi-
cator lamp :lights up continuously.
Garage door system with rolling code: indi-
cator lamp :flashes briefly and then lights
up for approximately two seconds. This is
repeated for up to 20 seconds.
i The transmitter will transmit a signal for
as long as the transmitter button is being
pressed. The transmission will be halted
after a maximum of 20 seconds and indi-
cator lamp :will flash. Press the trans-
mitter button again, if necessary.
Clearing the remote control memory X
Turn the key to position 2in the ignition
lock.
X Press and hold transmitter buttons ;
and ?for approximately 20 seconds until
indicator lamp :flashes rapidly.
The memory is cleared.
i You should clear the remote control mem-
ory before selling the vehicle. Floormat* on the driver's side
G
Risk of accident
Make sure that there is sufficient clearance
around the pedals when floormats are used,
and that the floormats are properly secured.
The floormats must be correctly secured at all
times using retainers and press-studs.
Before you drive off, check the floormats and
secure if necessary. A floormat which is not
properly secured can slip and, thereby, inter-
fere with the movement of the pedals.
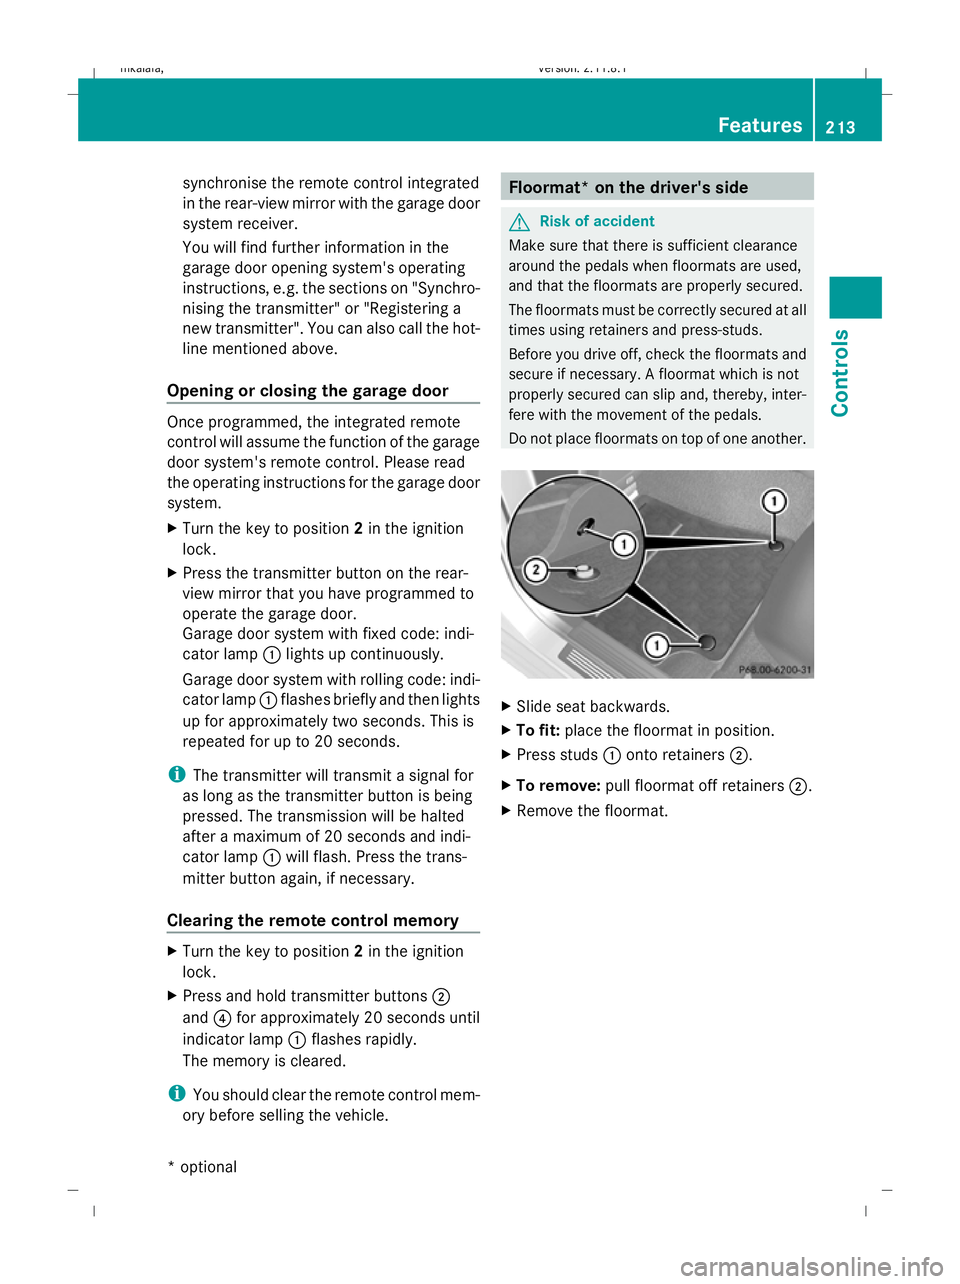
Do not place floormats on top of one another. X
Slide seat backwards.
X To fit: place the floormat in position.
X Press studs :onto retainers ;.
X To remove: pull floormat off retainers ;.
X Remove the floormat. Features
213Controls
* optional
212_AKB; 2; 4, en-GB
mkalafa,
Version: 2.11.8.1 2009-05-05T14:17:16+02:00 - Seite 213 Z
Dateiname: 6515346702_buchblock.pdf; erzeugt am 07. May 2009 14:16:52; WK
Page 219 of 373
Running-in notes
The first 1,500 km
G
Risk of accident
New brake pads/linings only have optimal
braking performance after several hundred
kilometres. Until then, compensate for this by
applying greater force to the brake pedal. This
also applies when brake pads/linings or
brake discs have been changed.
If you treat the engine with sufficient care
from the very start, you will be rewarded with
excellent performance for the remainder of
the engine's life.
R Therefore, you should drive at varying road
and engine speeds for the first 1,500 km.
R Avoid heavy loads, e.g. driving at full throt-
tle, during this time. Do not exceed 2
/ 3 of
the maximum permissible engine speed for
each gear.
R Change gear in good time.
R Do not shift down a gear manually in order
to brake.
Vehicles with automatic transmission*:
R try to avoid depressing the accelerator
pedal beyond the pressure point (kick-
down).
R only use ranges 3,2or 1for slow driving,
e.g. in mountainous terrain.
After 1,500 km, you may gradually bring the
vehicle up to full road and engine speeds.
Additional notes on running in AMG vehicles:
R do not drive faster than 140 km/h for the
first 1,500 km.
R only bring the engine up to a maximum
engine speed of 4,500 rpm for a brief
period.
i These running-in instructions must also
be observed if you have the engine, the dif-
ferenial gear or the front axle differential of
your vehicle replaced. AMG vehicles with a rear axle differ-
ential lock*
Your vehicle is equipped with a self-locking
differential on the rear axle. For optimum pro-
tection of the differential gear on the rear
axle, change the oil after running in the vehi-
cle over a distance of 3,000 km. This oil
change will increase the service life of your
differential. Have the oil change performed at
a qualified specialist workshop. Mercedes-
Benz recommends that you use a Mercedes-
Benz Service Centre for this purpose. Refuelling
Refuelling
G
Risk of explosion
Fuel is highly flammable. Fire, naked flames
and smoking are therefore prohibited when
handling fuels.
Switch off the engine and the auxiliary heat-
ing* before refuelling. G
Risk of injury
Do not come into direct contact with fuel.
Direct skin contact with fuels or the inhalation
of fuel vapours is a health hazard. G
Risk of fire
Do not use petrol to refuel vehicles with a die-
sel engine. Never mix diesel with petrol. This
causes damage to the fuel system and engine
and could result in the vehicle catching fire.
! Do not use petrol to refuel vehicles with a
diesel engine. Do not use diesel to refuel
vehicles with a petrol engine. Even small
amounts of the wrong fuel will cause dam-
age to the injection system and engine.
Damage resulting from adding the wrong
fuel is not covered by the warranty.
! Do not start the engine if you accidentally
refuel with the wrong fuel. Otherwise, the
fuel could enter the fuel lines. This would 216
RefuellingOperation
* optional
212_AKB; 2; 4, en-GB
mkalafa
,V ersion: 2.11.8.1
2009-05-05T14:17:16+02:00 - Seite 216
Dateiname: 6515346702_buchblock.pdf; erzeugt am 07. May 2009 14:16:54; WK