2009 MERCEDES-BENZ E-CLASS ESTATE axle
[x] Cancel search: axlePage 252 of 373
Estate
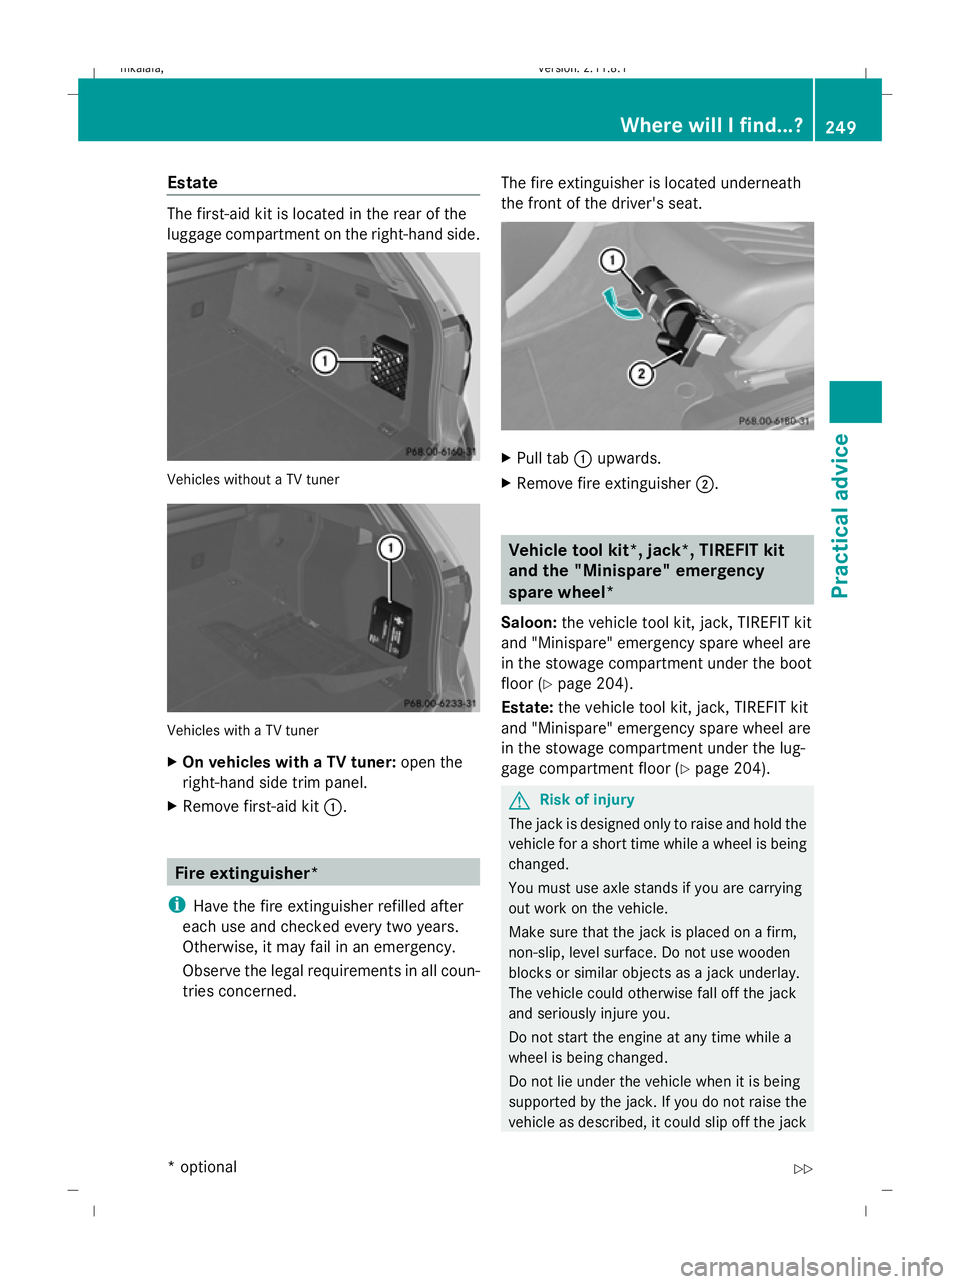
The first-aid kit is located in the rear of the
luggage compartment on the right-hand side.
Vehicles without a TV tuner
Vehicles with a TV tuner
X On vehicles with a TV tuner: open the
right-hand side trim panel.
X Remove first-aid kit :. Fire extinguisher*
i Have the fire extinguisher refilled after
each use and checked every two years.
Otherwise, it may fail in an emergency.
Observe the legal requirements in all coun-
tries concerned. The fire extinguisher is located underneath
the front of the driver's seat. X
Pull tab :upwards.
X Remove fire extinguisher ;. Vehicle tool kit
*, jack*, TIREFIT kit
and the "Minispare" emergency
spare wheel*
Saloon: the vehicle tool kit, jack, TIREFIT kit
and "Minispare" emergency spare wheel are
in the stowage compartment under the boot
floor (Y page 204).
Estate: the vehicle tool kit, jack, TIREFIT kit
and "Minispare" emergency spare wheel are
in the stowage compartment under the lug-
gage compartment floor (Y page 204). G
Risk of injury
The jack is designed only to raise and hold the
vehicle for a short time while a wheel is being
changed.
You must use axle stands if you are carrying
out work on the vehicle.
Make sure that the jack is placed on a firm,
non-slip, level surface. Do not use wooden
blocks or similar objects as a jack underlay.
The vehicle could otherwise fall off the jack
and seriously injure you.
Do not start the engine at any time while a
wheel is being changed.
Do not lie under the vehicle when it is being
supported by the jack. If you do not raise the
vehicle as described, it could slip off the jack Where will I find...?
249Practical advice
* optional
212_AKB; 2; 4, en-GB
mkalafa,
Version: 2.11.8.1 2009-05-05T14:17:16+02:00 - Seite 249 Z
Dateiname: 6515346702_buchblock.pdf; erzeugt am 07. May 2009 14:17:06; WK
Page 319 of 373
X
On downhill gradients: place foldable
chocks or similar items behind the wheels
of the front and rear axle. X
Using wheel wrench ?, loosen the bolts on
the wheel you wish to change by about one
full turn. Do not unscrew the wheel bolts
completely.
Raising the vehicle G
Risk of injury
The jack is designed only to raise and hold the
vehicle for a short time while a wheel is being
changed.
You must use axle stands if you are carrying
out work on the vehicle.
Make sure that the jack is placed on a firm,
non-slip, level surface. Do not use wooden
blocks or similar objects as a jack underlay.
The vehicle could otherwise fall off the jack
and seriously injure you.
Do not start the engine at any time while a
wheel is being changed.
Do not lie under the vehicle when it is being
supported by the jack. If you do not raise the
vehicle as described, it could slip off the jack
(e.g. if the engine is started or if a door or the
boot lid/tailgate is opened or closed) and you
could be seriously injured. G
Risk of accident
If you fail to position the jack correctly, the
vehicle may:
R slip off the jack
R injure you or others
R be damaged
Thus, it is important to make sure that the jack
is positioned correctly in the respective jack-
ing points. Before positioning the jack,
remove any dirt that may have collected in the
jacking points.
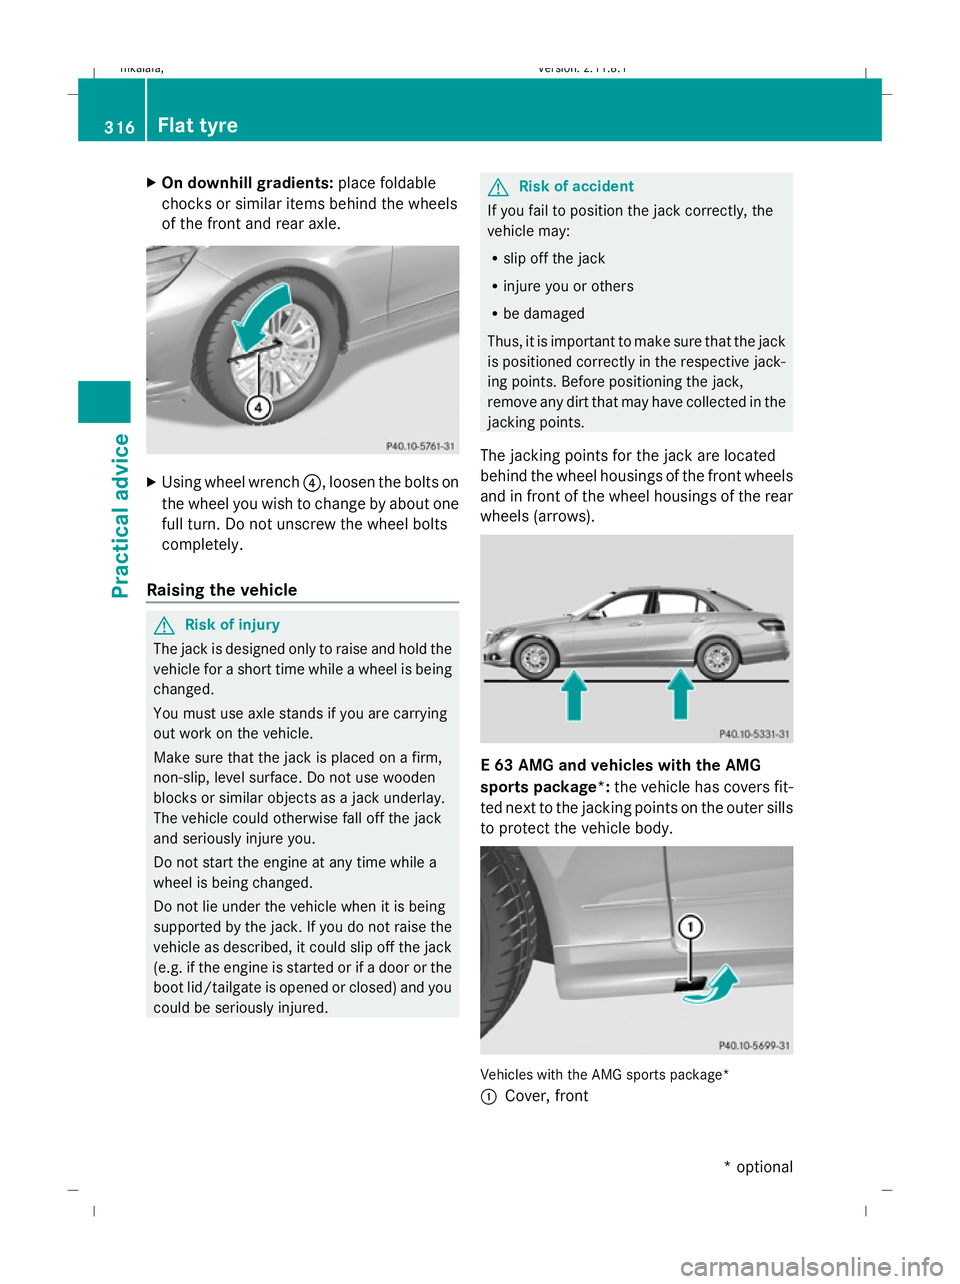
The jacking points for the jack are located
behind the wheel housings of the front wheels
and in front of the wheel housings of the rear
wheels (arrows). E 63 AMG and vehicles with the AMG
sports package*:
the vehicle has covers fit-
ted next to the jacking points on the outer sills
to protect the vehicle body. Vehicles with the AMG sports package*
:
Cover, front 316
Flat tyrePractical advice
* optional
212_AKB; 2; 4, en-GB
mkalafa,
Version: 2.11.8.1 2009-05-05T14:17:16+02:00 - Seite 316
Dateiname: 6515346702_buchblock.pdf; erzeugt am 07. May 2009 14:17:23; WK
Page 328 of 373
deactivate HOLD and Distronic Plus if the
vehicle is to be towed.
It is better to have the vehicle transported
than to have it towed.
When towing, observe the legal requirements
in all countries concerned.
! When towing, pull away slowly and
smoothly. If the tractive power is too high,
the vehicles could be damaged.
! Do not use the towing eye for recovery,
as this could damage the vehicle. If in
doubt, recover the vehicle with a crane.
! You may tow the vehicle for a maximum
of 50 km. A towing speed of 50 km/ hmust
not be exceeded.
For towing distances over 50 km, the entire
vehicle must be lifted up and transported.
! On vehicles with KEYLESS GO*, use the
key instead of the Start/Stop button. Turn
the key to position 2in the ignition lock and
shift the automatic transmission to N. Then
turn the key back to 0and leave it in the
ignition lock.
! Only secure the tow cable or towing bar
to the towing eyes. You could otherwise
damage the vehicle.
R Vehicles with an automatic transmission*
must not be tow-started.
R Vehicles with 4MATIC* must not be towed
with the front or rear axle raised.
R If you are towing the vehicle over a longer
distance, this must be done with the rear
axle raised.
R The ignition must be switched off if you are
towing the vehicle with the rear axle raised.
Otherwise, intervention by ESP ®
could
damage the brake system.
R If the vehicle has suffered transmission
damage, only tow it with the propeller shaft
disconnected. R
If the engine does not start, try jump-start-
ing it (Y page 323).
R If it is not possible to jump-start the vehicle,
have it towed to the nearest qualified spe-
cialist workshop, e.g. a Mercedes-Benz
Service Centre.
R The automatic transmission must be in
position Nwhen the vehicle is being towed.
R Before towing the vehicle, make sure that
the battery is connected and charged. Oth-
erwise:
-you cannot switch on the ignition.
- you cannot shift the transmission to posi-
tion Non vehicles with automatic trans-
mission*.
- you have no support when braking.
i Switch off the automatic locking feature
before the vehicle is towed (Y page 134).
Otherwise, you could be locked out when
pushing or towing the vehicle. Fitting the towing eye
Vehicles with a trailer tow hitch*: if you
intend to use the vehicle for towing, fold out
the ball coupling and connect the towbar
(Y page 234) to this. Towing and tow-starting
325Practical advice
* optional
212_AKB; 2; 4, en-GB
mkalafa,
Version: 2.11.8.1 2009-05-05T14:17:16+02:00 - Seite 325 Z
Dateiname: 6515346702_buchblock.pdf; erzeugt am 07. May 2009 14:17:27; WK
Page 329 of 373
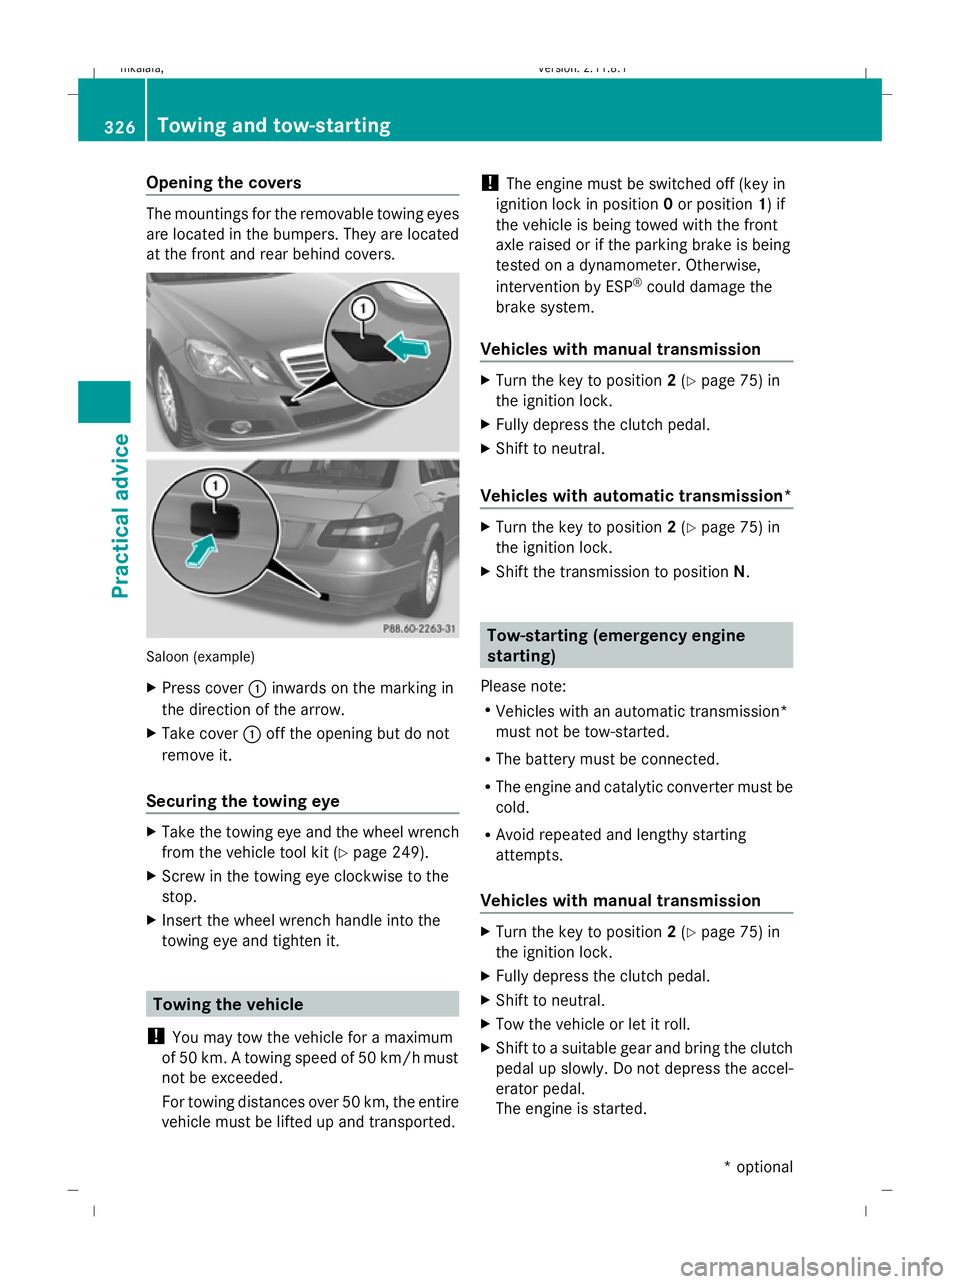
Opening the covers
The mountings for the removable towing eyes
are located in the bumpers. They are located
at the front and rear behind covers. Saloon (example)
X
Press cover :inwards on the marking in
the direction of the arrow.
X Take cover :off the opening but do not
remove it.
Securing the towing eye X
Take the towing eye and the wheel wrench
from the vehicle tool kit (Y page 249).
X Screw in the towing eye clockwise to the
stop.
X Insert the wheel wrench handle into the
towing eye and tighten it. Towing the vehicle
! You may tow the vehicle for a maximum
of 50 km. A towing speed of 50 km/hm ust
not be exceeded.
For towing distances over 50 km, the entire
vehicle must be lifted up and transported. !
The engine must be switched off (key in
ignition lock in position 0or position 1) if
the vehicle is being towed with the front
axle raised or if the parking brake is being
tested on a dynamometer. Otherwise,
intervention by ESP ®
could damage the
brake system.
Vehicles with manual transmission X
Turn the key to position 2(Y page 75) in
the ignition lock.
X Fully depress the clutch pedal.
X Shift to neutral.
Vehicles with automatic transmission* X
Turn the key to position 2(Y page 75) in
the ignition lock.
X Shift the transmission to position N. Tow-starting (emergency engine
starting)
Please note:
R Vehicles with an automatic transmission*
must not be tow-started.
R The battery must be connected.
R The engine and catalytic converter must be
cold.
R Avoid repeated and lengthy starting
attempts.
Vehicles with manual transmission X
Turn the key to position 2(Y page 75) in
the ignition lock.
X Fully depress the clutch pedal.
X Shift to neutral.
X Tow the vehicle or let it roll.
X Shift to a suitable gear and bring the clutch
pedal up slowly. Do not depress the accel-
erator pedal.
The engine is started. 326
Towing and tow-startingPractical advice
* optional
212_AKB; 2; 4, en-GB
mkalafa,
Version: 2.11.8.1 2009-05-05T14:17:16+02:00 - Seite 326
Dateiname: 6515346702_buchblock.pdf; erzeugt am 07. May 2009 14:17:28; WK
Page 330 of 373
Removing the towing eye
X Take the wheel wrench from the vehicle
tool kit (Y page 249).
X Insert the wheel wrench handle into the
towing eye and turn it anti-clockwise.
X Unscrew the towing eye.
X Replace the cover and press it until it
engages.
X Return the towing eye and the wheel
wrench to the vehicle tool kit. Transporting the vehicle
The towing eyes or trailer coupling* can be
used to pull the vehicle onto a trailer or trans-
porter if you wish to transport it.
! Only secure the vehicle by the wheels or
wheel rims, not by parts of the vehicle such
as axle or steering components. Otherwise,
the vehicle could be damaged.
Vehicles with manual transmission X
Shift to neutral.
Vehicles with automatic transmission* X
Turn the key to position 2(Y page 75) in
the ignition lock.
X Move the transmission to position N.Fuses
Notes on changing fuses
The fuses in your vehicle serve to close down
faulty circuits. If a fuse blows, all the compo-
nents on the circuit and their functions will
fail.
Blown fuses must be replaced with fuses of
the same rating, which you can recognise by
the colour and value. The fuse ratings are lis-
ted in the fuse allocation chart. A Mercedes- Benz Service Centre will be happy to advise
you. G
Risk of fire
Only use fuses that have been approved for
Mercedes-Benz vehicles and which have the
required fuse rating for the systems con-
cerned. Do not attempt to repair or bridge
faulty fuses. A circuit overload could other-
wise cause a fire. Have the cause traced and
rectified at a qualified specialist workshop,
e.g. a Mercedes-Benz Service Centre.
If the newly inserted fuse also blows, have the
cause traced and rectified at a qualified spe-
cialist workshop, e.g. a Mercedes-Benz
Service Centre.
! Only use fuses that have been approved
for Mercedes-Benz vehicles and which
have the correct fuse rating for the system
concerned. Otherwise, components or sys-
tems could be damaged.
The fuses are located in various fuse boxes:
R fuse box in the engine compartment on the
driver's side
R fuse box in the boot/luggage compartment
on the right-hand side of the vehicle
Fuse allocation chart The fuse allocation chart is located with the
vehicle tool kit (Y
page 249) in the stowage
compartment under the boot/luggage com-
partment floor. Before changing a fuse
X Park the vehicle.
X Switch off all electrical consumers.
X Remove the key from the ignition lock. Fuse box in the engine compartment
X Make sure that the windscreen wipers are
turned off. Fuses
327Practical advice
* optional
212_AKB; 2; 4, en-GB
mkalafa
,V ersion: 2.11.8.1
2009-05-05T14:17:16+02:00 - Seite 327 Z
Dateiname: 6515346702_buchblock.pdf; erzeugt am 07. May 2009 14:17:28; WK
Page 336 of 373
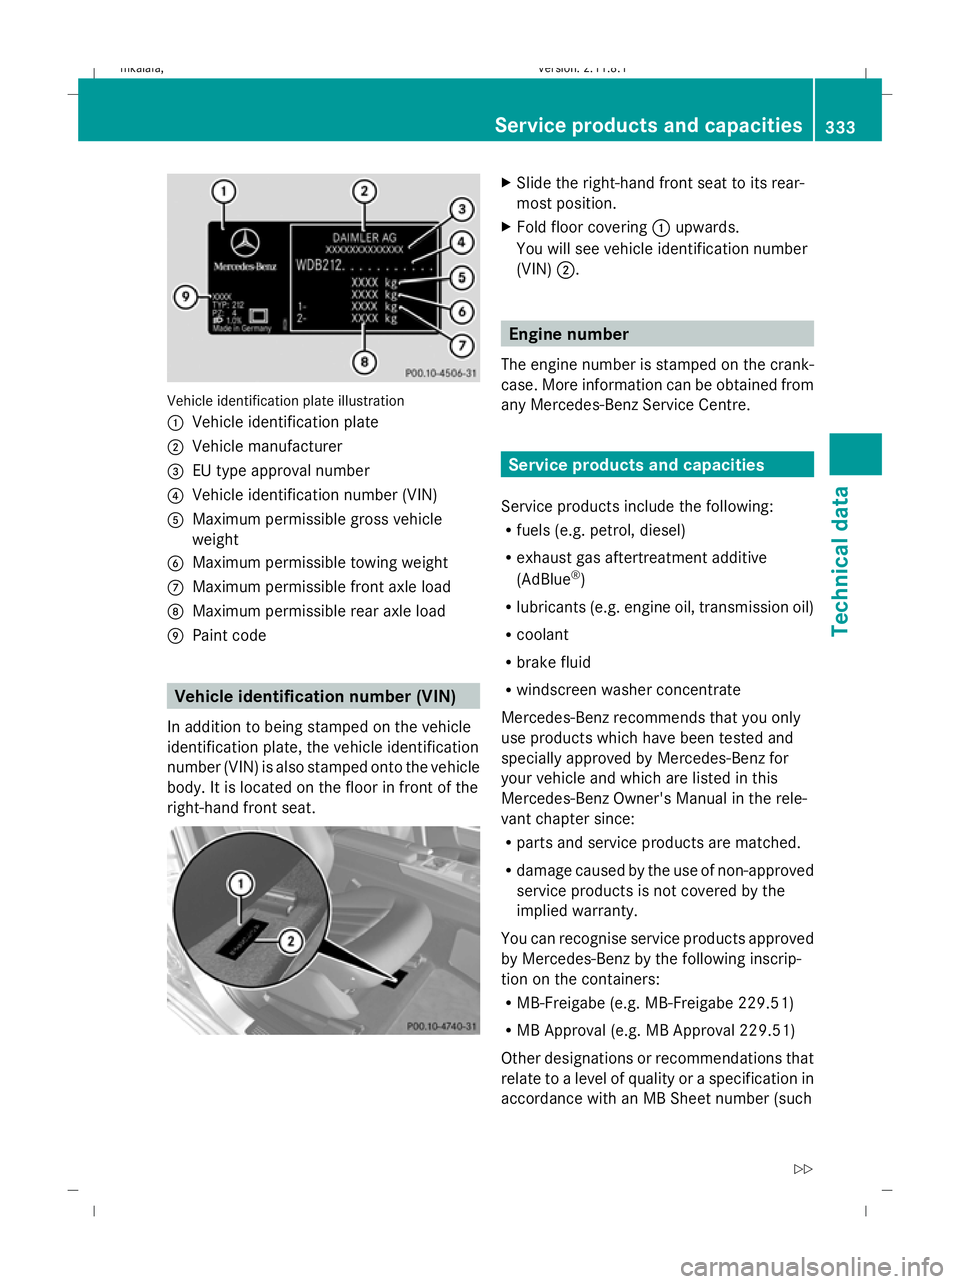
Vehicle identification plate illustration
:
Vehicle identification plate
; Vehicle manufacturer
= EU type approval number
? Vehicle identification number (VIN)
A Maximum permissible gross vehicle
weight
B Maximum permissible towing weight
C Maximum permissible front axle load
D Maximum permissible rear axle load
E Paint code Vehicle identification number (VIN)
In addition to being stamped on the vehicle
identification plate, the vehicle identification
number (VIN) is also stamped onto the vehicle
body. It is located on the floor in front of the
right-hand front seat. X
Slide the right-hand front seat to its rear-
most position.
X Fold floor covering :upwards.
You will see vehicle identification number
(VIN) ;. Engine number
The engine number is stamped on the crank-
case. More information can be obtained from
any Mercedes-Benz Service Centre. Service products and capacities
Service products include the following:
R fuels (e.g. petrol, diesel)
R exhaust gas aftertreatment additive
(AdBlue ®
)
R lubricants (e.g. engine oil, transmission oil)
R coolant
R brake fluid
R windscreen washer concentrate
Mercedes-Benz recommends that you only
use products which have been tested and
specially approved by Mercedes-Benz for
your vehicle and which are listed in this
Mercedes-Benz Owner's Manual in the rele-
vant chapter since:
R parts and service products are matched.
R damage caused by the use of non-approved
service products is not covered by the
implied warranty.
You can recognise service products approved
by Mercedes-Benz by the following inscrip-
tion on the containers:
R MB-Freigabe (e.g. MB-Freigabe 229.51)
R MB Approval (e.g. MB Approval 229.51)
Other designations or recommendations that
relate to a level of quality or a specification in
accordance with an MB Sheet number (such Service products and capacities
333Technical data
212_AKB; 2; 4, en-GB
mkalafa, Version: 2.11.8.1 2009-05-05T14:17:16+02:00 - Seite 333 Z
Dateiname: 6515346702_buchblock.pdf; erzeugt am 07. May 2009 14:17:32; WK
Page 351 of 373
Vehicle weights
Unladen weight
(according to EC
directive)
1845 kg
The unladen weight includes the driver
(68 kg), luggage (7 kg) and all fluids (fuel
tank 90% full). Items of optional equipment
increase the unladen weight and reduce the
maximum payload. Maximum roof
load
100 kg
Maximum luggage
compartment load
100 kg
You will find weight information specific to
the vehicle on the vehicle identification
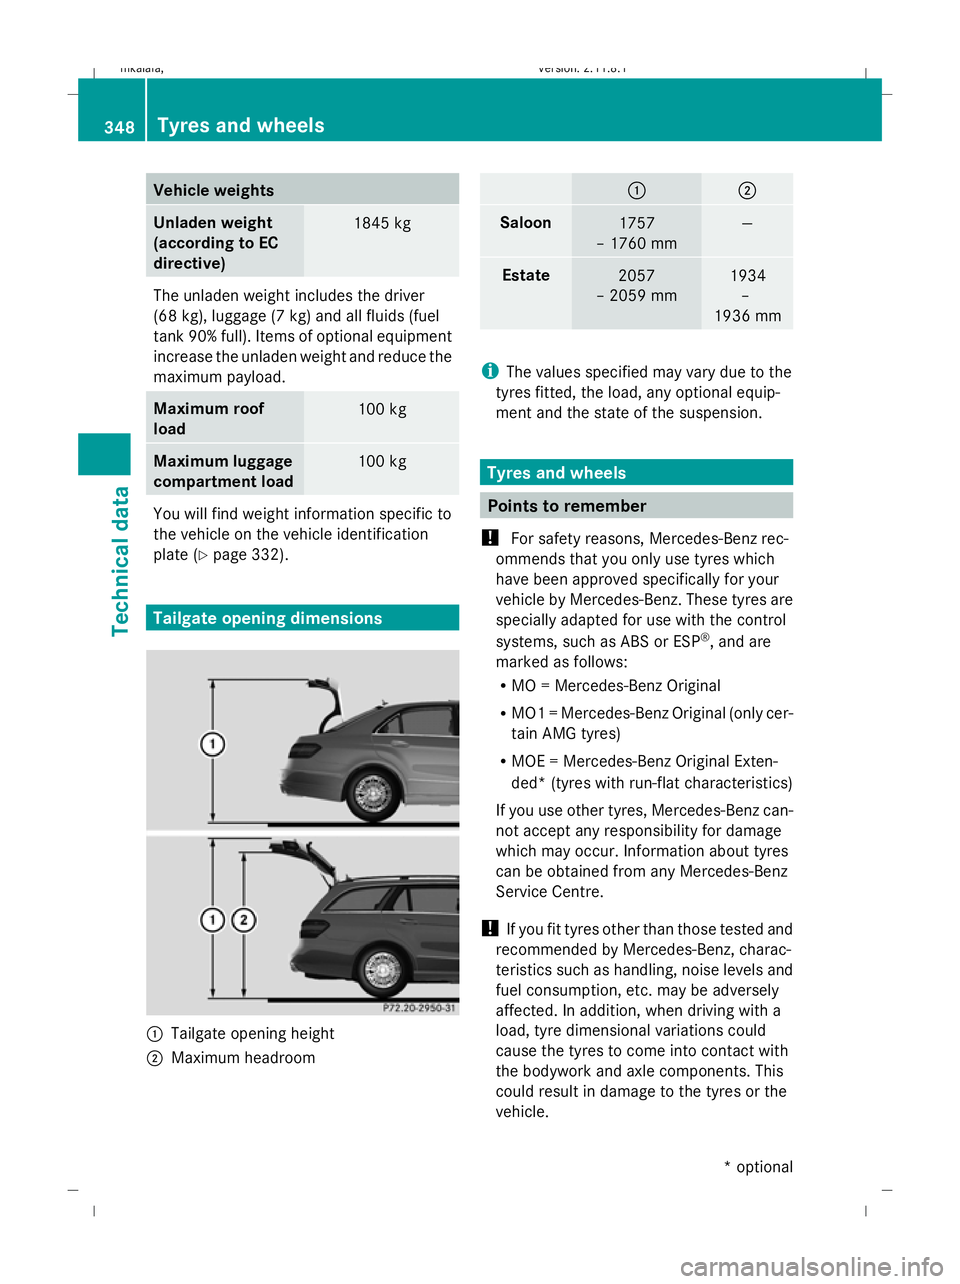
plate (Y page 332). Tailgate opening dimensions
:
Tailgate opening height
; Maximum headroom : ;
Saloon
1757
– 1760 mm —
Estate
2057
– 2059 mm 1934
–
1936 mm i
The values specified may vary due to the
tyres fitted, the load, any optional equip-
ment and the state of the suspension. Tyres and wheels
Points to remember
! For safety reasons, Mercedes-Benz rec-
ommends that you only use tyres which
have been approved specifically for your
vehicle by Mercedes-Benz. These tyres are
specially adapted for use with the control
systems, such as ABS or ESP ®
, and are
marked as follows:
R MO = Mercedes-Benz Original
R MO1 = Mercedes-Benz Original (only cer-
tain AMG tyres)
R MOE = Mercedes-Benz Original Exten-
ded* (tyres with run-flat characteristics)
If you use other tyres, Mercedes-Benz can-
not accept any responsibility for damage
which may occur. Information about tyres
can be obtained from any Mercedes-Benz
Service Centre.
! If you fit tyres other than those tested and
recommended by Mercedes-Benz, charac-
teristics such as handling, noise levels and
fuel consumption, etc. may be adversely
affected. In addition, when driving with a
load, tyre dimensional variations could
cause the tyres to come into contact with
the bodywork and axle components. This
could result in damage to the tyres or the
vehicle. 348
Tyres and wheelsTechnical data
* optional
212_AKB; 2; 4, en-GB
mkalafa
,V ersion: 2.11.8.1
2009-05-05T14:17:16+02:00 - Seite 348
Dateiname: 6515346702_buchblock.pdf; erzeugt am 07. May 2009 14:17:35; WK
Page 352 of 373
i
Further information about tyres and
wheels can be obtained from any
Mercedes-Benz Service Centre.
i You will find a table of tyre pressures on
the inside of your vehicle's fuel filler flap.
You will find further information about tyre
pressures in the "Operation" section
(Y page 225).
i Notes on vehicle tyres:
Always
R fit tyres of the same size on a given axle
(left/right)
R fit the same type of tyres on your vehicle
at a given time (summer tyres, winter
tyres, MOExtended tyres)
i Vehicles with the MOExtended run-flat
system are not equipped with the TIREFIT
kit. 68
Therefore, it is recommended that you
additionally equip your vehicle with the
TIREFIT kit* when fitting tyres that do not
feature run-flat properties, e.g. winter
tyres.
i A TIREFIT kit is available from any quali-
fied specialist workshop, e.g. a Mercedes-
Benz Service Centre.
68 Only for certain countries. Tyres and wheels
349Technical data
* optional
212_AKB; 2; 4, en-GB
mkalafa
,V ersion: 2.11.8.1
2009-05-05T14:17:16+02:00 - Seite 349 Z
Dateiname: 6515346702_buchblock.pdf; erzeugt am 07. May 2009 14:17:35; WK