2009 MERCEDES-BENZ E-CLASS ESTATE brake
[x] Cancel search: brakePage 287 of 373
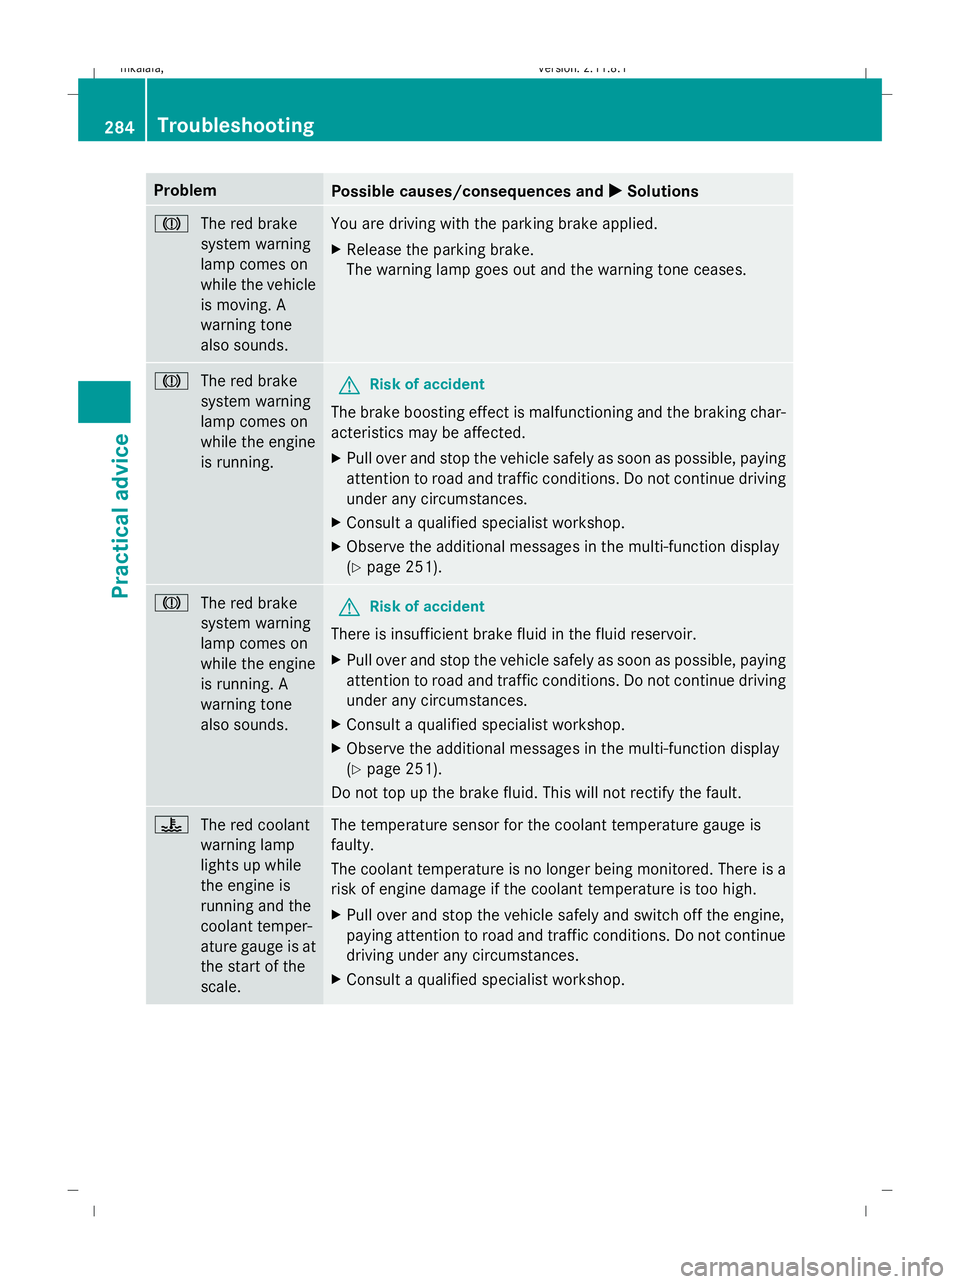
Problem
Possible causes/consequences and
X XSolutions J
The red brake
system warning
lamp comes on
while the vehicle
is moving. A
warning tone
also sounds. You are driving with the parking brake applied.
X
Release the parking brake.
The warning lamp goes out and the warning tone ceases. J
The red brake
system warning
lamp comes on
while the engine
is running. G
Risk of accident
The brake boosting effect is malfunctioning and the braking char-
acteristics may be affected.
X Pull over and stop the vehicle safely as soon as possible, paying
attention to road and traffic conditions. Do not continue driving
under any circumstances.
X Consult a qualified specialist workshop.
X Observe the additional messages in the multi-function display
(Y page 251). J
The red brake
system warning
lamp comes on
while the engine
is running. A
warning tone
also sounds. G
Risk of accident
There is insufficient brake fluid in the fluid reservoir.
X Pull over and stop the vehicle safely as soon as possible, paying
attention to road and traffic conditions. Do not continue driving
under any circumstances.
X Consult a qualified specialist workshop.
X Observe the additional messages in the multi-function display
(Y page 251).
Do not top up the brake fluid. This will not rectify the fault. ?
The red coolant
warning lamp
lights up while
the engine is
running and the
coolant temper-
ature gauge is at
the start of the
scale. The temperature sensor for the coolant temperature gauge is
faulty.
The coolant temperature is no longer being monitored. There is a
risk of engine damage if the coolant temperature is too high.
X
Pull over and stop the vehicle safely and switch off the engine,
paying attention to road and traffic conditions. Do not continue
driving under any circumstances.
X Consult a qualified specialist workshop. 284
TroubleshootingPractical advice
212_AKB; 2; 4, en-GB
mkalafa,
Version: 2.11.8.1 2009-05-05T14:17:16+02:00 - Seite 284
Dateiname: 6515346702_buchblock.pdf; erzeugt am 07. May 2009 14:17:12; WK
Page 290 of 373
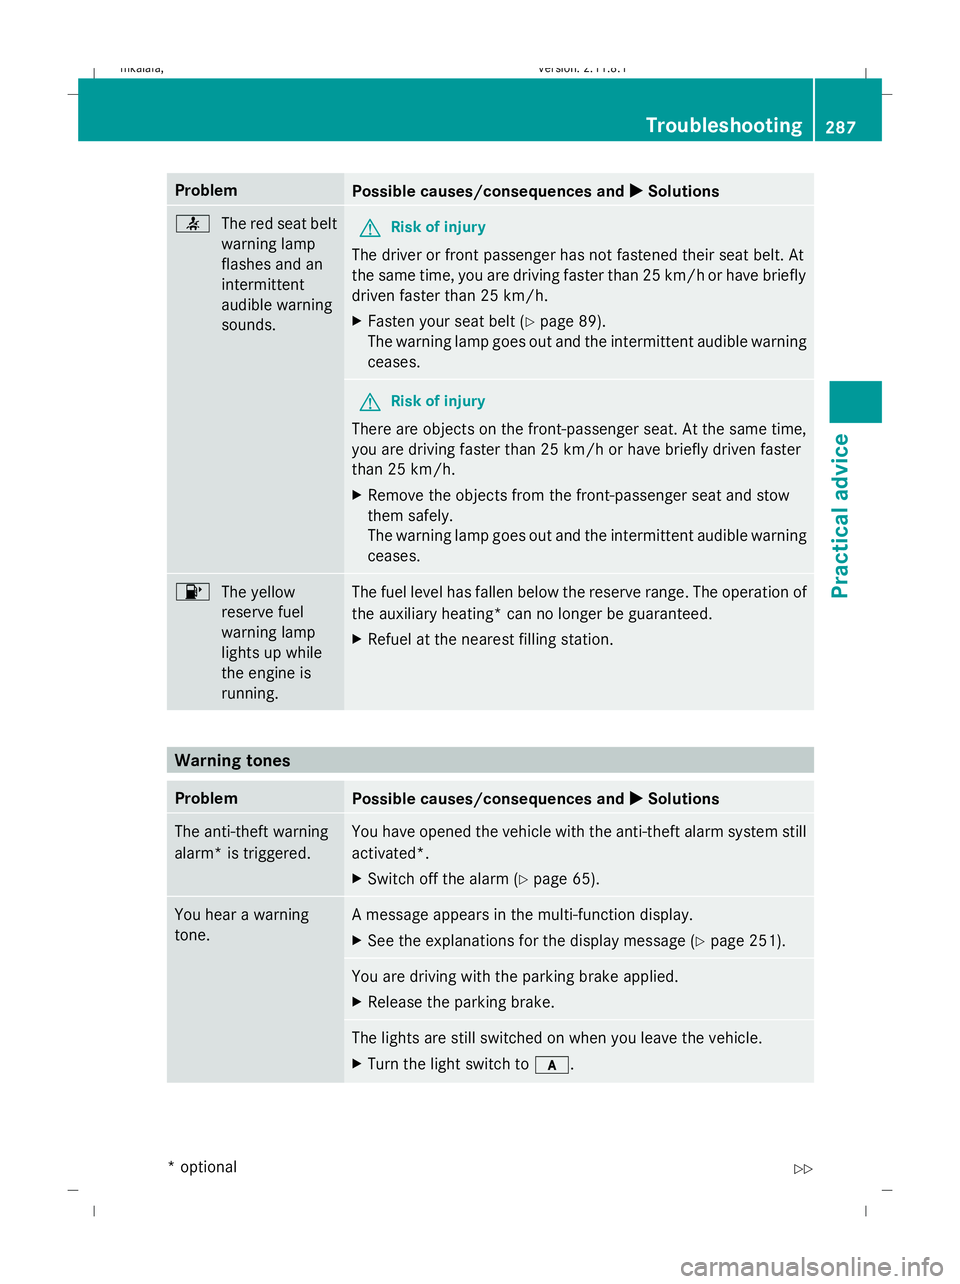
Problem
Possible causes/consequences and
X
X Solutions 7
The red seat belt
warning lamp
flashes and an
intermittent
audible warning
sounds. G
Risk of injury
The driver or front passenger has not fastened their seat belt. At
the same time, you are driving faster than 25 km/ho r have briefly
driven faster than 25 km/h.
X Fasten your seat belt (Y page 89).
The warning lamp goes out and the intermittent audible warning
ceases. G
Risk of injury
There are objects on the front-passenger seat. At the same time,
you are driving faster than 25 km/h or have briefly driven faster
than 25 km/h.
X Remove the objects from the front-passenger seat and stow
them safely.
The warning lamp goes out and the intermittent audible warning
ceases. 8
The yellow
reserve fuel
warning lamp
lights up while
the engine is
running. The fuel level has fallen below the reserve range. The operation of
the auxiliary heating* can no longer be guaranteed.
X
Refuel at the nearest filling station. Warning tones
Problem
Possible causes/consequences and
X
X Solutions The anti-theft warning
alarm* is triggered. You have opened the vehicle with the anti-theft alarm system still
activated*.
X Switch off the alarm (Y page 65). You hear a warning
tone. A message appears in the multi-function display.
X
See the explanations for the display message (Y page 251). You are driving with the parking brake applied.
X
Release the parking brake. The lights are still switched on when you leave the vehicle.
X
Turn the light switch to c. Troubleshooting
287Practical advice
* optional
212_AKB; 2; 4, en-GB
mkalafa,
Version: 2.11.8.1 2009-05-05T14:17:16+02:00 - Seite 287 Z
Dateiname: 6515346702_buchblock.pdf; erzeugt am 07. May 2009 14:17:12; WK
Page 304 of 373
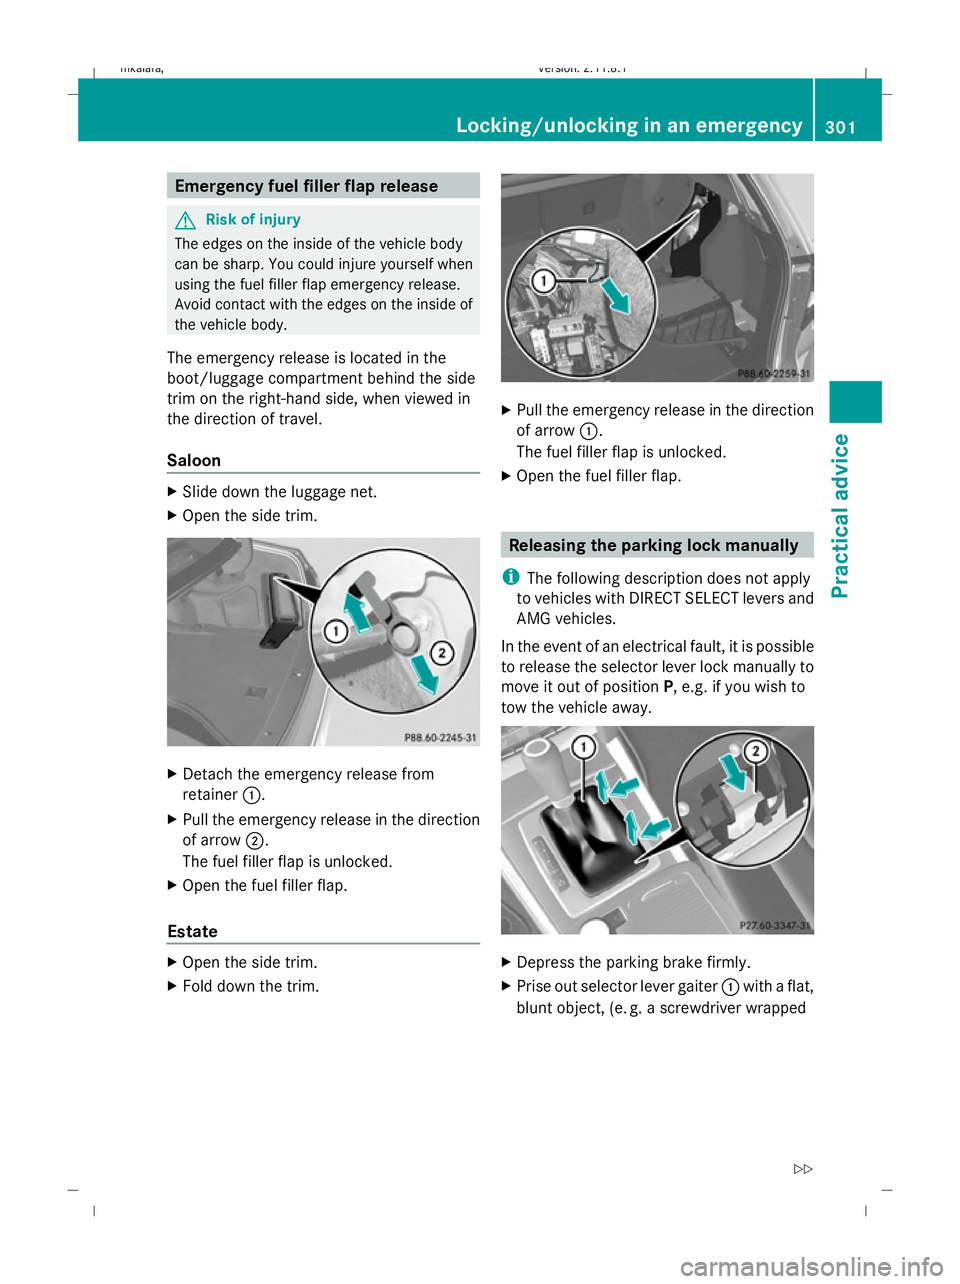
Emergency fuel filler flap release
G
Risk of injury
The edges on the inside of the vehicle body
can be sharp. You could injure yourself when
using the fuel filler flap emergency release.
Avoid contact with the edges on the inside of
the vehicle body.
The emergency release is located in the
boot/luggage compartment behind the side
trim on the right-hand side, when viewed in
the direction of travel.
Saloon X
Slide down the luggage net.
X Open the side trim. X
Detach the emergency release from
retainer :.
X Pull the emergency release in the direction
of arrow ;.
The fuel filler flap is unlocked.
X Open the fuel filler flap.
Estate X
Open the side trim.
X Fold down the trim. X
Pull the emergency release in the direction
of arrow :.
The fuel filler flap is unlocked.
X Open the fuel filler flap. Releasing the parking lock manually
i The following description does not apply
to vehicles with DIRECT SELECT levers and
AMG vehicles.
In the event of an electrical fault, it is possible
to release the selector lever lock manually to
move it out of position P, e.g. if you wish to
tow the vehicle away. X
Depress the parking brake firmly.
X Prise out selector lever gaiter :with a flat,
blunt object, (e. g. a screwdriver wrapped Locking/unlocking in an emergency
301Practical advice
212_AKB; 2; 4, en-GB
mkalafa, Version: 2.11.8.1 2009-05-05T14:17:16+02:00 - Seite 301 Z
Dateiname: 6515346702_buchblock.pdf; erzeugt am 07. May 2009 14:17:16; WK
Page 312 of 373
X
Turn the wiper blades until they are parallel
to the wiper arms.
X Fold the wiper arms back onto the wind-
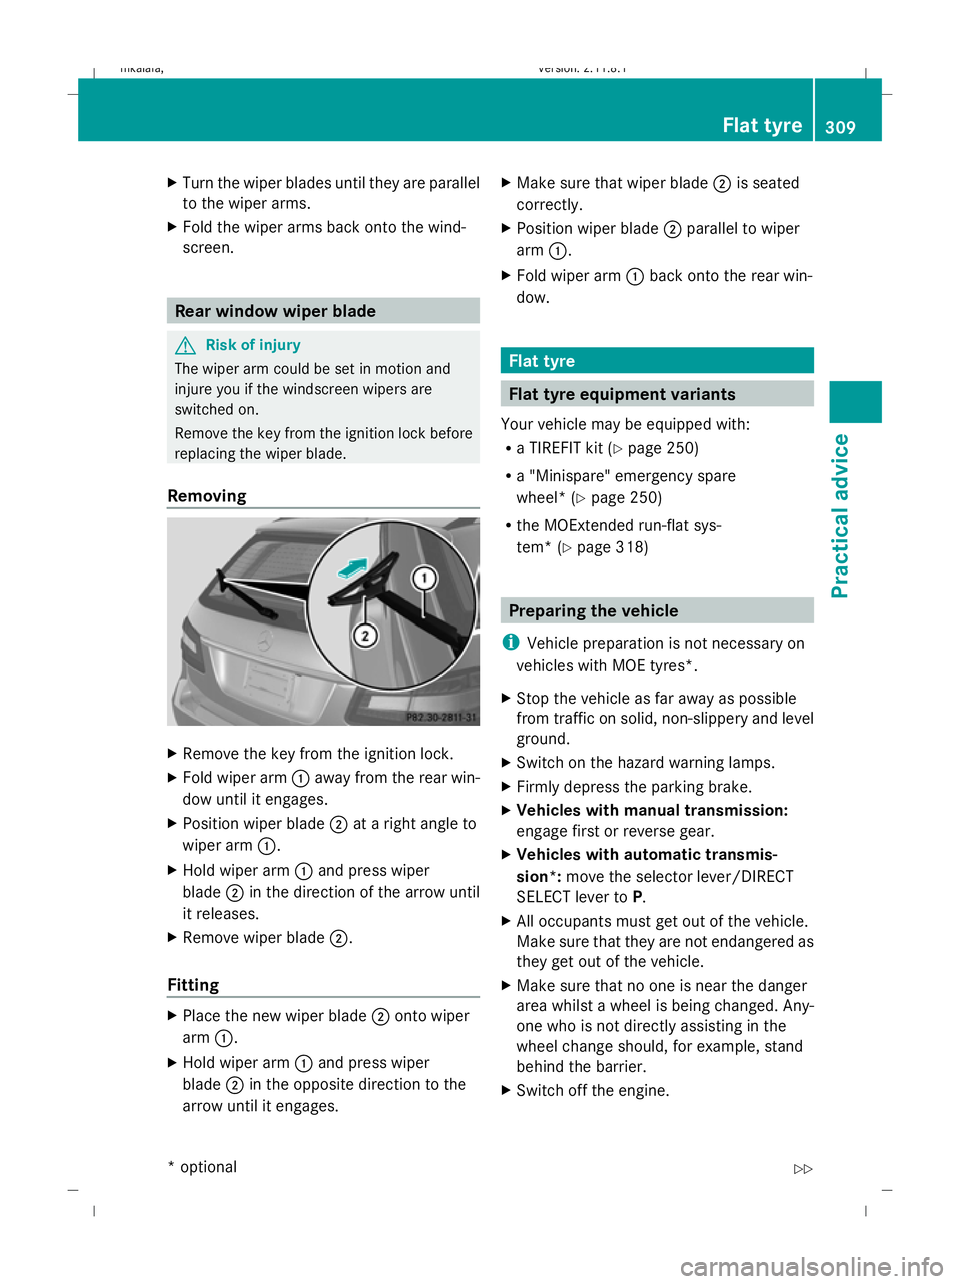
screen. Rear window wiper blade
G
Risk of injury
The wiper arm could be set in motion and
injure you if the windscreen wipers are
switched on.
Remove the key from the ignition lock before
replacing the wiper blade.
Removing X
Remove the key from the ignition lock.
X Fold wiper arm :away from the rear win-
dow until it engages.
X Position wiper blade ;at a right angle to
wiper arm :.
X Hold wiper arm :and press wiper
blade ;in the direction of the arrow until
it releases.
X Remove wiper blade ;.
Fitting X
Place the new wiper blade ;onto wiper
arm :.
X Hold wiper arm :and press wiper
blade ;in the opposite direction to the
arrow until it engages. X
Make sure that wiper blade ;is seated
correctly.
X Position wiper blade ;parallel to wiper
arm :.
X Fold wiper arm :back onto the rear win-
dow. Flat tyre
Flat tyre equipment variants
Your vehicle may be equipped with:
R a TIREFIT kit (Y page 250)
R a "Minispare" emergency spare
wheel* (Y page 250)
R the MOExtended run-flat sys-
tem* (Y page 318) Preparing the vehicle
i Vehicle preparation is not necessary on
vehicles with MOE tyres*.
X Stop the vehicle as far away as possible
from traffic on solid, non-slippery and level
ground.
X Switch on the hazard warning lamps.
X Firmly depress the parking brake.
X Vehicles with manual transmission:
engage first or reverse gear.
X Vehicles with automatic transmis-
sion*: move the selector lever/DIRECT
SELECT lever to P.
X All occupants must get out of the vehicle.
Make sure that they are not endangered as
they get out of the vehicle.
X Make sure that no one is near the danger
area whilst a wheel is being changed. Any-
one who is not directly assisting in the
wheel change should, for example, stand
behind the barrier.
X Switch off the engine. Flat tyre
309Practical advice
* optional
212_AKB; 2; 4, en-GB
mkalafa,
Version: 2.11.8.1 2009-05-05T14:17:16+02:00 - Seite 309 Z
Dateiname: 6515346702_buchblock.pdf; erzeugt am 07. May 2009 14:17:20; WK
Page 320 of 373
X
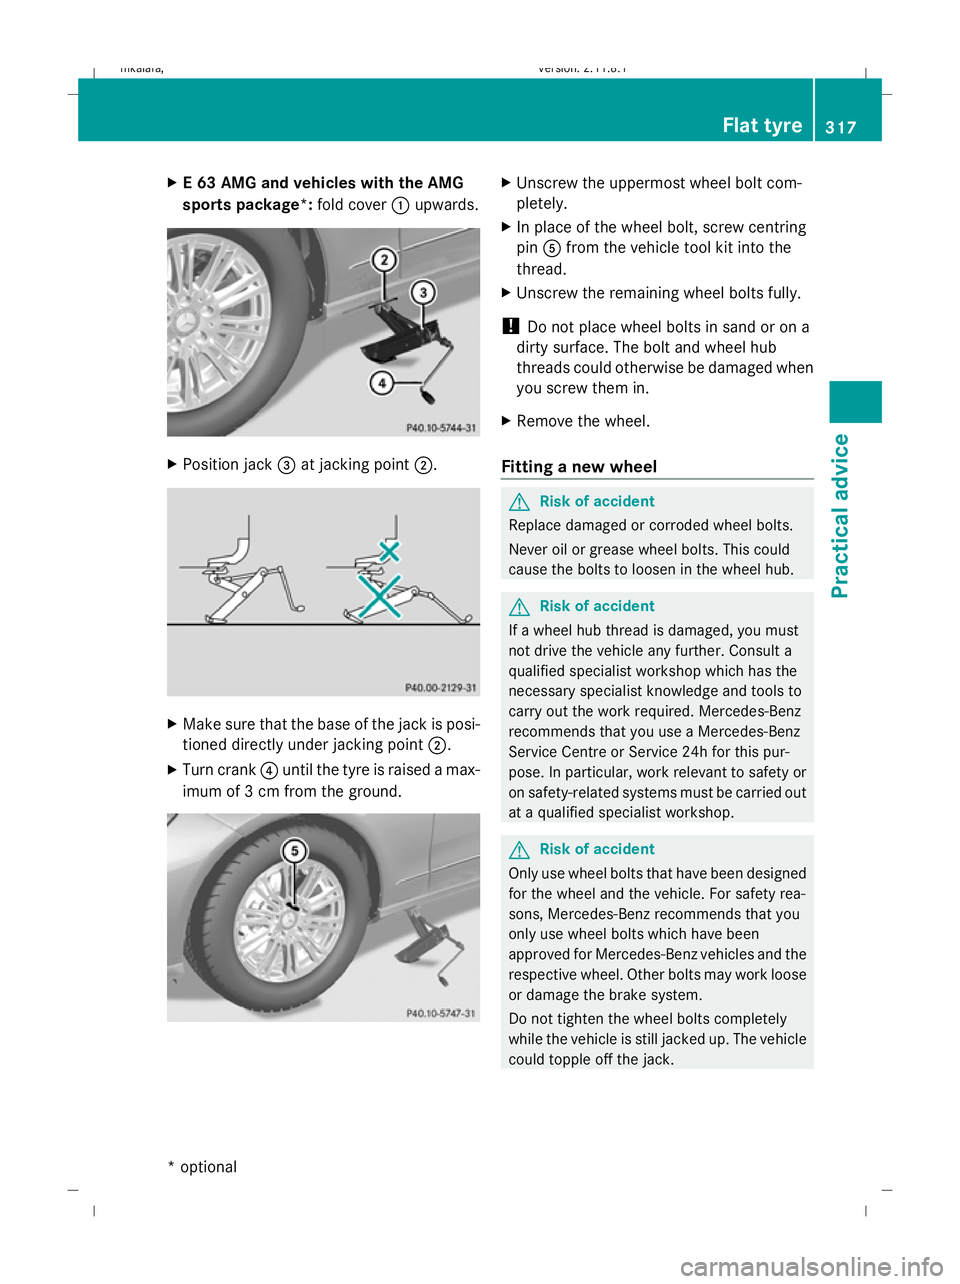
E 63 AMG and vehicles with the AMG
sports package*: fold cover:upwards. X
Position jack =at jacking point ;. X
Make sure that the base of the jack is posi-
tioned directly under jacking point ;.
X Turn crank ?until the tyre is raised a max-
imum of 3 cm from the ground. X
Unscrew the uppermost wheel bolt com-
pletely.
X In place of the wheel bolt, screw centring
pin Afrom the vehicle tool kit into the
thread.
X Unscrew the remaining wheel bolts fully.
! Do not place wheel bolts in sand or on a
dirty surface. The bolt and wheel hub
threads could otherwise be damaged when
you screw them in.
X Remove the wheel.
Fitting a new wheel G
Risk of accident
Replace damaged or corroded wheel bolts.
Never oil or grease wheel bolts. This could
cause the bolts to loosen in the wheel hub. G
Risk of accident
If a wheel hub thread is damaged, you must
not drive the vehicle any further. Consult a
qualified specialist workshop which has the
necessary specialist knowledge and tools to
carry out the work required. Mercedes-Benz
recommends that you use a Mercedes-Benz
Service Centre or Service 24h for this pur-
pose. In particular, work relevant to safety or
on safety-related systems must be carried out
at a qualified specialist workshop. G
Risk of accident
Only use wheel bolts that have been designed
for the wheel and the vehicle. For safety rea-
sons, Mercedes-Benz recommends that you
only use wheel bolts which have been
approved for Mercedes-Benz vehicles and the
respective wheel. Other bolts may work loose
or damage the brake system.
Do not tighten the wheel bolts completely
while the vehicle is still jacked up. The vehicle
could topple off the jack. Flat tyre
317Practical advice
* optional
212_AKB; 2; 4, en-GB
mkalafa,
Version: 2.11.8.1 2009-05-05T14:17:16+02:00 - Seite 317 Z
Dateiname: 6515346702_buchblock.pdf; erzeugt am 07. May 2009 14:17:23; WK
Page 324 of 373
right-hand side when viewed in the direction
of travel.
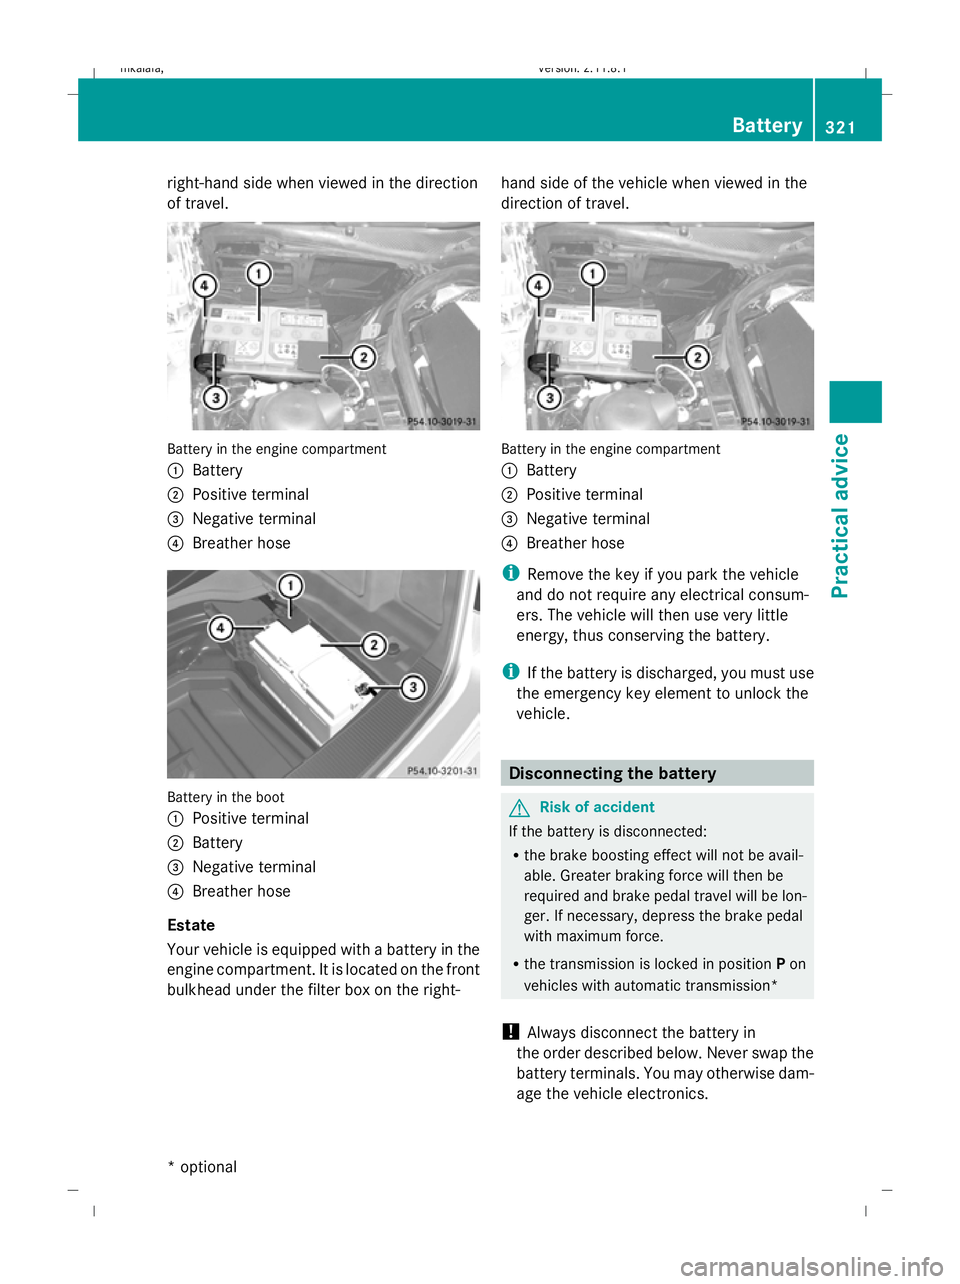
Battery in the engine compartment
:
Battery
; Positive terminal
= Negative terminal
? Breather hose Battery in the boot
:
Positive terminal
; Battery
= Negative terminal
? Breather hose
Estate
Your vehicle is equipped with a battery in the
engine compartment. It is located on the front
bulkhead under the filter box on the right- hand side of the vehicle when viewed in the
direction of travel. Battery in the engine compartment
:
Battery
; Positive terminal
= Negative terminal
? Breather hose
i Remove the key if you park the vehicle
and do not require any electrical consum-
ers. The vehicle will then use very little
energy, thus conserving the battery.
i If the battery is discharged, you must use
the emergency key element to unlock the
vehicle. Disconnecting the battery
G
Risk of accident
If the battery is disconnected:
R the brake boosting effect will not be avail-
able. Greater braking force will then be
required and brake pedal travel will be lon-
ger. If necessary, depress the brake pedal
with maximum force.
R the transmission is locked in position Pon
vehicles with automatic transmission*
! Always disconnect the battery in
the order described below. Never swap the
battery terminals. You may otherwise dam-
age the vehicle electronics. Battery
321Practical advice
* optional
212_AKB; 2; 4, en-GB
mkalafa,
Version: 2.11.8.1 2009-05-05T14:17:16+02:00 - Seite 321 Z
Dateiname: 6515346702_buchblock.pdf; erzeugt am 07. May 2009 14:17:25; WK
Page 325 of 373
X
Firmly depress the parking brake and on
vehicles with automatic transmission*,
shift the transmission to position P.
X Switch off all electrical consumers (e.g.
radio, blower, etc.).
X Turn the key to 0(Y page 75) in the ignition
lock and remove it or make sure that no
ignition position has been selected with
KEYLESS GO*. In the instrument cluster, all
of the indicator lamps must be out.
X Vehicles with the battery in the engine
compartment: open the bonnet.
X Vehicles with the battery in the boot:
open the boot. X
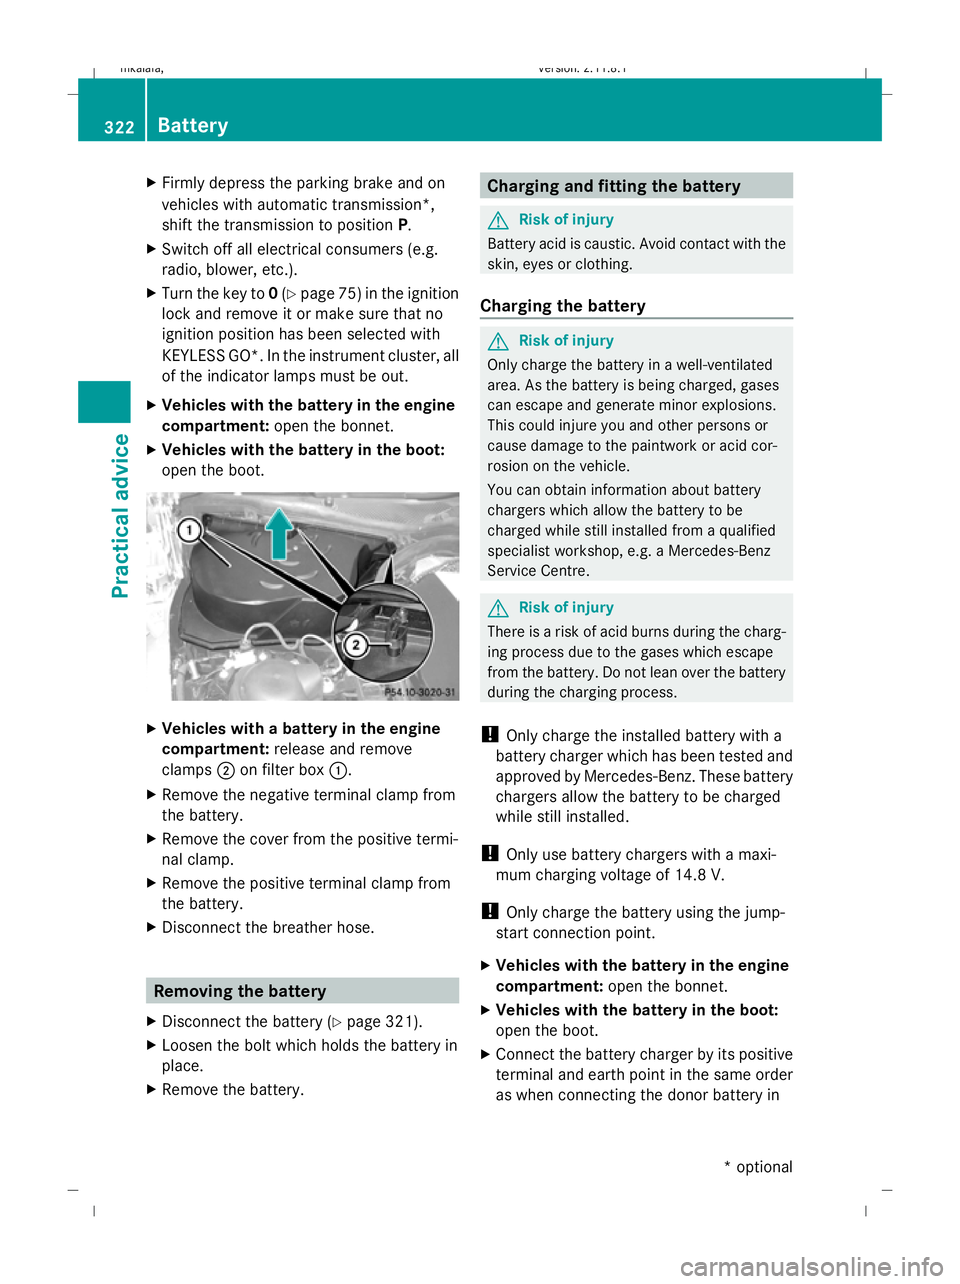
Vehicles with a battery in the engine
compartment: release and remove
clamps ;on filter box :.
X Remove the negative terminal clamp from
the battery.
X Remove the cover from the positive termi-
nal clamp.
X Remove the positive terminal clamp from
the battery.
X Disconnect the breather hose. Removing the battery
X Disconnect the battery ( Ypage 321).
X Loosen the bolt which holds the battery in
place.
X Remove the battery. Charging and fitting the battery
G
Risk of injury
Battery acid is caustic. Avoid contact with the
skin, eyes or clothing.
Charging the battery G
Risk of injury
Only charge the battery in a well-ventilated
area. As the battery is being charged, gases
can escape and generate minor explosions.
This could injure you and other persons or
cause damage to the paintwork or acid cor-
rosion on the vehicle.
You can obtain information about battery
chargers which allow the battery to be
charged while still installed from a qualified
specialist workshop, e.g. a Mercedes-Benz
Service Centre. G
Risk of injury
There is a risk of acid burns during the charg-
ing process due to the gases which escape
from the battery. Do not lean over the battery
during the charging process.
! Only charge the installed battery with a
battery charger which has been tested and
approved by Mercedes-Benz. These battery
chargers allow the battery to be charged
while still installed.
! Only use battery chargers with a maxi-
mum charging voltage of 14.8 V.
! Only charge the battery using the jump-
start connection point.
X Vehicles with the battery in the engine
compartment: open the bonnet.
X Vehicles with the battery in the boot:
open the boot.
X Connect the battery charger by its positive
terminal and earth point in the same order
as when connecting the donor battery in 322
BatteryPractical advice
* optional
212_AKB; 2; 4, en-GB
mkalafa
,V ersion: 2.11.8.1
2009-05-05T14:17:16+02:00 - Seite 322
Dateiname: 6515346702_buchblock.pdf; erzeugt am 07. May 2009 14:17:26; WK
Page 326 of 373
the jump-starting procedure
(Y
page 323).
Fitting the battery X
Install the battery. To do this, follow the
steps described in "Removing the battery"
(Y page 322) in reverse order.
X Reconnect the battery (Y page 323).Reconnecting the battery
! Always connect the battery in the order
described below. Never swap the terminal
clamps. Otherwise, you may damage the
vehicle electronics.
X Switch off all electrical consumers (e.g.
radio, blower, etc.).
X Connect the positive terminal clamp and
secure the cover.
X Connect the negative terminal clamp.
X Connect the breather hose.
X On vehicles with the battery in the
engine compartment: put the filter box
back in place, then clip in and close the
retaining clamps.
Close the bonnet.
X Vehicles with the battery in the boot:
close the boot.
i If the battery power supply has been inter-
rupted (e.g. if it has been reconnected), you
must carry out the following tasks:
R set the time ( Ypage 132)
R reset the function for folding the exterior
mirrors in/out automatically* by folding
the mirrors out once ( Ypage 87) Jump-starting
If your vehicle's battery is discharged, the
engine can be jump-started from another
vehicle or from an external battery using jump
leads. Observe the following points:
R
you may only jump-start when the engine
and catalytic converter are cold.
R do not start the engine if the battery is fro-
zen. Let the battery thaw first.
R jump-starting may only be performed from
batteries with a nominal voltage of 12 V.
R only use jump leads which have a sufficient
cross-section and insulated terminal
clamps.
i Jump leads and further information about
jump-starting can be obtained from any
Mercedes-Benz Service Centre.
! Avoid repeated and lengthy starting
attempts.
Do not use a rapid-charging device to start
the engine. G
Risk of injury
There is a risk of acid burns when jump-start-
ing a vehicle due to the gases which escape
from the battery. Do not lean over the battery
while the engine is being jump-started. G
Risk of explosion
Gases escaping from the battery during jump-
starting may cause minor explosions. Avoid
creating sparks. Keep naked flames away
from the battery, and do not smoke.
Comply with safety precautions and take pro-
tective measures when handling batteries.
You will find these under "Battery" in the
index.
X Make sure that the two vehicles do not
touch.
X Depress the parking brake firmly.
X Manual transmission: engage neutral.
X Automatic transmission*: shift the trans-
mission to position P.
X Switch off all electrical consumers (e.g.
radio, blower, etc.).
X Open the bonnet (Y page 219). Jump-starting
323Practical advice
* optional
212_AKB; 2; 4, en-GB
mkalafa
,V ersion: 2.11.8.1
2009-05-05T14:17:16+02:00 - Seite 323 Z
Dateiname: 6515346702_buchblock.pdf; erzeugt am 07. May 2009 14:17:26; WK