2009 MERCEDES-BENZ E-CLASS COUPE wheel
[x] Cancel search: wheelPage 136 of 313
Distroni
cPlusm aydetect vehicles tha tare
crossing your lane by mistake. Activating Dis-
troni cPlusatt rafficlight swithc rossing traf-
fic ,for example, could cause your vehicl eto
pull away unintentionally. SPEEDTRONIC
Speedtroni cbrakes automaticall ysothatyou
do not exceed the se tspeed. On long and
steep downhil lgradients ,especially if the
vehicl eisladen or towing atrailer, yo umust
shift to alower gear in good tim eorselect
shift range 1,2or 3on vehicles with auto-
matic transmission* .Bydoing so, yo uwill
make us eofthe braking effect of the engine,
which relieves the load on the brake system
and prevents the brakes fro moverheating
and wearing too quickly. If yo uneeda ddi-
tional braking ,depress the brake pedal
repeatedly rathe rtha nc ontinuously. G
Ris
kofa ccident
Never depress the brake peda lcontinuously
whil ethe vehicl eisinmotion, e.g .neve rcause
the brakes to ru bbyapplyingconstant slight
peda lpressure. This cause sthe brake system
to overheat, increase sthe braking distance
and can lead to the brakes failing completely. G
Ris
kofa ccident
Do not change down for additional engine
braking on aslipper yroads urface. This could
cause the drive wheels to lose their gri pand
the vehicl ecould skid.
Yo uc an se tavariable or permanent limit
speed:
R variable for speedlimit s, e.g .inbuilt-up
areas
R permanent for long-term spee drestric-
tions, e.g .for driving on winter tyres
(Y page 135) G
Ris
kofa ccident
Speedtroni ciso nlyana iddesigne dtoassist
driving. Yo uareresponsibl efor the vehicle's
spee dand for braking in good time.
i Thes peed indicated in the speedometer
ma ydiffe rs ligh tlyf romt he limi tspeed
stored.
Variabl eSpeedtronic With the cruis
econtro llev er,y ou can operate
cruis econtrol, Distroni cPlus* and variable
Speedtronic.
Th eL IM indicator lamp on the cruis econtrol
lever indicates which syste myouhave selec-
ted:
R LIM indicator lamp off:
Cruise contro lorDistroni cPlus* is selec-
ted.
R LIM indicator lamp lit:
Variable Speedtroni ciss elect ed.
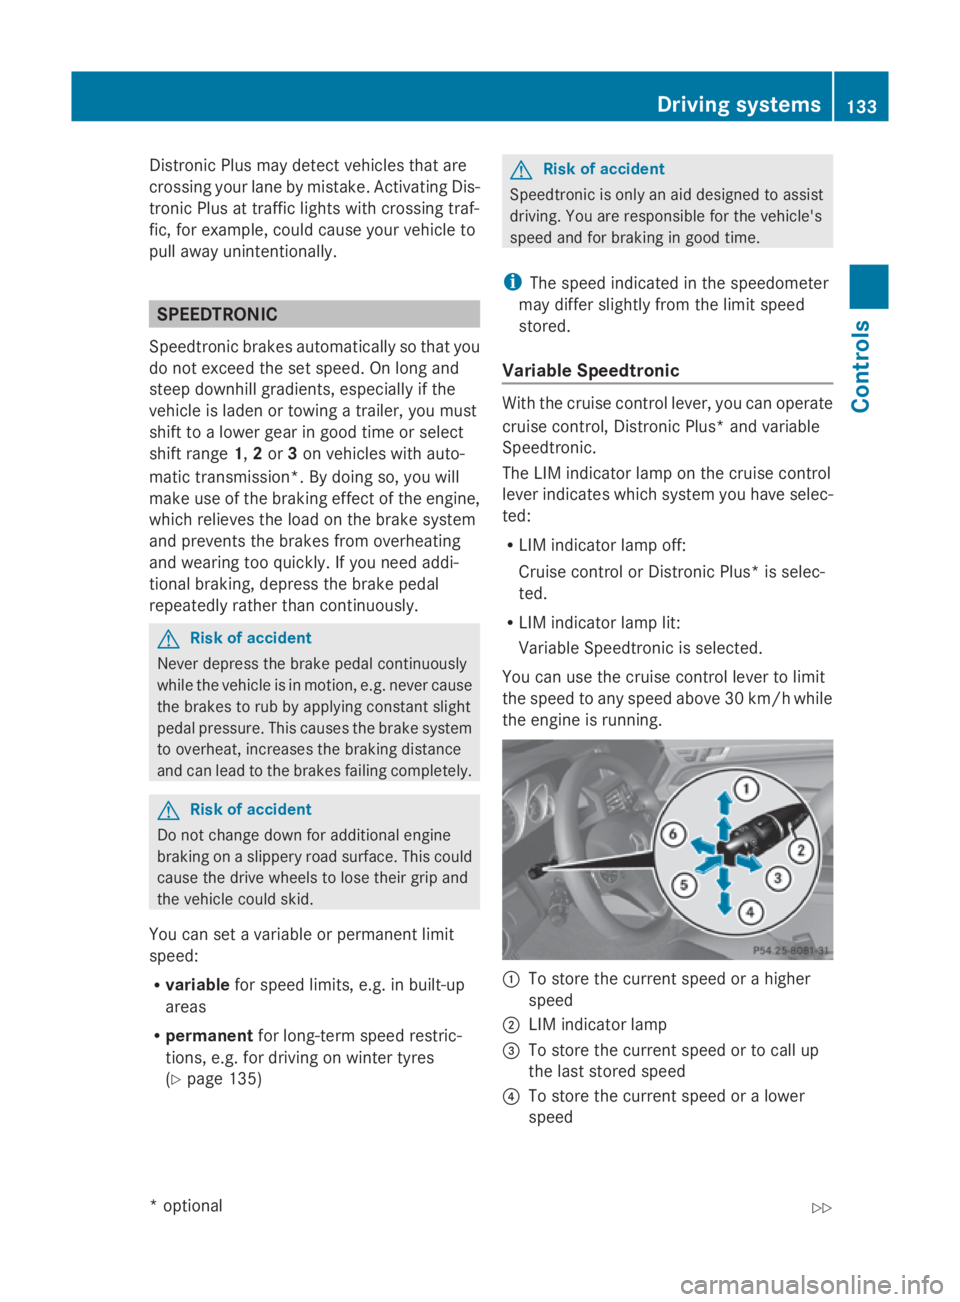
Yo uc an us ethe cruis econtro llev er to limit
the spee dtoany spee dabove 30 km/h while
the engine is running. 0046
To stor ethe current spee dorahigher
speed
0047 LIM indicator lamp
008A To stor ethe current spee dortocallup
the last stored speed
0088 To stor ethe current spee doralower
speed Driving systems
133Controls
*optio nal
207_AKB; 2; 3, en-GB
mkalafa
,V ersion: 2.11.8.1
2009-07-23T10:23:49+02:00
-Seite 133 Z
Page 140 of 313
You will see
awarnin gmessage in the multi-
function display if the HOL Dfunction is acti-
vated and:
R the driver's door is opened and you release
the seat belt.
R the engin eisswitched off.
R the bonnet is opened.
Vehicles with manual transmission:
Brak eimmediately
X Immediately depres sthe brak epedal firmly
until the warnin gmessage in the multi-
function display goes out. This deactivates
the HOL Dfunction.
On vehicles with automatic transmission*:
Select Park (P)
X Move the selector lever to Pto prevent the
vehicle fro mrollin gaway.
The HOL Dfunction is deactivated. The
warnin gmessage in the multi-function dis-
play disappears.
Ah orn will also sound at regular intervals if
the HOL Dfunction is activate dand you:
R switc hoff the engine, open the driver's
door and remove your seat belt.
R open the bonnet.
The sounding of the horn alert syou to the fact
that the vehicle has been parked while the
HOL Dfunction is still activated. The tone
becomes louder if you attempt to lock the
vehicle. The vehicle is not locked until the
HOL Dfunction is deactivated.
i If the ignition has been switched off ,the
engin ecannot be started again until the
HOL Dfunction has been deactivated.
If there is afault in the system or power supply
while the HOL Dfunction is activated, the
Brak eimmediately message is shown in
the multi-function display. Immediately
depres sthe brak efirmly until the warning
message in the multi-function display goes
out. On vehicles with automatic transmis-
sion*, you can also select P.This deactivates
the HOL Dfunction. Dynamic handling package with
sports mode*
The most importan tpart of the dynamic han-
dling package with sport smode is the adjust-
able suspension system. This automatically
controls and adapts the suspension to the
respectiv edrivin gsituation.
The calibration of the suspension depends
on:
R your drivin gstyle
R the road surfac econditions
R your individual selection ;see also the fol-
lowing description.
If your vehicle is equipped with automatic
transmission*, the dynamic handlin gpack-
age with sport smode also includes steering
wheel gearshift paddles* with amanual gear-
shift program* (Y page 105). X
Start the engine.
Sports tuning The firmer settin
gofthe suspension tuning in
sport smode ensures even better contact
with the road. Selec tthis mode when employ-
ing asport ydrivin gstyle, e. g. on winding
countr yroads.
Your selection remain sstored until you
switc hoff the engine.
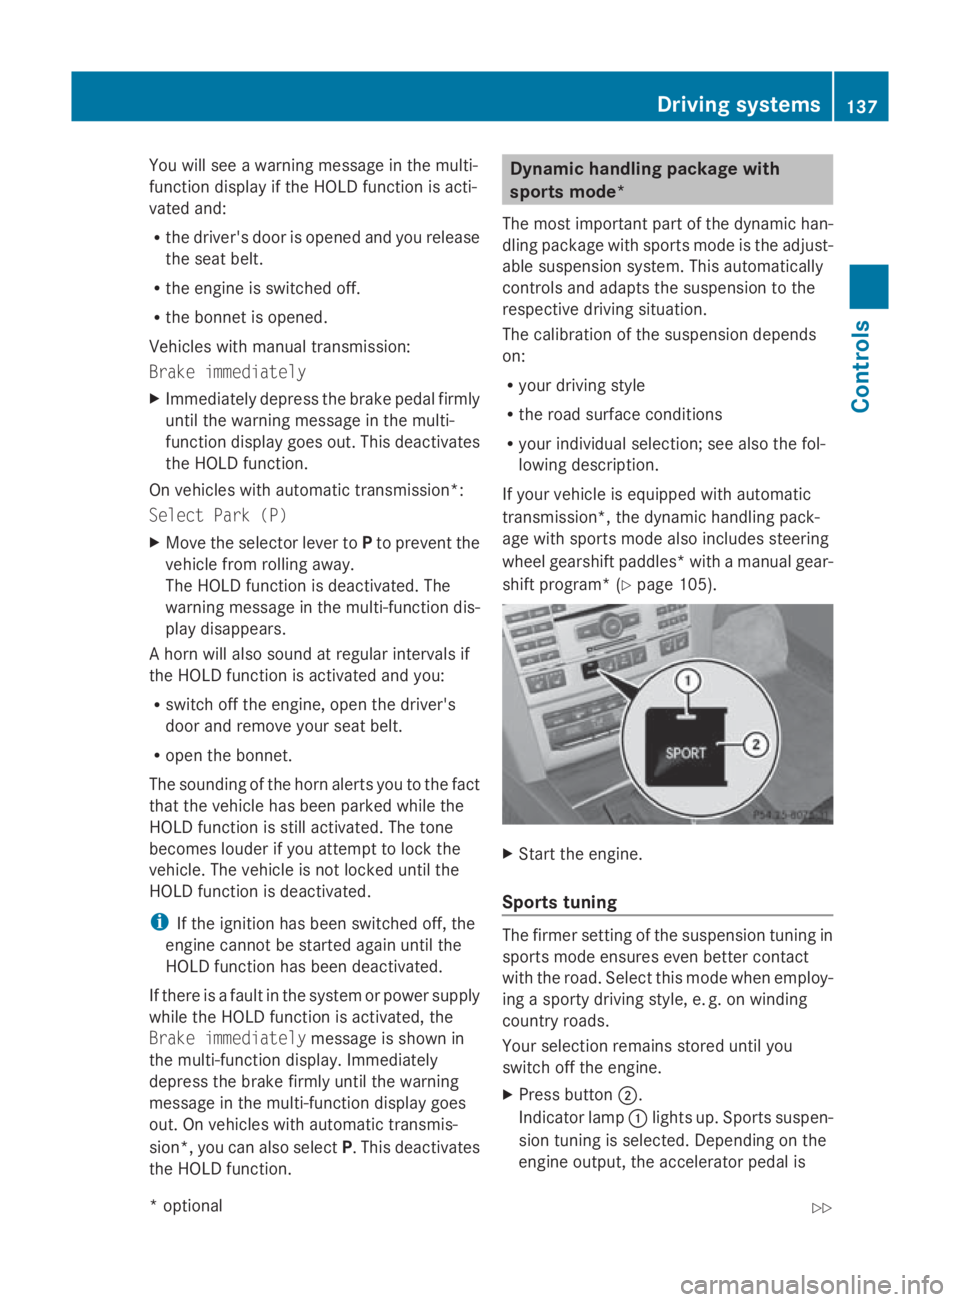
X Press button 0047.
Indicator lamp 0046light sup. Sports suspen-
sion tuning is selected. Dependin gonthe
engin eoutput ,the accelerator pedal is Driving systems
137Controls
*optional
207_AKB; 2; 3, en-GB
mkalafa,
Version: 2.11.8.1 2009-07-23T10:23:49+02:00-Seite1 37 Z
Page 144 of 313
G
Risk of injury
Make sure that no persons or animal sare in
the manoeuvring range. Otherwise, they
could be injured.
Whe nPARKTRONIC is deactivated, Parking
Guidance is also unavailable.
Use Parking Guidance for parking spaces:
R that are paralle ltothe direction of travel
R that are on straigh troads, not bends
R that are on the same level as the road, i.e.
not on the pavement
Parking tips:
R On narro wroads, drive as clos etothe park-
ing space as possible.
R Parking spaces which are littered ,over-
grow norp artiall yoccupied by traile rdraw-
bars might be identified incorrectl yornot
at all.
R Snowfal lorheavy rai nmay lead to aparking
space being measured inaccurately.
R Pa ya ttention to the PARKTRONIC warning
messages during the parking procedure
(Y page 138).
R Whe ntransporting aloa dw hich protrudes
from your vehicle ,you mus tnot us eParking
Guidance.
R Neve ruse Parking Guidance with snow
chains or an emergency spare wheel *fit-
ted.
R The wa yyourv ehicle is positioned in the
parking space afte rparking is dependent
on variou sfactors. These includ ethe posi-
tion and shape of the vehicle sparked in
front and behind it and the conditions of the
location. In some cases, Parking Guidance
may guid eyou too far or not far enough into
ap arking space. In some cases, it may also
lead yo uacross or onto the kerb. If neces-
sary, cance lthe parking procedure with
Parking Guidance. !
If unavoidable, yo ushoul ddrive over
obstacles such as kerbs slowl yand not at
as harp angle. Otherwise, yo umay damage
the wheel sortyres.
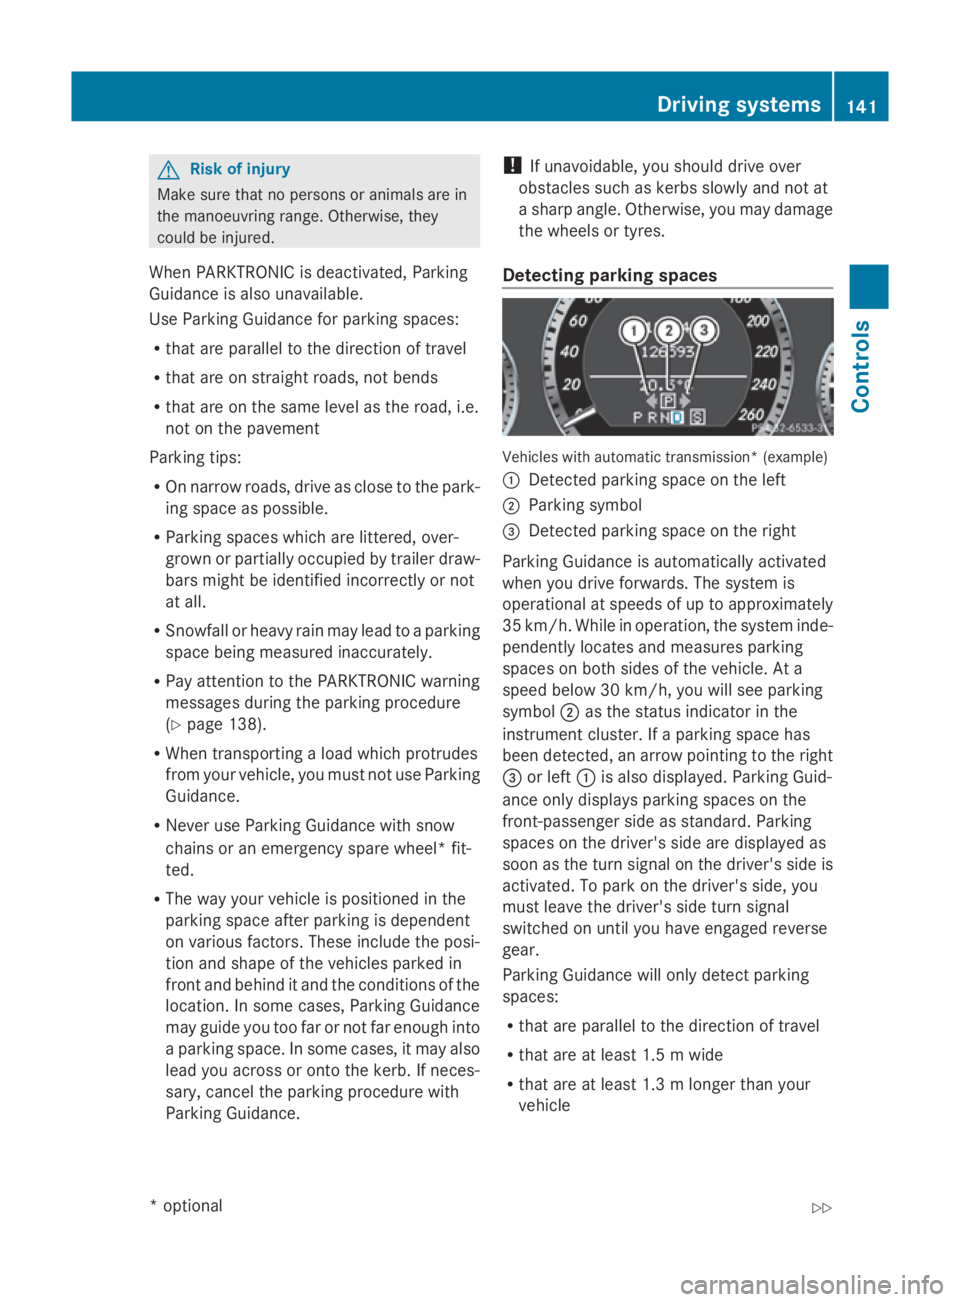
Detecting parkin gspaces Vehicles with automatic transmission* (example)
0046
Detected parking space on the left
0047 Parking symbol
008A Detected parking space on the right
Parking Guidance is automaticall yactivated
whe nyou drive forwards. The system is
operational at speeds of up to approximately
35 km/h .While in operation, the system inde-
pendently locates and measures parking
spaces on both sides of the vehicle .Ata
speed below 30 km/h ,you will see parking
symbol 0047as the statu sindicator in the
instrument cluster. If aparking space has
bee ndetected, an arrow pointing to the right
008A or left 0046is also displayed. Parking Guid-
ance only display sparking spaces on the
front-passenger sid easstandard .Parking
spaces on the driver' ssidea re displayed as
soo nasthe turn signal on the driver' ssideis
activated. To park on the driver' sside, you
mus tlea ve the driver' ssidet urn signal
switched on unti lyou have engaged reverse
gear.
Parking Guidance will only detect parking
spaces:
R that are paralle ltothe direction of travel
R that are at leas t1.5mw ide
R that are at leas t1.3ml onger than your
vehicle Drivin
gsystems
141Controls
*optional
207_AKB
;2;3,en-GB
mkalafa ,V ersion: 2.11.8.1
2009-07-23T10:23:49+02:00
-Seite 141 Z
Page 178 of 313
and your safety. Therefore, you must only use
this equipment if it is correctly connecte dto
as eparate reflection-free exterio raerial. G
Ris
kofi njury
Excessive levels of electromagnetic radiation
may caus edamage to your healt hand the
healt hofo thers. Usin ganexterio raerial takes
int oa ccoun tcurren tscientific discussions
relating to th epossible healt hrisk pose dby
electromagnetic fields.
To ensure optimum reception qualit yfor
mobile phones in th evehicle ,and to minimise
mutual influences between th evehicle elec-
tronics and mobile phones, Mercedes-Benz
recommend sthe use of an approved exterior
aerial. An exterio raerial conduct sthe elec-
tromagnetic field sgenerated by awireless
device to th eexterio rofthevehicle ;the field
strengt hwithin th evehicle interio rislower
than in avehicle that does no thave an exte-
rior aerial.
i Ther eare various mobile phon ebrackets
that may be fitte dtoyour vehicle ;insome
cases, these are country-specific .You can
obtain these mobile phon ebrackets from a
qualifie dspecialist workshop ,e.g.a
Mercedes-Ben zServic eCentre.
The function sand services available when
you use th ephon edepen dony our mobile
phon emodeland servic eprovider.
Insertin gthe mobile phone
X Open th etelephone compartment
(Y page 167).
X Plac ethe mobile phon ebracke tint ot he
pre-installe dfitting; see th eseparate
mobile phon ebracke tfittin ginstructions.
X Inser tthe mobile phon eintot he mobile
phon ebracket; see th eseparate mobile
phon ebracke tfittin ginstructions.
If th emobile phon eisinserted in th emobile
phon ebracket, you can speak to th eperson
you are callin gusingthe hands-free system. You can operate th
etelephone usin gthe
006A and007F button sonthemulti-function
steering wheel. You can operate other mobile
phon efunction svia th eon-board computer
(Y page 114).
When you tak ethe keyo ut of th eignition lock,
th em obile phon estays on but you can no
longer use th ehands-free system.
If you are making acall and you would like to
tak ethe keyo ut of th eignition lock, first
remove th emobile phon efromt hebracket.
Otherwise, th ecall will be ended. Floormat
*onthedriver's side G
Ris
kofa ccident
Mak esure that there is sufficient clearance
aroun dthe pedals when floormats are used,
and that th efloormats are properly secured.
The floormats must be correctly secured at all
times usin gretainers and press-studs.
Before you driv eoff,c he ck th efloormats and
secure if necessary. Afloormat whic hisnot
properly secured can slip and, thereby, inter-
fer ew ith th emovemen tofthepedals.
Do no tplace floormats on to pofoneanother. X
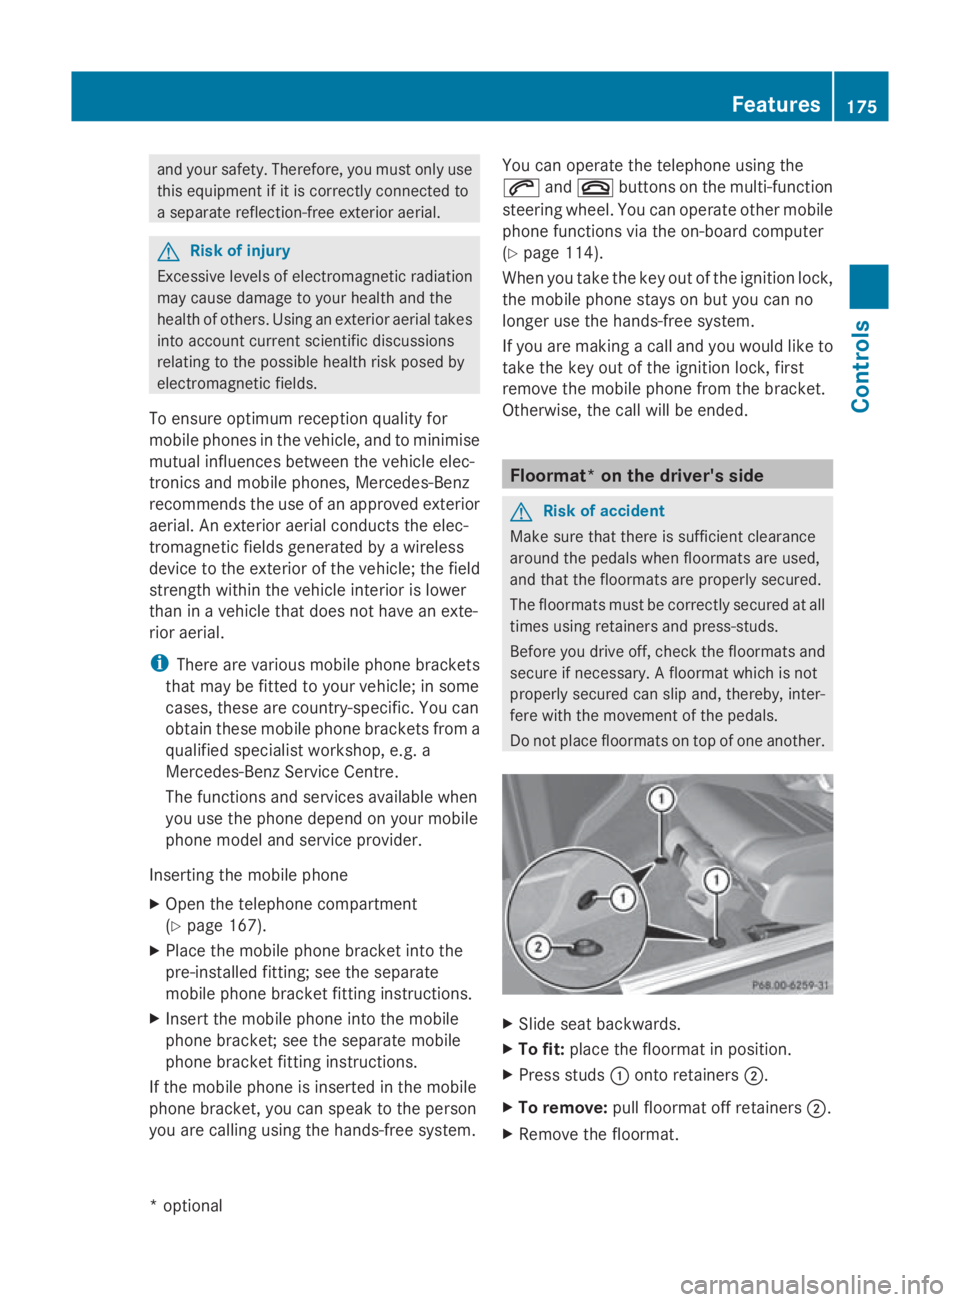
Slid eseat backwards.
X To fit: place th efloormat in position.
X Pres sstuds 0046 onto retainers 0047.
X To remove: pull floormat off retainers 0047.
X Remov ethe floormat. Features
175Controls
*optional
207_AKB
;2;3,en-GB
mkalafa, Version:2.11.8.1
2009-07-23T10:23:49+02:00
-Seite 175 Z
Page 180 of 313
Running-i
nnotes ............................... 178
Refuelling ........................................... 178
Engine compartment ........................180
Tyres and wheels .............................. 184
Winter driving ................................... 189
Driving tips ........................................ 190
Driving abroad ................................... 192
Trailer towing* .................................. 193
Service ............................................... 197
Care .................................................... 198 177Operation
207_AKB
;2;3,en-GB
mkalafa, Version:2.11.8.1
2009-07-23T10:23:49+02:0
0-Seite 177
Page 187 of 313
able washe
rfluid concentrate could dam-
age th eplastic lamp lenses of th ehead-
lamps.
X Mix th ewindscree nwashe rfluid in acon-
tainer beforehand.
X At temperatures abov efreezing:
Fill th ewashe rfluid reservoir wit hamix of
wate rand windscree nwashe rconcentrate
(e.g. MB SummerFit).
X At temperatures below freezing:
Fill th ewashe rfluid reservoir wit hamix of
water, antifreez eadditive and windscreen
washe rconcentrat e(e.g. MB WinterFit).
Adapt th emixing ratio to th eoutside tem-
peratures.
X To open: pull cap0046upwards by th etab.
X Top up wit hthe premixe dwashe rfluid.
X To close: presscap 0046 onto th efille rneck
until it engages. Tyres and wheels
Point
storemember
! For safety reasons, Mercedes-Ben zrec-
ommends that you only use tyres, wheels
and accessorie swhichhave been approved
by Mercedes-Ben zspecifically for your
vehicle .Thes etyres have been specially
adapted for use wit hthe control systems,
suc hasA BSor ESP ®
,a nd are marke das
follows:
R MO =Mercedes-Ben zOriginal
R MOE =Mercedes-Ben zOriginal Exten-
ded* (tyres wit hrun-flat characteristics)
Only use Mercedes-Ben zOriginal Extended
tyres* on wheels that have been specifi-
cally approved by Mercedes-Benz.
If you use other tyres, wheels and acces-
sories, Mercedes-Ben zcanno taccept any
responsibility for damag ethatm ay result
from this. Further informatio nabout tyres,
wheels and approved combinations can be obtaine
dfroma ny Mercedes-Ben zService
Centre.
! If you fit tyres other than those tested and
recommended by Mercedes-Benz, charac-
teristic ssuchash andling, noise levels and
fuel consumption ,etc.m ay be adversely
affected. In addition ,when driving wit ha
load, tyr edimensional variation scould
caus ethe tyres to come int ocontac twith
th eb odywork and axle components. This
could result in damag etothetyres or the
vehicle.
! Retreade dtyres are neither tested nor
recommended by Mercedes-Benz, since
previous damag ecanno talways be detec-
te donr etreade dtyres. As aresult,
Mercedes-Ben zcanno tguarante evehicle
safety if retreade dtyres are fitted. Do not
fit used tyres if you have no information
about their previous usage. G
Ris
kofa ccident
Tyres, wheel soraccessorie swhichh ave not
been approve dbyMercedes-Ben zfor your
vehicle or are no tused as they should be, can
impai rdriving safety. As aresult, you could
caus eana ccident. Before purchasin gand
usin gthem, enquire about their suitability,
legal stipulation sand factory recommenda-
tions at aMercedes-Ben zServic eCentre.
Modification work on th ebrak esystem and
wheel sisnotpermitted, no ristheuse of
spacer plates or brak edust shields. This inva-
lidates th eGeneral Operatin gPermit for the
vehicle.
Notes on selecting, fittin gand replac-
ing tyres R
Only fit tyres and wheels of th esame type
and make.
R Only fit tyres of th ecorrec tsizeo ntot he
wheels.
R Afte rfittin gnew tyres, run them in at mod-
erat espeeds for th efirst 10 0kmast hey 184
Tyres and wheelsOperation
*o
ptional
207_AKB
;2;3,en-GB
mkalafa ,V ersion: 2.11.8.1
2009-07-23T10:23:49+02:00
-Seite 184
Page 188 of 313
only reach their full performanc
eafter this
distance.
R Fit new tyres on the front wheels first if
tyres of the same size are required on the
front and rear wheels.
R Replace the tyres after six years at the lat-
est, regardless of wear. This also applies to
the spare wheel*.
R Do not drive with tyres which have too little
tread depth, as this significantly reduces
the traction on wet roads (aquaplaning).
! Storet yres that are not being used in a
cool, dry and preferably dark place. Protect
the tyres against oil, grease, petrol and die-
sel.
Notes on regularly inspecting wheels
and tyres R
Regularly check the wheels and tyres of
your vehicle for damage (e.g. cuts, punctu-
res, tears, bulges on tyres and deformation,
cracksors evere corrosion on wheels), at
least every 14 days, as well as after driving
off-road or on rough roads. Damaged
wheels can cause aloss of tyre pressure.
R Regularly check the tyre tread depth and
the condition of the tread across the whole
width of the tyre (Y page 186). If neces-
sary, turn the front wheels to full lock in
order to inspect the inner side of the tyre
surface.
R All wheels must have avalve cap to protect
the valve against dirt and moisture. Do not
fit anything ontot he valve (such as tyre
pressure monitoring systems) other than
the standard valve cap or other valve caps
approved by Mercedes-Benz for your vehi-
cle.
R Regularly check the pressure of all the tyres
including the spare tyre* ,particularly prior
to long trips, and correc tthe pressure as
necessary (Y page 186). Notes on driving R
While driving, pay attention to vibrations,
noises and unusual handling characteris-
tics, e.g. pulling to one side. This may indi-
cate that the wheels or tyres are damaged.
If you suspect that atyre is defective,
reduce your speed and stop the vehicle as
soon as possible to check the wheels and
tyres for damage. Hidden tyre damage
could also be causing the unusual handling
characteristics. If you find no signs of dam-
age, have the wheels and tyres examined
at as pecialist workshop, for example at a
Mercedes-Benz Servic eCentre.
R When parking your vehicle, make sure that
the tyres do not get deformed by the kerb
or other obstacles. If it is necessary to drive
over kerbs, speed humps or similar eleva-
tions, try to do so slowly and at an obtuse
angle. Otherwise, the tyres, particularly the
sidewalls, can get damaged. Direction of rotation
Tyres with aspecified direction of rotation
have additional benefits, e.g. if there is arisk
of aquaplaning. You will only gain these ben-
efits if the correc tdirection of rotation is
observed.
An arrow on the sidewal lofthe tyre indicates
its correc tdirection of rotation. MOExtended run-flat system*
The MOExtended run-flat system allows you
to continue driving the vehicle even when one
or more tyres lose all air pressure.
The MOExtended run-flat system may only be
used in combination with the activated tyre
pressure loss warning system and only on
wheels specifically tested and approved by
Mercedes-Benz. Tyres and wheels
185Operation
*optional
207_AKB; 2; 3, en-GB
mkalafa,
Version: 2.11.8.1 2009-07-23T10:23:49+02:00-Seite 185 Z
Page 189 of 313
i
Vehicles with the MOExtended run-flat
system are not equipped with the TIREFIT
kit. 36
It is therefore recommended to additionally
equipy ourvehicle with the TIREFIT kit when
fitting tyres that do not feature run-flat
properties, e.g. winter tyres.
i ATIREFIT kit is availablef rom any quali-
fied specialist workshop, e.g. aMercedes-
Benz Service Centre.
You willf ind notes on driving with aflat tyre
in the "Practical advice" section
(Y page 272). Tyre tread
G
Risk of accident
Bear in mind that:
R tyre grip decreases rapidly on wet roads
when the tread depth is less than 3mm.
Thus, you should replace tyres that have
insufficient tread.
R winter tyres should be replaced when the
tread depth is 4mmorless as they will no
longer provide adequate grip.
R the tread on atyre may not wear evenly.
Thus, you should regularly check the tread
depth and the condition of the tread across
the entire width of all tyres. If necessary,
turn the front wheelstof ull lock in order to
inspect the tyre tread more easily.
Otherwise, you could lose control of the vehi-
cle and cause an accident due to the reduced
grip of the tyres on the road. Tyre pressures
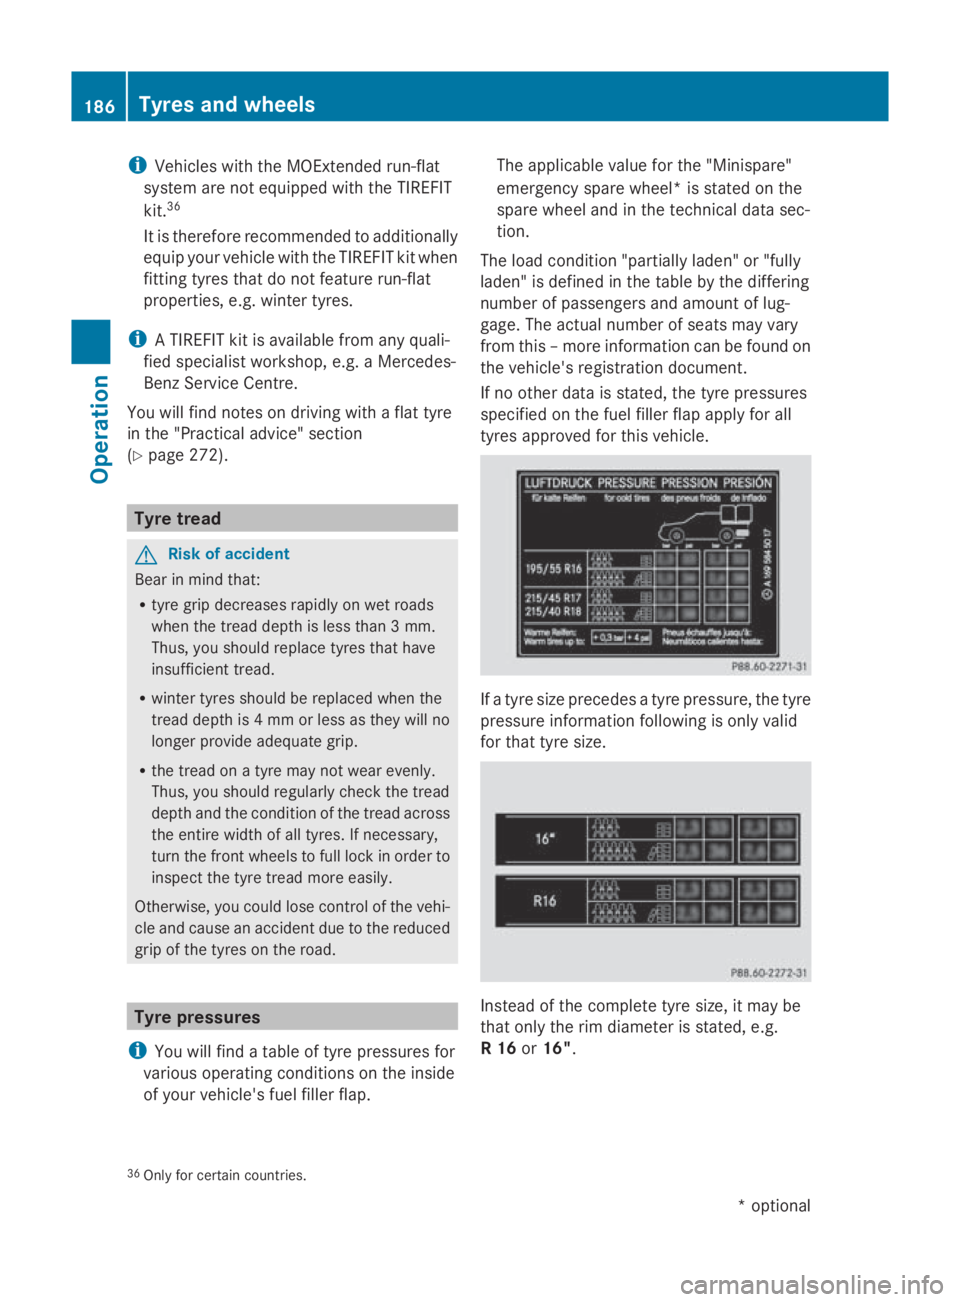
i You willf indatable of tyre pressures for
variouso perating conditions on the inside
of yourv ehicle's fuel filler flap. The applicable valuef
or the "Minispare"
emergency spare wheel*i sstated on the
spare wheel and in the technical data sec-
tion.
The load condition "partially laden" or "fully
laden" is defined in the table by the differing
number of passengers and amount of lug-
gage. The actual number of seats may vary
from this –more information can be found on
the vehicle's registration document.
If no other data is stated, the tyre pressures
specified on the fuel filler flap applyf or all
tyres approved for this vehicle. If
at yre size precedes atyre pressure, the tyre
pressure information following is only valid
for that tyre size. Instead of the complete tyre size, it may be
that only the rim diameter is stated, e.g.
R16or
16".
36 Only for certain countries. 186
Tyres and wheelsOperation
*o
ptional
207_AKB; 2; 3, en-GB
mkalafa,
Version: 2.11.8.1 2009-07-23T10:23:49+02:00-Seite 186