2009 MERCEDES-BENZ E-CLASS COUPE air condition
[x] Cancel search: air conditionPage 154 of 313
X
To activate: press the005Cbutton.
The indicator lamp above the 005Cbutton
come son.
X To switc hoff:press the 005Cbutton.
The indicator lamp above the 005Cbutton
goe sout.T he cooling with ai rdehumidifi-
cation functio nhasad elayed switch-off
feature. Controllin
gthe air conditioning auto-
matically
In automatic mode, the set temperatur eis
maintaine dautomaticall yataconstant level.
The system automaticall yregulate sthe tem-
peratur eofthe dispensed air, the airflow and
the ai rdistribution.
The automatic ai rconditioning will achieve
optima lope ratio nif" cooling with ai rdehu-
midification" is also activated .Ifnecessary,
cooling with ai rdehumidifica tion can be deac-
tivated.
X Turn the key to position 2in the ignition
lock.
X Set the desired temperature.
X To switc hon:press the 005Abutton.
The indicator lamp above the 005Abutton
lights up .Automatic ai rdistributio nand air-
flo wa reactivated.
X Thermotroni c3-zone luxur yautomatic cli-
mate control* :press button 0072up or down
and select the desired level (Y page 149).
FOCUS Air flo whigh/ai rdistributio nvia
the centre and side vents
MEDIU MAir flow medium/air distribution
via the centr eand side vents
DIFFUSE Air flow low/air distribution via the centre, side and defroster vents
i This settin gisespecially effective in auto-
matic mode when outside temperatures
are high.
X To deactivate: press the air distribution
button. Thermatic 2-zon
eautomatic climate con-
trol: press button 0071(Ypage 148).
Thermotronic 3-zon eluxury automatic cli-
mat econtrol*: press button 0074
(Y page 149).
The indicator lamp above the 005Abutton
goes out.
or
X Press the airflow button.
Thermatic 2-zon eautomatic climate con-
trol: press button 0072(Ypage 148).
Thermotronic 3-zon eluxury automatic cli-
mat econtrol*: press button 0073
(Y page 149).
The indicator lamp above the 005Abutton
goes out. Setting th
etemperature
2-zone THERMATIC automatic air condi-
tioning Different temperatures can be set for the
driver's and front-passenger sides.
X
Turn the key to position 2in the ignition
lock.
X To increase/reduce: press button0070or
0073 up or down ( Ypage 148). Only change
the temperature settin ginsmall incre-
ments .Start at 22 †. Air conditioning
151Controls
*optional
207_AKB; 2; 3, en-GB
mkalafa,
Version: 2.11.8.1 2009-07-23T10:23:49+02:00-Seite1 51 Z
Page 156 of 313
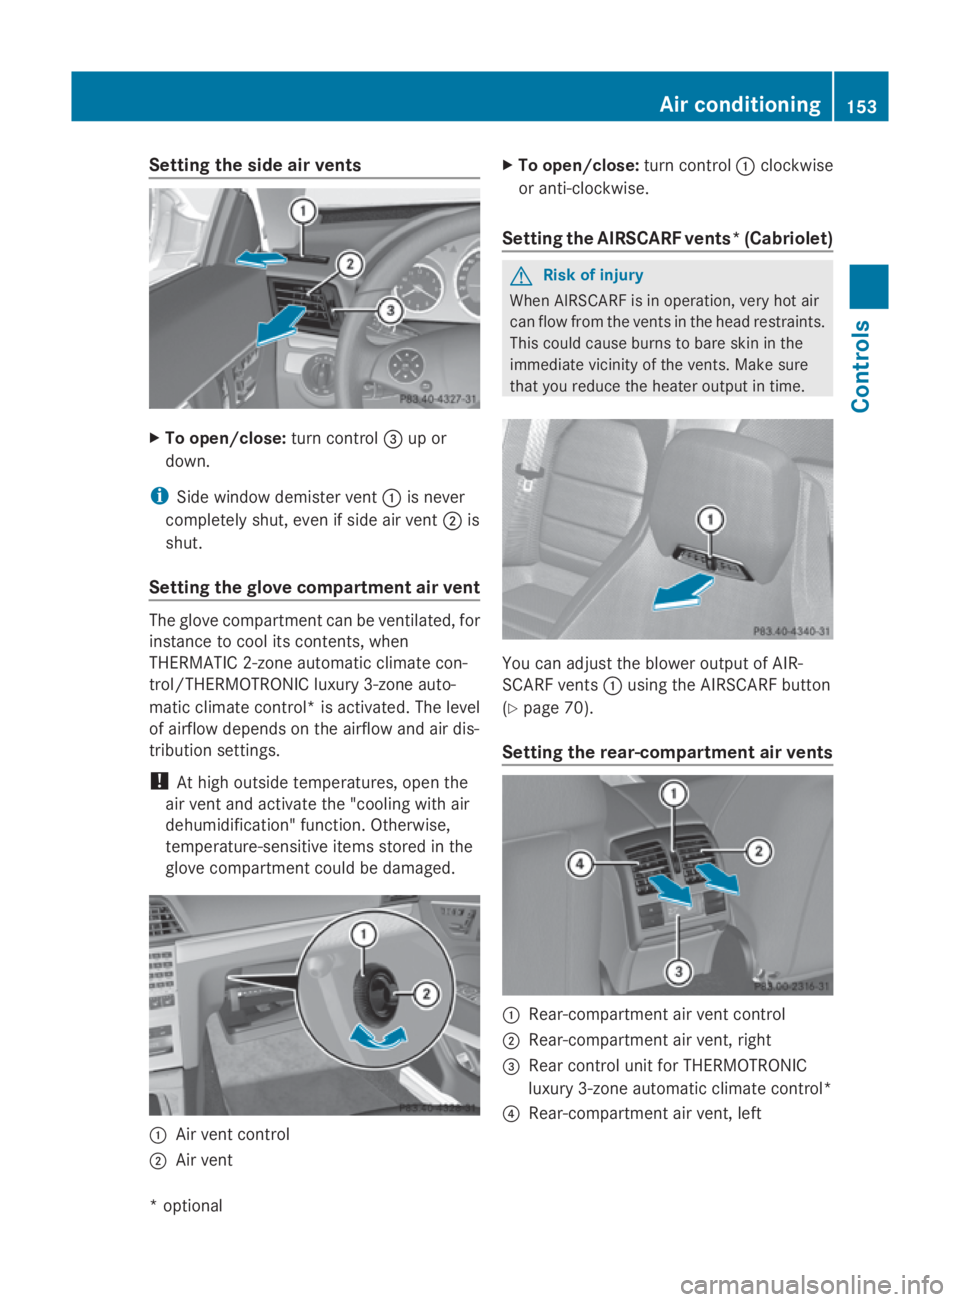
Setting the side air vents
X
To open/close: turn control008Aup or
down.
i Side window demister vent 0046is never
completely shut, even if side air vent 0047is
shut.
Setting the glove compartment air vent The glove compartmen
tcan be ventilated, for
instancetoc ool its contents, when
THERMATIC 2-zone automatic climate con-
trol/THERMOTRONIC luxury 3-zone auto-
matic climate control* is activated. The level
of airflow depends on the airflow and air dis-
tribution settings.
! At high outside temperatures, open the
air vent and activate the "cooling with air
dehumidification" function. Otherwise,
temperature-sensitive items stored in the
glove compartmen tcould be damaged. 0046
Air vent control
0047 Air vent X
To open/close: turn control0046clockwise
or anti-clockwise.
Setting the AIRSCARF vents* (Cabriolet) G
Risk of injury
When AIRSCARF is in operation, very hot air
can flow from the ventsint he head restraints.
This could cause burns to bare skin in the
immediate vicinity of the vents. Make sure
that you reduce the heater output in time. You can adjust the blower output of AIR-
SCARF vents
0046using the AIRSCARF button
(Y page 70).
Setting the rear-compartment air vents 0046
Rear-compartmen tair vent control
0047 Rear-compartmen tair vent,r ight
008A Rear control unit for THERMOTRONIC
luxury 3-zone automatic climate control*
0088 Rear-compartmen tair vent,l eft Air conditioning
153Controls
*optional
207_AKB; 2; 3, en-GB
mkalafa,
Version: 2.11.8.1 2009-07-23T10:23:49+02:00-Seite 153 Z
Page 157 of 313

X
To open/close: turnc ontrol 0046up or
down. Settin
gthe air distribution
0063 directs the airflow throug hthe demis-
ter vents
009E directs the airflow throug hthe centre
and side ai rvents
009D directs the airflow throug hthe footwell
ai rv ents
00A1 directs the airflow throug hthe centre
and side ai rvents as well as the foot-
well ai rvents 34
0089 directs the airflow throug hthe centre
and side ai rvents ,asw ellast he demis-
ter vents
0088 directs the airflow throug hthe footwell
and demister vents
i Regardless of the ai rdistributio nsetting,
airflow is always directe dthroug hthe side
ai rv ents .The side ai rvents can onl ybe
closed when the controls on the side air
vents ar eturned downwards.
2-zone THERMATIC automatic air condi-
tioning X
Turn the key to position 2in the ignition
lock.
X Press button 0071up or down repeatedly
unti lthe desired symbo lappears in the dis-
play (Y page 148).
THERMOTRONIC 3-zone luxury auto-
matic climate control* X
Turn the key to position 2in the ignition
lock.
X Press button 0074up or down repeatedly
unti lthe desired symbo lappears in the dis-
play (Y page 149). Settin
gthe airflow
Thermati c2-zone automatic climate
control X
Turn the key to position 2in the ignition
lock.
X To increase/reduce: press button0072up
or down (Y page 148).
Thermotronic 3-zone luxury automatic
climate control* X
Turn the key to position 2in the ignition
lock.
X To increase/reduce: press button0073up
or down (Y page 149). Switchin
gthe ZONE function on/off
X To activate: press the00D8butt-
ton ( Ypage 148) ,(Ypage 149).
The indicator lamp above the 00D8button
lights up.
Thermatic 2-zone automatic climate con-
trol :the temperatur esetting for the driver's
side is not adopted for the front-passenger
side.
Thermotroni clux ury3 -zone automatic cli-
mate control* :the temperatur esetting on
the driver's side is not adopted for the
front-passenger side or the rea rcompart-
ment.
Whe nthe buttons for temperature, airflow or
ai rd istributio nareactivated ,the temperature
setting on the driver's side is not adopted for
the othe rairconditioning zones.
X To deactivate: press the00D8button
(Y page 148) ,(Ypage 149).
The indicator lamp above the 00D8button
goe sout.
Thermatic 2-zone automatic climate con-
trol :the temperatur esetting for the driver's
34 Thi sairdistributio nsetting is onl yavailable on the Cabriolet. 154
Ai
rc onditioningControls
*optional
207_AKB; 2; 3, en-GB
mkalafa,
Version: 2.11.8.1 2009-07-23T10:23:49+02:00-Seite 154
Page 158 of 313
side is not adopted for the front-passenger
side.
Thermotronic luxury 3-zone automatic cli-
mate control*: the temperature setting on
the driver's side is not adopted for the
front-passenger side or the rear compart-
ment. Demisting the windscreen
i You should only select the "demisting"
function until the windscreen is clear again.
X Turn the key to position 2in the ignition
lock.
X To activate: press the0066button.
The indicator lamp above the 0066button
lights up.
The system automaticallys witches to the
following functions:
R cooling with air dehumidification on
R high airflow 35
R high temperature 35
R air distribution to the windscreen and
front side windows
R air-recirculation mode off
X To switch off: press the0066button.
The indicator lamp above the 0066button
goes out. The previouslys elected settings
come into effect again. The cooling with air
dehumidification function remains on. Air-
recirculation mode remains deactivated.
or
X Press the 005Abutton.
The indicator lamp above the 0066button
goes out. Airflow and air distribution are set
to automatic mode.
or
X Thermatic 2-zone automatic climate
control: press button 0070or0073 up or down
(Y page 148). Thermotronic luxury 3-zone automatic
climate control*:
press button0071or0075
up or down (Y page 149).
or
X Thermatic 2-zone automatic climate
control: press button 0072up or down
(Y page 148).
Thermotronic luxury 3-zone automatic
climate control*: press button0073up or
down (Y page 149). Demisting the windows
Windows misted up on the inside X
Activate the "cooling function with air dehu-
midification" function.
X Activate automatic mode.
X If the windows continue to mist up, activate
the demisting function.
i You should only select this setting until
the windscreen is clear again.
Windows misted up on the outside X
Activate the windscreen wipers.
X Thermatic 2-zone automatic climate
control: press button 0071up or down
(Y page 148) until the 009Eor009D symbol
appears in the display.
X Thermotronic luxury 3-zone automatic
climate control*: press button0074up or
down (Y page 149), until 009Eor009D
appears in the display.
i You should only select this setting until
the windscreen is clear again.
35 Depending on the outside temperature. Air conditioning
155Controls
*optional
207_AKB;2;3,e
n-GB
mkalafa, Version: 2.11.8.1 2009-07-23T10:23:49+02:00-Seite 155 Z
Page 159 of 313
Switching the rear window heating
on/off
G
Risk of accident
Clear all windows of ice or snow before setting
off. Otherwise, impaired visibility could
endanger you and others.
i The rear window heating has ahigh cur-
rent draw. You should therefore switch it
off as soon as the window is clear, as it only
switches off automatically after several
minutes.
i If the battery voltage is too low, the rear
window heating may switch off.
X Turn the key to position 2in the ignition
lock.
X Press the 006Ebutton.
The indicator lamp above the 006Ebutton
lights up or goes out. Activating/deactivating air-recircula-
tion mode
You can deactivate the flow of fresh air if
unpleasant odours are enteringt he vehicle
from outside. The air already inside the vehi-
cle will then be recirculated. G
Risk of accident
Only switch over to air-recirculation mode
briefly at low outside temperatures. Other-
wise, the windows could mist up, thus impair-
ing visibility and endangering yourself and
others. This may prevent you from observing
the traffic conditions, thereby causing an
accident.
X Turn the key to position 2in the ignition
lock.
X To activate: press the0074button.
The indicator lamp above the 0074button
lights up. i
Air-recirculation mode is activated auto-
matically at high outside temperatures.
When air-recirculation mode is activated
automatically, the indicator lamp above the
0074 button is not lit.
Outside air is added after about 30
minutes.
X To switch off: press the0074button.
The indicator lamp above the 0074button
goes out.
i Air-recirculation mode switches off auto-
matically:
R after approximately five minutes at out-
side temperatures below approximately
5†
R after approximately five minutes if cool-
ing with air dehumidification is deactiva-
ted
R after approximately 30 minutes at out-
side temperatures above approximately
5†
Convenience opening/closing (Coupé) G
Risk of injury
Make sure that nobody can become trapped
between the side window and the door frame
as the side windows are opened and closed.
Do not place objectsorl ean against the side
windows when they are being opened or
closed. You or the objectsc ould be drawn in
or become trapped between the side window
and the door frame as the window moves. If
there is arisk of entrapment, press the
0074 button again. Press the button for stop-
ping, opening or closing the side windows in
the opposite direction as appropriate.
Make sure that nobody can become trapped
as the panorama sliding sunroof* is opened
and closed. If there is arisk of entrapment,
press the 0074button again. Press the button
to stop, open or close the panorama sliding
sunroof* in the opposite direction as appro-
priate. 156
Air conditioningControls
*o
ptional
207_AKB; 2; 3, en-GB
mkalafa,
Version: 2.11.8.1 2009-07-23T10:23:49+02:00-Seite 156
Page 160 of 313
X
Convenience closing: pressand hold
the 0074 button until th eside windows and
th ep anorama slidin gsunroof* are closed.
The indicator lamp above the 0074button
light sup. Air-recirculation mode is activa-
ted.
X Convenience opening: pressand hold the
0074 button until th eside windows and the
panorama slidin gsunroof* have reached
their original position.
The indicator lamp above the 0074button
goes out .Air-recirculation mode is deacti-
vated.
i If you open th eside windows or th epan-
oram aslidin gsunroof* manually after clos-
ing with th econvenience closin gfeature,
they will remain in this position when
opened usin gthe convenience opening fea-
ture.
Convenience opening/closin g(Cabrio-
let) G
Ris
kofi njury
Mak esure that nobody can become trapped
between th eside window and th edoor frame
as th eside windows are opened and closed.
Do no tplace object sorlean against th eside
windows when they are bein gopened or
closed. You or th eobject scoul dbed rawn in
or become trapped between th eside window
and th edoor frame as th ewindow moves. If
there is arisk of entrapment ,pres sthe
0074 button again .Pres sthe button for stop-
ping, opening or closin gthe side windows in
th eo pposite direction as appropriate. X
Convenience closing: pressand hold the
0074 button until th eside windows are
closed.
The indicator lamp above the 0074button
light sup. Air-recirculation mode is activa-
ted.
X Convenience opening: pressand hold the
0074 button until th eside windows have
returned to their original position.
The indicator lamp above the 0074button
goes out .Air-recirculation mode is deacti-
vated.
i If you open th eside windows manually
after closin gwith th econvenience closing
feature, they will remain in this position
when opened usin gthe convenience open-
ing feature. Switching th
eresidual hea ton/off
The "residual heat "function is only available
with THERMOTRONIC luxur y3-zon eauto-
matic climate control*.
It is possible to mak euse of th eresidual heat
of th eengine to continue heating th estation-
ary vehicle for up to 30 minutes after the
engine has been switched off .The heating
tim edepends on th etem peratur ethath as
been set.
Coupé: th e"residual heat "function only
work soptimally when th eside windows and
panorama slidin gsunroof* are closed.
i The blower will run at alow speed regard-
less of th eairflow setting.
i If you activat ethe "residual heat "function
at high temperatures, only th eventilation
will be activated. The blower run sat
medium speed.
i It is possible that th e"residual heat "func-
tio nm ay be activated automatically an hour
after th ekeyis removed. The vehicle is then
ventilate dfor 30 minutes to dry th eair con-
ditioning system. Air conditioning
157Controls
*optional
207_AKB
;2;3,en-GB
mkalafa, Version:2.11.8.1
2009-07-23T10:23:49+02:00
-Seite 157 Z
Page 188 of 313
only reach their full performanc
eafter this
distance.
R Fit new tyres on the front wheels first if
tyres of the same size are required on the
front and rear wheels.
R Replace the tyres after six years at the lat-
est, regardless of wear. This also applies to
the spare wheel*.
R Do not drive with tyres which have too little
tread depth, as this significantly reduces
the traction on wet roads (aquaplaning).
! Storet yres that are not being used in a
cool, dry and preferably dark place. Protect
the tyres against oil, grease, petrol and die-
sel.
Notes on regularly inspecting wheels
and tyres R
Regularly check the wheels and tyres of
your vehicle for damage (e.g. cuts, punctu-
res, tears, bulges on tyres and deformation,
cracksors evere corrosion on wheels), at
least every 14 days, as well as after driving
off-road or on rough roads. Damaged
wheels can cause aloss of tyre pressure.
R Regularly check the tyre tread depth and
the condition of the tread across the whole
width of the tyre (Y page 186). If neces-
sary, turn the front wheels to full lock in
order to inspect the inner side of the tyre
surface.
R All wheels must have avalve cap to protect
the valve against dirt and moisture. Do not
fit anything ontot he valve (such as tyre
pressure monitoring systems) other than
the standard valve cap or other valve caps
approved by Mercedes-Benz for your vehi-
cle.
R Regularly check the pressure of all the tyres
including the spare tyre* ,particularly prior
to long trips, and correc tthe pressure as
necessary (Y page 186). Notes on driving R
While driving, pay attention to vibrations,
noises and unusual handling characteris-
tics, e.g. pulling to one side. This may indi-
cate that the wheels or tyres are damaged.
If you suspect that atyre is defective,
reduce your speed and stop the vehicle as
soon as possible to check the wheels and
tyres for damage. Hidden tyre damage
could also be causing the unusual handling
characteristics. If you find no signs of dam-
age, have the wheels and tyres examined
at as pecialist workshop, for example at a
Mercedes-Benz Servic eCentre.
R When parking your vehicle, make sure that
the tyres do not get deformed by the kerb
or other obstacles. If it is necessary to drive
over kerbs, speed humps or similar eleva-
tions, try to do so slowly and at an obtuse
angle. Otherwise, the tyres, particularly the
sidewalls, can get damaged. Direction of rotation
Tyres with aspecified direction of rotation
have additional benefits, e.g. if there is arisk
of aquaplaning. You will only gain these ben-
efits if the correc tdirection of rotation is
observed.
An arrow on the sidewal lofthe tyre indicates
its correc tdirection of rotation. MOExtended run-flat system*
The MOExtended run-flat system allows you
to continue driving the vehicle even when one
or more tyres lose all air pressure.
The MOExtended run-flat system may only be
used in combination with the activated tyre
pressure loss warning system and only on
wheels specifically tested and approved by
Mercedes-Benz. Tyres and wheels
185Operation
*optional
207_AKB; 2; 3, en-GB
mkalafa,
Version: 2.11.8.1 2009-07-23T10:23:49+02:00-Seite 185 Z
Page 194 of 313
Brakes
G
Ris
kofa ccident
Do not change down for additional engine
braking on aslipper yroads urface. Thi scould
cause the drive wheels to lose thei rgripa nd
the vehicl ecould skid. G
Ris
kofa ccident
Make sure tha tothe rroa du sers are not
endangere dbyyourb raking.
Downhil lgradients On long and stee
pdownhil lstretches ,espe-
ciall yift he vehicl eisladen or towing atrailer,
yo um usts hift to alower gearing oodtime or,
on vehicles with automatic transmission*,
select shift range 1,2or 3.
i Thisalsoa pplies if youhavea ctivated
cruis econtrol, SPEEDTRONIC or DIS-
TRONIC PLUS*.
Thi sw illu se the braking effect of the engine,
so less braking will be required to maintain
the speed .Thisr elieves the load on the brake
system and prevents the brakes from over-
heating and wearing too quickly. If yo uneed
additional braking ,depress the brake pedal
repeatedly rather tha ncontinuously.
Heavy and light loads If the brakes have been subjected to
aheavy
load ,don ot stop the vehicl eimmediately, but
drive on for ashort while. Thi sallow sthe air-
flo wtoc oolthe brakes more quickly. G
Ris
kofa ccident
Never depress the brake peda lcontinuously
whil ethe vehicl eisinmotion, e.g .neve rcause
the brakes to ru bbyapplyingconstant slight
peda lpressure. Thi scauses the brake system
to overheat, increases the braking distance
and can lead to the brakes failing completely.
If the brakes have been used onl ymoderately,
yo us houl doccasionall ytest thei reffective-
ness .Todot his, brake more firmly from a highe
rspeed .Thisi mprove sthe gri pofthe
brakes.
Wet roads If driving in heavy rain for
aprolonged period
of time withou tbraking ,ther em aybe a
delaye dreactio nfrom the brakes when brak-
ing for the first time .Thism ayalso occu rafter
the vehicl ehasbeen washed.
Yo uh avetod epress the brake peda lmore
firmly .Maintain agreate rdistance from the
vehicl einfront.
After driving on awetroa dorh aving the vehi-
cle washed, brake firmly whil epayin gatten-
tio ntot he traffic conditions. Thi swaythe
brake discs will become warm, drying more
quickly, which will protect them against cor-
rosion.
Limite dbraking performanc eonsalt
treate droads G
Ris
kofa ccident
The laye rofsaltont he brake discs and the
brake pads/lining smaycause adelay in the
braking effect, resulting in asignificantly lon-
ger braking distance, which could lead to an
accident.
To avoid thi sdanger ,you should:
R occasionall ybrake carefully, withou tput-
ting othe rroa du sers at risk, when yo uare
driving on salte droads. Thi shelps to
remove any salt tha tmayhave started to
buil dupont he brake discs and the brake
pads/linings.
R maintain agreate rdistance to the vehicle
ahea dand drive with particula rcare.
R carefull yapply the brakes at the end of a
trip and immediatel yaftercommencing a
new trip ,sothats altr esidue sare removed
from the brake discs. Driving tips
191Operation
*optional
207_AKB; 2; 3, en-GB
mkalafa,
Version: 2.11.8.1 2009-07-23T10:23:49+02:00-Seite 191 Z