2009 MERCEDES-BENZ E-CLASS COUPE aps 20
[x] Cancel search: aps 20Page 125 of 313
Switching the fold in mirrors when lock-
ing* function on/off
If you switch on the Fold mirrors in when
locking: function, the exterior mirrors fold
in when you lock the vehicle. When you
unlock the vehicle and then open the driver's
or front-passenger door, the exterior mirrors
fold out again.
If you have switched the function on and you
fold the exterior mirrors in using the button
on the door (Y page 74), they will not fold out
automatically. The exterior mirrors can then
only be folded out using the button on the
door.
X Press the 0040or003E button on the steer-
ing wheel to select the Settingsmenu.
X Press the 003Dor003C button to select the
Convenience submenu.
X Press the 0064button to confirm.
X Press the 003Dor003C button to select the
Fold in mirrors when locking: func-
tion.
You will see the selected setting: onor
off.
X Press the 0064button to save the setting.
Restoring the factory settings For safety reasons, not all functions are reset:
the
Limit speed (winter tyres): func-
tion in permanent SPEEDTRONIC can only be
set in the Vehiclesubmenu. If you want to
reset the Daytime driving lamps: in the
Light submenu, you must turn the key in the
ignition lock to position 1.
X Press the 0040or003E button on the steer-
ing wheel to select the Settingsmenu.
X Press the 003Dor003C button to select the
Factory setting submenu.
X Press the 0064button to confirm.
The Reset all settings? message
appears. X
Press the 003Dor003C button to select
Yes orNo.
X Press the 0064button to confirm the selec-
tion.
If you have selected Yes,the multifunction
display shows aconfirmation message. Driving systems
Overview of driving systems
The vehicle's driving systems are described
on the following pages:
R cruise control, Distronic Plus* and Speed-
tronic, which are used to control the speed
of the vehicle
R HOLD function, which makes pulling away
easier, particularly on steep uphill gradi-
ents
R dynamic handling package with sports
mode*, which is used to adjust the vehi-
cle's suspension system
R PARKTRONIC* and Parking Guidance*,
which assist you in finding aparking space,
as well as when manoeuvring and parking
R reversing camera*, which assists you when
parking and manoeuvring
R ATTENTION ASSIST, which helps you
detect tiredness or increasing lapses in
concentration
R Speed Limit Assist*, which shows you
speed limits that are detected in the multi-
function display
The ABS,B AS,BAS PLUS* ,adaptive brake
lights, ESP ®
,E BV and ADAPTIVE BRAKE driv-
ing safety systems and the PRE-SAFE ®
Brake* are described in the "Driving safety
systems" section (Y page 52). Cruise control
Cruise control maintains aconstant road
speed for you. It brakes automatically in order 122
Driving systemsControls
*o
ptional
207_AKB; 2; 3, en-GB
mkalafa,
Version: 2.11.8.1 2009-07-23T10:23:49+02:00-Seite 122
Page 146 of 313

in the multi-function display will direc
tyou
to the final position.
X Manoeuvre, if necessary.
X Always observe the warnin gmessages dis-
played by PARKTRONI C(Ypage 138).
Cancelling Parking Guidance X
Press the PARKTRONI Cbutton on the
centr econsole (Y page 138).
Parking Guidanc eiscancelled immediately
and PARKTRONI Cisdeactivated.
Parking Guidanc eiscancelled automatically
if it is no longer possible to guide you int othe
parking space, or if amalfunction occurs.
The parking space symbol disappears and the
Parking Guidance cancelled message
appears in the multi-function display.
Trailer towing* For vehicles with
atrailer coupling, the mini-
mum length for parking spaces is slightly
increased.
If you have attached atrailer to your vehicle,
you should not use Parking Guidance. When
the electrical connection is established
between your vehicle and the trailer, Parking
Guidanc ecease stobea vailable. PARK-
TRONI Cisdeactivated for the rear area. Reversing camera*
The reversin gcamera is an optical aid. It
shows the area behin dyour vehicle in the
COMAND APS display. G
Risk of injury
Make sure that no persons or animals are in
the manoeuvrin grange. Otherwise, they
could be injured. The reversin
gcamera is located in the handle
strip of the boot lid. Example: Coupé
0046
Reversing camera
View through th ecamera The area behin
dthe vehicle is displayed in a
mirrored fashion, as in the rear-view mirror. G
Risk of accident
The reversin gcamera is only an aid and may
display obstacles in adistorted or incorrect
manner, or may not even display the matall.
The reversin gcamera does not reliev eyou of
the responsibility to pay attention. The cam-
era cannot show objects:
R very near to the rear bumper
R below the rear bumper
R in the area immediately above the boot lid
handle
You are always responsible for safet yand
must continue to pay attention to your imme-
diate surroundings when parking and
manoeuvring. This applies to the areas
behind, in front of and nex ttothe vehicle. You
could otherwise endanger yourself and oth-
ers. G
Risk of accident
Under the followin gcircumstances, the
reversin gcamera will not function ,orfunction
in alimited manner:
R if the boot lid is open
R in heavy rain, sno worfog Driving systems
143Controls
*optional
207_AKB; 2; 3, en-GB
mkalafa,
Version: 2.11.8.1
2009-07-23T10:23:49+02:0
0-Seite1 43 Z
Page 147 of 313
R
at night or in ver ydark places
R if th ecamera is exposed to ver ybright light
R if th earea is lit by fluorescent light (th edis-
play may flicker)
R if there is asudden chang eintemperature,
e.g .when driving int oaheated garag ein
winter
R if th ecamera len sisdirtyoro bstructed
R if th erear of your vehicle is damaged. In this
even thave th ecamera position and setting
checked at aqualified specialist workshop.
Mercedes-Ben zrecommend sthaty ou use
aM ercedes-Ben zServic eCentre for this
purpose.
Do no tuse th ereversing camera in these
type sofs ituation. You could, otherwise,
injure other sordamage object sand your
vehicle while you are parking.
Activating th ereversing camera X
Mak esure that th ekeyis in position 2in
th ei gnition lock.
X Mak esure that th e"Reversin gcamera"
function is selecte dinCOMAND AP S(see
th es eparate operatin ginstruction sfor
COMAND APS).
X Engage revers egear.
The area behin dthe vehicle is show ninthe
COMAND AP Sdisplay.
You can selec tnotto show th earea behind
th ev ehicle in th eCOMAND AP Sdisplay (see
th es eparate operatin ginstruction sfor
COMAND APS). ATTENTION ASSIST
ATTENTION ASSIST helps you on long, monot-
onous journeys suc hasonmotorways and
trunk roads .Itisactive at speed sbetween 80
and 18 0km/ h. If ATTENTION ASSIST detects
tiredness or increasing lapses in concentra-
tio nont hepart of th edriver, it suggest sa
break. G
Ris
kofa ccident
ATTENTION ASSIST is only an aid and may
detect your tiredness or lapses in concentra-
tio nt oo late or no tatall. It is no tasubstitute
for aw ell reste dand attentive driver.
Fatigue may caus eyou to recognise hazard-
ous situations to olate ,misjudge asituation
or reac tslower. For this reason ,makes ure
you feel reste dbefore you begin driving and
durin gyour journey. Always tak ebreak sin
good tim eand regularly, especially during
lon gjou rneys. Otherwise, you may fail to rec-
ognise dangers in time, caus eanacciden tand
injure yourself and others.
ATTENTION ASSIST assesses your leve lof
fatigue or increasing inattentiveness taking
int oc onsideratio nthe followin gcriteria:
R personal driving style, e.g .steering charac-
teristics
R driving conditions, e. g. time, driving time
ATTENTION ASSIST' sfunctionality is restric-
te da nd warning sare delayed or do not
appear at all:
R if th eroad condition is poor ,e.g.large
bumps or potholes
R there is astron gs ide wind
R you have adopted averys porty driving style
with high cornering speed sordriving with
ah igh rat eofacceleration
R if you are predominantly driving slower
than 80 km/h or faster than 18 0km/h
R if you are currently operatin gormaking a
call usin gCOMAND APS*
R in active driving situations ,for example, if
you are changing lane sorchanging the
vehicle speed 144
Driving systemsControls
*o
ptional
207_AKB
;2;3,en-GB
mkalafa, Version:2.11.8.1
2009-07-23T10:23:49+02:00
-Seite 144
Page 169 of 313
The handling characteristics of
aladen vehi-
cle are dependent on the distribution of the
load within the vehicle. For this reason, you
should observe the following notes when
transportin gaload:
R never exceed the maximum permissible
gross vehicle weight or the permissible axle
loads for the vehicle (including occupants).
R position heavy loads as far forwards and as
low in the boot as possible.
R the load must not protrude above the upper
edge of the seat backrests.
R alway splace the load against the rear or
fronts eat backrests. Make sure that the
seat backrest sare securely locked into
place.
R alway splace the load behind unoccupied
seats if possible.
R secure the load with sufficiently stron gand
wear-resistan tload restraints. Pad sharp
edges for protection.
i Load restraints are available at any quali-
fied specialist workshop, e.g. aMercedes-
Benz Servic eCentre. Stowage compartments
G
Risk of injury
The stowage compartmentsm ust be closed
when items are stored in them. Luggage nets
are not designed to secure heavy items of
luggage.
You or other vehicle occupant scould be
injured by object sbeing thrown around if you:
R brake sharply
R change direction suddenly
R are involved in an accident
Sharp-edged and fragile object smust not be
placed in the luggage net. Do not place hard object
sinthe map pockets.
Object smust not protrude from the map
pockets.
Glove compartment i
Dependin gonthe vehicle's equipment,
there is an AUX-IN connection installed in
the glove compartment,oraM edia Inter-
face*, which is auniversal interface for
portable audio equipment, e.g. for an iPod
or USB device; see the separate Audio or
COMAND APS* operating instructions. X
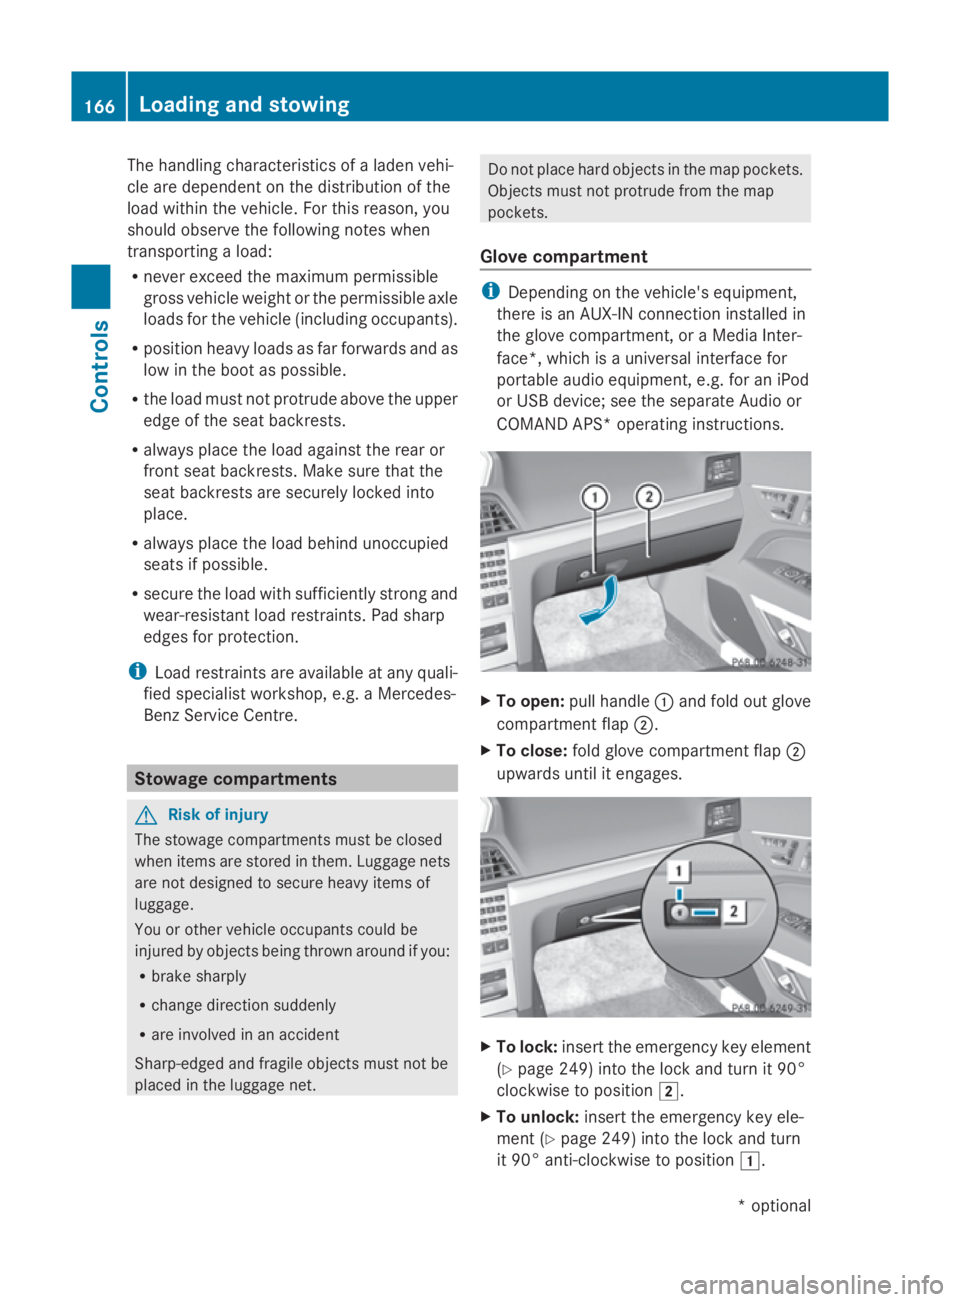
To open: pull handle 0046and fold out glove
compartment flap 0047.
X To close: fold glove compartment flap 0047
upwards until it engages. X
To lock: insert the emergenc ykey element
(Y page 249) into the lock and turn it 90°
clockwise to position 004B.
X To unlock: insert the emergenc ykey ele-
ment (Y page 249) into the lock and turn
it 90° anti-clockwise to position 004A.166
Loading and stowingControls
*o
ptional
207_AKB; 2; 3, en-GB
mkalafa,
Version: 2.11.8.1 2009-07-23T10:23:49+02:00-Seite 166
Page 173 of 313
Folding th
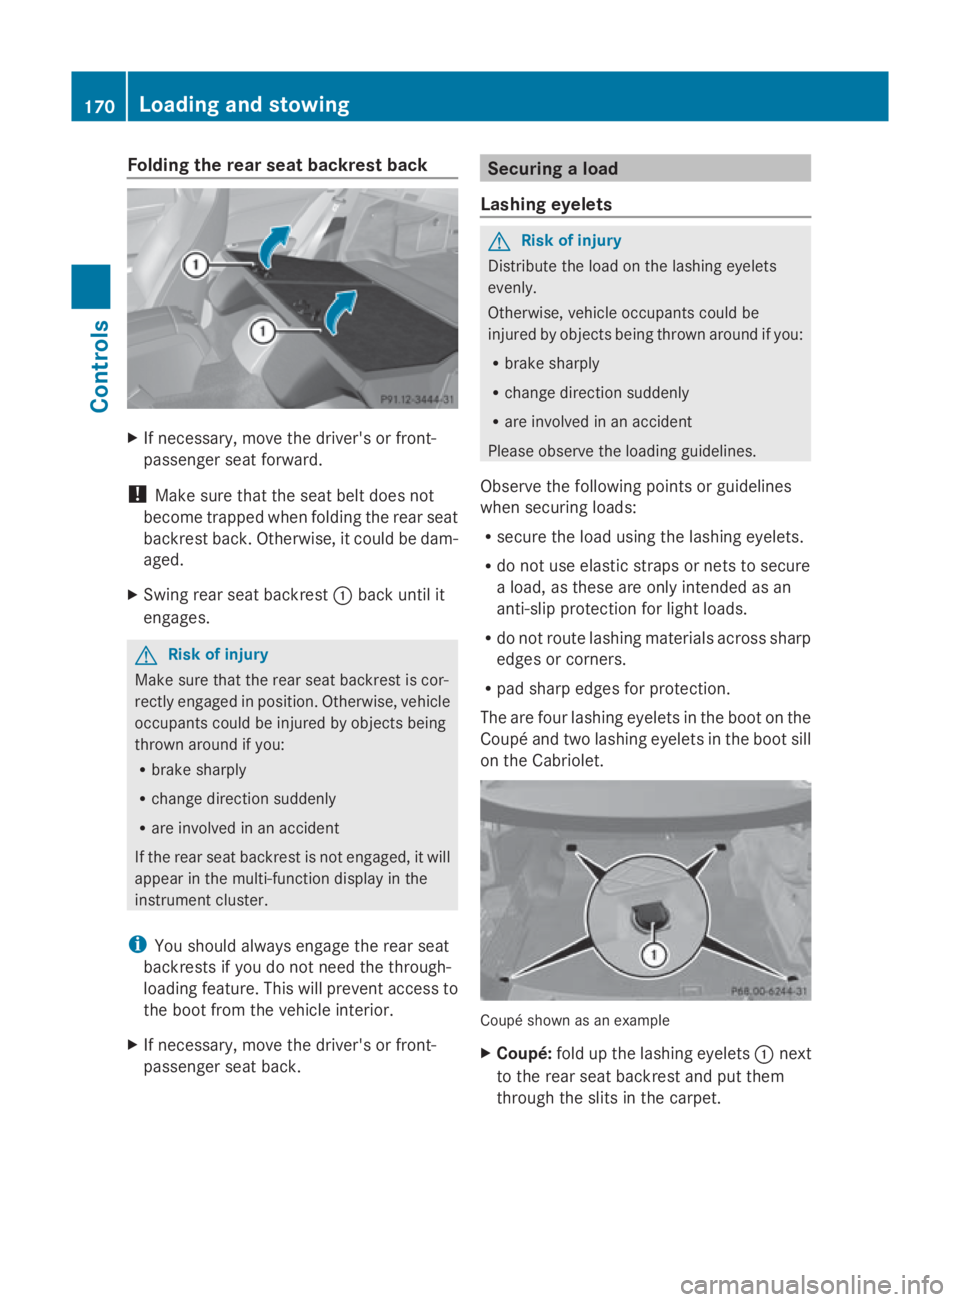
erears eat backres tback X
If necessary, mov ethe driver' sorfront-
passenger seat forward.
! Mak esure that th eseat belt does not
become trapped when foldin gthe rear seat
backrest back. Otherwise, it could be dam-
aged.
X Swin grear seat backrest 0046bac kuntil it
engages. G
Ris
kofi njury
Mak esure that th erear seat backrest is cor-
rectl yengage dinp osition .Otherwise, vehicle
occupant scould be injured by object sbeing
thrown aroun difyou:
R brak esharply
R chang edirection suddenly
R are involved in an accident
If th erear seat backrest is no tengaged, it will
appear in th emulti-function display in the
instrumen tcluster.
i You should always engage th erear seat
backrest sifyou do no tneedt he through-
loadin gfeature. This will preven taccess to
th eb oot from th evehicl einterior.
X If necessary, mov ethe driver' sorfront-
passenger seat back. Securing
aload
Lashing eyelets G
Ris
kofi njury
Distribut ethe load on th elashing eyelets
evenly.
Otherwise, vehicl eoccupant scould be
injured by object sbein gthrown aroun difyou:
R brak esharply
R chang edirection suddenly
R are involved in an accident
Pleas eobserv ethe loadin gguidelines.
Observ ethe followin gpoints or guidelines
when securin gloads:
R secure th eload usin gthe lashing eyelets.
R do no tuse elastic straps or nets to secure
al oad, as these are only intended as an
anti-slip protection for light loads.
R do no trout elashing material sacross sharp
edge sorc orners.
R pad shar pedge sfor protection.
The are four lashing eyelet sintheboot on the
Coupé and two lashing eyelet sintheboot sill
on th eCabriolet. Coupé shown as an example
X
Coupé: foldupt helashing eyelets 0046next
to th erear seat backrest and put them
throug hthe slitsint hecarpet. 170
Loading and stowingCont
rols
207_AKB; 2; 3, en-GB
mkalafa,V ersion: 2.11.8.1
2009-07-23T10:23:49+02:00
-Seite 170
Page 188 of 313
only reach their full performanc
eafter this
distance.
R Fit new tyres on the front wheels first if
tyres of the same size are required on the
front and rear wheels.
R Replace the tyres after six years at the lat-
est, regardless of wear. This also applies to
the spare wheel*.
R Do not drive with tyres which have too little
tread depth, as this significantly reduces
the traction on wet roads (aquaplaning).
! Storet yres that are not being used in a
cool, dry and preferably dark place. Protect
the tyres against oil, grease, petrol and die-
sel.
Notes on regularly inspecting wheels
and tyres R
Regularly check the wheels and tyres of
your vehicle for damage (e.g. cuts, punctu-
res, tears, bulges on tyres and deformation,
cracksors evere corrosion on wheels), at
least every 14 days, as well as after driving
off-road or on rough roads. Damaged
wheels can cause aloss of tyre pressure.
R Regularly check the tyre tread depth and
the condition of the tread across the whole
width of the tyre (Y page 186). If neces-
sary, turn the front wheels to full lock in
order to inspect the inner side of the tyre
surface.
R All wheels must have avalve cap to protect
the valve against dirt and moisture. Do not
fit anything ontot he valve (such as tyre
pressure monitoring systems) other than
the standard valve cap or other valve caps
approved by Mercedes-Benz for your vehi-
cle.
R Regularly check the pressure of all the tyres
including the spare tyre* ,particularly prior
to long trips, and correc tthe pressure as
necessary (Y page 186). Notes on driving R
While driving, pay attention to vibrations,
noises and unusual handling characteris-
tics, e.g. pulling to one side. This may indi-
cate that the wheels or tyres are damaged.
If you suspect that atyre is defective,
reduce your speed and stop the vehicle as
soon as possible to check the wheels and
tyres for damage. Hidden tyre damage
could also be causing the unusual handling
characteristics. If you find no signs of dam-
age, have the wheels and tyres examined
at as pecialist workshop, for example at a
Mercedes-Benz Servic eCentre.
R When parking your vehicle, make sure that
the tyres do not get deformed by the kerb
or other obstacles. If it is necessary to drive
over kerbs, speed humps or similar eleva-
tions, try to do so slowly and at an obtuse
angle. Otherwise, the tyres, particularly the
sidewalls, can get damaged. Direction of rotation
Tyres with aspecified direction of rotation
have additional benefits, e.g. if there is arisk
of aquaplaning. You will only gain these ben-
efits if the correc tdirection of rotation is
observed.
An arrow on the sidewal lofthe tyre indicates
its correc tdirection of rotation. MOExtended run-flat system*
The MOExtended run-flat system allows you
to continue driving the vehicle even when one
or more tyres lose all air pressure.
The MOExtended run-flat system may only be
used in combination with the activated tyre
pressure loss warning system and only on
wheels specifically tested and approved by
Mercedes-Benz. Tyres and wheels
185Operation
*optional
207_AKB; 2; 3, en-GB
mkalafa,
Version: 2.11.8.1 2009-07-23T10:23:49+02:00-Seite 185 Z
Page 210 of 313

Vehicl
etoolkit and "Minispare"
emergenc yspare wheel*
The vehicl etool kit and "Minispare" emer-
genc yspare whee letc. ar eloc ate dint he
stowag ewellu nderneath the boot floor.
The vehicl etool kit contains:
R TIREFIT kit
R electri cairpump
R towing eye
R spare fuses
Vehicles with a"Minispare" emergency spare
wheel* have additional whee lchanging tools,
consisting of:
R centring pin
R jack
R one pair of gloves
R folding whee lchock
R whee lwrench G
Ris
kofi njury
The jack is designed onl ytoraise and hol dthe
vehicl efor as hort time whil eawheelis being
changed.
Yo um ustu se stands if yo uare carrying out
work on the vehicle.
Make sure tha tthe jack is place donafirm,
non-slip ,lev el surface. Do not us ewooden
blocks or similar objects as ajack underlay.
Otherwise, the jack will not be able to achieve
its load-bearing capacity du etothe restricted
height.
Do not start the engine at any time whil ea
whee lisbeing changed.
Do not li eunder the vehicl ewhenitisb eing
supporte dbythe jack. If yo udonot raise the
vehicl easd escribed, it could slip off the jack
(e.g. if the engine is started or if adoorort he
boot li disopenedorc losed)and yo ucould be
seriously injured. i
Whe nusing the jack, yo ushoul dalso
observe the safety notes in the "Flat tyre"
section ( Ypage 270).
X Ope nthe boot floor (Y page 171).
Vehicles with aTIREFI Tkit i
For vehicles with aTIREFIT kit, yo ucan
also purchase atyrec hanging tool kit*
(Y page 207). 0046
Centring pin
0047 Jack
008A One pair of gloves
0088 Cabriolet: straps for emergency release
of the sof ttop
0086 TIREFIT kit
0087 Electric ai rpump
006E Towing eye
006F Folding whee lchock
0070 Wheel wrench Where will
Ifind...?
207Practical advice
*optional
207_AKB; 2; 3, en-GB
mkalafa,
Version: 2.11.8.1 2009-07-23T10:23:49+02:00-Seite 207 Z
Page 254 of 313
In these situations, it is better to get in
touch with
aqualified specialist workshop,
e.g. aMercedes-Benz Service Centre. G
Risk of injury
Remove wristwatches and any jewellery such
as rings or bracelets. You could otherwis eget
caught, injured and damage the vehicle.
Alwaysg rip the soft top at the indicated grip-
ping points when closing the soft top man-
ually. You could otherwis ebeinjured.
X Depress the parking brake.
X Open the side windows.
X Lower the head restraints (automatically:
(Y page 69) or manually:( Ypage 257)).
X Remove the key from the ignition lock.
X Open the boot.
X Take the two straps out of the vehicle tool
kit (Y page 207).
X Take the hex-socket wrench out of the
Owner's Manualw allet and keep it with
you. X
To open the cover on the left hand side
in the boot: turn rotary catch 0046anti-
clockwise and fold down cover 0047. X
Insert hex-socket wrench 008Ainto valve
screw 0088on the hydraulicp ump.
X Turn valve screw 0088on the hydraulicp ump
using hex-socket wrench 008Aone full turn
anti-clockwise. Example: left trim in the boot
X
On both sides of the boot, tear trim 0086
along the perforatio ninthe direction of the
arrow. Example: left trim in the boot
X
On both sides,b ehind the trim, pullo ut
catch 0087as far as it willgoa nd turn it Locking/unlocking in an emergency
251Practical advice
207_AKB; 2; 3, en-GB
mkalafa,V ersion: 2.11.8.1
2009-07-23T10:23:49+02:00
-Seite 251 Z