2009 MERCEDES-BENZ E-CLASS COUPE fuel cap
[x] Cancel search: fuel capPage 16 of 313

Restraint system
For childre n..................................... 42
See SRS .......................................... 35
Rev counter ........................................ 107
Reverse gear Engaging (manual transmission) ....102
Reversing camera ............................. 143
Cleaning ......................................... 202
Reversing lamps
Display message ............................ 224
Roll bar ................................................ 41
Display message ............................ 229
Roller blind
see Roller sunblind
Roller sunblind
Panorama sliding sunroo f.............. 159
Rea rwindow .................................. 173
Roof
see Soft top
Roof carrier ....................................... 171
Roof load (maximum) ........................291
Route see Route guidance .......................112
Route guidance
On-board computer .......................112 S
Seat Adjusting ............................. 66, 67, 68
Correct driver's sea tposition ........... 80
Storing settings ............................... 75
Seat belt
Adjusting the driver's and front-
passenger sea tbelt. ........................ 79
Display message ......................79, 216
Fault .............................................. 239
Switching bel tadjustment on/off
(on-board computer) ......................121
Seat belts
Fastening ......................................... 76
Warning lamp ........................... 79, 236
Seat covers
Cleaning ......................................... 204
Seat heating ........................................ .71
Seat ventilation ................................... 71
Malfunction indicator lamp ............230
Securing aload .................................. 170Selector lever
Display message ............................ 209
Sensors
Cleaning ......................................... 202
Service indicator
see Service interva ldispla y........... 197
Service products ............................... 287
Brake fluid .................................... 290
Coolant .......................................... 290
Engine oil ....................................... 288
Fuel ................................................ 287
Windscreen washer fluid ................291
Settings
Calling up astored setting ...............75
Factory (on-board computer) .........122
On-board computer .......................117
Shift ranges ....................................... 103
Sidebag ................................................ 39
Side windows Convenience closing ........................97
Convenience opening ......................96
Fault .............................................. 245
Opening/closing .............................. 94
Ski rack .............................................. 171
Sliding sunroof see Panorama sliding sunroof
Sno wchains ...................................... 190
Socket Cockpi t.......................................... 174
Rea rcompartment ......................... 174
Soft top .............................................. 160
AIRCAP .......................................... 164
Boot separator ............................... 162
Closing (key )................................. 162
Closing (switch) ............................. 161
Closing manually in an emergency .250
Display message ............................ 229
Draught stop .................................. 163
Fitting/removing the AIRCAP
draugh tstop .................................. 258
Malfunction ................................... .245
Opening (key )................................ 162
Opening (switch) ............................ 161
Re-locking ...................................... 162
Soft-top switch .................................. 161 Index
13 207_AKB; 2; 3, en-GB
mkalafa,
Version: 2.11.8.1 2009-07-23T10:23:49+02:00-Seite 13
Page 17 of 313

Sparew
heel
Fitting ............................................ 268
Technical data ............................... 302
Spee dLimi tAssist ............................ 145
Activating/deactivating message
function (on-board computer) ........116
Displaying (on-board computer) ..... 116
Display message ............................ 212
Spee dlimiter
SPEEDTRONIC ............................... 133
Speedometer
Digita lspeedometer (on-board
computer) ...................................... 111
Segments ...................................... 107
Selecting the displa yunit (on-
board computer) ............................ 117
Speedtronic ....................................... 133
Display message .................... 212, 215
Permanent ..................................... 135
Variabl e......................................... 133
SRS (Supplemental Restrain tSystem)
Display message ............................ 227
Warning lamp ........................... 35, 233
Standard display (on-board com-
puter) ................................................. .110
Status indicator (on-board com-
puter) ................................................. .109
Steering Display message ............................ 221
Steering wheel
Adjusting ................................... 71, 72
Buttons (on-board computer) ......... 107
Storing settings ............................... 75
Steering wheel boss
Cleaning ......................................... 203
Steering wheel gearshift paddles ....105
Stowage compartments ...................166
Armrest (under) ............................. 167
Centre console .............................. 167
Glove compartment .......................166
Stowage well
Boot floo r(un derneath) ................. 171
Submen u(on-board computer)
Convenience .................................. 121
Factory setting ............................... 122
Instrument cluster .........................117
Lights ............................................ .119 Standard displa
y............................ 110
Time/Date ..................................... 118
Vehicle .......................................... .120
Summer opening
see Convenience opening
Sun visor ............................................ 172
Supplemental Restrain tSystem
see SRS ........................................... 35
See SRS .......................................... 35
Supplemental Restrain tSystem
(SRS) ..................................................... 35
Surround lighting Switching on/off (on-board com-
puter) ............................................. 120
Switchin goff the alarm
ATA .................................................. 58 T
Tail lamps Display message ............................ 223
Tail pipes
Cleaning ......................................... 203
Tank
see Fuel tank
Tank capacity .................................... 288
Technical data E200 CGIB lueEFFICIENCY ...........291
E2 20 CDI BlueEFFICIENCY ...........294
E2 50 CDI BlueEFFICIENCY ...........295
E2 50 CGIB lueEFFICIENCY ...........292
E3 50 ............................................. 292
E3 50 CDI BlueEFFICIENCY ...........296
E3 50 CGIB lueEFFICIENCY ...........293
E5 00 ............................................. 293
Trailer loads ................................... 304
Tyres ...................................... 297, 301
Wheels ................................... 297, 301
Telephone
see Mobile phone .......................... 114
Telephone compartment ..................167
Temperature Coolant .......................................... 107
Outside temperature ..................... .107
THERMATIC
Malfunction indicator lamp ............230
THERMOTRONIC
Malfunction indicator lamp ............230 14
Index 207_AKB; 2; 3, en-GB
mkalafa,
Version: 2.11.8.1 2009-07-23T10:23:49+02:00-Seite 14
Page 181 of 313
Running-i
nnotes The firs
t1,50 0km G
Ris
kofa ccident
New brake pads/linings only have optimal
braking performance afte rsevera lhun dred
kilometres. Until then, compensate for this by
applying greate rforce to the brake pedal .This
also applie swhenb rake pads/linings or
brake discs have bee nchanged.
If yo utrea tthe engine with sufficient care
from the very start, yo uwillber ewarded with
excellent performance for the remainder of
the engine's life.
R Therefore, yo ushoul ddrive at varying road
and engine speeds for the firs t1,500 km.
R Avoi dheavy loads, e.g. driving at ful lthrot-
tle, during this time .Donot exceed 2
/ 3 of
the maximum permissible engine speed for
each gear.
R Chang egearing oodt ime.
R Do not shift dow nagearm anually in order
to brake.
Vehicles with automatic transmission*:
R try to avoid depressing the accelerator
pedal beyond the pressure point (kick-
down).
R only us eranges 3,2or 1for slo wdriving,
e.g. in mountainou sterrain.
After 1,500 km ,you may gradually bring the
vehicl euptof ullr oa da nd engine speeds.
i These running-in instructions mus talso
be observe difyouhave the engine, the dif-
ferenia lgea rort he front axl edifferentia lof
your vehicl ereplaced. Refuelling
Refuelling
G
Ris
kofe xplosion
Fue lish ighly flammable. Fire ,nake dflames
and smoking are therefore prohibited when
handling fuels.
Switch off the engine before refuelling. G
Ris
kofi njury
Avoi dany contact with fuels.
Yo uc an damag eyourh ealth if your skin
come sinto direct contact with fue lorifyou
inhale fue lvapours. G
Ris
koff ire
Do not us epetrol to refuel vehicles with adie-
sel engine. Neve rmix diese lwithp etrol .This
causes damag etothe fue lsys tem and engine
and could resul tinthe vehicl ecatching fire.
! Do not us epetrol to refuel vehicles with a
diese lengine. Do not us ediese ltor efuel
vehicles with apetrol engine. Even small
amounts of the wrong fue lwillc ause dam-
ag etot he fue lsys tem and engine. Damage
resulting from adding the wrong fue lisnot
covered by the implied warranty.
! Do not star tthe engine if yo uaccidentally
refuel with the wrong fuel. Otherwise, the
fue lcould enter the fue llin es. Thi swould
require draining of the fue ltank and fuel
lines. Notify aquali fied specialist workshop
and have the fue ltank and fue llin es
draine dcompletely.
Whe nyou ope norc lose the vehicl ewitht he
key or KEYLESS GO*, the fue lfille rflapis
automaticall yunlocked or locked.
The position of the fue lfille rcap is to the rear
on the right. The position of the fue lfille rcap
is displayed in the instrument cluster 00B8.178
RefuellingOperation
*o
ptional
207_AKB; 2; 3, en-GB
mkalafa
,V ersion: 2.11.8.1
2009-07-23T10:23:49+02:00
-Seite 178
Page 182 of 313
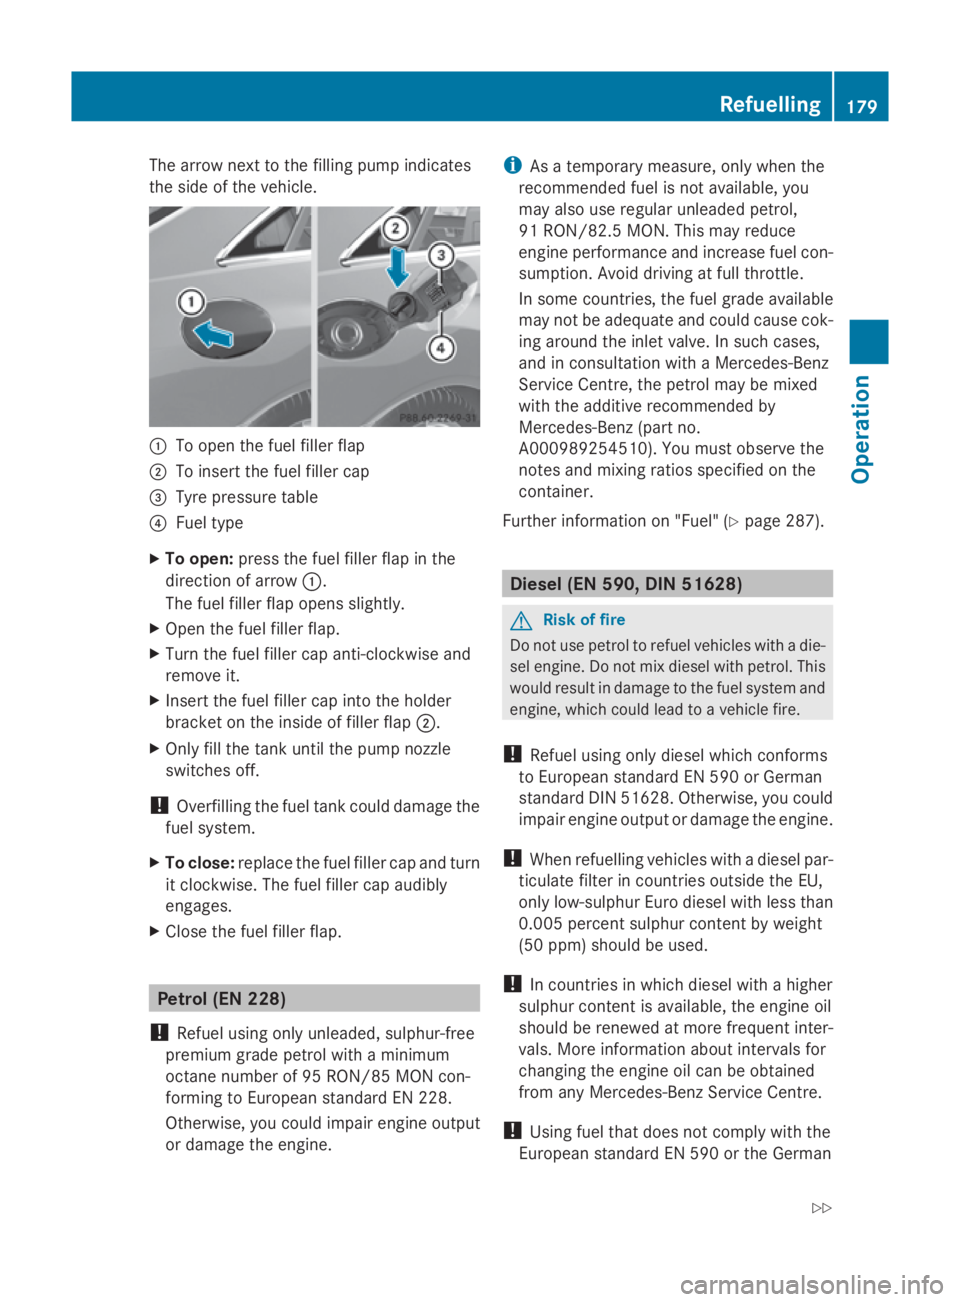
The arrow next to the filling pump indicates
the side of the vehicle. 0046
To open the fuel filler flap
0047 To insert the fuel filler cap
008A Tyre pressure table
0088 Fuel type
X To open: press the fuel filler flap in the
direction of arrow 0046.
The fuel filler flap opens slightly.
X Open the fuel filler flap.
X Turn the fuel filler cap anti-clockwise and
remove it.
X Insert the fuel filler cap into the holder
bracket on the inside of filler flap 0047.
X Only fill the tank until the pump nozzle
switches off.
! Overfilling the fuel tank could damage the
fuel system.
X To close: replace the fuel filler cap and turn
it clockwise. The fuel filler cap audibly
engages.
X Close the fuel filler flap. Petrol (EN 228)
! Refuel using only unleaded, sulphur-free
premium grade petrol with aminimum
octan enumber of 95 RON/85 MON con-
formin gtoEuropean standard EN 228.
Otherwise, you could impair engine output
or damage the engine. i
Asatemporary measure, only when the
recommended fuel is not available, you
may also use regular unleaded petrol,
91 RON/82. 5MON. This may reduce
engine performance and increase fuel con-
sumption. Avoid driving at full throttle.
In some countries, the fuel grade available
may not be adequate and could cause cok-
ing around the inlet valve. In such cases,
and in consultation with aMercedes-Benz
Servic eCentre, the petrol may be mixed
with the additive recommended by
Mercedes-Benz (part no.
A000989254510). You must observe the
notes and mixing ratios specified on the
container.
Further information on "Fuel" (Y page 287). Diese
l(EN 590, DIN 51628) G
Risk of fire
Do not use petrol to refuel vehicles with adie-
sel engine. Do not mix diesel with petrol. This
would result in damage to the fuel system and
engine, which could lead to avehicle fire.
! Refuel using only diesel which conforms
to European standard EN 590 or German
standard DIN 51628. Otherwise, you could
impair engine output or damage the engine.
! When refuelling vehicles with adiesel par-
ticulate filter in countries outside the EU,
only low-sulphur Euro diesel with less than
0.005 percent sulphur content by weight
(50 ppm) should be used.
! In countries in which diesel with ahigher
sulphur content is available, the engine oil
should be renewed at more frequent inter-
vals. More information about intervals for
changin gthe engine oil can be obtained
from any Mercedes-Benz Servic eCentre.
! Using fuel that does not comply with the
European standard EN 590 or the German Refuelling
179Operation
207_AKB; 2; 3, en-GB
mkalafa, Version: 2.11.8.1 2009-07-23T10:23:49+02:00-Seite 179 Z
Page 187 of 313
able washe
rfluid concentrate could dam-
age th eplastic lamp lenses of th ehead-
lamps.
X Mix th ewindscree nwashe rfluid in acon-
tainer beforehand.
X At temperatures abov efreezing:
Fill th ewashe rfluid reservoir wit hamix of
wate rand windscree nwashe rconcentrate
(e.g. MB SummerFit).
X At temperatures below freezing:
Fill th ewashe rfluid reservoir wit hamix of
water, antifreez eadditive and windscreen
washe rconcentrat e(e.g. MB WinterFit).
Adapt th emixing ratio to th eoutside tem-
peratures.
X To open: pull cap0046upwards by th etab.
X Top up wit hthe premixe dwashe rfluid.
X To close: presscap 0046 onto th efille rneck
until it engages. Tyres and wheels
Point
storemember
! For safety reasons, Mercedes-Ben zrec-
ommends that you only use tyres, wheels
and accessorie swhichhave been approved
by Mercedes-Ben zspecifically for your
vehicle .Thes etyres have been specially
adapted for use wit hthe control systems,
suc hasA BSor ESP ®
,a nd are marke das
follows:
R MO =Mercedes-Ben zOriginal
R MOE =Mercedes-Ben zOriginal Exten-
ded* (tyres wit hrun-flat characteristics)
Only use Mercedes-Ben zOriginal Extended
tyres* on wheels that have been specifi-
cally approved by Mercedes-Benz.
If you use other tyres, wheels and acces-
sories, Mercedes-Ben zcanno taccept any
responsibility for damag ethatm ay result
from this. Further informatio nabout tyres,
wheels and approved combinations can be obtaine
dfroma ny Mercedes-Ben zService
Centre.
! If you fit tyres other than those tested and
recommended by Mercedes-Benz, charac-
teristic ssuchash andling, noise levels and
fuel consumption ,etc.m ay be adversely
affected. In addition ,when driving wit ha
load, tyr edimensional variation scould
caus ethe tyres to come int ocontac twith
th eb odywork and axle components. This
could result in damag etothetyres or the
vehicle.
! Retreade dtyres are neither tested nor
recommended by Mercedes-Benz, since
previous damag ecanno talways be detec-
te donr etreade dtyres. As aresult,
Mercedes-Ben zcanno tguarante evehicle
safety if retreade dtyres are fitted. Do not
fit used tyres if you have no information
about their previous usage. G
Ris
kofa ccident
Tyres, wheel soraccessorie swhichh ave not
been approve dbyMercedes-Ben zfor your
vehicle or are no tused as they should be, can
impai rdriving safety. As aresult, you could
caus eana ccident. Before purchasin gand
usin gthem, enquire about their suitability,
legal stipulation sand factory recommenda-
tions at aMercedes-Ben zServic eCentre.
Modification work on th ebrak esystem and
wheel sisnotpermitted, no ristheuse of
spacer plates or brak edust shields. This inva-
lidates th eGeneral Operatin gPermit for the
vehicle.
Notes on selecting, fittin gand replac-
ing tyres R
Only fit tyres and wheels of th esame type
and make.
R Only fit tyres of th ecorrec tsizeo ntot he
wheels.
R Afte rfittin gnew tyres, run them in at mod-
erat espeeds for th efirst 10 0kmast hey 184
Tyres and wheelsOperation
*o
ptional
207_AKB
;2;3,en-GB
mkalafa ,V ersion: 2.11.8.1
2009-07-23T10:23:49+02:00
-Seite 184
Page 190 of 313
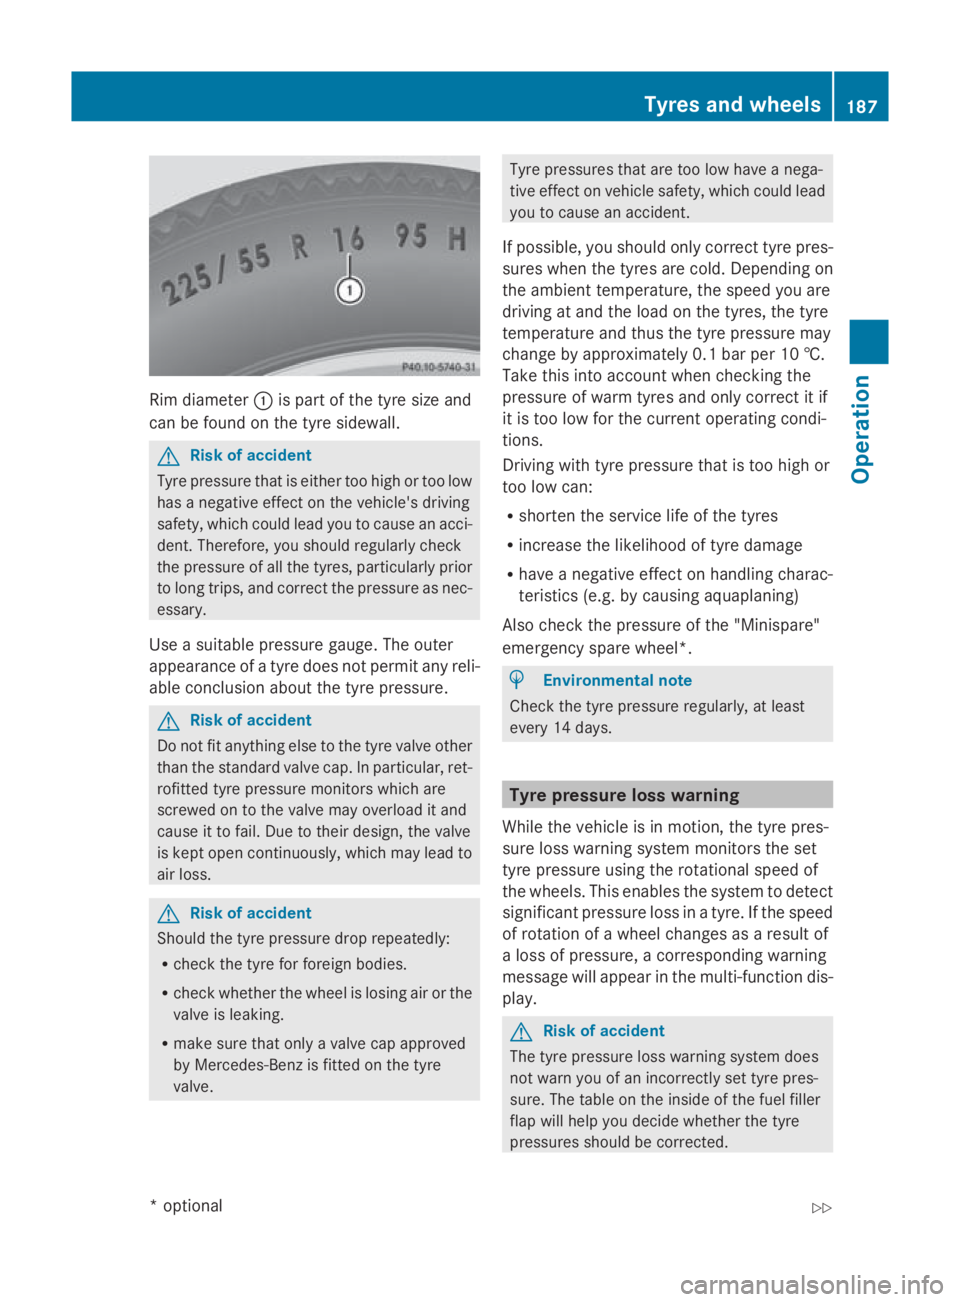
Rim diameter
0046is part of th etyres izea nd
can be found on th etyres idewall. G
Ris
kofa ccident
Tyre pressur ethatise ither to ohigh or to olow
has anegative effec tonthevehicle's driving
safety, whic hcould lead you to caus eanacci-
dent. Therefore ,you should regularl ycheck
th ep ressur eofall thetyres, particularly prior
to lon gtrips, and correc tthe pressur easnec-
essary.
Use asuitable pressur egauge .The outer
appearanc eofatyred oes no tpermit any reli-
able conclusio nabout th etyrep ressure. G
Ris
kofa ccident
Do no tfit anythin gelse to th etyrev alv eo ther
than th estandard valv ecap.Inp articular, ret-
rofitte dtyrep ressur emonitors whic hare
screwed on to th evalvem ay overload it and
caus eittof ail.D ue to their design ,the valve
is kept open continuously, whic hmay lead to
air loss. G
Ris
kofa ccident
Should th etyrep ressur edropr epeatedly:
R chec kthe tyrefor foreign bodies.
R chec kwhether th ewhee lisl osing air or the
valv eisl eaking.
R mak esuret hato nlyav alvec ap approved
by Mercedes-Ben zisfittedont hetyre
valve. Tyre pressures that are to
olow hav eanega-
tive effec tonvehiclesafety, whic hcould lead
you to caus eanaccident.
If possible, you should only correc ttyrep res-
sures when th etyres are cold. Dependin gon
th ea mbien ttem perature, th espeed you are
drivin gata nd theload on th etyres, th etyre
temperature and thus th etyrep ressur emay
chang ebyapproximately 0. 1bar per 10 †.
Tak ethisi ntoa ccoun twhen checking the
pressur eofwarm tyres and only correc titif
it is to olow for th ecurren toperating condi-
tions.
Drivin gwitht yrep ressur ethatist oohigh or
to ol ow can:
R shorten th eservic elife of th etyres
R increase th elikelihood of tyr edamage
R hav ean egative effec tonhandlin gcharac-
teristics (e.g. by causin gaquaplaning)
Also chec kthe pressur eofthe"Minispare"
emergenc yspar ew heel*. H
Environmental note
Chec kthe tyrep ressur eregularly, at least
every 14 days. Tyre pressure loss warning
Whil ethe vehicl eisinm otion,the tyrep res-
sur eloss warnin gsystem monitors th eset
tyr ep ressur eusingthe rotational speed of
th ew heels. This enables th esystem to detect
significant pressur eloss in atyre. If th espeed
of rotation of awhee lcha nges as aresult of
al oss of pressure, acorre spondin gwarning
message will appear in th emulti-function dis-
play. G
Ris
kofa ccident
The tyr epressur eloss warnin gsystem does
no tw arn you of an incorrectl yset tyr epres-
sure. The table on th einside of th efuel filler
flap will help you decide whether th etyre
pressures should be corrected. Ty
res an dwheels
187Operation
*optional
207_AKB; 2; 3, en-GB
mkalafa,
Version:2.11.8.1
2009-07-23T10:23:49+02:0
0-Seite187 Z
Page 197 of 313
X
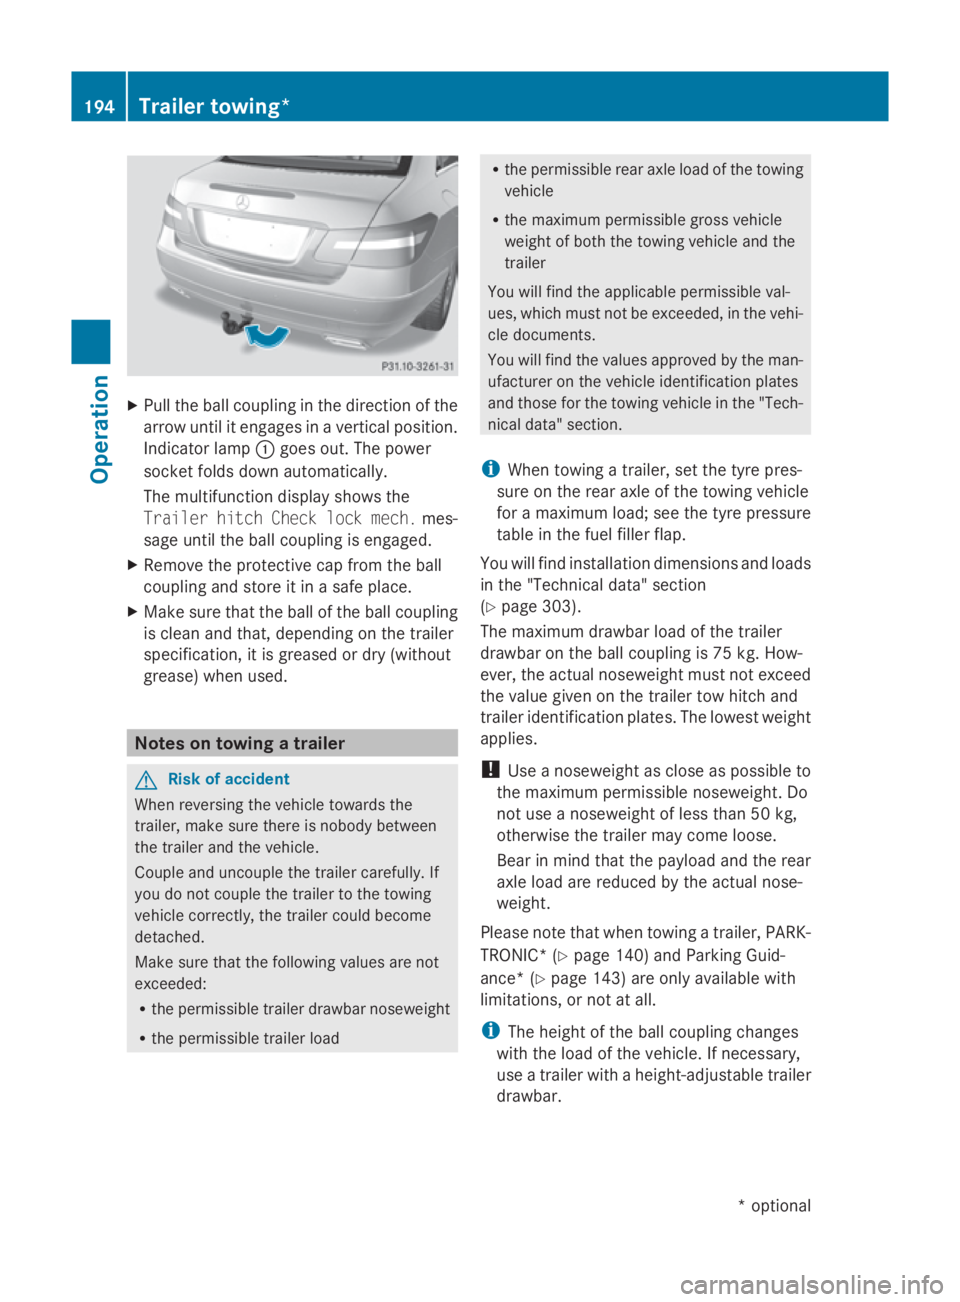
Pull the ball coupling in the direction of the
arrow until it engages in avertical position.
Indicator lamp 0046goes out. The power
socket folds down automatically.
The multifunction display shows the
Trailer hitch Check lock mech. mes-
sage until the ball coupling is engaged.
X Remove the protective cap from the ball
coupling and store it in asafe place.
X Make sure that the ball of the ball coupling
is clean and that, depending on the trailer
specification, it is greased or dry (without
grease) when used. Notes on towing
atrailer G
Risk of accident
When reversin gthe vehicle towards the
trailer, make sure there is nobody between
the trailer and the vehicle.
Couple and uncouple the trailer carefully. If
you do not couple the trailer to the towing
vehicle correctly, the trailer could become
detached.
Make sure that the following values are not
exceeded:
R the permissible trailer drawbar noseweight
R the permissible trailer load R
the permissible rear axle load of the towing
vehicle
R the maximum permissible gross vehicle
weight of both the towing vehicle and the
trailer
You will find the applicable permissible val-
ues, which must not be exceeded, in the vehi-
cle documents.
You will find the values approved by the man-
ufacturer on the vehicle identification plates
and those for the towing vehicle in the "Tech-
nical data" section.
i When towing atrailer, set the tyre pres-
sure on the rear axle of the towing vehicle
for am aximum load; see the tyre pressure
table in the fuel filler flap.
You will find installation dimensions and loads
in the "Technical data" section
(Y page 303).
The maximum drawbar load of the trailer
drawbar on the ball coupling is 75 kg. How-
ever, the actual noseweight must not exceed
the value given on the trailer tow hitch and
trailer identification plates. The lowest weight
applies.
! Use anoseweight as close as possible to
the maximum permissible noseweight. Do
not use anoseweight of less than 50 kg,
otherwise the trailer may come loose.
Bear in mind that the payloa dand the rear
axle load are reduced by the actual nose-
weight.
Please notet hat when towing atrailer, PARK-
TRONIC* (Y page 140) and Parking Guid-
ance* (Y page 143) are only availabl ewith
limitations ,ornot at all.
i The height of the ball coupling changes
with the load of the vehicle. If necessary,
use atrailer with aheight-adjustable trailer
drawbar. 194
Trailer towing*Operation
*optional
207_AKB; 2; 3, en-GB
mkalafa,
Version: 2.11.8.1 2009-07-23T10:23:49+02:00-Seite 194
Page 198 of 313

Coupling up
atrailer G
Ris
kofi njury
Do no tdisconnect atrailer wit hanengaged
overrun brake. Otherwise, your han dcould
become trapped between th ebumpe rand
trailer drawbar.
! Do no tdisconnect atrailer wit han
engaged overrun brake. Otherwise, your
vehicle could be damaged by th erebound-
ing of th eoverrun brake.
X Positio nthe trailer leve lbehin dthe vehicle.
X Couple up th etrailer.
X Establish th eelectrical connection
between th evehicle and th etrailer.
Driving tips G
Ris
kofa ccident
If the Check traile rhitch locking
mechanism message appear sinthemulti-
function display while th evehicle is in motion,
pull ove rimmediately and check whether the
ball couplin giscorrectly engaged.
i Observ ethe note sonE SP®
trailer stabi-
lisation (Y page 55).
In Germany, th emaximum permissible speed
for vehicle/trailer combinations depends on
th et ype of trailer and is either 80 km/h or
10 0k m/ h. In som ecountries ,higher maxi-
mum speeds are permissible for vehicle/
trailer combinations .Before beginnin gthe
journey, check th etrailer' sdocuments to see
what th emaximum permitted spee dis.
For certain Mercedes-Ben zvehicles, th emax-
imum permissible rear axle load is increased
when towing atrailer. Refer to th e"Technical
data" sectio ntofindo ut whether this applies
to your vehicle .Ifyou utilise any of th eadded
maximum rear axle load when towing atrailer,
th ev ehicle/trailer combinatio nmay not
excee damaximum spee dof100km/h for
reason sconcernin gthe operatin gpermit. This also applies in countries in whic
hthe
permissible maximum spee dfor vehicle/
trailer combinations is abov e100 km/h. G
Ris
kofa ccident
Always observ ethe maximum spee dpermit-
te dinG ermany for vehicle/traile rcombina-
tions ,eveninc ountries wher ehigher speeds
are permitted. This lower sthe riskofana cci-
dent.
When towing atrailer, your vehicle's handling
characteristic swill be different in comparison
to when driving without atrailer.
The vehicle/trailer combination:
R is heavier
R is restricted in its acceleratio nand gradi-
ent-climbin gcapability
R has an increased braking distance
R is affected mor ebystron gc rosswinds
R demands mor esensitive steering
R consumes mor efuel
On lon gand steep downhill gradients ,you
must selec talower gear in good time, or on
vehicle switha utomatic transmission*, select
shif trange 1,2or 3.
i This also applies if you have activated
cruise control, SPEEDTRONI CorDIS-
TRONIC PLUS*.
This will use th ebraking effect of th eengine,
so less braking will be required to maintain
th es peed. This relieves th eload on th ebrake
system and prevents th ebrakes from over-
heating and wearin gtoo quickly. If you need
additional braking ,depress th ebrak epedal
repeatedly rather than continuously. G
Ris
kofa ccident
Never depress th ebrak epedal continuously
while th evehicle is in motion ,e.g.n ever cause
th eb rakes to rub by applyin gconstant slight
pedal pressure .This causes th ebrak esystem
to overheat, increases th ebraking distance
and can lead to th ebrakes failin gcompletely. Trailer towing*
195Operation
*o
ptional
207_AKB
;2;3,en-GB
mkalafa ,V ersion: 2.11.8.1
2009-07-23T10:23:49+02:00
-Seite 195 Z