Page 249 of 430

Black plate (249,1)
Displaying the SIRIUS ID (ESN)
When the ESN button is pressed for 1.5
seconds or longer, a 12-digit Electronic
Serial Number (ESN) for the SIRIUS
tuner is displayed.
[SR + (bank number) + (first 8 digits of
SIRIUS ID (ESN) )] are displayed.
The 4 digits following the first 8 digits are
displayed by turning the display feed dial
clockwise.
While the last 4 digits of the 12-digit
SIRIUS ID (ESN) are displayed, turning
the display feed dial displays the first 8
digits of SIRIUS ID (ESN).
(How to clear the message)
lTurn off the ACC.lTurn off the POWER.lPress any one of the following buttons:
FM/AM, CD, MEDIA, SAT, ESN/
DISP, CAT, SCAN, Instant replay, or a
channel preset button.
lInsert or play a CD.
(If the SIRIUS ID (ESN) for the tuner
does not display)
If “ESN + FAIL ”is displayed after
pressing the ESN button for 1.5 seconds
or longer, contact an Authorized Mazda
Dealer.
Initialization of ID code
If the registered ID code is forgotten,
return the ID code to the default [0000] by
performing the following steps:
Setting condition: SAT mode
(Master code input preparation)
1. Hold the auto memory button, then press channel preset button 4, hold
both buttons together for 1.5 seconds. 2.
“ENTER PIN ”appears for 2 seconds
which indicates that it is in code input
mode.
3. “SR1 - - - - ”appears, which indicates
that it is ready for code input.
(Master code input)
4. Input the master code using the channel preset buttons 1-4.
Press the auto memory button inputting
the code.
(The master code is already set at the
time of factory shipment.)
(Master code input determination)
5. Determine the master code which has been input by pressing the auto
memory button briefly.
6. “PIN CLEARED ”appears which
indicates that the master code input has
been completed.
7. The ID code is set to the default [0000] and the initialization process is
completed.
NOTE
Master code:
The Master Code is used to initialize or re-
initialize the ID code in the event that the code
is not set to [0000] and/or the personalized ID
code is not known. The initialization process
resets the ID code to [0000]. The master code
can potentially defeat the intent of the security
of the parental lock if it is located by persons
not authorized by the owner to access certain
channels.
SIRIUS Satellite Radio Master Code: [0913]
(How to clear the message)lPress any of the following FM/AM,
SAT, CD, MEDIA, CAT, ESN/DISP,
Instant replay, POWER buttons.
Interior Comfort
Audio System
6-41
RX-8_8Z09-EA-08C_Edition3 Page249
Thursday, July 3 2008 2:23 PM
Form No.8Z09-EA-08C
Page 250 of 430

Black plate (250,1)
lTurn the ACC off or insert a CD.
NOTE
lWhen a numeric value other than the
master code is input and the auto memory
button is pressed, “SR1 Err ”is displayed
and then it returns to the “SR1---- ”
display again.
lIf an ID code is not input for 10 seconds,
“ Err ”is displayed and it returns to the
former display.
lChannel preset buttons 1, 2, 3, 4 and the
auto memory button are used for inputting
the ID code. Buttons 5 and 6 cannot be
used.
Change of ID code
Setting condition: SAT mode
(Registered ID code input)
1. Hold the auto memory button, then press channel preset button 5, hold
both buttons together for 1.5 seconds.
2. “ENTER PIN ”appears for 2 seconds
which indicates that it is in code input
mode.
3. “SR1 - - - - ”appears, which indicates
that it is ready for code input.
4. Input the registered ID code using channel preset buttons 1-4. Then press
the auto memory button.
Example: When the registered ID code
is“2323 ”, input “2323 ”. At this time
“ SR1 2323 ”is displayed.
Press 1 for the first digit, 2 for the
second, 3 for the third, and 4 for the
last digit. For example, if your number
is 2323, press 1 three times, 2 four
times, 3 three, and 4 four times. If the
display goes off while inputting, begin
from Step 1. NOTE
The registered ID code is the default [0000] at
the time of factory shipment. If [0000] results
in
“Err ”on the display, go to the
“ INITIALIZATION OF ID CODE” section to
reset to [0000].
(Verification with the registered ID
code)
5. Determine the input code by pressing the auto memory button briefly.
6. If it does not match with the previously registered code, “SR1 Err ”is displayed
and then it returns to “SR1 - - - - ”.
7. If it matches with the previously registered code, “ENTER PIN ”appears
again and it switches to code input
mode.
8. “SR1 - - - - ”appears, and it is ready for
input of the new ID code.
(New ID code input)
9. Input the new ID code using channel preset buttons 1-4.
Example: If “1234 ”is input as the new
code, “SR1 1234 ”is displayed.
Press the auto memory button after the
code is input.
(New ID code input determination)
10. Determine the new ID code which has been input by pressing the auto
memory button briefly.
11. “PIN CHANGED” appears for 3
seconds which indicates that the new
ID code input has been completed.
12. It returns to the former display.
6-42
Interior Comfort
Audio System
RX-8_8Z09-EA-08C_Edition3 Page250
Thursday, July 3 2008 2:23 PM
Form No.8Z09-EA-08C
Page 251 of 430

Black plate (251,1)
(How to clear the message)lPress any of the following FM/AM,
SAT, CD, MEDIA, CAT, ESN/DISP,
Instant replay, POWER buttons.
lTurn the ACC off or insert a CD.
NOTE
lIf an ID code is not input for 10 seconds,
“ Err ”is displayed and it returns to the
former display.
lChannel preset buttons 1, 2, 3, 4 and the
auto memory button are used for input of
the ID code. Buttons 5 and 6 cannot be
used.
Individual channel locking
If a channel is locked, the channel is
muted.
NOTE
If the registered ID code is forgotten, return
the ID code to the default [0000]. (See
“ INTIALIZATION OF ID CODE” section)
(Locking a channel)
1. Select a channel to be locked by
pressing the tune button.Example:
Select channel 100
(Registered ID code input preparation)
2. Hold the auto memory button, then press channel preset button 6, hold
both buttons together for 1.5 seconds.
3. “ENTER PIN ”appears for 2 seconds
which indicates that it is in code input
mode.
4. “SR1 - - - - ”appears which indicates
that it is ready for code input. (Registered ID code input)
5. Input the registered ID code using
channel preset buttons 1-4. Example: If
the registered ID code is “2323 ”, input
“ 2323 ”. At this time “SR1 2323 ”is
displayed. Press the auto memory
button after the code is input.
(Registered ID code input
determination)
6. Determine the code which has been input by pressing the auto memory
button briefly.
7. If it does not match the registered code, “SR1 Err ”is displayed and then it
returns to “SR1 - - - - ”.
8. If it matches the registered code, “SR1 LOCK ”appears for 3 seconds
which indicates that the code input has
been completed.
9. “SR1 LOCK 100 ”appears which
indicates that the parental lock is
activated. At this time, mute is on and
no sound is heard.
(How to clear the message)
lPress any of the following FM/AM,
SAT, CD, MEDIA, CAT, ESN/DISP,
Instant replay, POWER buttons.
lTurn the ACC off or insert a CD.
NOTE
lIf an ID code is not input for 10 seconds,
“ Err ”is displayed and it returns to the
former display.
lChannel preset buttons 1, 2, 3, 4 and the
auto memory button are used for input of
the ID code. Buttons 5 and 6 cannot be
used.
Lock cancellation
Setting condition: SAT mode
Interior Comfort
Audio System
6-43
RX-8_8Z09-EA-08C_Edition3 Page251
Thursday, July 3 2008 2:23 PM
Form No.8Z09-EA-08C
Page 252 of 430

Black plate (252,1)
(Releasing a locked channel)
1. Select a channel to be released bypressing the tune button. Example:
Select the locked channel (i.e. 100). At
this time, “SR1 LOCK 100 ”is
displayed.
(Registered ID code input preparation)
2. Hold the auto memory button, then press channel preset button 6, hold
both buttons together for 1.5 seconds.
3. “ENTER PIN ”appears for 2 seconds
which indicates that it is in code input
mode.
4. “SR1 - - - - ”appears, which indicates
that it is ready for code input.
(Registered ID code input)
5. Input the registered ID code using channel preset buttons 1-4. Example:
When the registered ID code is “2323 ”,
input “2323 ”. At this time “SR1 2323 ”
is displayed. Press the auto memory
button after the code is input.
NOTE
If “Err ”is displayed, go to the
“ INITIALIZATION OF ID CODE” section to
reset the ID code to [0000].
(Registered ID code input
determination)
6. Determine the input code by pressing the auto memory button briefly.
7. If it does not match the registered code, “SR1 Err ”is displayed and then it
returns to “SR1 - - - - ”.
8. If it matches the registered code, “SR1 UNLOCK ”appears for 3
seconds which indicates that the code
input has been completed. 9.
“SR1 100 ”appears which indicates that
the parental lock is off. At this time,
sound is heard.
(How to clear the message)
lPress any of the following FM/AM,
SAT, CD, MEDIA, CAT, ESN/DISP,
Instant replay, POWER buttons.
lTurn the ACC off or insert a CD.
NOTE
lIf an ID code is not input for 10 seconds,
“ Err ”is displayed and it returns to the
former display.
lChannel preset buttons 1, 2, 3, 4 and the
auto memory button are used for input of
the ID code. Buttons 5 and 6 cannot be
used.
Error signs
(1) Depending on the surrounding conditions (such as large trees,
buildings, or tunnels) and special
weather conditions, the reception of
SIRIUS radio waves may be
decreased or temporarily interrupted.
“ACQUIRING SIGNAL” may
appear.
(2) In case of an antenna malfunction, “ANTENNA FAIL” is displayed.
Check the satellite radio antenna,
antenna cable and DLP antenna
connector.
NOTE
If a broken DLP* unit is replaced with a new
unit, cancel the license for the broken unit and
make sure to carry out new registration for the
replaced unit. If the license for the broken unit
is not canceled, you will be charged a
reception fee for both units.
* DLP: Down Link Processor (SATELLITE RADIO Module)
6-44
Interior Comfort
Audio System
RX-8_8Z09-EA-08C_Edition3 Page252
Thursday, July 3 2008 2:23 PM
Form No.8Z09-EA-08C
Page 253 of 430
Black plate (253,1)
MEMO
6-45
RX-8_8Z09-EA-08C_Edition3 Page253
Thursday, July 3 2008 2:23 PM
Form No.8Z09-EA-08C
Page 254 of 430

Black plate (254,1)
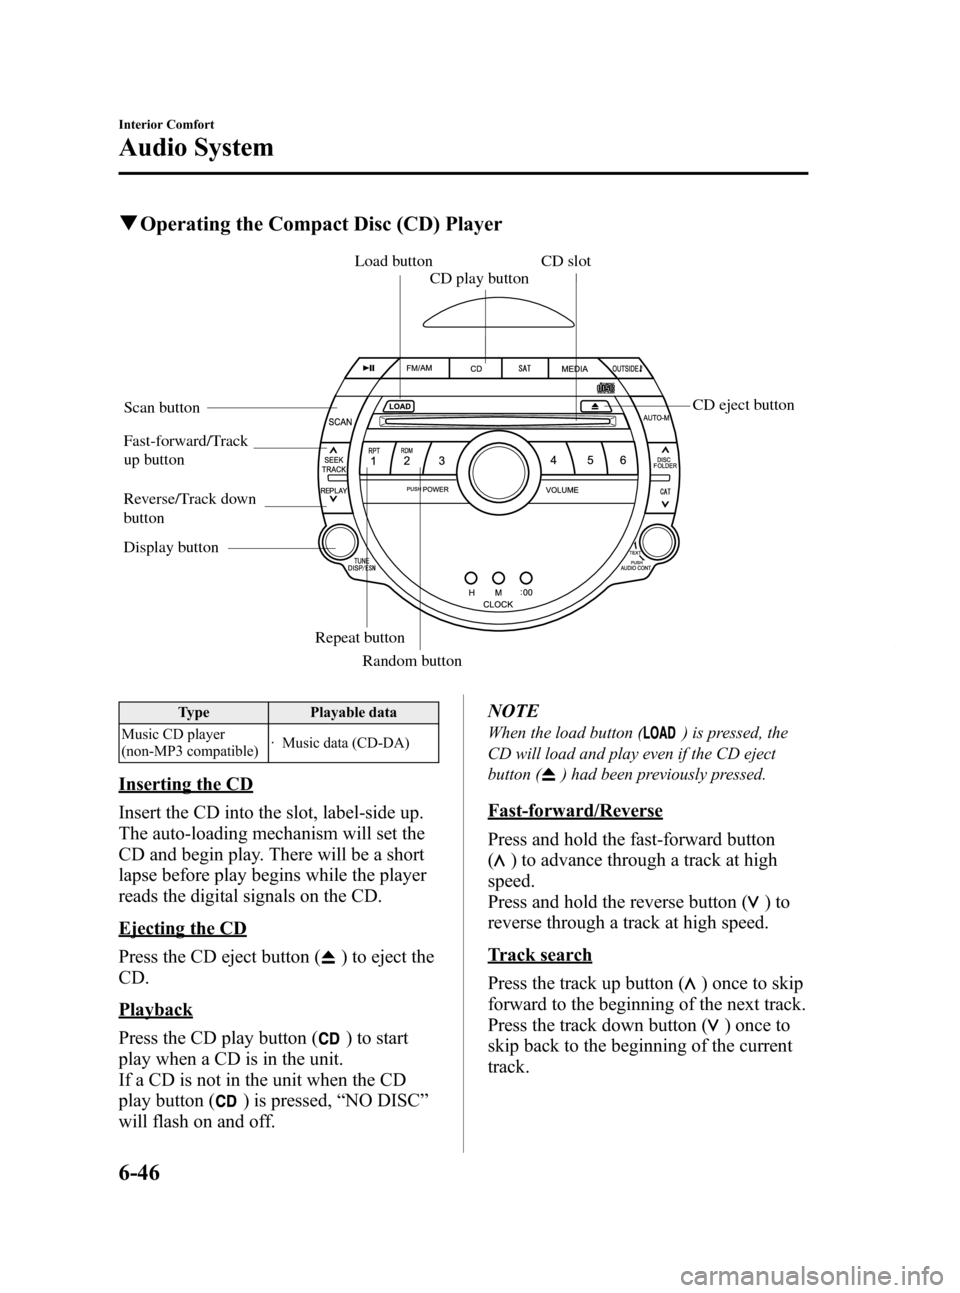
qOperating the Compact Disc (CD) Player
Fast-forward/Track
up button
Reverse/Track down
button Load button
CD slot
CD play button
Display button Repeat buttonRandom button
Scan button
CD eject button
Type
Playable data
Music CD player
(non-MP3 compatible) · Music data (CD-DA)
Inserting the CD
Insert the CD into the slot, label-side up.
The auto-loading mechanism will set the
CD and begin play. There will be a short
lapse before play begins while the player
reads the digital signals on the CD.
Ejecting the CD
Press the CD eject button (
) to eject the
CD.
Playback
Press the CD play button (
) to start
play when a CD is in the unit.
If a CD is not in the unit when the CD
play button (
) is pressed, “NO DISC ”
will flash on and off. NOTE
When the load button () is pressed, the
CD will load and play even if the CD eject
button (
) had been previously pressed.
Fast-forward/Reverse
Press and hold the fast-forward button
(
) to advance through a track at high
speed.
Press and hold the reverse button (
)to
reverse through a track at high speed.
Track search
Press the track up button (
) once to skip
forward to the beginning of the next track.
Press the track down button (
)onceto
skip back to the beginning of the current
track.
6-46
Interior Comfort
Audio System
RX-8_8Z09-EA-08C_Edition3 Page254
Thursday, July 3 2008 2:23 PM
Form No.8Z09-EA-08C
Page 255 of 430

Black plate (255,1)
Music scan
This feature helps to find a program by
playing about the first 10 seconds of each
track.
Press the scan button (
) during
playback to start the scan play operation
(the track number will flash).
Press the scan button (
) again to
cancel scan playback.
NOTE
If the unit is left in scan, normal playback will
resume where scan was selected.
Repeat playback
This feature makes it possible to listen to
a selection repeatedly.
Press the repeat button (
) during
playback. The current selection will be
repeated ( “RPT ”will be displayed).
Press the repeat button (
) once again
to cancel repeat playback.
Random playback
This feature allows the CD player to
randomly select the order of the songs.
Press the random button (
) during
playback. The next selection will be
randomly selected ( “RDM ”will be
displayed).
Press the random button (
) once
again to cancel random playback.
Message display
If “CHECK CD ”is displayed, it means
that there is some CD malfunction. Check
the CD for damage, dirt, or smudges, and
then properly reinsert. If the message
appears again, take the unit to an
Authorized Mazda Dealer for service.
Interior Comfort
Audio System
6-47
RX-8_8Z09-EA-08C_Edition3 Page255
Thursday, July 3 2008 2:23 PM
Form No.8Z09-EA-08C
Page 256 of 430

Black plate (256,1)
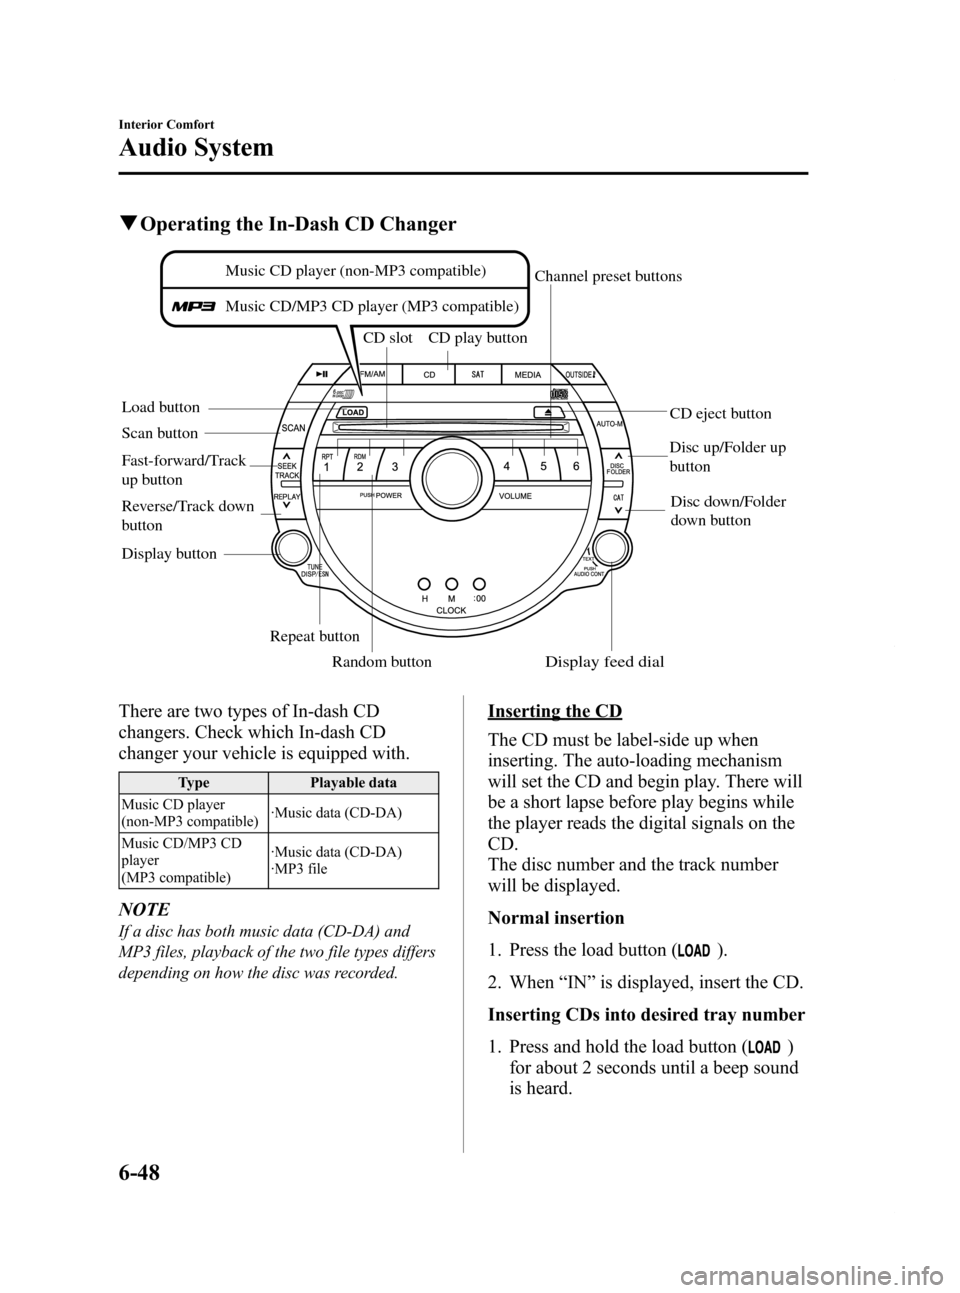
qOperating the In-Dash CD Changer
Load button CD slot CD play button
Display button Repeat buttonRandom button
Scan button
CD eject button
Channel preset buttons
Disc down/Folder
down button
Disc up/Folder up
button
Music CD player (non-MP3 compatible)
Music CD/MP3 CD player (MP3 compatible)
Fast-forward/Track
up button
Reverse/Track down
button
Display feed dial
There are two types of In-dash CD
changers. Check which In-dash CD
changer your vehicle is equipped with.
Type Playable data
Music CD player
(non-MP3 compatible) ·Music data (CD-DA)
Music CD/MP3 CD
player
(MP3 compatible) ·Music data (CD-DA)
·MP3 file
NOTE
If a disc has both music data (CD-DA) and
MP3 files, playback of the two file types differs
depending on how the disc was recorded.
Inserting the CD
The CD must be label-side up when
inserting. The auto-loading mechanism
will set the CD and begin play. There will
be a short lapse before play begins while
the player reads the digital signals on the
CD.
The disc number and the track number
will be displayed.
Normal insertion
1. Press the load button (
).
2. When “IN ”is displayed, insert the CD.
Inserting CDs into desired tray number
1. Press and hold the load button (
)
for about 2 seconds until a beep sound
is heard.
6-48
Interior Comfort
Audio System
RX-8_8Z09-EA-08C_Edition3 Page256
Thursday, July 3 2008 2:23 PM
Form No.8Z09-EA-08C