Page 228 of 371
481
Driving your vehicle
1
2
3
4
5
6
7
8
9
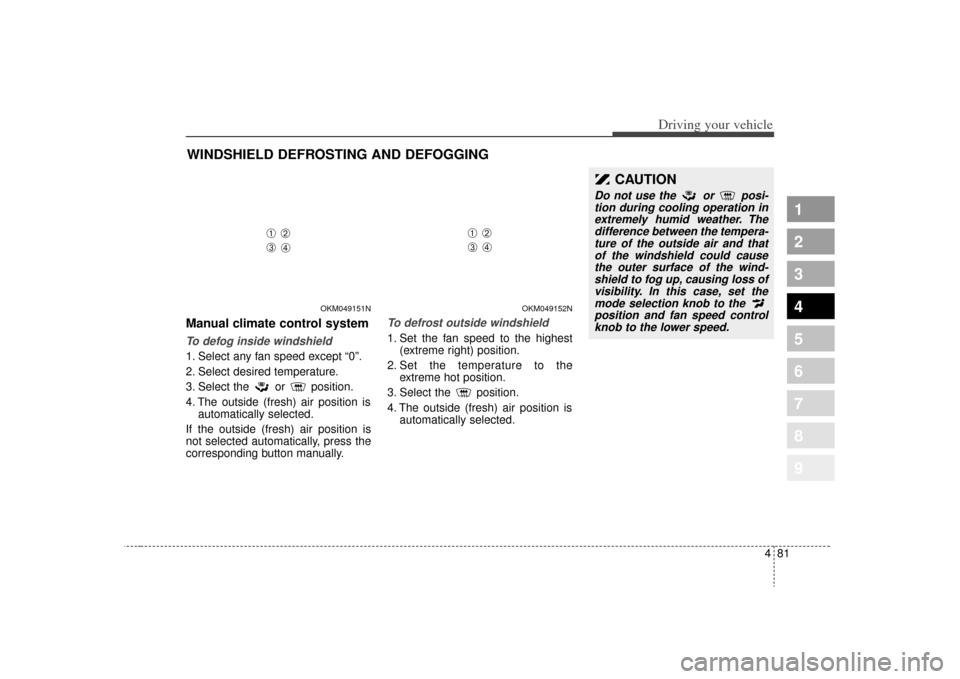
Manual climate control systemTo defog inside windshield 1. Select any fan speed except “0”.
2. Select desired temperature.
3. Select the or position.
4. The outside (fresh) air position isautomatically selected.
If the outside (fresh) air position is
not selected automatically, press the
corresponding button manually.
To defrost outside windshield 1. Set the fan speed to the highest (extreme right) position.
2. Set the temperature to the extreme hot position.
3. Select the position.
4. The outside (fresh) air position is automatically selected.
WINDSHIELD DEFROSTING AND DEFOGGING
CAUTION
Do not use the or posi-tion during cooling operation inextremely humid weather. Thedifference between the tempera-ture of the outside air and thatof the windshield could causethe outer surface of the wind-shield to fog up, causing loss ofvisibility. In this case, set themode selection knob to the position and fan speed controlknob to the lower speed.
OKM049151N
OKM049152N
➀
➁
➂
➃
➀
➁
➂
➃
Page 229 of 371
Driving your vehicle82
4
1
2
3
4
5
6
7
8
9
Automatic climate control sys-
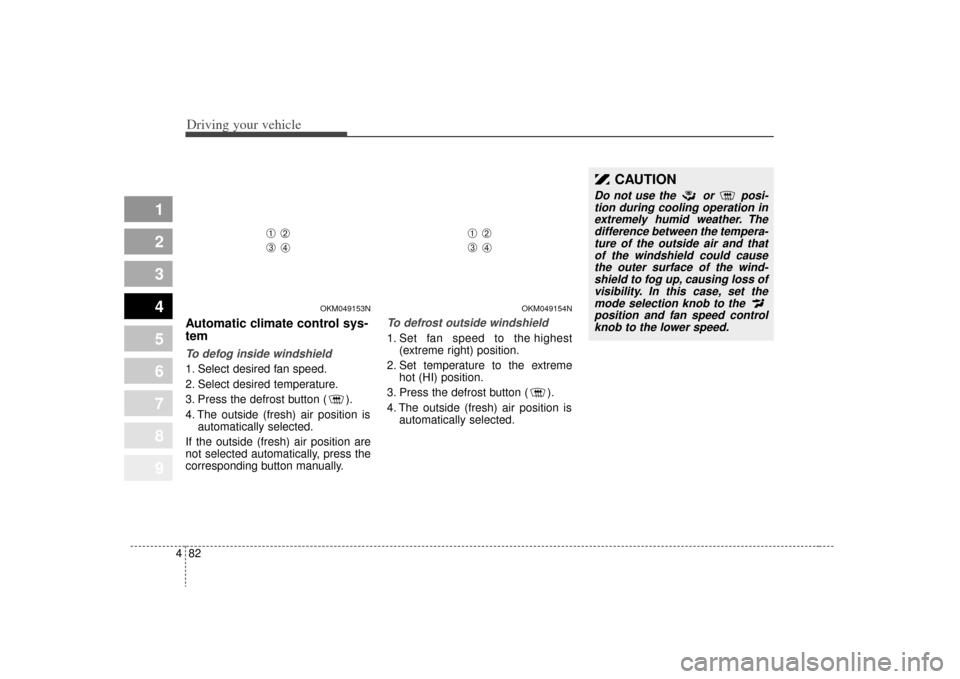
temTo defog inside windshield 1. Select desired fan speed.
2. Select desired temperature.
3. Press the defrost button ( ).
4. The outside (fresh) air position is
automatically selected.
If the outside (fresh) air position are
not selected automatically, press the
corresponding button manually.
To defrost outside windshield 1. Set fan speed to the highest (extreme right) position.
2. Set temperature to the extreme hot (HI) position.
3. Press the defrost button ( ).
4. The outside (fresh) air position is automatically selected.
CAUTION
Do not use the or posi-tion during cooling operation inextremely humid weather. Thedifference between the tempera-ture of the outside air and thatof the windshield could causethe outer surface of the wind-shield to fog up, causing loss ofvisibility. In this case, set themode selection knob to the position and fan speed controlknob to the lower speed.
OKM049153N
➀
➁
➂
➃
OKM049154N
➀
➁
➂
➃
Page 230 of 371

483
Driving your vehicle
1
2
3
4
5
6
7
8
9
For maximum defrosting, set thetemperature control to the extreme
right/hot position and the fan speed
control to the highest speed.
If warm air to the floor is desired while defrosting or defogging, set
the mode to the floor-defrost posi-
tion.
Before driving, clear all snow and ice from the windshield, rear win-
dow, outside rear view mirrors, and
all side windows.
Clear all snow and ice from the hood and air inlet in the cowl grill to
improve heater and defroster effi-
ciency and to reduce the probabili-
ty of fogging up inside of the wind-
shield.
Defogging logicManual climate control systemTo reduce the probability of fogging
up the inside of the windshield, the
air intake control is set to the outside
(fresh) air position automatically if
any of following occur.
The mode is selected to the , or while the system is acti-
vated.
The ignition switch is turned on while the mode is selected to the ,or .
The ignition switch is turned off.
The fan is off.
The fan begins to be operated.
Press the air intake control button to
select the recirculated air position
while the ignition switch is on. How to cancel or return defogging
logic of manual climate control system
1. Turn the ignition switch to the “ON”
position.
2. Turn the fan speed control knob to the “0” position.
3. Turn the mode selection knob to the defrost position ( ).
4. Push the air intake control button ( ) at least 5 times within 3 sec-
onds.
OKM049155
➀
➁
➂
➃
Page 231 of 371
Driving your vehicle84
4
1
2
3
4
5
6
7
8
9
The indicator light in the air intake
control button will blink 3 times at 0.5
second intervals. This indicates that
the defogging logic is canceled or
has returned to the programmed
condition.
If the battery has been discharged or
disconnected, the defog logic is reset
to the original condition.
Automatic climate control systemTo reduce the probability of fogging
up inside of the windshield, the air
intake control is set to outside (fresh)
air position automatically if any of fol-
lowing occur.
The ignition switch is turned on
while the mode is selected to the
, , .
The OFF button is pushed.
The mode is selected to the , or position.
Press the air intake control button to
select the recirculated air position
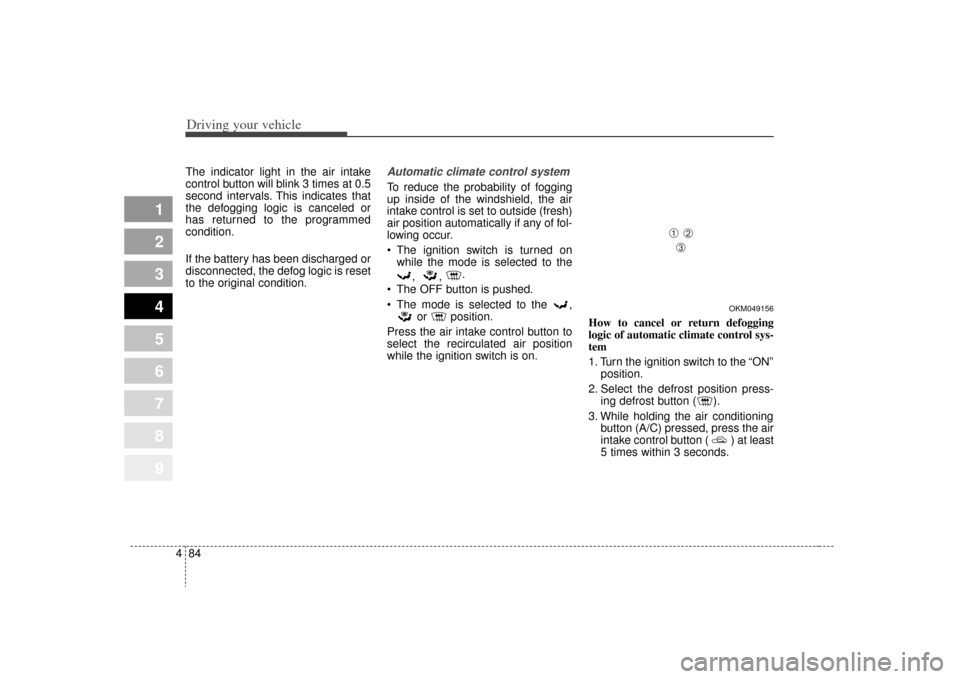
while the ignition switch is on. How to cancel or return defogging
logic of automatic climate control sys-
tem
1. Turn the ignition switch to the “ON”
position.
2. Select the defrost position press- ing defrost button ( ).
3. While holding the air conditioning button (A/C) pressed, press the air
intake control button ( ) at least
5 times within 3 seconds.
OKM049156
➀
➁➂
Page 310 of 371
1
2
3
4
5
6
7
8
9
Maintenance services / 7-3
Maintenance schedule / 7-4
Explanation of scheduled maintenance items / 7-8
Owner maintenance / 7-12
Engine compartment / 7-15
Engine oil and oil filter / 7-17
Engine cooling system / 7-19
Brakes and clutch / 7-22
Parking brake / 7-23
Power steering / 7-24
Automatic transaxle / 7-25
Rear differential (4WD) / 7-27
Transfer case (4WD) / 7-27
Lubricants and fluids / 7-28
Air cleaner / 7-29
Climate control air filter / 7-30
Wiper blades / 7-31
Battery / 7-33
Tires and wheels / 7-36
Maintenance
Page 339 of 371
Maintenance30
7
1
2
3
4
5
6
7
8
9
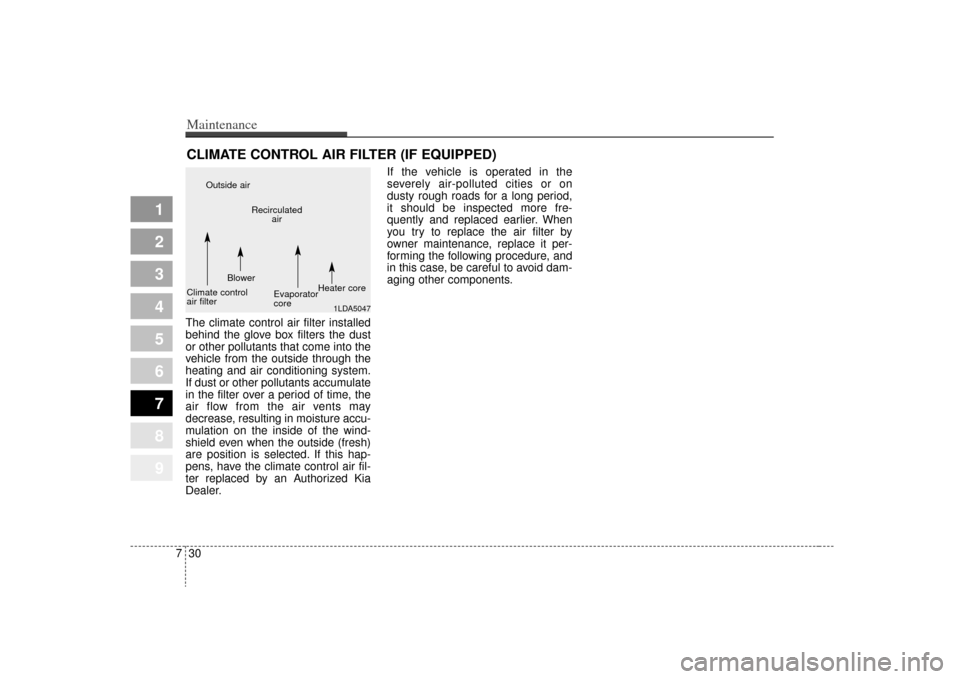
CLIMATE CONTROL AIR FILTER (IF EQUIPPED)The climate control air filter installed
behind the glove box filters the dust
or other pollutants that come into the
vehicle from the outside through the
heating and air conditioning system.
If dust or other pollutants accumulate
in the filter over a period of time, the
air flow from the air vents may
decrease, resulting in moisture accu-
mulation on the inside of the wind-
shield even when the outside (fresh)
are position is selected. If this hap-
pens, have the climate control air fil-
ter replaced by an Authorized Kia
Dealer. If the vehicle is operated in the
severely air-polluted cities or on
dusty rough roads for a long period,
it should be inspected more fre-
quently and replaced earlier. When
you try to replace the air filter by
owner maintenance, replace it per-
forming the following procedure, and
in this case, be careful to avoid dam-
aging other components.
1LDA5047
Outside air
Recirculatedair
Climate control
air filter Blower
Evaporator
coreHeater core
Page 343 of 371
Maintenance34
7
1
2
3
4
5
6
7
8
9
For best battery service : Keep the battery securely mount-
ed.
Keep the battery top clean and dry.
Keep the terminals and connec- tions clean, tight, and coated with
petroleum jelly or terminal grease.
Rinse any spilled electrolyte from the battery immediately with a
solution of water and baking soda.
If the vehicle is not going to be used for an extended time, discon-
nect the battery cables.
Battery recharging Your vehicle has a maintenance-free,
calcium-based battery.
If the battery becomes dischargedin a short time (because, for exam-
ple, the headlights or interior lights
were left on while the vehicle was
not in use), recharge it by slow
charging (trickle) for 10 hours.
If the battery gradually discharges because of high electric load while
the vehicle is being used, recharge
it at 20-30A for two hours.Items to be reset after the batteryhas been discharged or the bat-tery has been disconnected. Clock (See Chapter 3)
Sunroof (See Chapter 3)
Trip computer (See Chapter 4)
Compass (See Chapter 4)
Climate control system (See Chapter 4)
Audio (See Chapter 3)
1KMN5030
(Continued) An inappropriately dis-
posed battery can be
harmful to the environ-
ment and human health.
Dispose the battery
according to your local
law(s) or regulation.
When lifting a plastic-cased battery, excessive pressure on
the case may cause battery
acid to leak, resulting in per-
sonal injury. Lift with a battery
carrier or with your hands on
opposite corners.
Never attempt to recharge the battery when the battery
cables are connected.
The electrical ignition system works with high voltage.
Never touch these compo-
nents with the engine running
or the ignition switched on.
Failure to follow the above
warnings can result in serious
bodily injury or death.
Page 352 of 371
743
Maintenance
1
2
3
4
5
6
7
8
9
3. Checking tire life (TIN : TireIdentification Number) Any tires that are over 6 years, based
on the manufacturing date, tire
strength and performance, decline
with age naturally (even unused
spare tires). Therefore, the tires
(including the spare tire) should be
replaced by new ones. You can find
the manufacturing date on the tire
sidewall (possibly on the inside of the
wheel), displaying the DOT Code.
The DOT Code is a series of num-
bers on a tire consisting of numbers
and English letters. The manufactur-
ing date is designated by the last four
digits (characters) of the DOT code.
DOT : XXXX XXXX OOOO
The front part of the DOT means a
plant code number, tire size and
tread pattern and the last four num-
bers indicate week and year manu-
factured.
For example:
DOT XXXX XXXX 1608 represents
that the tire was produced in the 16th
week of 2008.
4. Tire ply composition and mate-rialThe number of layers or plies of rub-
bercoated fabric in the tire. Tire man-
ufacturers also must indicate the
materials in the tire, which include
steel, nylon, polyester, and others.
The letter "R" means radial ply con-
struction; the letter "D" means diago-
nal or bias ply construction; and the
letter "B" means belted-bias ply con-
struction.
WARNING -
Tire age
Tires degrade over time, even
when they are not being used.
Regardless of the remaining
tread, it is recommended that
tires generally be replaced after
six (6) years of normal service.
Heat caused by hot climates or
frequent high loading condi-
tions can accelerate the aging
process. Failure to follow this
warning can result in sudden
tire failure, which could lead to a
loss of control and an accident
involving serious injury or
death.