2009 KIA SOUL window
[x] Cancel search: windowPage 208 of 328
Driving your vehicle
38
5
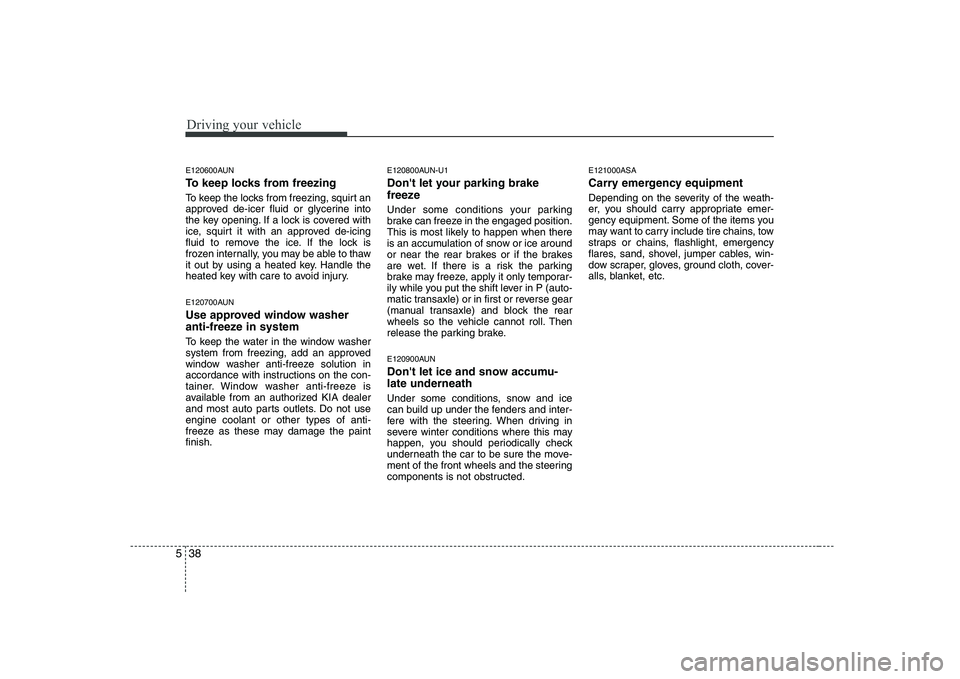
E120600AUN
To keep locks from freezing
To keep the locks from freezing, squirt an
approved de-icer fluid or glycerine into
the key opening. If a lock is covered with
ice, squirt it with an approved de-icing
fluid to remove the ice. If the lock is
frozen internally, you may be able to thaw
it out by using a heated key. Handle the
heated key with care to avoid injury.
E120700AUN
Use approved window washer
anti-freeze in system
To keep the water in the window washer
system from freezing, add an approved
window washer anti-freeze solution in
accordance with instructions on the con-
tainer. Window washer anti-freeze is
available from an authorized KIA dealer
and most auto parts outlets. Do not useengine coolant or other types of anti-
freeze as these may damage the paintfinish. E120800AUN-U1
Don't let your parking brake
freeze
Under some conditions your parking
brake can freeze in the engaged position.
This is most likely to happen when there
is an accumulation of snow or ice around
or near the rear brakes or if the brakes
are wet. If there is a risk the parking
brake may freeze, apply it only temporar-
ily while you put the shift lever in P (auto-
matic transaxle) or in first or reverse gear
(manual transaxle) and block the rear
wheels so the vehicle cannot roll. Then
release the parking brake.
E120900AUN
Don't let ice and snow accumu- late underneath
Under some conditions, snow and ice
can build up under the fenders and inter-
fere with the steering. When driving in
severe winter conditions where this may
happen, you should periodically check
underneath the car to be sure the move-
ment of the front wheels and the steering
components is not obstructed.E121000ASA
Carry emergency equipment
Depending on the severity of the weath-
er, you should carry appropriate emer-
gency equipment. Some of the items you
may want to carry include tire chains, tow
straps or chains, flashlight, emergency
flares, sand, shovel, jumper cables, win-
dow scraper, gloves, ground cloth, cover-
alls, blanket, etc.
Page 276 of 328
735
Maintenance
Replace the filter according to the
Maintenance Schedule.
If the vehicle is operated in extremelydusty or sandy areas, replace the ele-
ment more often than the usual recom-mended intervals. (Refer to“Maintenance under severe usage condi-
tions” in this section.)
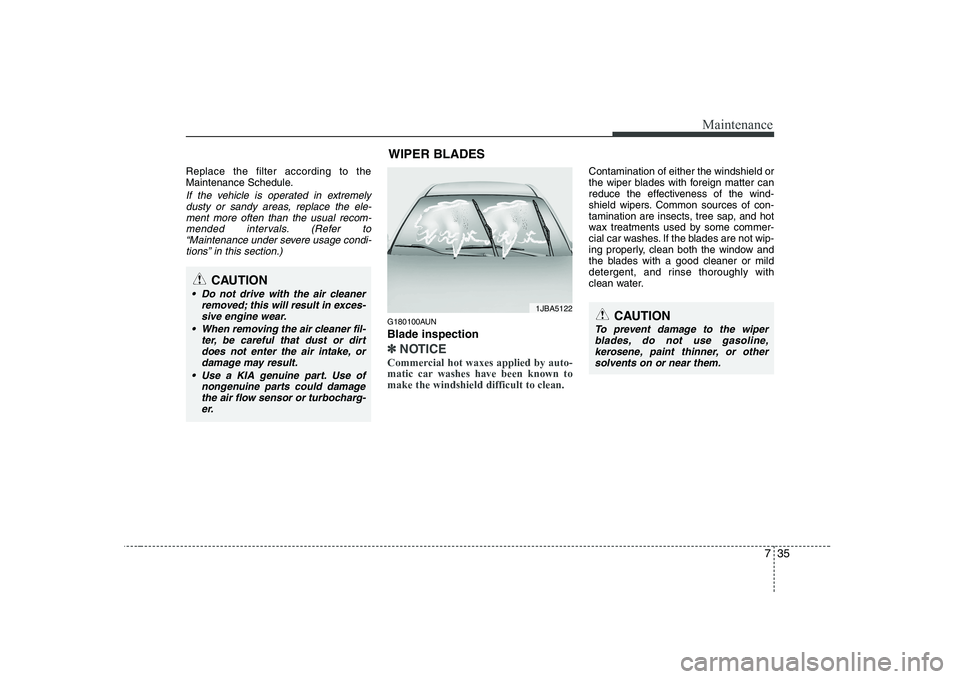
G180100AUN Blade inspection
✽✽ NOTICE
Commercial hot waxes applied by auto-
matic car washes have been known tomake the windshield difficult to clean.
Contamination of either the windshield or
the wiper blades with foreign matter can
reduce the effectiveness of the wind-
shield wipers. Common sources of con-
tamination are insects, tree sap, and hot
wax treatments used by some commer-
cial car washes. If the blades are not wip-
ing properly, clean both the window and
the blades with a good cleaner or mild
detergent, and rinse thoroughly with
clean water.
CAUTION
Do not drive with the air cleaner removed; this will result in exces-
sive engine wear.
When removing the air cleaner fil- ter, be careful that dust or dirtdoes not enter the air intake, or damage may result.
Use a KIA genuine part. Use of nongenuine parts could damagethe air flow sensor or turbocharg- er.
WIPER BLADES
1JBA5122CAUTION
To prevent damage to the wiperblades, do not use gasoline,
kerosene, paint thinner, or other solvents on or near them.
Page 278 of 328

737
Maintenance
G180202AED
Rear window wiper blade (if equipped)
1. Raise the wiper arm and pull out thewiper blade assembly. 2. Install the new blade assembly by
inserting the center part into the slot in
the wiper arm until it clicks into place.
3. Make sure the blade assembly is installed firmly by trying to pulling it
slightly.
4. Place back the wiper arm to the prop- er position.
OED076041OED076040
Page 297 of 328
Maintenance
56
7
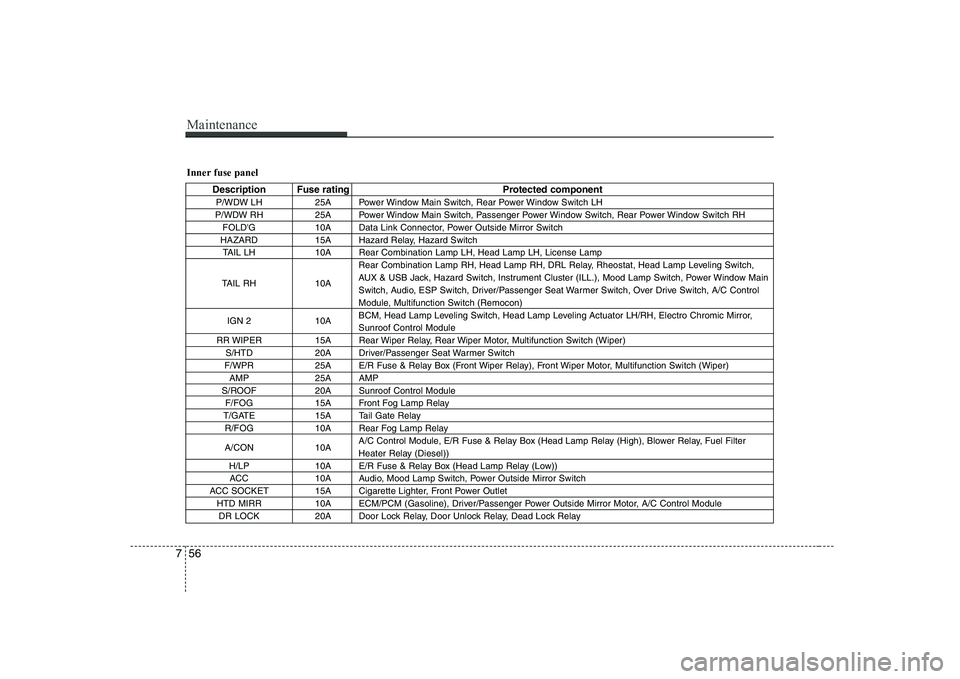
Inner fuse panel
Description Fuse rating Protected component
P/WDW LH 25A Power Window Main Switch, Rear Power Window Switch LH
P/WDW RH 25A Power Window Main Switch, Passenger Power Window Switch, Rear Power Window Switch RH FOLD'G 10A Data Link Connector, Power Outside Mirror Switch
HAZARD 15A Hazard Relay, Hazard Switch TAIL LH 10A Rear Combination Lamp LH, Head Lamp LH, License Lamp
TAIL RH 10A Rear Combination Lamp RH, Head Lamp RH, DRL Relay, Rheostat, Head Lamp Leveling Switch,
AUX & USB Jack, Hazard Switch, Instrument Cluster (ILL.), Mood Lamp Switch, Power Window Main
Switch, Audio, ESP Switch, Driver/Passenger Seat Warmer Switch, Over Drive Switch, A/C Control
Module, Multifunction Switch (Remocon)
IGN 2 10A BCM, Head Lamp Leveling Switch, Head Lamp Leveling Actuator LH/RH, Electro Chromic Mirror,Sunroof Control Module
RR WIPER 15A Rear Wiper Relay, Rear Wiper Motor, Multifunction Switch (Wiper) S/HTD 20A Driver/Passenger Seat Warmer Switch
F/WPR 25A E/R Fuse & Relay Box (Front Wiper Relay), Front Wiper Motor, Multifunction Switch (Wiper) AMP 25A AMP
S/ROOF 20A Sunroof Control Module F/FOG 15A Front Fog Lamp Relay
T/GATE 15A Tail Gate Relay R/FOG 10A Rear Fog Lamp Relay
A/CON 10A A/C Control Module, E/R Fuse & Relay Box (Head Lamp Relay (High), Blower Relay, Fuel Filter
Heater Relay (Diesel))
H/LP 10A E/R Fuse & Relay Box (Head Lamp Relay (Low)) ACC 10A Audio, Mood Lamp Switch, Power Outside Mirror Switch
ACC SOCKET 15A Cigarette Lighter, Front Power Outlet HTD MIRR 10A ECM/PCM (Gasoline), Driver/Passenger Power Outside Mirror Motor, A/C Control ModuleDR LOCK 20A Door Lock Relay, Door Unlock Relay, Dead Lock Relay
Page 299 of 328
Maintenance
58
7
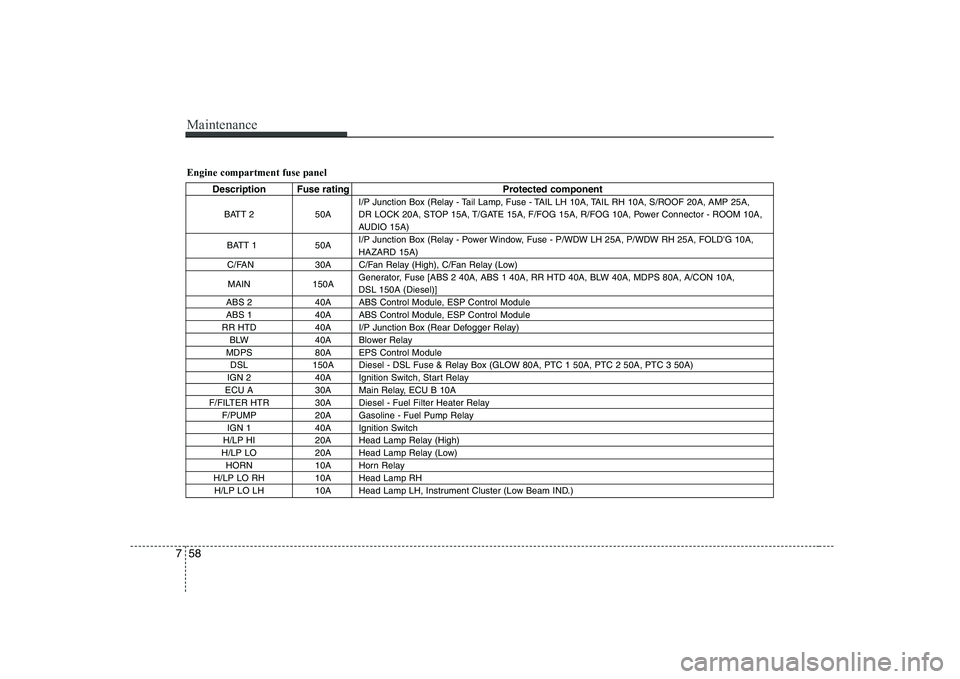
Engine compartment fuse panel
Description Fuse rating Protected component
BATT 2 50A I/P Junction Box (Relay - Tail Lamp, Fuse - TAIL LH 10A, TAIL RH 10A, S/ROOF 20A, AMP 25A,
DR LOCK 20A, STOP 15A, T/GATE 15A, F/FOG 15A, R/FOG 10A, Power Connector - ROOM 10A,
AUDIO 15A)
BATT 1 50A I/P Junction Box (Relay - Power Window, Fuse - P/WDW LH 25A, P/WDW RH 25A, FOLD'G 10A,HAZARD 15A)
C/FAN 30A C/Fan Relay (High), C/Fan Relay (Low)
MAIN 150A Generator, Fuse [ABS 2 40A, ABS 1 40A, RR HTD 40A, BLW 40A, MDPS 80A, A/CON 10A, DSL 150A (Diesel)]
ABS 2 40A ABS Control Module, ESP Control Module
ABS 1 40A ABS Control Module, ESP Control Module
RR HTD 40A I/P Junction Box (Rear Defogger Relay) BLW 40A Blower Relay
MDPS 80A EPS Control Module DSL 150A Diesel - DSL Fuse & Relay Box (GLOW 80A, PTC 1 50A, PTC 2 50A, PTC 3 50A)
IGN 2 40A Ignition Switch, Start Relay
ECU A 30A Main Relay, ECU B 10A
F/FILTER HTR 30A Diesel - Fuel Filter Heater Relay F/PUMP 20A Gasoline - Fuel Pump RelayIGN 1 40A Ignition Switch
H/LP HI 20A Head Lamp Relay (High)
H/LP LO 20A Head Lamp Relay (Low) HORN 10A Horn Relay
H/LP LO RH 10A Head Lamp RH H/LP LO LH 10A Head Lamp LH, Instrument Cluster (Low Beam IND.)
Page 301 of 328
Maintenance
60
7
LIGHT BULBS
G220000AUN
Use only the bulbs of the specified wattage.
✽✽ NOTICE
After heavy, driving rain or washing, headlight and taillight lenses could
appear frosty. This condition is caused by
the temperature difference between the
lamp inside and outside. This is similar
to the condensation on your windows
inside your vehicle during the rain and
doesn’t indicate a problem with your
vehicle. If the water leaks into the lamp
bulb circuitry, have the vehicle checked
by an authorized KIA dealer.
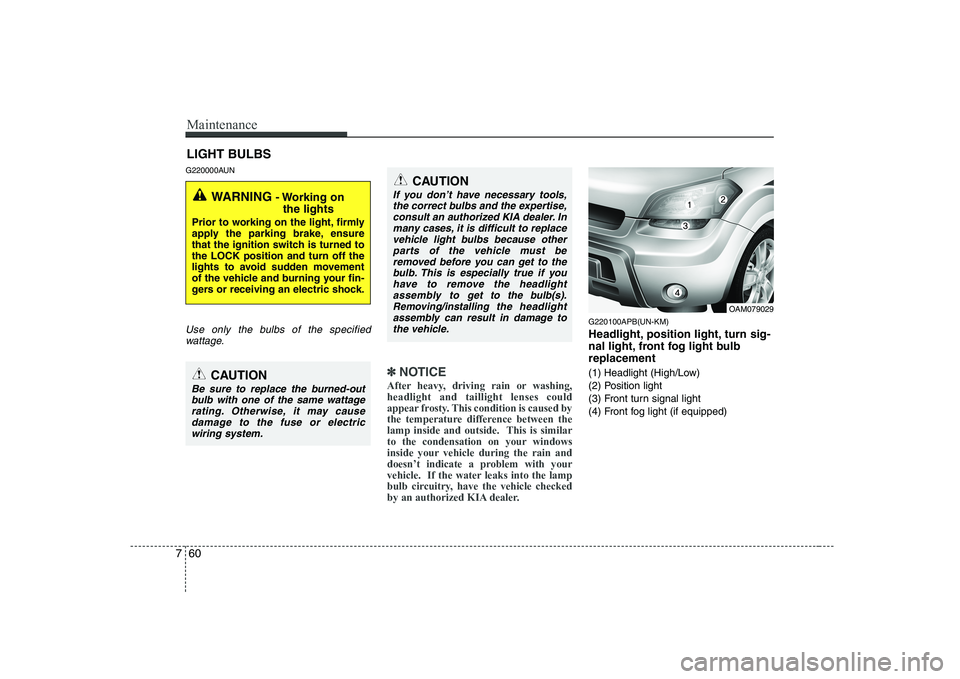
G220100APB(UN-KM)
Headlight, position light, turn sig-
nal light, front fog light bulbreplacement
(1) Headlight (High/Low)
(2) Position light
(3) Front turn signal light
(4) Front fog light (if equipped)
WARNING - Working on
the lights
Prior to working on the light, firmly
apply the parking brake, ensure
that the ignition switch is turned tothe LOCK position and turn off the
lights to avoid sudden movement
of the vehicle and burning your fin-
gers or receiving an electric shock.
CAUTION
Be sure to replace the burned-out bulb with one of the same wattage rating. Otherwise, it may cause damage to the fuse or electricwiring system.
CAUTION
If you don’t have necessary tools,
the correct bulbs and the expertise,consult an authorized KIA dealer. In many cases, it is difficult to replace
vehicle light bulbs because otherparts of the vehicle must be removed before you can get to the bulb. This is especially true if you
have to remove the headlight assembly to
get to the bulb(s).
Removing/installingthe headlight
assembly can result in damage to the vehicle.OAM079029
Page 309 of 328
Maintenance
68
7
APPEARANCE CARE
Exterior care
G230101AUN
Exterior general caution
It is very important to follow the label
directions when using any chemical
cleaner or polish. Read all warning andcaution statements that appear on thelabel.
G230102BUN
Finish maintenance
Washing
To help protect your vehicle’s finish from
rust and deterioration, wash it thoroughlyand frequently at least once a month with
lukewarm or cold water.
If you use your vehicle for off-road driv-
ing, you should wash it after each off-
road trip. Pay special attention to the
removal of any accumulation of salt, dirt,
mud, and other foreign materials. Make
sure the drain holes in the lower edges of
the doors and rocker panels are keptclear and clean.
Insects, tar, tree sap, bird droppings,
industrial pollution and similar deposits
can damage your vehicle’s finish if not
removed immediately. Even prompt washing with plain water
may not completely remove all these
deposits. A mild soap, safe for use on
painted surfaces, may be used.
After washing, rinse the vehicle thor-
oughly with lukewarm or cold water. Do
not allow soap to dry on the finish.
WARNING -
Wet brakes
After washing the vehicle, test the
brakes while driving slowly to see if
they have been affected by water. If
braking performance is impaired,
dry the brakes by applying them
lightly while maintaining a slow for-
ward speed.
CAUTION
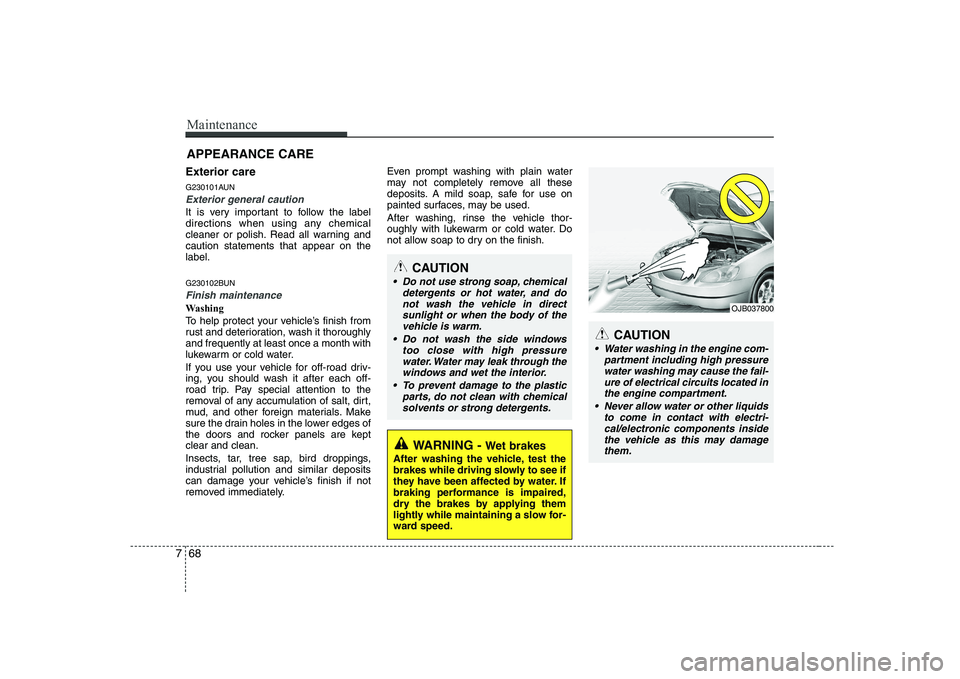
Water washing in the engine com- partment including high pressurewater washing may cause the fail-ure of electrical circuits located in
the engine compartment.
Never allow water or other liquids to come in contact with electri-cal/electronic components insidethe vehicle as this may damage
them.
OJB037800
CAUTION
Do not use strong soap, chemical detergents or hot water, and donot wash the vehicle in directsunlight or when the body of the
vehicle is warm.
Do not wash the side windows too close with high pressurewater. Water may leak through the
windows and wet the interior.
To prevent damage to the plastic parts, do not clean with chemicalsolvents or strong detergents.
Page 314 of 328
773
Maintenance
Interior care
G230201AUN
Interior general precautions
Prevent caustic solutions such as per- fume and cosmetic oil from contacting
the dashboard because they may cause
damage or discoloration. If they do con-tact the dashboard, wipe them off imme-
diately. See the instructions for the prop-
er way to clean vinyl.G230202AUN
Cleaning the upholstery and interior
trim
Vinyl
Remove dust and loose dirt from vinyl
with a whisk broom or vacuum cleaner.
Clean vinyl surfaces with a vinyl cleaner. Fabric
Remove dust and loose dirt from fabric
with a whisk broom or vacuum cleaner.Clean with a mild soap solution recom-
mended for upholstery or carpets.
Remove fresh spots immediately with a
fabric spot cleaner. If fresh spots do not
receive immediate attention, the fabriccan be stained and its color can be
affected. Also, its fire-resistant properties
can be reduced if the material is not
properly maintained. G230203AUN
Cleaning the lap/shoulder belt web-
bing
Clean the belt webbing with any mild
soap solution recommended for cleaning
upholstery or carpet. Follow the instruc-
tions provided with the soap. Do not
bleach or re-dye the webbing because
this may weaken it.
G230204AUN
Cleaning the interior window glass
If the interior glass surfaces of the vehi-
cle become fogged (that is, covered with
an oily, greasy or waxy film), they should
be cleaned with glass cleaner. Follow the
directions on the glass cleaner container.CAUTION
Never allow water or other liquidsto come in contact with electrical/electronic components inside the vehicle as this may damage them.
CAUTION
Using anything but recommended
cleaners and procedures may affectthe fabric’s appearance and fire-resistant properties.
CAUTION
Do not scrape or scratch the insideof the rear window. This may result in damage to the rear window
defroster grid.CAUTION
When cleaning leather products (steering wheel, seats etc.), useneutral detergents or low alcohol content solutions. If you use high
alcohol content solutions oracid/alkaline detergents, the colorof the leather may fade or the sur- face may get stripped off.