Page 234 of 321
611
In case of an emergency
Driver-side knee bolster
Description Fuse rating Protected component
B/ALARM10A Burglar alarm
A/BAG 15A Air bag
C/LIGHTER 20A Cigar lighter
S/WARMER 10A Seat warmer
P/WDW(RH) 20A Power window (right)
P/HANDLE 15A Power steering wheel
T/SIG LP 15A Turn signal light
HTD GLASS 30A Defroster
TRUNK OPEN 15A Trunk lid opener
CLUSTER 10A Cluster
A/BAG IND 10A Air bag indicator
P/OUTLET 25A Electrical power socket
LAN UNIT 10A Lan unit
CURTAIN(RR) 15A Electric curtain (rear)
FOG LP(RR), PIC 15A Fog light (rear), Personal identifi- cation card
F/LID OPEN 15A Fuel filler lid opener
P/SEAT(RR) 30A Power seat (rear)
B/ALARM 10A Burglar alarm
STOP LP 15A Stop light
TRIP COMPUTER 10A Trip computer
B/UP LP 10A Back-up light
AV 10A Audio
H/LP 10A Headlight
91117-3F060
Driver-side knee bolster
Page 235 of 321

In case of an emergency12
6
Power connectorYour vehicle is equipped with a power connector to prevent bat-
tery discharge if your vehicle is parked without being operated
for prolonged periods. Use the following procedures before
parking the vehicle for prolonged period.
1. Turn off the engine.
2. Turn off the headlights and tail lights.
3. Open the driver-side knee bolster cover and pull up the
“POWER/CONN”.✽ ✽NOTICE• If the power connector is pulled up from the fuse panel, the
warning chime, AV system, clock and intetrior lamps, etc.,
will not operate. Some items must be reset after replace-
ment.
• Even though the power connector is pulled up, the battery can still be discharged by operation of the headlights or
other electrical devices.
Description Fuse rating Protected component
A/CON 10A Air-conditioning system
P/WDW(LH) 20A Power window (left)
TAIL LP(RH) 10A Taillight (right)
BACK WARN’G 10A Back warning
DR LP 10A Door courtesy lamp
MIRROR HTD 15A Outside review mirror defroster
ENG SNSR 10A
Power train control system sensors
T/REDUCER10A Seat belt tension reducer
CLOCK 10A Clock
WIPER(FR) 25A Wiper (front)
EPS 10A Electronic power steering
TAIL LP(LH) 10A Tail light (left)
ROOM LP 10A Room lamp
AV, CLOCK 15A Audio, Clock
LAN UNIT 10A Lan unit
TPMS 15A Tire pressure monitoring system
H/LP WASHER 20A Headlight washer
SHUNT CONN - Switch illumination
POWER/CONN - Power connector
1GHA403
Power
connector
Page 238 of 321
615
In case of an emergency
If towing service is not available in an
emergency, your vehicle may be tem-
porarily towed using a cable or chain
secured to the emergency towing hook
under the front or rear of the vehicle. Use
extreme caution when towing the vehicle.
A driver must be in the vehicle to steer it
and operate the brakes.
Towing in this manner may be done only
on hard-surfaced roads for a short dis-
tance and at low speeds. Also, the
wheels, axles, power train, steering and
brakes must all be in good condition.
Do not use the tow hooks to pull avehicle out of mud, sand or other con-
ditions from which the vehicle cannot
be driven out under its own power.
Avoid towing a vehicle heavier than the vehicle doing the towing.
The drivers of both vehicles should communicate with each other frequent-
ly. Before emergency towing, check that
the hook is not broken or damaged.
Fasten the towing cable or chain securely to the hook.
Do not jerk the hook. Apply steady and even force.
To avoid damaging the hook, do not pull from the side or at a vertical angle.
Always pull straight ahead.
CAUTION
Attach a towing strap to the tow hook.
Using a portion of the vehicle other than the tow hooks for tow-ing may damage the body of yourvehicle.
Use only a cable or chain specifi- cally intended for use in towingvehicles. Securely fasten the cable or chain to the towing hookprovided.
WARNING
Use extreme caution when towing
the vehicle.
Avoid sudden starts or erratic driving maneuvers which would
place excessive stress on the
emergency towing hook and tow-
ing cable or chain. The hook and
towing cable or chain may break
and cause serious injury or dam-
age.
If the towing vehicle can hardly move, do not forcibly continue
the towing. Contact an Authorized
Kia dealer or a commercial tow
truck service for assistance.
Tow the vehicle as straight ahead as possible.
Keep away from the vehicle dur- ing towing.
Page 239 of 321
In case of an emergency16
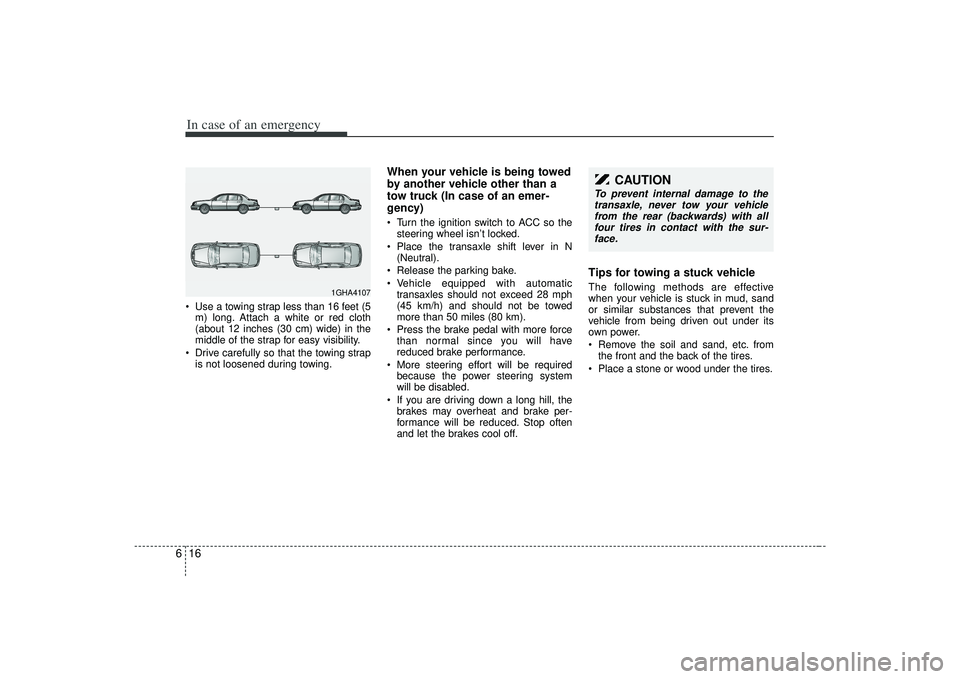
6 Use a towing strap less than 16 feet (5
m) long. Attach a white or red cloth
(about 12 inches (30 cm) wide) in the
middle of the strap for easy visibility.
Drive carefully so that the towing strap is not loosened during towing.
When your vehicle is being towed
by another vehicle other than a
tow truck (In case of an emer-
gency) Turn the ignition switch to ACC so thesteering wheel isn’t locked.
Place the transaxle shift lever in N (Neutral).
Release the parking bake.
Vehicle equipped with automatic transaxles should not exceed 28 mph
(45 km/h) and should not be towed
more than 50 miles (80 km).
Press the brake pedal with more force than normal since you will have
reduced brake performance.
More steering effort will be required because the power steering system
will be disabled.
If you are driving down a long hill, the brakes may overheat and brake per-
formance will be reduced. Stop often
and let the brakes cool off.
Tips for towing a stuck vehicleThe following methods are effective
when your vehicle is stuck in mud, sand
or similar substances that prevent the
vehicle from being driven out under its
own power.
Remove the soil and sand, etc. fromthe front and the back of the tires.
Place a stone or wood under the tires.
1GHA4107
CAUTION
To prevent internal damage to the transaxle, never tow your vehiclefrom the rear (backwards) with allfour tires in contact with the sur- face.
Page 251 of 321
7
Maintenance services / 7-2
Normal maintenance schedule / 7-3
Severe maintenance schedule / 7-6
Owner maintenance / 7-9
Engine compartment / 7-12
Engine oil and oil filter / 7-13
Engine cooling system / 7-14
Brakes / 7-16
Power steering / 7-17
Automatic transaxle / 7-18
Lubricants and fluids / 7-20
Air cleaner / 7-21
Climate control air filter / 7-22
Wiper blades / 7-24
Battery / 7-26
Tires and wheels / 7-29
Bulb replacement / 7-41
Lubricant specifications / 7-46
Exterior care / 7-48
Interior care / 7-51
California perchlorate notice / 7-52
Maintenance
Page 255 of 321
75
Maintenance
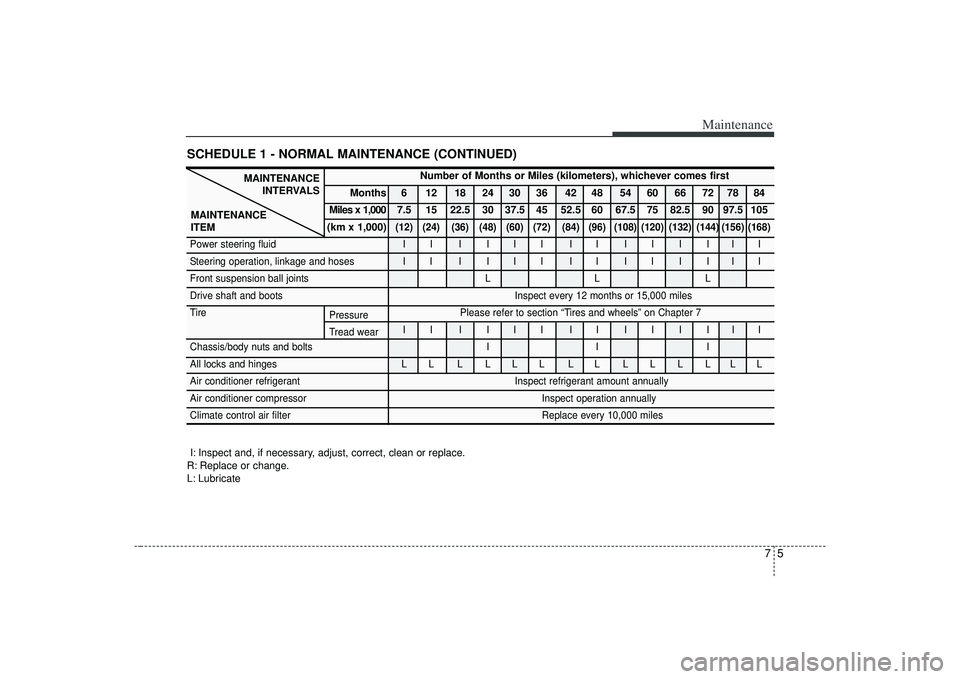
SCHEDULE 1 - NORMAL MAINTENANCE (CONTINUED)
MAINTENANCEINTERVALS
MAINTENANCE
ITEM
Number of Months or Miles (kilometers), whichever comes first
Months 6 12 18 24 30 36 42 48 54 60 66 72 78 84
Miles x 1,000 7.5 15 22.5 30 37.5 45 52.5 60 67.5 75 82.5 90 97.5 105
(km x 1,000)
(12) (24) (36) (48) (60) (72) (84) (96) (108) (120) (132) (144) (156) (168)
Power steering fluid I I I I I I I I I I I I I I
Steering operation, linkage and hoses I I I I I I I I I I I I I I
Front suspension ball joints L L L
Drive shaft and boots Inspect every 12 months or 15,000 miles
Tire Please refer to section “Tires and wheels” on Chapter 7 II I III II II I III
Chassis/body nuts and bolts I I I
All locks and hinges L L L L L L L L L L L L L L
Air conditioner refrigerant Inspect refrigerant amount annually
Air conditioner compressor Inspect operation annually
Climate control air filter Replace every 10,000 miles
I: Inspect and, if necessary, adjust, correct, clean or replace.
R: Replace or change.
L: Lubricate
Pressure
Tread wear
Page 258 of 321
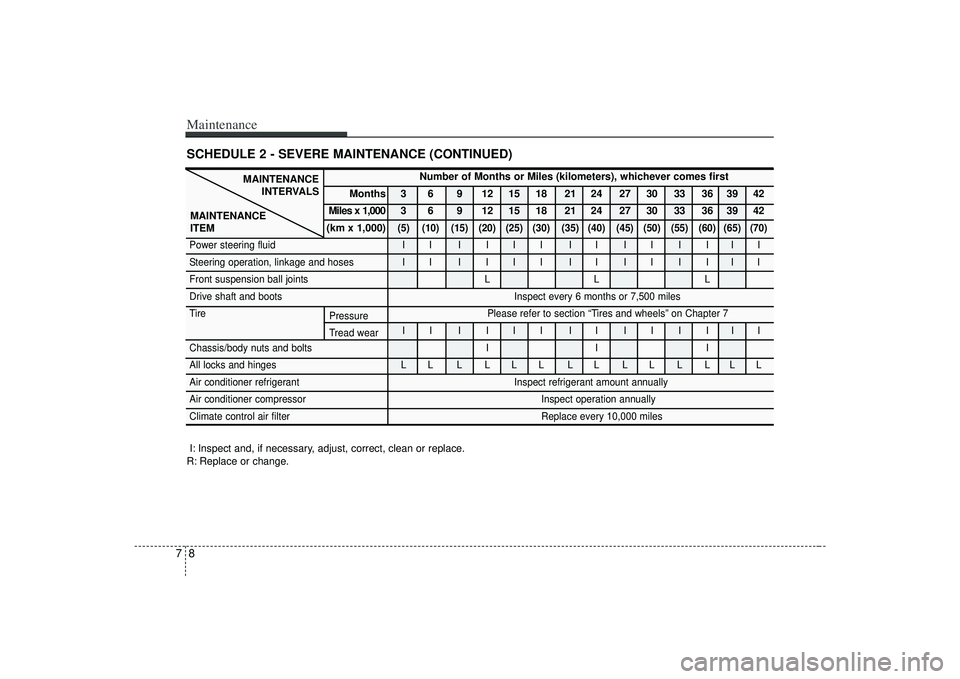
Maintenance87SCHEDULE 2 - SEVERE MAINTENANCE (CONTINUED)
MAINTENANCEINTERVALS
MAINTENANCE
ITEM
Number of Months or Miles (kilometers), whichever comes first
Months 3 6 9 12 15 18 21 24 27 30 33 36 39 42
Miles x 1,000 3 6 9 12 15 18 21 24 27 30 33 36 39 42
(km x 1,000)
(5) (10) (15) (20) (25) (30) (35) (40) (45) (50) (55) (60) (65) (70)
Power steering fluid I I I I I I I I I I I I I I
Steering operation, linkage and hoses I I I I I I I I I I I I I I
Front suspension ball joints L L L
Drive shaft and boots Inspect every 6 months or 7,500 miles
Tire Please refer to section “Tires and wheels” on Chapter 7 II I III II II I III
Chassis/body nuts and bolts I I I
All locks and hinges L L L L L L L L L L L L L L
Air conditioner refrigerant Inspect refrigerant amount annually
Air conditioner compressor Inspect operation annually
Climate control air filter Replace every 10,000 miles
I: Inspect and, if necessary, adjust, correct, clean or replace.
R: Replace or change.
Pressure
Tread wear
Page 259 of 321
79
Maintenance
OWNER MAINTENANCE Owner maintenance schedule The following lists are vehicle checks and
inspections that should be performed by
the owner or qualified service technician
at the frequencies indicated to help
ensure safe, dependable operation of
your vehicle.
Any adverse conditions should be
brought to the attention of your dealer or
qualified service technician or service
advisor as soon as possible.
These Owner Maintenance Checks are
generally not covered by warranties and
you may be charged for labor, parts and
lubricants used.
When you stop for fuel: Check the engine oil level.
Check coolant level in coolant reser-voir.
Check the windshield washer fluid level.
Look for low or under-inflated tires.
While operating your vehicle: Note any changes in the sound of the exhaust or any smell of exhaust fumes
in the vehicle.
Check for vibrations in the steering wheel. Notice any increased steering
effort or looseness in the steering
wheel, or change in its straight-ahead
position.
Notice if your vehicle constantly turns slightly or “pulls” to one side when trav-
eling on smooth, level road.
When stopping, listen and check for strange sounds, pulling to one side,
increased brake pedal travel or “hard-
to-push” brake pedal.
If any slipping or changes in the oper- ation of your transaxle occurs, check
the transaxle fluid level.
Check automatic transaxle P (Park) function.
Check parking brake.
Check for fluid leaks under your vehicle (water dripping from the air condition-
ing system after use is normal).
WARNING
Be careful when checking your
engine coolant level when the
engine is hot. Scalding hot coolant
and steam may blow out under
pressure. This could cause serious
injury.