2009 KIA AMANTI clock
[x] Cancel search: clockPage 88 of 321

Knowing your vehicle76
3Outside the vehicle To open the trunk, insert the key into
the lock (
➀) and turn it clockwise (
➁).
If the trunk is opened with the key while
all the doors are locked, trunk will be
locked if closed.
To open the trunk, pull up (
➃) the trunk
lid by pressing the button (➂) of the
trunk handle when the trunk is
unlocked. Trunk can be opened by
pressing the button (
➂) of the handle
and pulling up the lid while any door is
unlocked. To close the trunk, use both hands to
push the trunk lid down. Check to see
if the trunk is completely shut. If all the
doors are locked then the trunk will be
locked too.
If the trunk lid control button in the glove box is in the ON position
(depressed), the trunk can be opened
with a transmitter.
If the trunk is opened with the transmit- ter while all the doors are locked, the
trunk will be locked when closed.
Trunk cannot be opened with the sub key.
TRUNK
OGH026007
PROPOSITION 65
WARNING
Engine exhaust and a wide variety
of automobile components and
parts, including components found
in the interior furnishings in a vehi-
cle, contain or emit chemicals
known to the State of California to
cause cancer and birth defects and
reproductive harm. In addition, cer-
tain fluids contained in vehicles
and certain products of component
wear contain or emit chemicals
known to the State of California to
cause cancer and birth defects or
other reproductive harm.
CAUTION
Do not try to open the trunk with thesub key. It may damage the key set.
Page 93 of 321

381
Knowing your vehicle
1. Stop the engine.
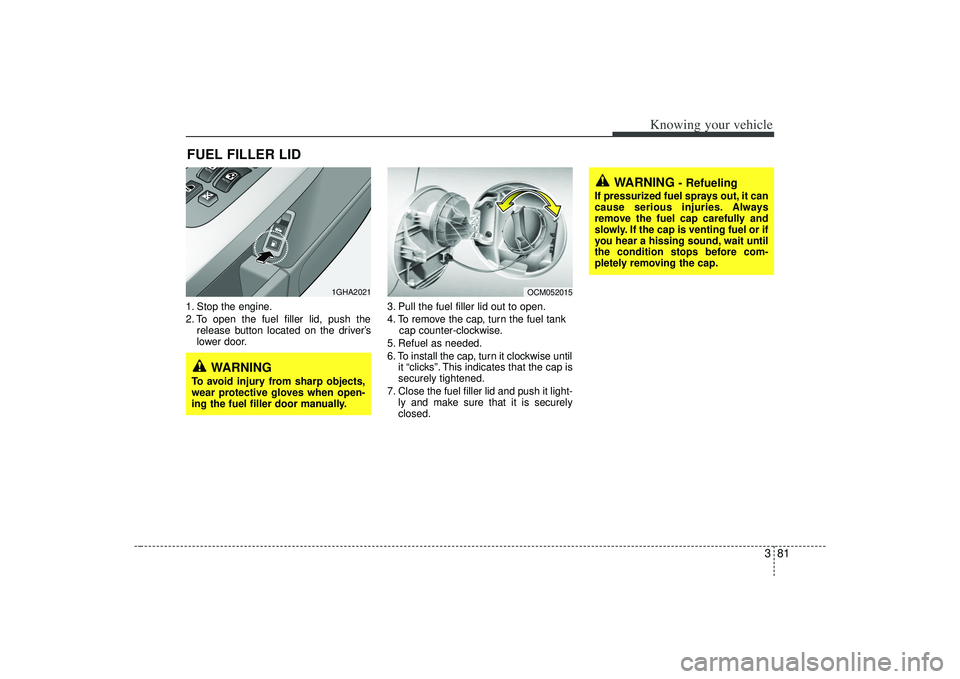
2. To open the fuel filler lid, push therelease button located on the driver’s
lower door. 3. Pull the fuel filler lid out to open.
4. To remove the cap, turn the fuel tank
cap counter-clockwise.
5. Refuel as needed.
6. To install the cap, turn it clockwise until it “clicks”. This indicates that the cap is
securely tightened.
7. Close the fuel filler lid and push it light- ly and make sure that it is securely
closed.FUEL FILLER LID
1GHA2021
OCM052015
WARNING
To avoid injury from sharp objects,
wear protective gloves when open-
ing the fuel filler door manually.
WARNING
- Refueling
If pressurized fuel sprays out, it can
cause serious injuries. Always
remove the fuel cap carefully and
slowly. If the cap is venting fuel or if
you hear a hissing sound, wait until
the condition stops before com-
pletely removing the cap.
Page 107 of 321

395
Knowing your vehicle
ClockAnalog (if equipped)Whenever the battery terminals, A/V
CLOCK fuse, or Power Connect are dis-
connected, you must reset the time.
When the ignition switch is in the ACC or
ON position, the clock buttons operate as
follows:➀
: time increases one minute each timethe button is pressed. It increases
continuously if pressed longer than 3
seconds.
Digital (if equipped)Whenever the battery terminals, A/V
CLOCK fuse, or Power Connect are dis-
connected, you must reset the time.
For details, see end of chapter 3.
OGH026077N
➀
OGH029078
Page 109 of 321

397
Knowing your vehicle
Sunshade The sunshade will be opened with the
glass panel automatically when the glass
panel is slid. After closing the glass panel
the sunshade will only close manually.
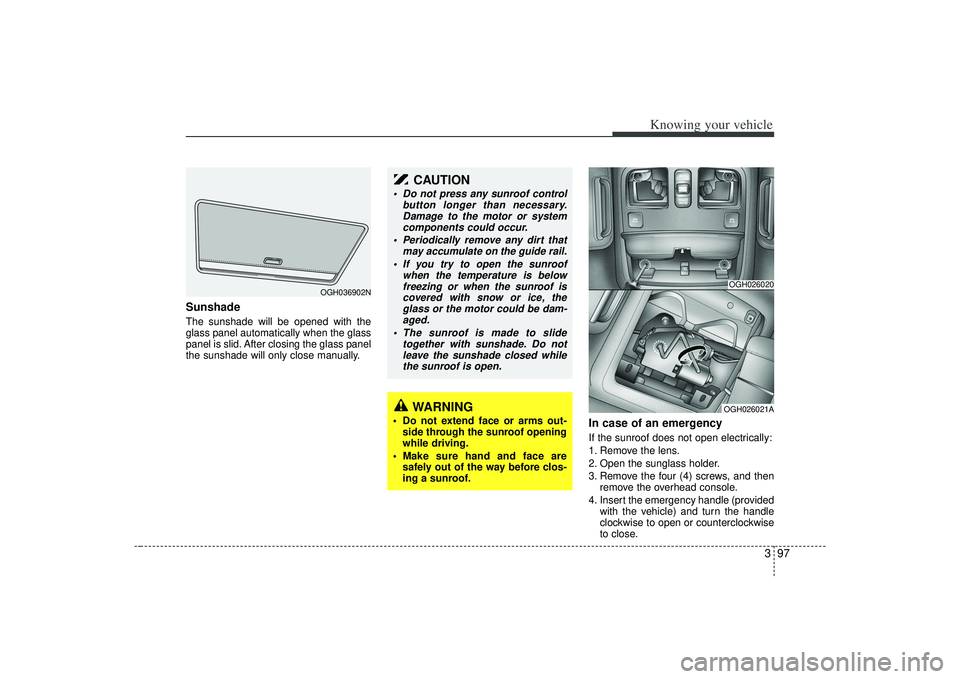
In case of an emergency If the sunroof does not open electrically:
1. Remove the lens.
2. Open the sunglass holder.
3. Remove the four (4) screws, and thenremove the overhead console.
4. Insert the emergency handle (provided with the vehicle) and turn the handle
clockwise to open or counterclockwise
to close.
OGH036902N
WARNING
Do not extend face or arms out-side through the sunroof opening
while driving.
Make sure hand and face are safely out of the way before clos-
ing a sunroof.
CAUTION
Do not press any sunroof control button longer than necessary.Damage to the motor or systemcomponents could occur.
Periodically remove any dirt that may accumulate on the guide rail.
If you try to open the sunroof when the temperature is belowfreezing or when the sunroof iscovered with snow or ice, the glass or the motor could be dam-aged.
The sunroof is made to slide together with sunshade. Do notleave the sunshade closed whilethe sunroof is open.
OGH026020OGH026021A
Page 117 of 321

3105
Knowing your vehicle
1. FM/AM Selection ButtonTurns to FM or AM mode and toggles
FM1
➟FM2
➟AM
➟...➟FM1
➟... when the
button is pressed each time.
2. Automatic Channel Selection Button When the [TRACK ] is pressed, it
will automatically tune to the previous
lower station.
When the [SEEK ] is pressed, it will automatically tune to the next higher
station.3. SCAN Selection ButtonWhen the button is pressed, it automati-
cally only [SCAN] up. The sound hearing
for 5 seconds per all searched station
preset.4. MUTE Selection ButtonPush button to stop sound and [MUTE] is
displayed.
5. Pre-set Selection Button Push [1]~[6] buttons less than 0.8 sec-onds to play the channel saved in each
button.
Push pre-set button for 0.8 seconds or longer to save current channel to the
respective button with a beep.6. SET UP Button The SET UP Mode is displayed if the[SET UP] Button is pressed. While in
SET UP Mode, use the [TUNE/ENTER]
Button to set the SOUND(BASS, MID-
DLE, TREBLE, FADER, BALANCE),
SAT(CHANNEL/TITLE, CATEGORY/
CHANNEL), CLOCK(12, 24), TEMP
(°C, °F) and SCROLL(ON, OFF).
To exit from SET UP Mode, press "RETURN" or wait 10 seconds.
Method of adjusting the SET UP is the same for CDP, AUX, USB, and iPod
Mode.
■Setting the SET UP Mode Press the [TUNE/ENTER] Button to
select and make adjustments to the
desired mode within SET UP Mode.
While in SOUND Mode, press the[TUNE/ENTER] Button to change in
the order of BASS
➟MIDDLE
➟TREBLE
➟FADER
➟BALANCE
➟SET UP Mode.
Turn the [TUNE/ENTER] Button in
clockwise or counterclockwise direc-
tion to make adjustments for each SUB
Mode.
While in SAT Mode, press the [TUNE/ ENTER] Button to display the "CHAN-
NEL/TITLE, CATEGORY/CHANNEL".
Rotate the [TUNE/ENTER] Button to
select the SUB Mode and press the
[TUNE/ENTER] Button to set.
While in CLOCK Mode, press the [TUNE/ENTER] Button to display the
"ON, OFF".
Rotate the [TUNE/ENTER] Button to
select the SUB Mode and press the
[TUNE/ENTER] Button to set.
(CLOCK Mode CDC Only)
Page 118 of 321
![KIA AMANTI 2009 Owners Manual Knowing your vehicle106
3 While in TEMP Mode, press the [TUNE
/ENTER] Button to display the "°C, °F".
Rotate the [TUNE/ENTER] Button to
select the SUB Mode and press the
[TUNE/ENTER] Button to set.
KIA AMANTI 2009 Owners Manual Knowing your vehicle106
3 While in TEMP Mode, press the [TUNE
/ENTER] Button to display the "°C, °F".
Rotate the [TUNE/ENTER] Button to
select the SUB Mode and press the
[TUNE/ENTER] Button to set.](/manual-img/2/57931/w960_57931-117.png)
Knowing your vehicle106
3 While in TEMP Mode, press the [TUNE
/ENTER] Button to display the "°C, °F".
Rotate the [TUNE/ENTER] Button to
select the SUB Mode and press the
[TUNE/ENTER] Button to set.
(TEMP Mode CDC Only)
While in SCROLL Mode, press the [TUNE/ENTER] Button to display the
"ON, OFF".
Rotate the [TUNE/ENTER] Button to
select the SUB Mode and press the
[TUNE/ENTER] Button to set.7. TUNE/ENTER Button Turn this button clockwise by one notchto increase frequency by 200KHz(AM:
10KHz) from current frequency.
Turn this button counterclockwise by one notch to decrease frequency by
200KHz(AM:10KHz)from current fre-
quency.
Press this button while holding SET UP button to activate/inactivate the
item to select SET UP item using left
and right function of the Tune button.
8. Power ON/OFF & Volume Control ButtonTurns on/off the set when the IGNITION
SWITCH is on ACC or ON. If the button
is turned to the right, it increases the vol-
ume and left, decreases the volume.
channel is found.
Page 122 of 321

Knowing your vehicle110
310. CD Selection Button If there is a cd in the CDP DECK it
turns to CD mode when the button is
pressed each time.
If no Disc, it displays "NO DISC" and returns to th previous mode.11. File(Track) Search/ENTER Button Turn this button clockwise to display
Track NO(File name) after current
song.
Turn this button counterclockwise to display Track NO(File Name) before
current song.
To select to the displayed song, press the button.12. CD Eject Button Press this button to eject the CD duringCD playback.
If no CD is in the deck, "NO DISC" will be displayed and returns to the previ-
ous mode.❈ ALL EJECT(CDC ONLY)
Press this button for more than 0.8 sec-
onds to eject all discs inside the decks in
respective order.
13. CD LOAD Button(CDC Only) Press this button for less than 0.8 sec- onds to load CD into deck.
Press this button for more than 0.8 seconds to load CDs into all available
deck(from 1~6).
The last CD will play. 10 seconds idle status will disable loading process.14. DISC UP/DOWN Button(CDC Only)Disc is moved up or down from currently
playing disc.
Page 126 of 321

Knowing your vehicle114
31. AUX/USB Selection Button If auxiliary device/USB/ is connected, it
turns to AUX/USB mode and toggles
as below when the button is pressed
each time.
If no auxiliary device and USB is con- nected, it displays "No Media" and
returns to the previous mode.2. Automatic Track Selection Button Press [TRACK ] to return to the
beginning of current file and Press
again within 1 seconds to return the
previous track file.
Press and hold [TRACK ] to initiate fast backward search.
Press [SEEK ] for less than 0.8 sec- onds to advance the next file.
Press and hold [SEEK ] to initiate fast forward search.3. SCAN Play ButtonPlays 10 seconds of each song in the
USB device. Press the button once again
to cancel scanning.
4. RANDOM Play ButtonPress this button for less than 0.8 sec-
onds to activate 'RDM' mode and more
than 0.8 seconds to activate 'ALL RDM'
mode.
RDM : Only files in a folder are playedback in a random sequence.
ALL RDM : All files in a USB memory are played back in the random sequence.5. REPEAT Play ButtonPress this button for less than 0.8 sec-
onds to activate 'RPT' mode and more
than 0.8 seconds to activate 'FLD RPT'
mode.
RPT : Only a file is repeatedly playedback.
FLD RPT : Only files in a folder are repeatedly played back.6. INFORMATION ButtonDisplays the information of the file cur-
rently played in the order of FILE NAME➟TITLE
➟ARTIST
➟ALBUM
➟FOLDER
➟
TOTAL FILE
➟NORMAL DISPLAY
➟FILE
NAME
➟... (Displays no information if the
file has no song information.)
Press the button again to cancel the mode.
7. Folder Search Button Folder name/File name(the first song in the folder) is moved up or down from
currently playing folder.
To select to the displayed folder, press ENTER(NO.8) button.8. File Search/ENTER Button Turn this button clockwise to displayFile name after current song.
Turn this button counterclockwise to display File Name before current song.
To select to the displayed song, press the button.