2009 KIA AMANTI turn signal
[x] Cancel search: turn signalPage 11 of 321
23
Your vehicle at a glance
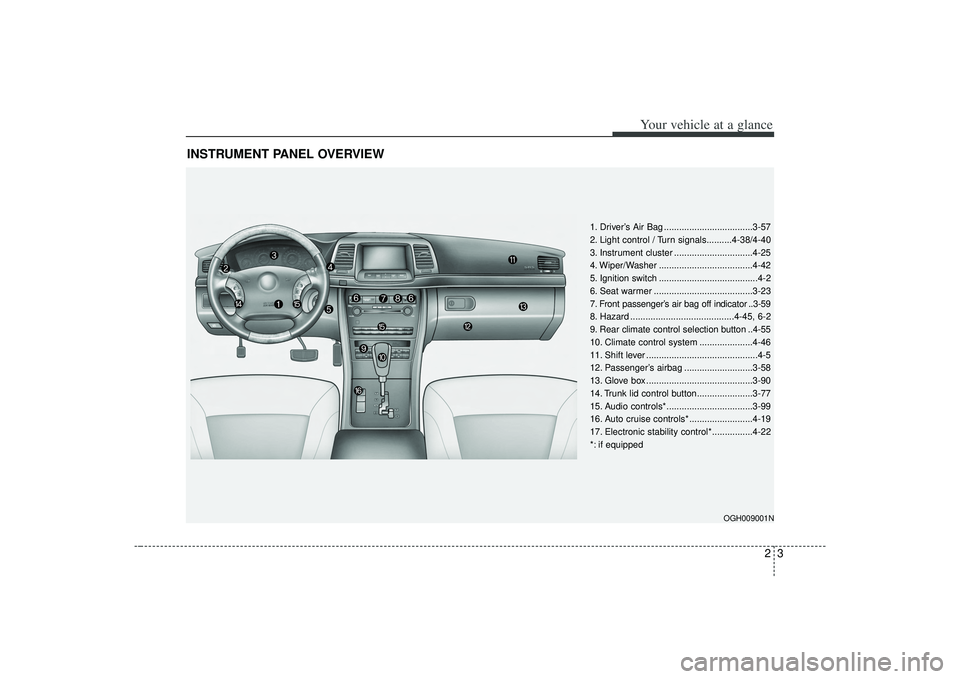
INSTRUMENT PANEL OVERVIEW
1. Driver’s Air Bag ...................................3-57
2. Light control / Turn signals..........4-38/4-40
3. Instrument cluster ...............................4-25
4. Wiper/Washer .....................................4-42
5. Ignition switch .......................................4-2
6. Seat warmer .......................................3-23
7. Front passenger’s air bag off indicator ..3-59
8. Hazard .........................................4-45, 6-2
9. Rear climate control selection button ..4-55
10. Climate control system .....................4-46
11. Shift lever ............................................4-5
12. Passenger’s airbag ...........................3-58
13. Glove box ..........................................3-90
14. Trunk lid control button......................3-77
15. Audio controls*..................................3-99
16. Auto cruise controls* .........................4-19
17. Electronic stability control*................4-22
*: if equipped
OGH009001N
Page 19 of 321
37
Knowing your vehicle
Your vehicle is equipped with an elec-
tronic engine immobilizer system to
reduce the risk of unauthorized vehicle
use.
The immobilizer system is comprised of
a small transponder in the ignition key
and electronic devices inside the vehicle.
With the immobilizer system, whenever
you insert your ignition key into the igni-
tion switch and turn it to ON, it checks
and determines whether the ignition key
is valid or not.
If the key is determined to be valid, the
engine will start.
If the key is determined to be invalid, the
engine will not start.To deactivate the immobilizer sys-
tem:Insert the ignition key into the key cylin-
der and turn it to the ON position.To activate the immobilizer sys-
tem:Turn the ignition key to the OFF position.
The immobilizer system activates auto-
matically. Without a valid ignition key for
your vehicle, the engine will not start.IMMOBILIZER SYSTEM (IF EQUIPPED)
CAUTION
The transponder in your ignitionkey is an important part of theimmobilizer system. It is designed to give years of trouble free service,however you should avoid expo- sure to moisture, static electricityand rough handling. Immobilizersystem malfunction could occur.
CAUTION
Do not change, alter or adjust the immobilizer system because itcould cause the immobilizer sys-tem to malfunction and should only be serviced by an authorized Kiadealer.
Malfunctions caused by improperalterations, adjustments or modifi-cations to the immobilizer system are not covered by your vehiclemanufacturer warranty.
CAUTION
Do not put metal accessories nearthe key or ignition key.
The engine may not start for themetal accessories may interrupt thetransponder signal from normally transmitting
WARNING
In order to prevent theft of your
vehicle, do not leave spare keys
anywhere in your vehicle. Your
Immobilizer password is a cus-
tomer unique password and should
be kept confidential. Do not leave
this number anywhere in your vehi-
cle.
Page 83 of 321
371
Knowing your vehicle
How does the air bag system
operate Air bag only operates when the ignitionswitch is turned to the ON or START
positions.
Air bags inflate instantly in the event of serious frontal or side collision (if
equipped with side air bag or curtain
air bag) in order to help protect the
occupants from serious physical injury.
There is no single speed at which the air bags will inflate.
Generally, air bags are designed to
inflate by the severity of a collision and
its direction. These two factors deter-
mine whether the sensors send out an
electronic deployment/inflation signal. Air bag deployment depends on a
number of factors including vehicle
speed, angles of impact and the densi-
ty and stiffness of the vehicles or
objects which your vehicle hits in the
collision. However, factors are not limit-
ed to those mentioned above.
The front air bags will completely inflate and deflate in an instant.
It is virtually impossible for you to see
the air bags inflate during an accident.
It is much more likely that you will sim-
ply see the deflated air bags hanging
out of their storage compartments after
the collision. In order to help provide protection in a
severe collision, the air bags must
inflate rapidly. The speed of air bag
inflation is a consequence of the
extremely short time in which a collision
occurs and the need to get the air bag
between the occupant and the vehicle
structures before the occupant impacts
those structures. This speed of inflation
reduces the risk of serious or life-
threatening injuries in a severe collision
and is thus a necessary part of air bag
design.
However, air bag inflation can also
cause injuries which normally can
include facial abrasions, bruises and
broken bones, and sometimes more
serious injuries because that inflation
speed also causes the air bags to
expand with a great deal force.
There are even circumstances under which contact with the steer-
ing wheel air bag can cause fatal
injuries, especially if the occupant
is positioned excessively close to
the steering wheel.
Page 110 of 321
Knowing your vehicle98
3Resetting the sunroofWhenever the vehicle battery is discon-
nected or discharged, or you use the
emergency handle to operate the sun-
roof, you have to reset your sunroof sys-
tem as follows:
1. Turn the ignition key to the ON posi-
tion.
2. According to the position of the sun- roof, do as follows.
1) in case that the sunroof has closedcompletely or been tilted
: Press the TILT UP button for 1 second.
2) in case that the sunroof has slide- opened
: Press and hold the CLOSE button for more than 5 seconds until the
sunroof has closed completely.
And then press the TILT UP but-
ton for 1 second
3. Then, release it.
4. Press and hold the TILT UP button once again until the sunroof has
returned to the original position of
TILT UP after it is raised a little higher
than the maximum TILT UP position.
When this is complete, the sunroof sys-
tem is reset.
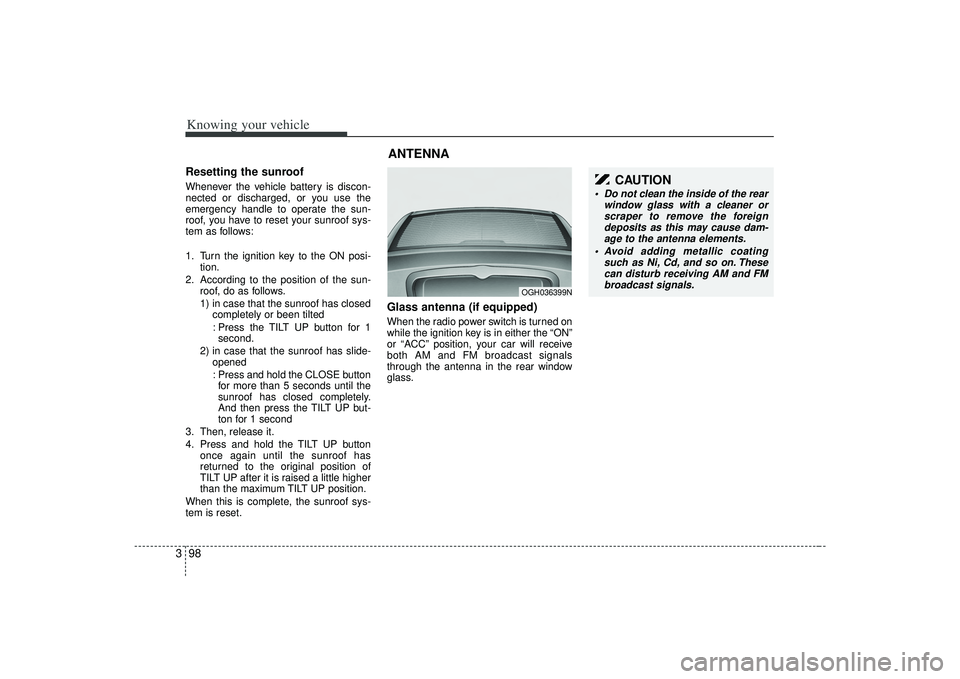
Glass antenna (if equipped)When the radio power switch is turned on
while the ignition key is in either the “ON”
or “ACC” position, your car will receive
both AM and FM broadcast signals
through the antenna in the rear window
glass.ANTENNA
OGH036399N
CAUTION
Do not clean the inside of the rear window glass with a cleaner orscraper to remove the foreigndeposits as this may cause dam- age to the antenna elements.
Avoid adding metallic coating such as Ni, Cd, and so on. Thesecan disturb receiving AM and FMbroadcast signals.
Page 133 of 321

3121
Knowing your vehicle
How to Use SIRIUS Satellite
RadioYour new Kia vehicle is equipped with 3
months complimentary period of SIRIUS
Satellite Radio so you have access to
over 130 channels of music, information
and entertainment programming.ActivationIn order to extend or reactivate your sub-
scription to SIRIUS Satellite Radio, you
will need to contact SIRIUS Customer
Care at 888-539-7474. Have your 12 digit
SID(Sirius Identification Number)/ESN
(Electronic Serial Number) ready. To
retrieve the SID/ESN, turn on the radio,
press the [SAT] button and tune to chan-
nel zero. please note that the vehicle will
need to be turned on, in Sirius mode, and
have an unobstructed view of the sky in
order for the radio to receive the activation
signal.1. SATELLITE RADIO SelectionButton(SIRIUS Satellite Radio)Press the [SAT] button to switch to SIR-
IUS Satellite Radio. It cycles through the
different bands as noted below.
SAT1
➟SAT2
➟SAT3
➟SAT1
➟...
2. Channel Selection Button Press [TRACK ] or [SEEK ] but-
ton for less than 0.8 seconds to select
previous or next channel.
Press [TRACK ] or [SEEK ] but- ton for 0.8 or longer to continuously
move to previous or next channel.
if "CATEGORY" Icon is displayed at the top of the screen, channel up/down is
done through the channels within cur-
rent category.3. SCAN Selection Button When the button is pressed, it automat-ically scans the radio stations upwards.
The SCAN feature steps through each channel, starting from the initial chan-
nel, for ten seconds. Press the [SCAN]
button again to stop the scan feature
and to listen to the currently selected
channel.4. MUTE Selection ButtonPress this button to temporarily cut off
the Sound. "MUTE" is displayed on the
LCD. Press the button once again to can-
cel MUTE mode.
5. Preset Selection Button Press [1]~[6] buttons less than 0.8seconds to play the Channel saved in
each button.
Press [1]~[6] button for 0.8 seconds or longer to save current Channel to the
respective button with a beep.6. INFO Selection ButtonDisplays the information of the channel
currently played by in the order of CATE-
GORY NAME
➟ARTIST NAME
➟COM-
POSER NAME
➟...(CH/TITLE Selection)
Displays the information of the channel
currently played in the order of SONG
TITLE
➟ARTIST NAME
➟COMPOSER
NAME
➟... (CAT/CH Selection) (If there is
no information of COMPOSER NAME, it
returns to main display.)
Page 161 of 321
425
Driving your vehicle
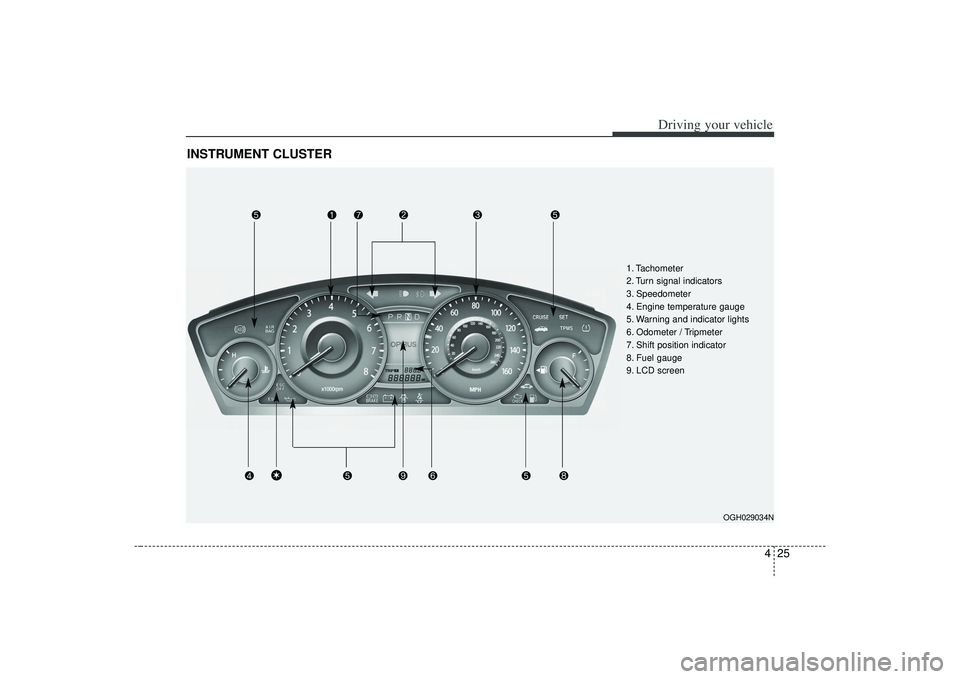
INSTRUMENT CLUSTER
OGH029034N
1. Tachometer
2. Turn signal indicators
3. Speedometer
4. Engine temperature gauge
5. Warning and indicator lights
6. Odometer / Tripmeter
7. Shift position indicator
8. Fuel gauge
9. LCD screen
\b
Page 170 of 321
Driving your vehicle34
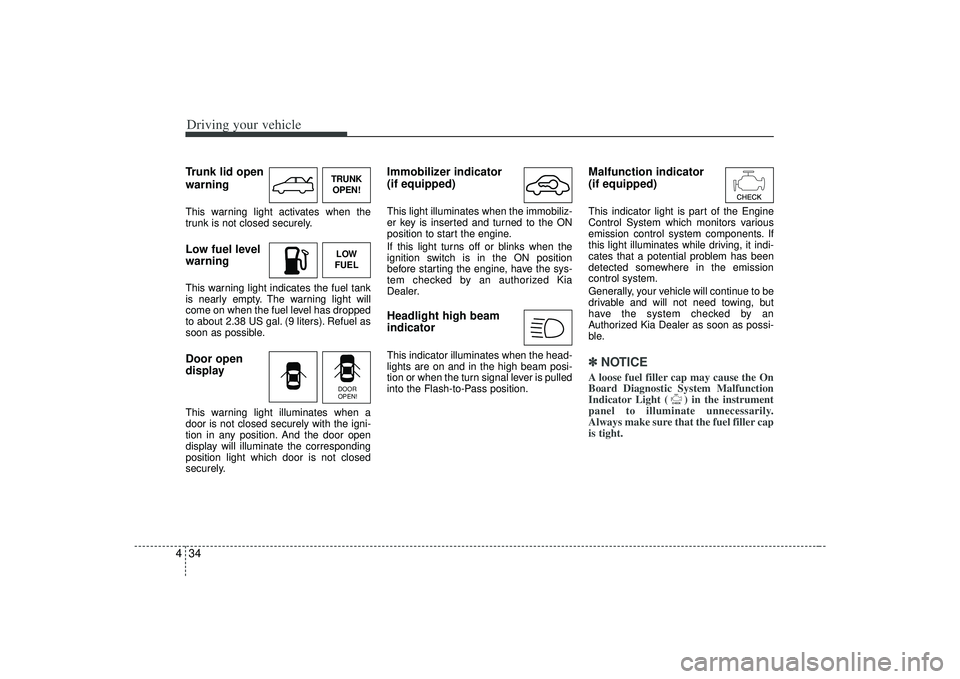
4Trunk lid open
warningThis warning light activates when the
trunk is not closed securely.Low fuel level
warningThis warning light indicates the fuel tank
is nearly empty. The warning light will
come on when the fuel level has dropped
to about 2.38 US gal. (9 liters). Refuel as
soon as possible.Door open
displayThis warning light illuminates when a
door is not closed securely with the igni-
tion in any position. And the door open
display will illuminate the corresponding
position light which door is not closed
securely.
Immobilizer indicator
(if equipped)This light illuminates when the immobiliz-
er key is inserted and turned to the ON
position to start the engine.
If this light turns off or blinks when the
ignition switch is in the ON position
before starting the engine, have the sys-
tem checked by an authorized Kia
Dealer.Headlight high beam
indicator This indicator illuminates when the head-
lights are on and in the high beam posi-
tion or when the turn signal lever is pulled
into the Flash-to-Pass position.
Malfunction indicator
(if equipped)This indicator light is part of the Engine
Control System which monitors various
emission control system components. If
this light illuminates while driving, it indi-
cates that a potential problem has been
detected somewhere in the emission
control system.
Generally, your vehicle will continue to be
drivable and will not need towing, but
have the system checked by an
Authorized Kia Dealer as soon as possi-
ble.✽ ✽
NOTICEA loose fuel filler cap may cause the On
Board Diagnostic System Malfunction
Indicator Light ( ) in the instrument
panel to illuminate unnecessarily.
Always make sure that the fuel filler cap
is tight.
TRUNK
OPEN!LOW
FUELDOOR
OPEN!
Page 176 of 321
Driving your vehicle40
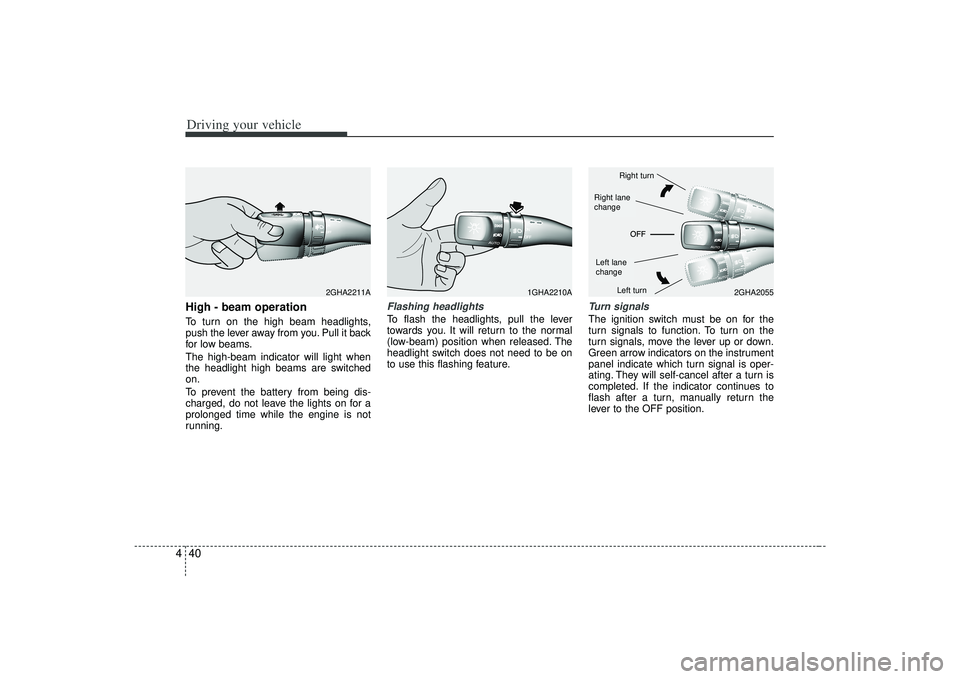
4High - beam operation To turn on the high beam headlights,
push the lever away from you. Pull it back
for low beams.
The high-beam indicator will light when
the headlight high beams are switched
on.
To prevent the battery from being dis-
charged, do not leave the lights on for a
prolonged time while the engine is not
running.
Flashing headlights To flash the headlights, pull the lever
towards you. It will return to the normal
(low-beam) position when released. The
headlight switch does not need to be on
to use this flashing feature.
Turn signalsThe ignition switch must be on for the
turn signals to function. To turn on the
turn signals, move the lever up or down.
Green arrow indicators on the instrument
panel indicate which turn signal is oper-
ating. They will self-cancel after a turn is
completed. If the indicator continues to
flash after a turn, manually return the
lever to the OFF position.
1GHA2210A
2GHA2055
2GHA2211A
Right turnLeft turn
Left lane
changeRight lane
change