2009 KIA AMANTI ESP
[x] Cancel search: ESPPage 170 of 321
Driving your vehicle34
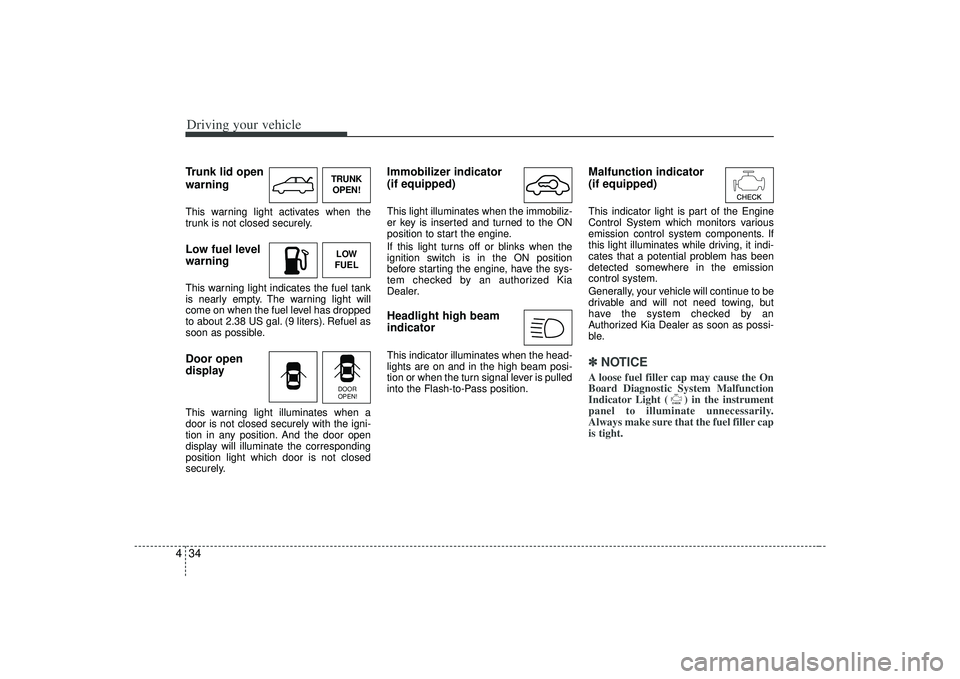
4Trunk lid open
warningThis warning light activates when the
trunk is not closed securely.Low fuel level
warningThis warning light indicates the fuel tank
is nearly empty. The warning light will
come on when the fuel level has dropped
to about 2.38 US gal. (9 liters). Refuel as
soon as possible.Door open
displayThis warning light illuminates when a
door is not closed securely with the igni-
tion in any position. And the door open
display will illuminate the corresponding
position light which door is not closed
securely.
Immobilizer indicator
(if equipped)This light illuminates when the immobiliz-
er key is inserted and turned to the ON
position to start the engine.
If this light turns off or blinks when the
ignition switch is in the ON position
before starting the engine, have the sys-
tem checked by an authorized Kia
Dealer.Headlight high beam
indicator This indicator illuminates when the head-
lights are on and in the high beam posi-
tion or when the turn signal lever is pulled
into the Flash-to-Pass position.
Malfunction indicator
(if equipped)This indicator light is part of the Engine
Control System which monitors various
emission control system components. If
this light illuminates while driving, it indi-
cates that a potential problem has been
detected somewhere in the emission
control system.
Generally, your vehicle will continue to be
drivable and will not need towing, but
have the system checked by an
Authorized Kia Dealer as soon as possi-
ble.✽ ✽
NOTICEA loose fuel filler cap may cause the On
Board Diagnostic System Malfunction
Indicator Light ( ) in the instrument
panel to illuminate unnecessarily.
Always make sure that the fuel filler cap
is tight.
TRUNK
OPEN!LOW
FUELDOOR
OPEN!
Page 200 of 321
Driving tips85✽
✽NOTICEProlonged rocking may cause engine
over-heating, transaxle damage or fail-
ure, and tire damage.
Driving at night Because night driving presents more
hazards than driving in the daylight, here
are some important tips to remember:
Slow down and keep more distance
between you and other vehicles, as it
may be more difficult to see at night,
especially in areas where there may
not be any street lights.
Adjust your mirrors to reduce the glare from other driver's headlights.
Keep your headlights clean and prop- erly aimed on vehicles not equipped
with the automatic headlight aiming
feature. Dirty or improperly aimed
headlights will make it much more diffi-
cult to see at night.
Avoid staring directly at the headlights of oncoming vehicles. You could be
temporarily blinded, and it will take
several seconds for your eyes to read-
just to the darkness.
Driving in the rain Rain and wet roads can make driving
dangerous, especially if you’re not pre-
pared for the slick pavement. Here are a
few things to consider when driving in the
rain:
A heavy rainfall will make it harder tosee and will increase the distance
needed to stop your vehicle, so slow
down.
Keep your windshield wiping equip- ment in good shape. Replace your
windshield wiper blades when they
show signs of streaking or missing
areas on the windshield.
If your tires are not in good condition, making a quick stop on wet pavement
can cause a skid and possibly lead to
an accident. Be sure your tires are in
good shape.
Turn on your headlights to make it eas- ier for others to see you.
WARNING
- Spinning tires
Do not spin the wheels, especially
at speeds more than 35 mph (56
km/h). Spinning the wheels at high
speeds when the vehicle is station-
ary could cause a tire to overheat,
explode and injure bystanders.
Page 213 of 321
521
Driving tips
Safety chains You should always attach chains
between your vehicle and your trailer.
Cross the safety chains under the tongue
of the trailer so that the tongue will not
drop to the road if it becomes separated
from the hitch.
Instructions about safety chains may be
provided by the hitch manufacturer or by
the trailer manufacturer. Follow the man-
ufacturer’s recommendation for attaching
safety chains. Always leave just enough
slack so you can turn with your trailer.
And, never allow safety chains to drag on
the ground.
Trailer brakes If your trailer weighs more than 1000 lbs.
(454 kg) loaded, then it needs its own
brakes and they must be adequate. Be
sure to read and follow the instructions
for the trailer brakes so you’ll be able to
install, adjust and maintain them proper-
ly.
Don’t tap into your vehicle's brake sys-tem.
Driving with a trailer Towing a trailer requires a certain
amount of experience. Before setting out
for the open road, you must get to know
your trailer. Acquaint yourself with the
feel of handling and braking with the
added weight of the trailer. And always
keep in mind that the vehicle you are
driving is now a good deal longer and not
nearly so responsive as your vehicle is
by itself.
Before you start, check the trailer hitch
and platform, safety chains, electrical
connector(s), lights, tires and mirror
adjustment. If the trailer has electric
brakes, start your vehicle and trailer mov-
ing and then apply the trailer brake con-
troller by hand to be sure the brakes are
working. This lets you check your electri-
cal connection at the same time.
During your trip, check occasionally to be
sure that the load is secure, and that the
lights and any trailer brakes are still work-
ing.
WARNING
Do not use a trailer with its own
brakes unless you are absolutely
certain that you have properly set
up the brake system. This is not a
task for amateurs. Use an experi-
enced, competent trailer shop for
this work.
Page 223 of 321
531
Driving tips
Reprogramming a single
HomeLink buttonTo program a device to HomeLink using
a HomeLink button previously trained,
follow these steps:
1. Press and hold the desired HomeLinkbutton. Do NOT release until step 4
has been completed.
2. When the indicator light begins to flash slowly (after 20 seconds), position the
hand-held transmitter 1 to 3 inches
away from the HomeLink surface.
3. Press and hold the hand-held trans- mitter button (or press and “cycle” - as
described in “Canadian Programming”
above).
4. The HomeLink indicator light will flash, first slowly and then rapidly. When the
indicator light begins to flash rapidly,
release both buttons.
The previous device has now been
erased and the new device can be acti-
vated by pushing the HomeLink button
that has just been programmed. This pro-
cedure will not affect any other pro-
grammed HomeLink buttons.
Gate operator programming &
canadian programmingDuring programming, your hand-held
transmitter may automatically stop trans-
mitting. Continue to press and hold the
HomeLink button (note steps 2 through 4
in the “Programming” portion of this text)
while you press and re-press (“cycle”)
your handheld transmitter every two sec-
onds until the frequency signal has been
learned. The indicator light will flash
slowly and then rapidly after several sec-
onds upon successful training.✽ ✽ NOTICEIf programming a garage door opener
or gate, it is advised to unplug the device
during the “cycling” process to prevent
possible motor burn-up.
AccessoriesIf you would like additional information on
the HomeLink Wireless Control System,
HomeLink compatible products, or to
purchase other accessories such as the
HomeLink® Lighting Package, please
contact HomeLink at 1-800-355-3515 or
on the internet at www.homelink.com.
This device complies with FCC rules part
15. Operation is subject to the following
two conditions:
(1) This device may not cause harmful
interference.
(2) This device must accept any interfer- ence that may be received including
interference that may cause unde-
sired operation.
CAUTION
The transmitter has been testedand complies with FCC and DOC/MDC rules. Changes or modifi-cations not expressly approved bythe party responsible for compli-ance could void the user’s authority to operate the device.
IC: 4112104541A Gentex MODEL/FCC ID: NZLSTDHL3
Page 240 of 321
617
In case of an emergency
TIRES PRESSURE MONITORING SYSTEM (TPMS) (IF EQUIPPED)
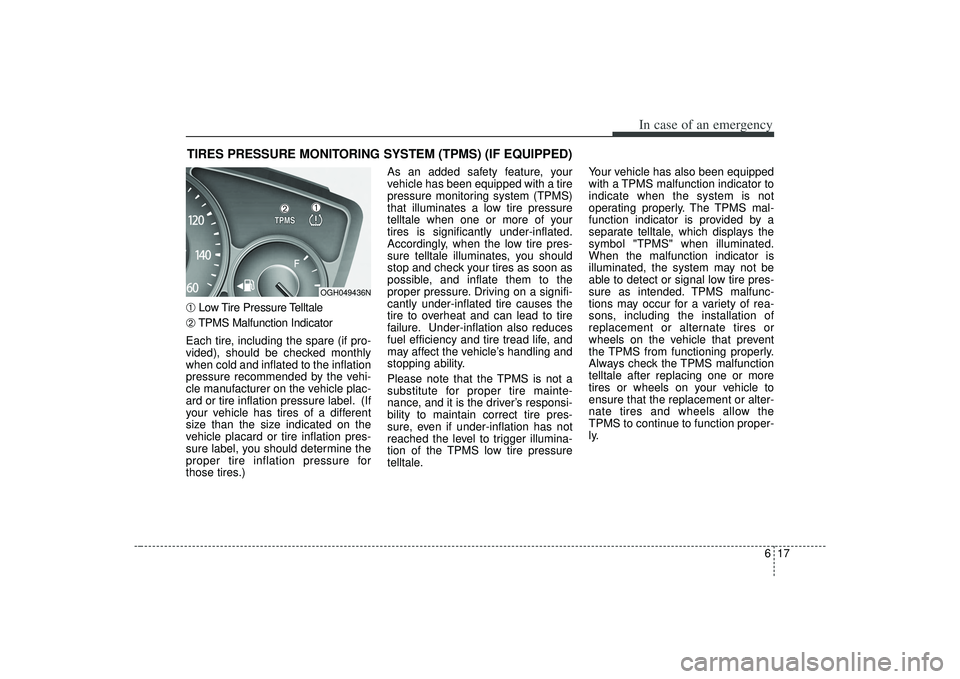
➀
Low Tire Pressure Telltale
➁
TPMS Malfunction Indicator
Each tire, including the spare (if pro-
vided), should be checked monthly
when cold and inflated to the inflation
pressure recommended by the vehi-
cle manufacturer on the vehicle plac-
ard or tire inflation pressure label. (If
your vehicle has tires of a different
size than the size indicated on the
vehicle placard or tire inflation pres-
sure label, you should determine the
proper tire inflation pressure for
those tires.) As an added safety feature, your
vehicle has been equipped with a tire
pressure monitoring system (TPMS)
that illuminates a low tire pressure
telltale when one or more of your
tires is significantly under-inflated.
Accordingly, when the low tire pres-
sure telltale illuminates, you should
stop and check your tires as soon as
possible, and inflate them to the
proper pressure. Driving on a signifi-
cantly under-inflated tire causes the
tire to overheat and can lead to tire
failure. Under-inflation also reduces
fuel efficiency and tire tread life, and
may affect the vehicle’s handling and
stopping ability.
Please note that the TPMS is not a
substitute for proper tire mainte-
nance, and it is the driver’s responsi-
bility to maintain correct tire pres-
sure, even if under-inflation has not
reached the level to trigger illumina-
tion of the TPMS low tire pressure
telltale.
Your vehicle has also been equipped
with a TPMS malfunction indicator to
indicate when the system is not
operating properly. The TPMS mal-
function indicator is provided by a
separate telltale, which displays the
symbol "TPMS" when illuminated.
When the malfunction indicator is
illuminated, the system may not be
able to detect or signal low tire pres-
sure as intended. TPMS malfunc-
tions may occur for a variety of rea-
sons, including the installation of
replacement or alternate tires or
wheels on the vehicle that prevent
the TPMS from functioning properly.
Always check the TPMS malfunction
telltale after replacing one or more
tires or wheels on your vehicle to
ensure that the replacement or alter-
nate tires and wheels allow the
TPMS to continue to function proper-
ly.
OGH049436N➀
➁
Page 244 of 321
621
In case of an emergency
This device complies with Part 15
of the FCC rules.Operation is sub-
ject to the following two conditions:
1. This device may not cause harm- ful interference, and
2. This device must accept any inter- ference received, including inter-
ference that may cause undesired
operation.
WARNING - TPMS
The TPMS cannot alert you tosevere and sudden tire dam-
age caused by external fac-
tors.
If you feel any vehicle instabil- ity, immediately take your foot
off the accelerator and slowly
move to a safe position off the
road.
WARNING
Tampering with, modifying, or
disabling the Tire Pressure
Monitoring System (TPMS)
components may interfere with
the system's ability to warn the
driver of low tire pressure con-
ditions and/or TPMS malfunc-
tions. Tampering with, modify-
ing, or disabling the Tire
Pressure Monitoring System
(TPMS) components may void
the warranty for that portion of
the vehicle.
WARNING
Changes or modifications not
expressly approved by the party
responsible for compliance
could void the user's authority
to operate the equipment.
CAUTION
Do not use any tire sealant if your vehicle is equipped witha Tire Pressure MonitoringSystem. The liquid sealant candamage the tire pressure sen-sors.
In order for the system to cor- rectly monitor tires for under-inflation, there should be atotal of exactly 4 sensors fit-ted to each of the four drivenwheel positions. There shouldbe no other sensors in thevehicle include spare tireposition since this couldcause the system to monitorthe wrong sensors.
Page 246 of 321
623
In case of an emergency
The compact spare should be inflat-
ed to 60 psi (420 kPa).✽ ✽NOTICECheck the inflation pressure after
installing the spare tire. Adjust it to
the specified pressure, as necessary.
When using a compact spare tire,
observe the following precautions:
Under no circumstances should
you exceed 50 mph (80 km/h); a
higher speed could damage the
tire.
Ensure that you drive slowly enough for the road conditions to
avoid all hazards. Any road hazard,
such as a pothole or debris, could
seriously damage the compact
spare.
Any continuous road use of this tire could result in tire failure, loss of
vehicle control, and possible per-
sonal injury.
Do not exceed the vehicle’s maxi- mum load rating or the load-carry-
ing capacity shown on the sidewall
of the compact spare tire.
Avoid driving over obstacles. The compact spare tire diameter is
smaller than the diameter of a con-
ventional tire and reduces the
ground clearance approximately 1
inch (25 mm), which could result in
damage to the vehicle. Do not take the vehicle through an
automatic car wash with a compact
spare.
Do not use tire chains on this tire. Because of the smaller size, a tire
chain will not fit properly. This could
damage the vehicle and result in
loss of the chain.
This tire should not be installed on the front axle if the vehicle must be
driven in snow or on ice.
Do not use the compact spare tire on any other vehicle because this
tire has been designed especially
for your vehicle.
The compact spare tire’s tread life is shorter than a regular tire.
Inspect your compact spare tire
regularly and replace worn com-
pact spare tires with the same size
and design, mounted on the same
wheel.
WARNING
- Compact spare
This spare tire should be used
only for VERY short distances.
Compact spares should NEVER
be used for long drives or
extended distances.
Page 252 of 321
Maintenance27MAINTENANCE SERVICESYou should exercise the utmost care to
prevent damage to your vehicle and
injury to yourself whenever performing
any maintenance or inspection proce-
dures.
Should you have any doubts concerning
the inspection or servicing of your vehi-
cle, we strongly recommend that you
have an Authorized Kia Dealer perform
this work.
An Authorized Kia Dealer has factory-
trained technicians and genuine Kia
parts to service your vehicle properly. For
expert advice and quality service, see an
Authorized Kia Dealer.
Inadequate, incomplete or insufficient
servicing may result in operational prob-
lems with your vehicle that could lead to
vehicle damage, an accident, or person-
al injury.
Owner’s responsibility ✽ ✽NOTICEMaintenance Service and Record
Retention are the owner's responsibility. You should retain documents that show
proper maintenance has been performed
on your vehicle in accordance with the
scheduled maintenance service charts
shown on the following pages. You need
this information to establish your compli-
ance with the servicing and maintenance
requirements of your Kia warranties.
Detailed warranty information is provided
in your Warranty & Consumer
Information manual.
Repairs and adjustments required as a
result of improper maintenance or a lack
of required maintenance are not covered.
We recommend you have your vehicle
maintained and repaired by an
Authorized Kia Dealer. An Authorized Kia
Dealer meets Kia`s high service quality
standards and receives technical support
from Kia in order to provide you with a
high level of service satisfaction.
Scheduled maintenance service If none of the following conditions are
applicable, then use Schedule 1 –
Normal Maintenance.
Repeated short distance driving.
Driving in dusty conditions or sandy areas.
Extensive use of brakes.
Driving in areas where salt or other corrosive materials are being used.
Driving on rough or muddy roads.
Driving in mountainous areas.
Extended periods of idling or low speed operation.
Driving for a prolonged period in cold temperatures and/or extremely humid
climates.
More than 50% driving in heavy city traffic during hot weather above 90°F
(32°C)
If any of the preceding conditions apply,
follow Schedule 2 – Severe Maintenance.After 105 months or 105,000 miles (168,000 km) continue to follow the pre-scribed maintenance intervals.