2009 KIA AMANTI buttons
[x] Cancel search: buttonsPage 30 of 321
Knowing your vehicle18
3For a seating position more comfortable
to the driver and front passenger, adjust
the seat forward, backward, up and
down.
WARNING
Loose objects in the driver’s foot
area could interfere with the oper-
ation of the foot pedals, possibly
causing an accident. Loose
objects might interfere with the
seat slide mechanism. Do not
place anything under the front
seats.
The power seats are operable with the ignition OFF.
Therefore, children should never
be left unattended in the car.
WARNING
- Driver’s seat
Never attempt to adjust the seatwhile the vehicle is moving. This
could result in loss of control,
and an accident causing death,
serious injury, or property dam-
age.
with the normal position of the
seatback. Storing items against a
seatback or in any other way
interfering with proper locking of
a seatback could result in serious
or fatal injury in a sudden stop or
collision.
seatback upright and the lap por-
tion of the safety belt, or lap belt,
snug and low across the hips.
This position puts your safety
belts in the best position to pro-
tect you in case of an accident.
In order to avoid unnecessary air bag injuries including the possi-
bility of severe injury or death,
always sit as far back as possible
from the steering wheel so that
your chest is away at least 10
inches (250 mm) away from the
steering wheel.
CAUTION
Power seats are driven by electric motor. Stop operating when theadjustment is completed.
Excessive operation may damagethe electrical equipment.
When in operation, the power seats consume large amounts ofelectrical power. To preventunnecessary charging system drain, don’t adjust the powerseats longer than necessarywhile the engine is not running.
Do not operate two or more power seat control buttons at the sametime. Doing so may result inpower seat motor or electricalcomponent malfunction.
Page 40 of 321
Knowing your vehicle28
3A driver position memory system is pro-
vided to store and recall the seat and
outside mirror positions with a simple
button operation. By saving the desired
positions into the system memory, differ-
ent drivers can reposition the seat and
outside mirror based upon their driving
preference.
If battery is disconnected, the position
memory will be lost and the driving posi-
tions should be restored in the system.
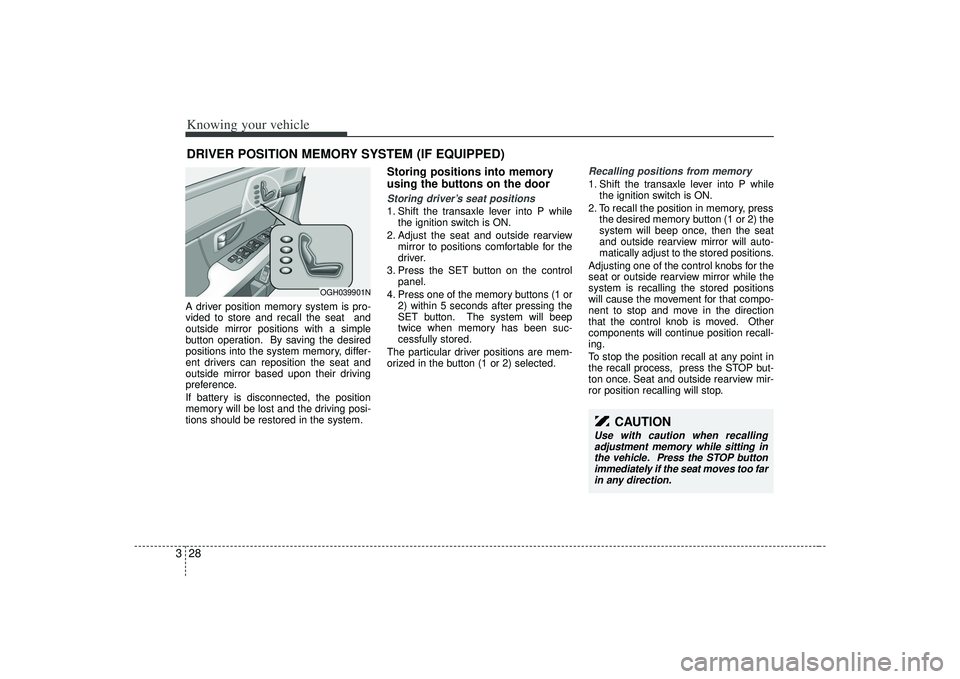
Storing positions into memory
using the buttons on the doorStoring driver’s seat positions1. Shift the transaxle lever into P while
the ignition switch is ON.
2. Adjust the seat and outside rearview mirror to positions comfortable for the
driver.
3. Press the SET button on the control panel.
4. Press one of the memory buttons (1 or 2) within 5 seconds after pressing the
SET button. The system will beep
twice when memory has been suc-
cessfully stored.
The particular driver positions are mem-
orized in the button (1 or 2) selected.
Recalling positions from memory1. Shift the transaxle lever into P while the ignition switch is ON.
2. To recall the position in memory, press the desired memory button (1 or 2) the
system will beep once, then the seat
and outside rearview mirror will auto-
matically adjust to the stored positions.
Adjusting one of the control knobs for the
seat or outside rearview mirror while the
system is recalling the stored positions
will cause the movement for that compo-
nent to stop and move in the direction
that the control knob is moved. Other
components will continue position recall-
ing.
To stop the position recall at any point in
the recall process, press the STOP but-
ton once. Seat and outside rearview mir-
ror position recalling will stop.
DRIVER POSITION MEMORY SYSTEM (IF EQUIPPED)
OGH039901N
CAUTION
Use with caution when recalling adjustment memory while sitting in the vehicle. Press the STOP buttonimmediately if the seat moves too far in any direction.
Page 107 of 321

395
Knowing your vehicle
ClockAnalog (if equipped)Whenever the battery terminals, A/V
CLOCK fuse, or Power Connect are dis-
connected, you must reset the time.
When the ignition switch is in the ACC or
ON position, the clock buttons operate as
follows:➀
: time increases one minute each timethe button is pressed. It increases
continuously if pressed longer than 3
seconds.
Digital (if equipped)Whenever the battery terminals, A/V
CLOCK fuse, or Power Connect are dis-
connected, you must reset the time.
For details, see end of chapter 3.
OGH026077N
➀
OGH029078
Page 108 of 321
Knowing your vehicle96
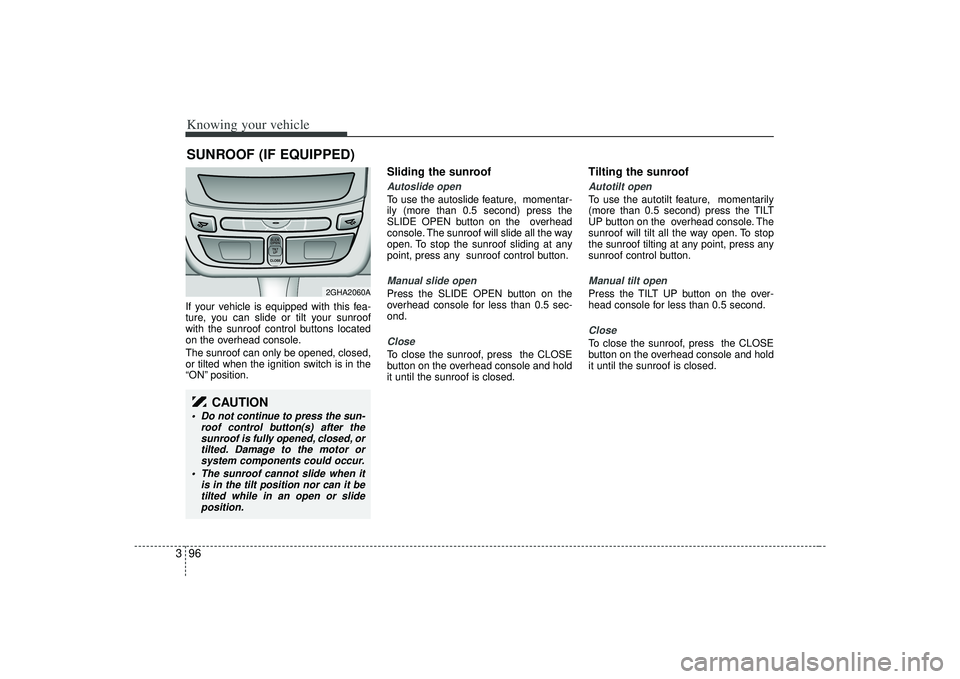
3If your vehicle is equipped with this fea-
ture, you can slide or tilt your sunroof
with the sunroof control buttons located
on the overhead console.
The sunroof can only be opened, closed,
or tilted when the ignition switch is in the
“ON” position.
Sliding the sunroof Autoslide openTo use the autoslide feature, momentar-
ily (more than 0.5 second) press the
SLIDE OPEN button on the overhead
console. The sunroof will slide all the way
open. To stop the sunroof sliding at any
point, press any sunroof control button.Manual slide openPress the SLIDE OPEN button on the
overhead console for less than 0.5 sec-
ond.CloseTo close the sunroof, press the CLOSE
button on the overhead console and hold
it until the sunroof is closed.
Tilting the sunroof Autotilt openTo use the autotilt feature, momentarily
(more than 0.5 second) press the TILT
UP button on the overhead console. The
sunroof will tilt all the way open. To stop
the sunroof tilting at any point, press any
sunroof control button.Manual tilt openPress the TILT UP button on the over-
head console for less than 0.5 second.CloseTo close the sunroof, press the CLOSE
button on the overhead console and hold
it until the sunroof is closed.
SUNROOF (IF EQUIPPED)
SLIDESLIDEOPENOPENTILTTILT UP UPCLOSECLOSESLIDESLIDEOPENOPENTILTTILT UP UPCLOSECLOSE
2GHA2060A
CAUTION
Do not continue to press the sun-
roof control button(s) after thesunroof is fully opened, closed, ortilted. Damage to the motor orsystem components could occur.
The sunroof cannot slide when it is in the tilt position nor can it betilted while in an open or slideposition.
Page 111 of 321
399
Knowing your vehicle
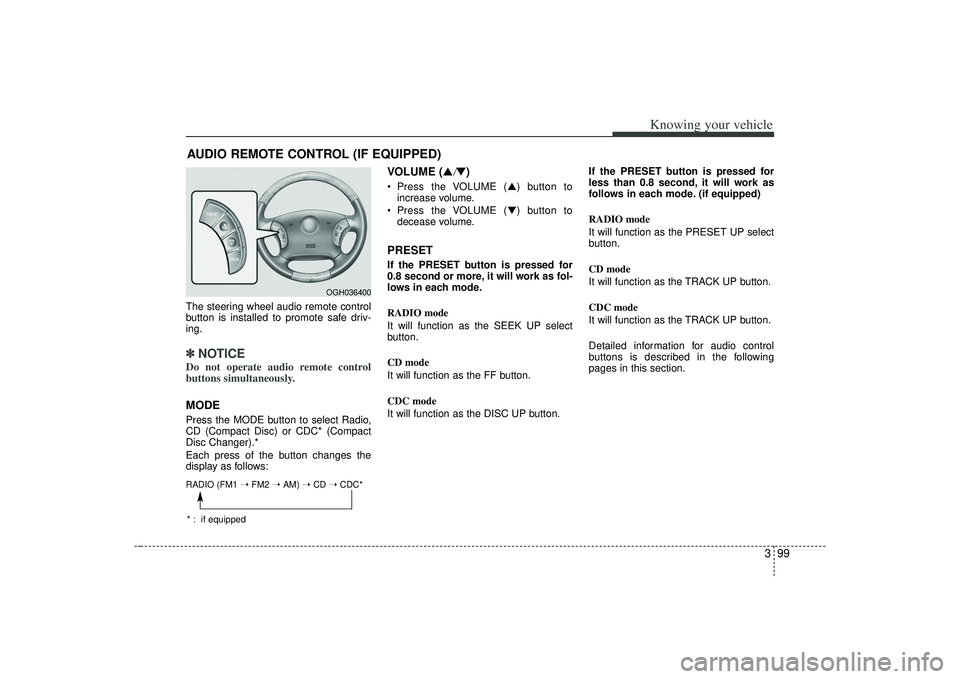
The steering wheel audio remote control
button is installed to promote safe driv-
ing.✽ ✽NOTICEDo not operate audio remote control
buttons simultaneously.MODEPress the MODE button to select Radio,
CD (Compact Disc) or CDC* (Compact
Disc Changer).*
Each press of the button changes the
display as follows:
VOLUME (▲
/▼)
Press the VOLUME ( ▲) button to
increase volume.
Press the VOLUME ( ▼) button to
decease volume.PRESETIf the PRESET button is pressed for
0.8 second or more, it will work as fol-
lows in each mode.
RADIO mode
It will function as the SEEK UP select
button.
CD mode
It will function as the FF button.
CDC mode
It will function as the DISC UP button. If the PRESET button is pressed for
less than 0.8 second, it will work as
follows in each mode. (if equipped)
RADIO mode
It will function as the PRESET UP select
button.
CD mode
It will function as the TRACK UP button.
CDC mode
It will function as the TRACK UP button.
Detailed information for audio control
buttons is described in the following
pages in this section.
AUDIO REMOTE CONTROL (IF EQUIPPED)
OGH036400
RADIO (FM1
➝ FM2 ➝ AM) ➝ CD ➝ CDC** : if equipped
Page 117 of 321

3105
Knowing your vehicle
1. FM/AM Selection ButtonTurns to FM or AM mode and toggles
FM1
➟FM2
➟AM
➟...➟FM1
➟... when the
button is pressed each time.
2. Automatic Channel Selection Button When the [TRACK ] is pressed, it
will automatically tune to the previous
lower station.
When the [SEEK ] is pressed, it will automatically tune to the next higher
station.3. SCAN Selection ButtonWhen the button is pressed, it automati-
cally only [SCAN] up. The sound hearing
for 5 seconds per all searched station
preset.4. MUTE Selection ButtonPush button to stop sound and [MUTE] is
displayed.
5. Pre-set Selection Button Push [1]~[6] buttons less than 0.8 sec-onds to play the channel saved in each
button.
Push pre-set button for 0.8 seconds or longer to save current channel to the
respective button with a beep.6. SET UP Button The SET UP Mode is displayed if the[SET UP] Button is pressed. While in
SET UP Mode, use the [TUNE/ENTER]
Button to set the SOUND(BASS, MID-
DLE, TREBLE, FADER, BALANCE),
SAT(CHANNEL/TITLE, CATEGORY/
CHANNEL), CLOCK(12, 24), TEMP
(°C, °F) and SCROLL(ON, OFF).
To exit from SET UP Mode, press "RETURN" or wait 10 seconds.
Method of adjusting the SET UP is the same for CDP, AUX, USB, and iPod
Mode.
■Setting the SET UP Mode Press the [TUNE/ENTER] Button to
select and make adjustments to the
desired mode within SET UP Mode.
While in SOUND Mode, press the[TUNE/ENTER] Button to change in
the order of BASS
➟MIDDLE
➟TREBLE
➟FADER
➟BALANCE
➟SET UP Mode.
Turn the [TUNE/ENTER] Button in
clockwise or counterclockwise direc-
tion to make adjustments for each SUB
Mode.
While in SAT Mode, press the [TUNE/ ENTER] Button to display the "CHAN-
NEL/TITLE, CATEGORY/CHANNEL".
Rotate the [TUNE/ENTER] Button to
select the SUB Mode and press the
[TUNE/ENTER] Button to set.
While in CLOCK Mode, press the [TUNE/ENTER] Button to display the
"ON, OFF".
Rotate the [TUNE/ENTER] Button to
select the SUB Mode and press the
[TUNE/ENTER] Button to set.
(CLOCK Mode CDC Only)
Page 130 of 321
Knowing your vehicle118
3✽
✽
NOTICE -
Using iPod device
• Some iPod models might not support
the communication protocol and the
files will not be played. (iPod models
supported: Mini, 4G, Photo, Nano,
5G)
• The order of search or playback of songs in the iPod can be different
from the order searched in the audio
system.
• If the iPod crashes due to its own trou- ble, reset iPod. (Reset: Refer to iPod
manual)
• iPod may not operate normally on low battery.
(Continued)
When the iPod cable is connected, the system can be switched to theAUX mode even without the iPoddevice and can cause noise. Disconnect iPod cable when youare not using the iPod device.
CAUTION
- Using iPod device
You need the power cable exclu-
sive for iPod in order to operateiPod with the buttons on the audio system. The PC cable provided byApple may cause malfunction and do not use it for vehicle use.
When connecting the device with iPod cable, push in the jack fullynot to interfere with communica-tion.
When adjusting the sound effects of iPod and the audio system, thesound effects of both devices willoverlap each and might causereduce or distort the quality of thesound.
Deactivate (turn off) the equalizer function of iPod when adjustingthe audio system’s volume, andturn off the equalizer of the audio system when using the equalizerof iPod.
(Continued)
Page 133 of 321

3121
Knowing your vehicle
How to Use SIRIUS Satellite
RadioYour new Kia vehicle is equipped with 3
months complimentary period of SIRIUS
Satellite Radio so you have access to
over 130 channels of music, information
and entertainment programming.ActivationIn order to extend or reactivate your sub-
scription to SIRIUS Satellite Radio, you
will need to contact SIRIUS Customer
Care at 888-539-7474. Have your 12 digit
SID(Sirius Identification Number)/ESN
(Electronic Serial Number) ready. To
retrieve the SID/ESN, turn on the radio,
press the [SAT] button and tune to chan-
nel zero. please note that the vehicle will
need to be turned on, in Sirius mode, and
have an unobstructed view of the sky in
order for the radio to receive the activation
signal.1. SATELLITE RADIO SelectionButton(SIRIUS Satellite Radio)Press the [SAT] button to switch to SIR-
IUS Satellite Radio. It cycles through the
different bands as noted below.
SAT1
➟SAT2
➟SAT3
➟SAT1
➟...
2. Channel Selection Button Press [TRACK ] or [SEEK ] but-
ton for less than 0.8 seconds to select
previous or next channel.
Press [TRACK ] or [SEEK ] but- ton for 0.8 or longer to continuously
move to previous or next channel.
if "CATEGORY" Icon is displayed at the top of the screen, channel up/down is
done through the channels within cur-
rent category.3. SCAN Selection Button When the button is pressed, it automat-ically scans the radio stations upwards.
The SCAN feature steps through each channel, starting from the initial chan-
nel, for ten seconds. Press the [SCAN]
button again to stop the scan feature
and to listen to the currently selected
channel.4. MUTE Selection ButtonPress this button to temporarily cut off
the Sound. "MUTE" is displayed on the
LCD. Press the button once again to can-
cel MUTE mode.
5. Preset Selection Button Press [1]~[6] buttons less than 0.8seconds to play the Channel saved in
each button.
Press [1]~[6] button for 0.8 seconds or longer to save current Channel to the
respective button with a beep.6. INFO Selection ButtonDisplays the information of the channel
currently played by in the order of CATE-
GORY NAME
➟ARTIST NAME
➟COM-
POSER NAME
➟...(CH/TITLE Selection)
Displays the information of the channel
currently played in the order of SONG
TITLE
➟ARTIST NAME
➟COMPOSER
NAME
➟... (CAT/CH Selection) (If there is
no information of COMPOSER NAME, it
returns to main display.)