Page 120 of 502
5. Unlatch the header panel latch located at the top of the
windshield.
6. Remove the panel.
To remove the right panel, follow the steps above except
for Step 2.Front Panel(s) Installation
NOTE:Set the panels on the windshield frame so that
there is no overhang. Also, make sure that the panels are
sitting flush with the body.
1. Install the right panel first, then the left panel.
2. Reinstall the panel(s) using the same steps for removal
in reverse order.
Front Panel(s) Installation Only (With Rear Hard
Top Removed)
1. Turn the left and right panels over and move the
spacer block (located on the rear of the panel) upward 90
degrees.
118 UNDERSTANDING THE FEATURES OF YOUR VEHICLE
Page 123 of 502
CAUTION!
Make sure the storage cap is installed to prevent
foreign materials from entering the washer tube and
clogging system, and also to prevent fluid from being
sprayed into the rear of the vehicle.
8. Disconnect the wire harness from the hard top by
pressing the tab at the side of the connector and pulling
to disconnect.
NOTE: If the red latch on the connector is locked, push
the red latch to the right until you can only see the latch
on one end (right) of the connector. This will unlock the
connector tab, allowing the tab to be pressed down and
enabling the harness to be disconnected from the hard
top. 9. Close the swing gate.
10. Remove the hard top from the vehicle. Place on a soft
surface to prevent damage.
3
UNDERSTANDING THE FEATURES OF YOUR VEHICLE 121
Page 172 of 502
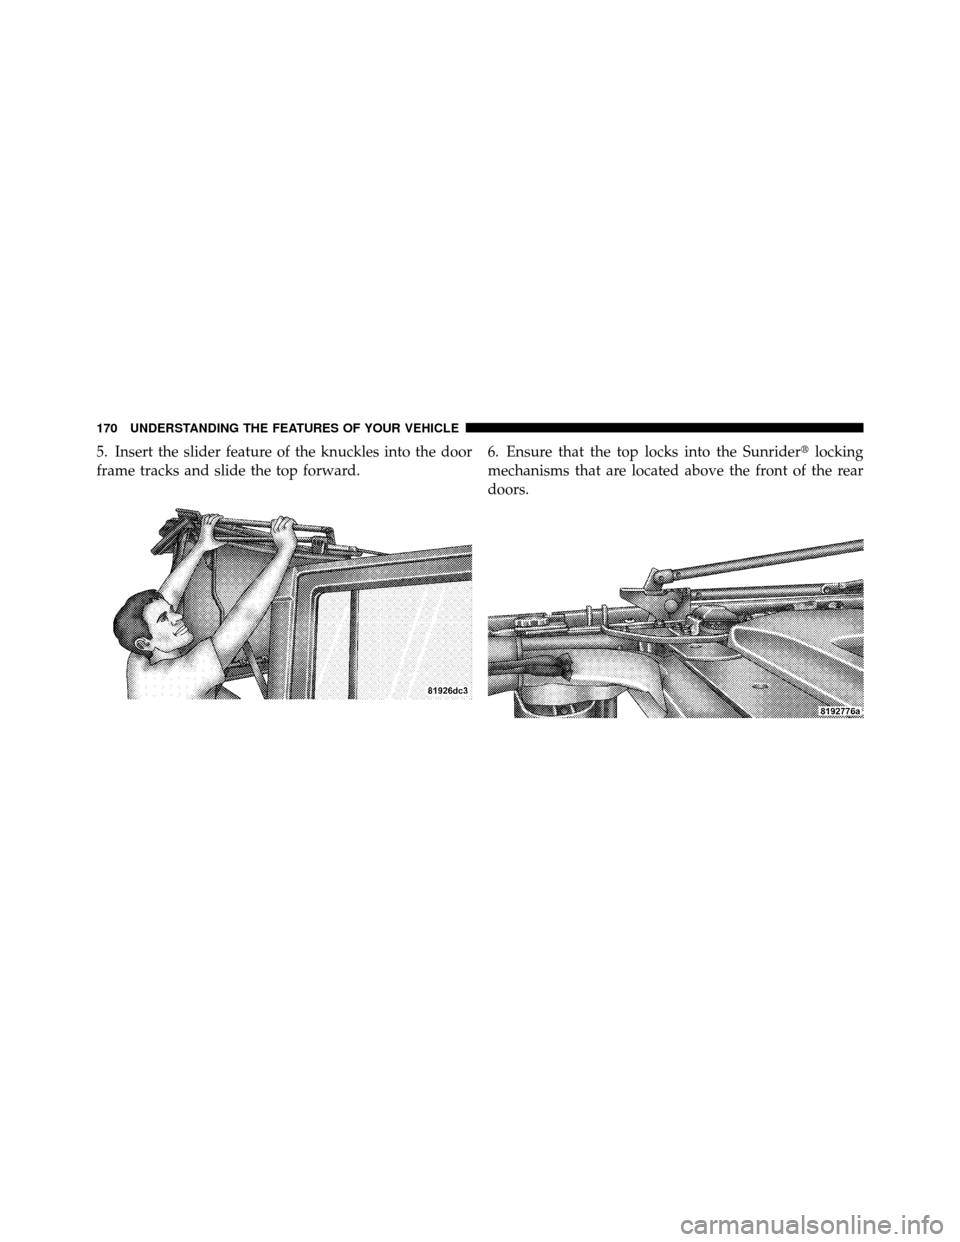
5. Insert the slider feature of the knuckles into the door
frame tracks and slide the top forward.6. Ensure that the top locks into the Sunrider�
locking
mechanisms that are located above the front of the rear
doors.
170 UNDERSTANDING THE FEATURES OF YOUR VEHICLE
Page 188 of 502

8. Secure the top by using the two provided straps. Each
strap will wrap around the side bow and Velcro�to itself;
use one strap on each side of the vehicle.
To Close
Perform the above steps in the opposite order.
NOTE: Failure to fold the fabric rearward will allow the
material to sag and may block the rearview mirror.FOLDING WINDSHIELD
The fold-down windshield and removable side bars on
your vehicle are structural elements that can provide
some protection in some accidents. The windshield also
provides some protection against weather, road debris
and intrusion of small branches and other objects.
Do not drive your vehicle on-road with the windshield
down and the side bars removed as you lose the protec-
tion these structural elements can provide.
If required for certain off-road uses, the side bars can be
removed and the windshield folded down. However, the
protection afforded by these features is then lost. If you
remove the side bars and fold down the windshield,
drive slowly and cautiously. It is recommended that the
speed of the vehicle be limited to 10 mph (16 km/h), with
low range operation preferred if you are driving off-road
with the windshield folded down.
186 UNDERSTANDING THE FEATURES OF YOUR VEHICLE
Page 192 of 502
7. Remove the windshield wiper arms by first pulling
the wiper away from the windshield and out to the
“lock” position. Unsnap the wiper arm nut caps, and
remove the retaining nuts. Lift the wiper arms off and
store them in the center console or securely behind the
rear seat.
NOTE:It may be necessary to use a battery terminal
puller tool in order to separate the wiper arms from the
shaft after the nuts have been removed.
8. Remove the lower windshield plates by removing the
six black round-headed Torx� head screws (using a #40
Torx� head driver) on each side of the base of the
windshield. 9. Lower the windshield gently until it contacts the
rubber hood bumpers.
10. Secure the windshield by passing a cinch strap
through the footman hoop on the center of the hood and
on the center of the windshield frame. Tighten the strap
to secure the windshield in place.
190 UNDERSTANDING THE FEATURES OF YOUR VEHICLE
Page 195 of 502
If the rear wiper is operating when the ignition is turned
to the LOCK position, the wiper will automatically returnto the “Park” position. When the vehicle is restarted, the
wiper will resume function at whichever position the
switch is set at.
Rear Window Defroster — If Equipped
The rear window defroster button is located on the
bottom right-side of the blower control knob.
Press this button to turn on the rear window defroster
and the heated outside mirrors (if equipped). An indica-
tor in the button will illuminate when the rear window
defroster is on. The rear window defroster automatically
turns off after approximately 10 minutes. For an addi-
tional five minutes of operation, press the button a
second time.
NOTE: To prevent excessive battery drain, use the rear
window defroster only when the engine is operating.
Windshield Wiper/Washer Switch
1 — Rear Wiper Position
2 — Rear Washer Position
3
UNDERSTANDING THE FEATURES OF YOUR VEHICLE 193
Page 198 of 502
 — AM/FM/CD/DVD
Radio – If Equipped .................... 234
▫ Operating Instructions — Voice Recognition
System (VR) — If Equipped ............. 234
▫ Operating Instr")
�Sales Code (RER/REN) — AM/FM/CD/DVD
Radio – If Equipped .................... 234
▫ Operating Instructions — Voice Recognition
System (VR) — If Equipped ............. 234
▫ Operating Instructions — uconnect� phone
— If Equipped ...................... 234
▫ Clock Setting Procedure ............... 234
� Sales Code RES — AM/FM Stereo Radio With
CD Player (MP3 AUX Jack)............... 237
▫ Operating Instructions — Radio Mode ..... 237
▫ Operation Instructions — CD Mode For CD
And MP3 Audio Play ................. 240
▫ Notes On Playing MP3 Files ............ 242
▫ Operation Instructions - Auxiliary Mode .... 245�
Sales Code RES/RSC — AM/FM Stereo Radio
With CD Player (MP3 AUX Jack) And Sirius
Radio ............................... 246
▫ Operating Instructions — Radio Mode ..... 246
▫ Operation Instructions — CD Mode For CD
And MP3 Audio Play ................. 252
▫ Notes On Playing MP3 Files ............ 254
▫ List Button (CD Mode For MP3 Play) ...... 256
▫ Info Button (CD Mode For MP3 Play) ...... 256
� uconnect� studios (Satellite Radio) —
If Equipped (REN/REQ/RER/RES/REU
Radios Only) ......................... 258
▫ System Activation .................... 258
▫ Electronic Serial Number/Sirius
Identification Number (ESN/SID) ......... 258
196 UNDERSTANDING YOUR INSTRUMENT PANEL
Page 203 of 502

6. Front Axle Lock Indicator — If EquippedIndicates when the front axle lock has been
activated.
7. Seat Belt Reminder Light A warning chime and an indicator light will alert
you to buckle the seat belts. When the belt is
buckled, the chime will stop, but the light will stay
on for about six seconds, until it times out.
8. Turn Signal Indicators The arrows will flash with the exterior turn signals
when the turn signal lever is operated. A tone will
chime if the turn signals are left on for more than 1 mile
(1.6 km).
9. Oil Pressure Warning Light This light indicates low engine oil pressure. The
light should turn on momentarily when the engine is started, if the bulb does not come on, have the system
checked by an authorized dealer. If the light turns on
while driving, stop the vehicle and shut off the engine as
soon as possible. A chime will sound when this light
turns on.
Do not operate the vehicle until the cause is corrected.
This light does not indicate how much oil is in the engine.
The engine oil level must be checked under the hood.
10. High Beam Indicator
This indicator shows that the high beam head-
lights are on. Push the multifunction control lever
away from you to switch the headlights to high beam.
Pull the lever towards you to switch the headlights back
to low beam. If the driver’s door is open, and the
headlights or park lights are left on, the high beam
indicator light will remain illuminated and a chime will
sound.
4
UNDERSTANDING YOUR INSTRUMENT PANEL 201
 Installation
NOTE:Set th")