Page 84 of 457

UConnect�features Bluetooth�technology - the global
standard that enables different electronic devices to con-
nect to each other without wires or a docking station, so
UConnect�works no matter where you stow your cellu-
lar phone (be it your purse, pocket, or briefcase), as long
as your phone is turned on and has been paired to the
vehicle’s UConnect�system. The UConnect�system
allows up to seven cellular phones to be linked to the
system. Only one linked (or paired) cellular phone can be
used with the system at a time. The system is available in
English, Spanish, or French languages.
Phone Button
The rearview mirror contains the microphone
for the system (depending on the type of
mirror and radio equipped), and either the
radio or the mirror has the two control buttons
(PHONE Button and VOICE RECOGNITION button)
that will enable you to access the system.Voice Recognition Button
Actual button location may vary with the ra-
dio. The individual buttons are described in the
“Operation” section.
The UConnect�system can be used with any Hands-Free
Profile certified Bluetooth�cellular phone. See the
UConnect�website for supported phones. If your cellu-
lar phone supports a different profile (e.g., Headset
Profile) you may not be able to use any UConnect�
features. Refer to your cellular service provider or the
phone manufacturer for details.
The UConnect�system is fully integrated with the vehi-
cle’s audio system. The volume of the UConnect�system
can be adjusted either from the radio volume control
knob or from the steering wheel radio control (right
switch), if so equipped.
82 UNDERSTANDING THE FEATURES OF YOUR VEHICLE
Page 135 of 457
TILT STEERING COLUMN
To tilt the steering column, push down on the lever below
the turn signal control lever. With one hand firmly on the
wheel, move the steering column up or down as desired.
Push the lever back up to lock the column firmly in place.WARNING!
Tilting the steering column while the vehicle is
moving is dangerous. Without a stable steering col-
umn, you could lose control of the vehicle and have
an accident. Adjust the column only while the ve-
hicle is stopped. Be sure it is locked before driving.
Tilting Steering Column Control
UNDERSTANDING THE FEATURES OF YOUR VEHICLE 133
3
Page 136 of 457

ELECTRONIC SPEED CONTROL — IF EQUIPPED
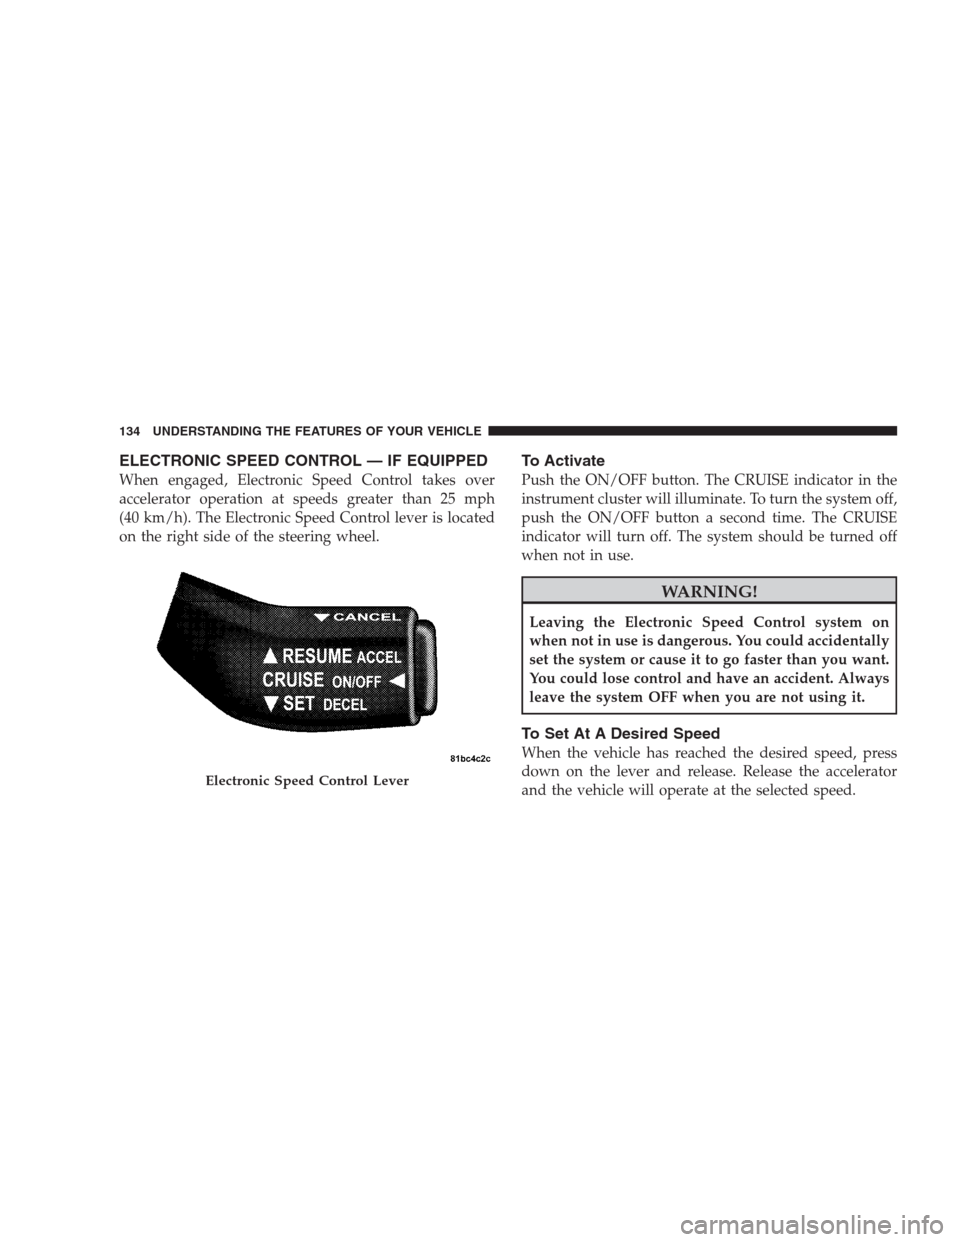
When engaged, Electronic Speed Control takes over
accelerator operation at speeds greater than 25 mph
(40 km/h). The Electronic Speed Control lever is located
on the right side of the steering wheel.
To Activate
Push the ON/OFF button. The CRUISE indicator in the
instrument cluster will illuminate. To turn the system off,
push the ON/OFF button a second time. The CRUISE
indicator will turn off. The system should be turned off
when not in use.
WARNING!
Leaving the Electronic Speed Control system on
when not in use is dangerous. You could accidentally
set the system or cause it to go faster than you want.
You could lose control and have an accident. Always
leave the system OFF when you are not using it.
To Set At A Desired Speed
When the vehicle has reached the desired speed, press
down on the lever and release. Release the accelerator
and the vehicle will operate at the selected speed.
Electronic Speed Control Lever
134 UNDERSTANDING THE FEATURES OF YOUR VEHICLE
Page 242 of 457
REMOTE SOUND SYSTEM CONTROLS — IF
EQUIPPED
The remote sound system controls are located on the rear
surface of the steering wheel. Reach behind the wheel to
access the switches.The right-hand control is a rocker type switch with a
pushbutton in the center. Pressing the top of the switch
will increase the volume and pressing the bottom of the
switch will decrease the volume.
The button located in the center of the right-hand control
will switch modes to Radio or CD.
The left-hand control is a rocker type switch with a
pushbutton in the center. The function of the left-hand
control is different depending on which mode you are in.
The following describes the left-hand control operation in
each mode.
Radio Operation
Press the top of the switch to SEEK up for the next
listenable station. Press the bottom of the switch to SEEK
down for the next listenable station.
Remote Sound System Controls
240 UNDERSTANDING YOUR INSTRUMENT PANEL
Page 254 of 457

�AutoStick�— If Equipped............... 264
▫Operation.......................... 264
▫General Information................... 265
�Four-Wheel Drive Operation — If Equipped . . . 266
�Driving On Slippery Surfaces............. 266
▫Acceleration........................ 266
▫Traction........................... 267
�Driving Through Water.................. 267
▫Flowing/Rising Water................. 268
▫Shallow Standing Water................ 268
�On-Road Driving Tips.................. 270
�Off-Road Driving Tips.................. 270▫When To Use Low (L Off-Road) With The
4WD Lock Lever Engaged.............. 271
▫Simultaneous Brake And Throttle
Operation.......................... 271
▫Driving In Snow, Mud And Sand......... 271
▫Crossing Obstacles (Rocks And Other High
Points)............................ 273
▫Hill Climbing....................... 276
▫Driving Through Water................ 278
▫Airing Down For Off-Road Driving........ 281
▫Vehicle Recovery..................... 282
▫After Driving Off-Road................ 284
�Power Steering........................ 286
▫Power Steering Fluid Check............. 286
252 STARTING AND OPERATING
Page 258 of 457

STARTING PROCEDURES
Before starting your vehicle, adjust your seat, adjust both
inside and outside mirrors, and fasten your seat belts.
WARNING!
Never leave children alone in a vehicle. Leaving
unattended children in a vehicle is dangerous for a
number of reasons. A child or others could be seri-
ously or fatally injured. Do not leave the key in the
ignition. A child could operate power windows,
other controls, or move the vehicle.
Manual Transmission — If Equipped
Before starting the engine fully apply the parking brake,
press the clutch pedal to the floor, and place the shift
lever in NEUTRAL.
NOTE:
•The engine will not start unless the clutch pedal is
pressed to the floor.
•If the key will not turn and the steering wheel is
locked, rotate the wheel in either direction to relieve
pressure on the locking mechanism and then turn the
key.
Automatic Transmission — If Equipped
The shift lever must be in the PARK or NEUTRAL
position before you can start the engine. Apply the brakes
before shifting to any driving gear.
NOTE:You must press the brake pedal before shifting
out of PARK.
Normal Starting
Normal starting of either a cold or a warm engine does
not require pumping or depressing the accelerator pedal.
Simply turn the ignition switch to the START position
and release when the engine starts. If the engine fails to
start within 15 seconds, turn the ignition switch to the
OFF position, wait 10 to 15 seconds, then repeat the
normal starting procedure.
256 STARTING AND OPERATING
Page 265 of 457

PARK while the vehicle is in motion. Apply the parking
brake when leaving the vehicle in this range. Always
apply the parking brake first, and then place the shift
lever in the PARK position.
WARNING!
Unintended movement of a vehicle could injure
those in and near the vehicle. As with all vehicles,
you should never exit a vehicle while the engine is
running. Before exiting a vehicle, you should always
shift the vehicle into PARK, remove the key from the
ignition, and apply the parking brake. Once the key
is removed from the ignition, the shift lever is locked
in the PARK position, securing the vehicle against
unwanted movement. Furthermore, you should never
leave unattended children inside a vehicle.The following indicators should be used to ensure that
you have engaged the shift lever into the PARK position:
•When shifting into PARK, firmly move the shift lever
all the way forward until it stops.
•Look at the shift indicator window on the shift lever
bezel to ensure it is in the PARK position.
•You must depress the brake pedal to move the shift
lever out of the PARK position.
CAUTION!
Before moving the shift lever out of PARK, you must
turn the ignition from LOCK to ON so the steering
wheel and shift lever are released. Otherwise, dam-
age to the steering column or shift lever could result.
You must also depress the brake pedal.
STARTING AND OPERATING 263
5
Page 272 of 457

ON-ROAD DRIVING TIPS
Utility vehicles have higher ground clearance and a
narrower track to make them capable of performing in a
wide variety of off-road applications. Specific design
characteristics give them a higher center of gravity than
ordinary cars.
An advantage of the higher ground clearance is a better
view of the road, allowing you to anticipate problems.
They are not designed for cornering at the same speeds as
conventional two-wheel drive vehicles any more than
low-slung sports cars are designed to perform satisfacto-
rily in off-road conditions. If at all possible, avoid sharp
turns or abrupt maneuvers. As with other vehicles of this
type, failure to operate this vehicle correctly may result in
loss of control or vehicle rollover.
OFF-ROAD DRIVING TIPS
You will encounter many types of terrain driving off-
road. You should be familiar with the terrain and area
before proceeding. There are many types of surface
conditions: hard packed dirt, gravel, rocks, grass, sand,
mud, snow and ice. Every surface has a different effect on
your vehicle’s steering, handling and traction. Control-
ling your vehicle is one of the keys to successful off-road
driving, so always keep a firm grip on the steering wheel
and maintain a good driving posture. Avoid sudden
accelerations, turns or braking. In most cases there are no
road signs, posted speed limits or signal lights. Therefore
you will need to use your own good judgment on what is
safe and what is not. When on a trail, you should always
be looking ahead for surface obstacles and changes in
terrain. The key is to plan your future driving route while
remembering what you are currently driving over.
270 STARTING AND OPERATING