Page 57 of 506
WARNING!
•Do not put anything on or around the front and
side curtain airbag covers or attempt to manually
open them. You may damage the airbags and you
could be injured because the airbags are no longer
functional. These protective covers for the airbag
cushions are designed to open only when the
airbags are inflating.
•Do not stack luggage or other cargo up high
enough to block the location of the side curtain
airbag. The area where the side curtain airbag is
located should remain free from any obstructions.(Continued)
WARNING! (Continued)
•Do not have any accessory items installed which
will alter the roof, including adding a sunroof to
your vehicle. Do not add roof racks that require
permanent attachments (bolts or screws) for instal-
lation on the vehicle roof. Do not drill into the roof
of the vehicle for any reason.
•Do not cover or place items on the airbag covers.
These items may cause serious injury during
inflation.
Along with the seat belts, the front airbags provide
improved protection for the driver and front passenger.
Side Curtain Airbags also work with seat belts to im-
prove occupant protection.
The seat belts are designed to protect you in many types
of collisions. The front airbags deploy in moderate-to-
severe collisions. The Side Curtain Airbag will also
THINGS TO KNOW BEFORE STARTING YOUR VEHICLE 55
2
Page 91 of 506
�Sky Slider� Full Length Open Roof ......... 174
▫ Sky Slider� Usage Precautions ........... 175
▫ Sky Slider� Control................... 177
▫ Opening The Sky Slider� ............... 177
▫ Closing The Sky Slider� ............... 178
▫ Anti-Pinch Protect Feature .............. 179
▫ Wind Buffeting ...................... 179
▫ Sky Slider� Maintenance ............... 179
� Electrical Power Outlet ................. 180
� Power Inverter — If Equipped ............ 182
� Cupholders .......................... 184 �
Storage ............................. 185
▫ Front Storage Compartment ............. 185
▫ Console Storage Compartment ........... 185
� Cargo Area Features ................... 186
▫ Cargo Load Floor .................... 186
� Rear Window Features .................. 192
▫ Rear Window Wiper/Washer —
If Equipped ........................ 192
▫ Rear Window Defroster ................ 193
� Roof Luggage Rack — If Equipped ......... 194
UNDERSTANDING THE FEATURES OF YOUR VEHICLE 89
3
Page 170 of 506
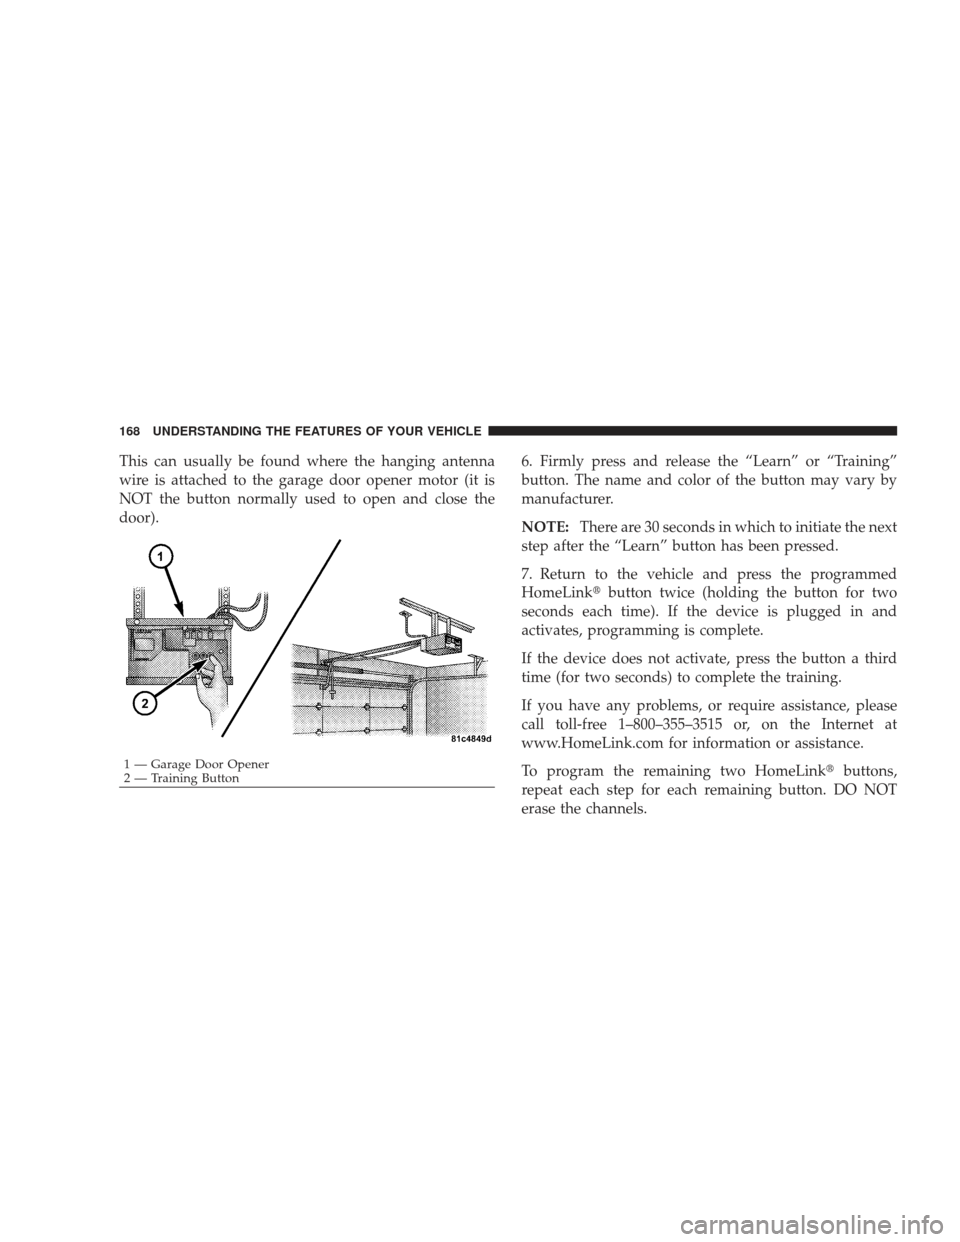
This can usually be found where the hanging antenna
wire is attached to the garage door opener motor (it is
NOT the button normally used to open and close the
door).6. Firmly press and release the “Learn” or “Training”
button. The name and color of the button may vary by
manufacturer.
NOTE:
There are 30 seconds in which to initiate the next
step after the “Learn” button has been pressed.
7. Return to the vehicle and press the programmed
HomeLink� button twice (holding the button for two
seconds each time). If the device is plugged in and
activates, programming is complete.
If the device does not activate, press the button a third
time (for two seconds) to complete the training.
If you have any problems, or require assistance, please
call toll-free 1–800–355–3515 or, on the Internet at
www.HomeLink.com for information or assistance.
To program the remaining two HomeLink� buttons,
repeat each step for each remaining button. DO NOT
erase the channels.
1 — Garage Door Opener
2 — Training Button
168 UNDERSTANDING THE FEATURES OF YOUR VEHICLE
Page 171 of 506
Gate Operator/Canadian Programming
Canadian radio-frequency laws require transmitter sig-
nals to “time-out” (or quit) after several seconds of
transmission – which may not be long enough for
HomeLink�to pick up the signal during programming.
Similar to this Canadian law, some U.S. gate operators are
designed to “time-out” in the same manner.
It may be helpful to unplug the device during the cycling
process to prevent possible overheating of the garage
door or gate motor.
If you are having difficulties programming a garage door
opener or a gate operator, replace “Programming
HomeLink�” Step 3 with the following:
3. Continue to press and hold the HomeLink� button
while you press and release - every two seconds
(“cycle”) your hand-held transmitter until HomeLink �has successfully accepted the frequency signal. The
indicator light will flash slowly and then rapidly when
fully trained.
If you unplugged the device for training, plug it back in
at this time.
Then proceed with Step 4 under “Programming
HomeLink�” earlier in this section.
Using HomeLink�
To operate, simply press and release the programmed
HomeLink�
button. Activation will now occur for the
trained device (i.e., garage door opener, gate operator,
Security system, entry door lock, home/office lighting,
etc. The hand-held transmitter of the device may also be
used at any time.
UNDERSTANDING THE FEATURES OF YOUR VEHICLE 169
3
Page 172 of 506
Reprogramming A Single HomeLink�Button
To re-program a channel that has been previously
trained, follow these steps:
1. Turn the ignition switch to the ON/RUN position.
2. Press and hold the desired HomeLink� button until
the indicator light begins to flash after 20 seconds. Do not
release the button.
3. Without releasing the button, proceed with Program-
ming Homelink� Step 2 and follow all remaining steps.
Security
It is advised to erase all channels before you sell or turn
in your vehicle.
To do this, press and hold the two outside buttons for
20 seconds until the red indicator flashes. Note that all
channels will be erased. Individual channels cannot be
erased. The HomeLink�
Universal Transceiver is disabled when
the Vehicle Security Alarm is active.
Troubleshooting Tips
If you are having trouble programming HomeLink�, here
are some of the most common solutions:
•Replace the battery in the original transmitter.
•Press the “Learn” button on the Garage Door Opener
to complete the training for a Rolling Code.
•Did you unplug the device for training, and remember
to plug it back in?
If you have any problems, or require assistance, please
call toll-free 1–800–355–3515 or, on the Internet at
www.HomeLink.com for information or assistance.
170 UNDERSTANDING THE FEATURES OF YOUR VEHICLE
Page 182 of 506
ELECTRICAL POWER OUTLET
Your vehicle is equipped with a fused 12-Volt (DC) power
outlet. This power outlet is located on the instrument
panel, below the climate controls. It has power available
when the ignition switch is in the ON or ACC position.Insert the cigar lighter or accessory plug into the outlet
for use to ensure proper operation.
NOTE:
•To ensure proper operation a MOPAR�
knob and
element must be used.
•Do not exceed the maximum power of 160 Watts (13
Amps) at 12-Volts.
WARNING!
To avoid serious injury or death:
•Do not insert any objects into the receptacles.
•Do not touch with wet hands.
•Close the lid when not in use and while driving
the vehicle.
•If this outlet is mishandled, it may cause an
electric shock and failure.
Front Power Outlet
180 UNDERSTANDING THE FEATURES OF YOUR VEHICLE
Page 183 of 506
CAUTION!
•Many accessories that can be plugged in draw
power from the vehicle’s battery, even when not in
use (i.e., cellular phones, etc.). Eventually, if
plugged in long enough, the vehicle’s battery will
discharge sufficiently to degrade battery life
and/or prevent the engine from starting.
•Accessories that draw higher power (i.e., coolers,
vacuum cleaners, lights, etc.) will degrade the
battery even more quickly. Only use these inter-
mittently and with greater caution.(Continued)
CAUTION! (Continued)
•After the use of high power draw accessories, or
long periods of the vehicle not being started (with
accessories still plugged in), the vehicle must be
driven a sufficient length of time to allow the
alternator to recharge the vehicle’s battery.
•Power outlets are designed for accessory plugs
only. Do not hang any type of accessory or acces-
sory bracket from the plug.
UNDERSTANDING THE FEATURES OF YOUR VEHICLE 181
3
Page 192 of 506
WARNING! (Continued)
•Do not pile luggage or cargo higher than the top of
the seatback. This could impair visibility or be-
come a dangerous projectile in a sudden stop or
collision.
Retractable Cargo Area Cover — If Equipped
NOTE:The purpose of this cover is for privacy, not to
secure loads. It will not prevent cargo from shifting or
protect passengers from loose cargo.
The removable retractable cargo area cover mounts in the
cargo area behind the top of the rear seats. The cover, when extended, covers the cargo area to keep
items out of sight. Notches in the trim panels near the
liftgate opening secure the extended cover in place.
The cover rolls away neatly inside its housing when not
in use. You can also remove the cover from the vehicle to
make more room in the cargo area.
To install the cover, position it in the vehicle so that the
flat side of the housing faces upward. Then, insert either
the left or the right spring-loaded post (located on the
ends of the cover housing) into either of the left or the
right attachment points shown.
190 UNDERSTANDING THE FEATURES OF YOUR VEHICLE