Page 174 of 506

WARNING!
•Never leave unattended children in a vehicle with
the key in the ignition switch. Occupants, particu-
larly unattended children, can become entrapped
by the power sunroof while operating the power
sunroof switch. Such entrapment may result in
serious injury or death.
•In an accident, there is a greater risk of being
thrown from a vehicle with an open sunroof. You
could also be seriously injured or killed. Always
fasten your seat belt properly and make sure all
passengers are properly secured too.
•Do not allow small children to operate the sun-
roof. Never allow your fingers, other body parts, or
any object to project through the sunroof opening.
Injury may result.
Opening Sunroof — Express
Press the switch rearward and release it within one-half
second and the sunroof will open automatically from any
position. The sunroof will open fully and stop automati-
cally. This is called “Express Open”. During Express
Open operation, any movement of the sunroof switch
will stop the sunroof.
Opening Sunroof — Manual Mode
To open the sunroof, press and hold the switch rearward
to full open. Any release of the switch will stop the
movement and the sunroof will remain in a partially
opened condition until the switch is pushed and held
rearward again.
Closing Sunroof — Express
Press the switch forward and release it within one-half
second and the sunroof will close automatically from any
172 UNDERSTANDING THE FEATURES OF YOUR VEHICLE
Page 178 of 506

WARNING!
Failure to follow these warnings can result in injuries
that are serious or fatal to you, your passengers, and
others around you:
•In an accident, there is a greater risk of being
thrown from a vehicle with the Sky Slider�open.
Always fasten your seat belt properly and make
sure all passengers are properly secured too.
•Before operating the Sky Slider,� make sure that
no moving parts of the Sky Slider� can injure a
person or animal.
•Never place any extremities (hands, feet, etc.) near
the Sky Slider� components or the roof area while
operating the Sky Slider.�
(Continued)
WARNING! (Continued)
•If potential danger exists while opening or closing
the Sky Slider�in Automatic Mode, press and
release the switch immediately to interrupt the
operation.
•If potential danger exists while opening or closing
the Sky Slider� in Operator Mode, release the
switch immediately to interrupt the operation.
•Do not allow small children to operate the Sky
Slider.�
•Never leave children in a vehicle, with the key in
the ignition switch. Occupants, particularly unat-
tended children, can become entrapped by the Sky
Slider� while operating the Sky Slider� switch.
Such entrapment may result in serious injury or
death.
176 UNDERSTANDING THE FEATURES OF YOUR VEHICLE
Page 179 of 506
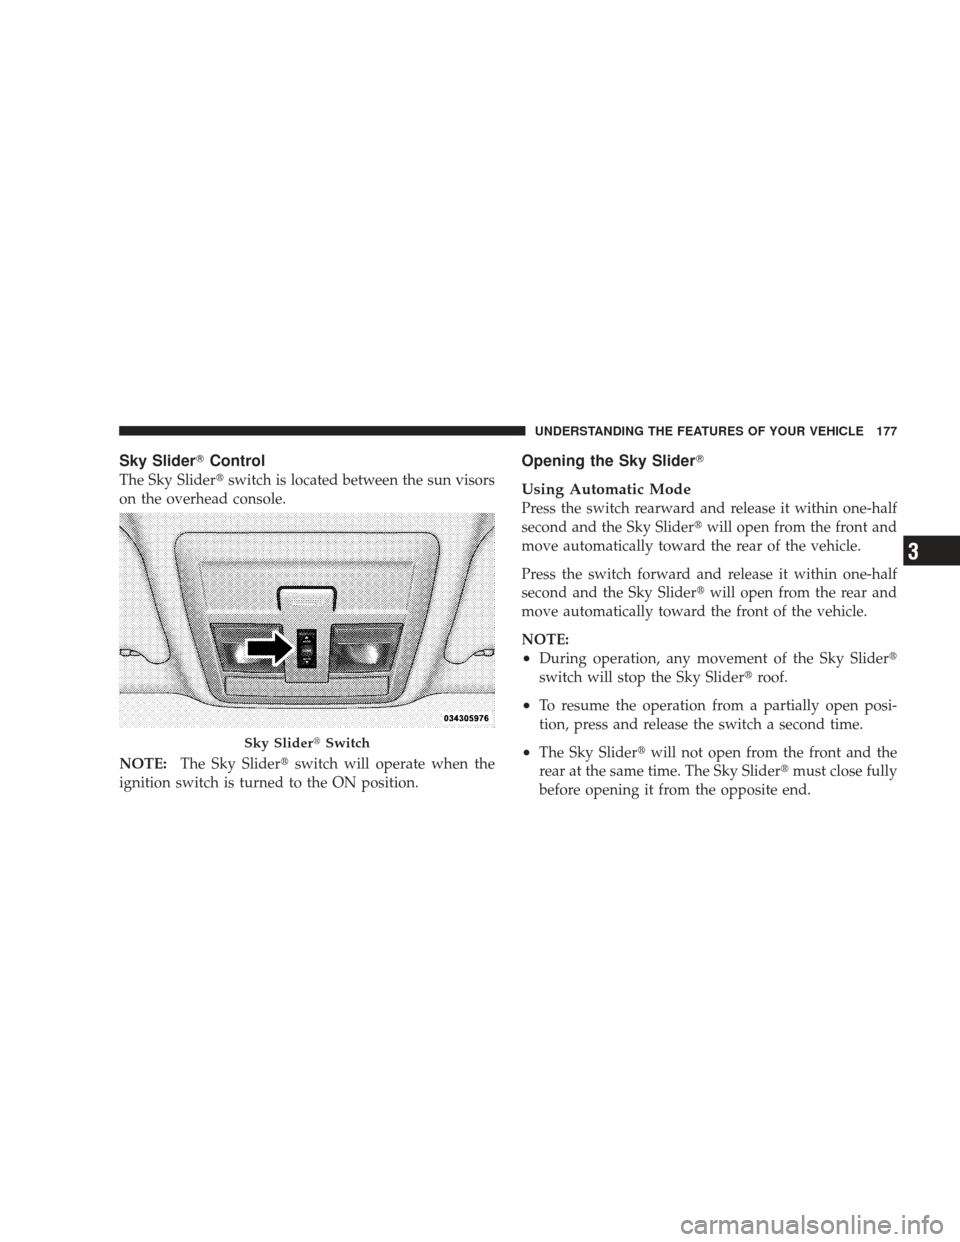
Sky Slider�Control
The Sky Slider� switch is located between the sun visors
on the overhead console.
NOTE: The Sky Slider� switch will operate when the
ignition switch is turned to the ON position.
Opening the Sky Slider�
Using Automatic Mode
Press the switch rearward and release it within one-half
second and the Sky Slider� will open from the front and
move automatically toward the rear of the vehicle.
Press the switch forward and release it within one-half
second and the Sky Slider� will open from the rear and
move automatically toward the front of the vehicle.
NOTE:
•During operation, any movement of the Sky Slider�
switch will stop the Sky Slider� roof.
•To resume the operation from a partially open posi-
tion, press and release the switch a second time.
•The Sky Slider�will not open from the front and the
rear at the same time. The Sky Slider� must close fully
before opening it from the opposite end.Sky Slider� Switch
UNDERSTANDING THE FEATURES OF YOUR VEHICLE 177
3
Page 200 of 506
 ............................. 240
� AM/FM/CD/DVD Radio (RER/REN) – If
Equipped ............................ 243
▫ Operating Instructions — Voice Recog")
▫Info Button (Disc Mode For MP3/WMA
Play) ............................. 240
� AM/FM/CD/DVD Radio (RER/REN) – If
Equipped ............................ 243
▫ Operating Instructions — Voice Recognition
System (VR) — If Equipped ............. 243
▫ Operating Instructions — uconnect� phone
— If Equipped ...................... 243
▫ Clock Setting Procedure ............... 243
� Sales Code RES — AM/FM Stereo Radio With
CD Player (MP3 AUX Jack) ............... 245
▫ Operating Instructions — Radio Mode ..... 246
▫ Operation Instructions — CD Mode For CD
And MP3 Audio Play ................. 249
▫ Notes On Playing MP3 Files ............ 251▫
Operation Instructions - Auxiliary Mode .... 253
� Sales Code RES/RSC — AM/FM Stereo Radio
With CD Player (MP3 AUX Jack) And Sirius
Radio ............................... 254
▫ Operating Instructions — Radio Mode ..... 254
▫ Operation Instructions — CD Mode For CD
And MP3 Audio Play ................. 260
▫ Notes On Playing MP3 Files ............ 262
▫ List Button (CD Mode For MP3 Play) ...... 264
▫ Info Button (CD Mode For MP3 Play) ...... 264
� uconnect� studios (Satellite Radio) — If
Equipped (REN/REQ/RER/RES/REU Radios
Only) ............................... 266
▫ System Activation .................... 266
198 UNDERSTANDING YOUR INSTRUMENT PANEL
Page 212 of 506

WARNING!
A hot engine cooling system is dangerous. You or
others could be badly burned by steam or boiling
coolant. You may want to call an authorized dealer-
ship for service if your vehicle overheats. If you
decide to look under the hood yourself, see Section 7
of this manual. Follow the warnings under the Cool-
ing System Pressure Cap paragraph.
24. Transmission Temperature Indicator — If Equipped This light indicates that the transmission fluid
temperature is running hot. This may occur
with severe usage, such as trailer towing. If this
light turns on, safely pull over and stop the
vehicle. Then, shift the transmission into NEUTRAL and
run the engine at idle or faster until the light turns off. 25. Trip Odometer Button
Changing the Display
Press and release this button once to change the display
from odometer to “Trip A.” Press and release it again to
change the display from “Trip A” to “Trip B.” On vehicles
equipped with a Base Cluster, press and release it once
again to display the outside temperature. On vehicles
equipped with a Mid Line Cluster, press and release it
once again to display the outside temperature and com-
pass heading in the screen below the speedometer. Refer
to “Vacuum Fluorescent Display” for details.
Resetting the Trip Odometer
Display the trip mileage that you want to reset, “Trip A”
or “Trip B.” Then push and hold the button (approxi-
mately two seconds) until the display resets to 0. The
odometer must be in Trip Mode to reset the trip odom-
eter.
210 UNDERSTANDING YOUR INSTRUMENT PANEL
Page 213 of 506

26. 4WD Indicator — Vehicles Equipped with
Selec-Trac�II
This light alerts the driver that the vehicle is in
the full-time four-wheel drive auto mode. In
this mode, the system operates with a normal
torque split of 42% front axle and 58% rear axle.
It can redirect up to 100% of torque to the front or rear
axle, if necessary.
27. Odometer/Trip Odometer
The odometer shows the total distance the vehicle has
been driven. The trip odometer shows individual trip
mileage. Refer to “Trip Odometer button” for additional
information.
NOTE: U.S. Federal regulations require upon transfer of
vehicle ownership, the seller certify the mileage the
vehicle has been driven. Therefore, if the odometer
reading is changed because of repair or replacement, be sure to keep a record of the reading before and after the
service so that the correct mileage can be determined.
Vehicle Warning Messages
When the appropriate conditions exist, messages such as
“door” (door ajar), “gATE” (liftgate ajar), “gLASS”
(flip-up glass ajar), “gASCAP” (fuel cap fault), “LoW
tirE” (low tire pressure), or “CHANgE OIL” will display
in the odometer.
LoW tirE
When the appropriate condition exists, the odometer
display will toggle between LoW and tirE for three
cycles.
NOTE:
If the instrument cluster is equipped with the
optional Electronic Vehicle Information Center (EVIC),
then most warnings will display in the EVIC.
UNDERSTANDING YOUR INSTRUMENT PANEL 211
4
Page 221 of 506

Unless reset, this message will continue to display each
time you turn the ignition switch to the ON position. To
turn off the message temporarily, press and release the
MENU button. To reset the oil change indicator system
(after performing the scheduled maintenance) perform
the following procedure:
1. Turn the ignition switch to the ON position.Do not
start the engine.
2. Fully depress the accelerator pedal slowly three times
within 10 seconds.
3. Turn the ignition switch to the LOCK position.
NOTE: If the indicator message illuminates when you
start the vehicle, the oil change indicator system did not
reset. If necessary, repeat this procedure.Trip Functions
Press and release the MENU button until one of the
following Trip Functions displays in the EVIC:
•Average Fuel Economy
•Distance To Empty
•Elapsed Time
•Display Units of Measure in
Press the SCROLL button to cycle through all the Trip
Computer functions.
The Trip Functions mode displays the following informa-
tion:
•Average Fuel Economy
Shows the average fuel economy since the last reset. When
the fuel economy is reset, the display will read “RESET” or
show dashes for two seconds. Then, the history informa-
tion will be erased, and the averaging will continue from
the last fuel average reading before the reset.
UNDERSTANDING YOUR INSTRUMENT PANEL 219
4
Page 230 of 506

Push the ON/VOLUME control knob to turn on the
radio. Press the ON/VOLUME control knob a second
time to turn off the radio.
Electronic Volume Control
The electroni")
Power Switch/Volume Control (Rotary)
Push the ON/VOLUME control knob to turn on the
radio. Press the ON/VOLUME control knob a second
time to turn off the radio.
Electronic Volume Control
The electronic volume control turns continuously (360
degrees) in either direction without stopping. Turning the
ON/VOLUME control knob to the right increases the
volume and to the left decreases it.
When the audio system is turned ON, the sound will be
set at the same volume level as last played.
SEEK Buttons
Press and release the SEEK buttons to search for the next
listenable station in AM/FM mode. Press the right switch
to seek up and the left switch to seek down. The radio
will remain tuned to the new station until you make
another selection. Holding either button will bypass
stations without stopping until you release it.
SCAN Button
Pressing the SCAN button causes the tuner to search for
the next listenable station in AM, FM or Satellite (if
equipped) frequencies, pausing for five seconds at each
listenable station before continuing to the next. To stop
the search, press the SCAN button a second time.
Voice Recognition Button uconnect�phone — If
Equipped
Press this button to operate the uconnect� phone feature
(if equipped). Refer to “uconnect� phone” in Section 3.
If your vehicle is not equipped with or this feature is not
available on your vehicle, a “Not Equipped With
uconnect” message will display on the radio screen.
Phone Button uconnect� phone — If Equipped
Press this button to operate the uconnect� phone feature
(if equipped). Refer to “uconnect� phone” in Section 3.
228 UNDERSTANDING YOUR INSTRUMENT PANEL