Page 122 of 521
WARNING! (Continued)
•Do not place anything on the seat that insulates
against heat, such as a blanket or cushion. This
may cause the seat heater to overheat. To avoid
heated seat surfaces coming in contact with each
other and potential seat overheating, ALWAYS
ensure that the seat heater is in the Off position
(amber lights indicate High/Low/Off) before plac-
ing any of the seats into a folded flat position (if
equipped).
Rear Heated Seats — If Equipped
On vehicles equipped with rear heated seats, the seats
closest to the doors are heated. The controls for these
seats are located on the rear of the center console.Press the switch once to select High-level heat-
ing. Press the switch a second time to select
Low-level heating. Press the switch a third time
to shut the heating elements Off. Two indica-
tors will illuminate for High, one for Low, and none for
Off.Rear Heated Seat Switches
120 UNDERSTANDING THE FEATURES OF YOUR VEHICLE
Page 136 of 521
Instrument Panel and Interior Lights
When the multifunction lever is in the parking light,
headlight, or AUTO position (if equipped), rotating the
center portion of the lever up and down will increase and
decrease the brightness (dimmer control) of the instru-
ment panel lights. Full daytime brightness on all elec-
tronic displays (odometer, overhead console, radio, and
Automatic Climate Control (if equipped) is obtained by
rotating the center portion of the control to the first
detent above the dimmer range. Rotating the control to
the second detent above the dimmer range turns the
interior lights on. Rotating the control to the “Off”
(extreme bottom) position disables all the interior lights,
even when the doors and liftgate are open. While in the
“Off” position the instrument panel lighting is at the
lowest light level and may not be suitable for night
driving.
Dimmer Control
134 UNDERSTANDING THE FEATURES OF YOUR VEHICLE
Page 139 of 521

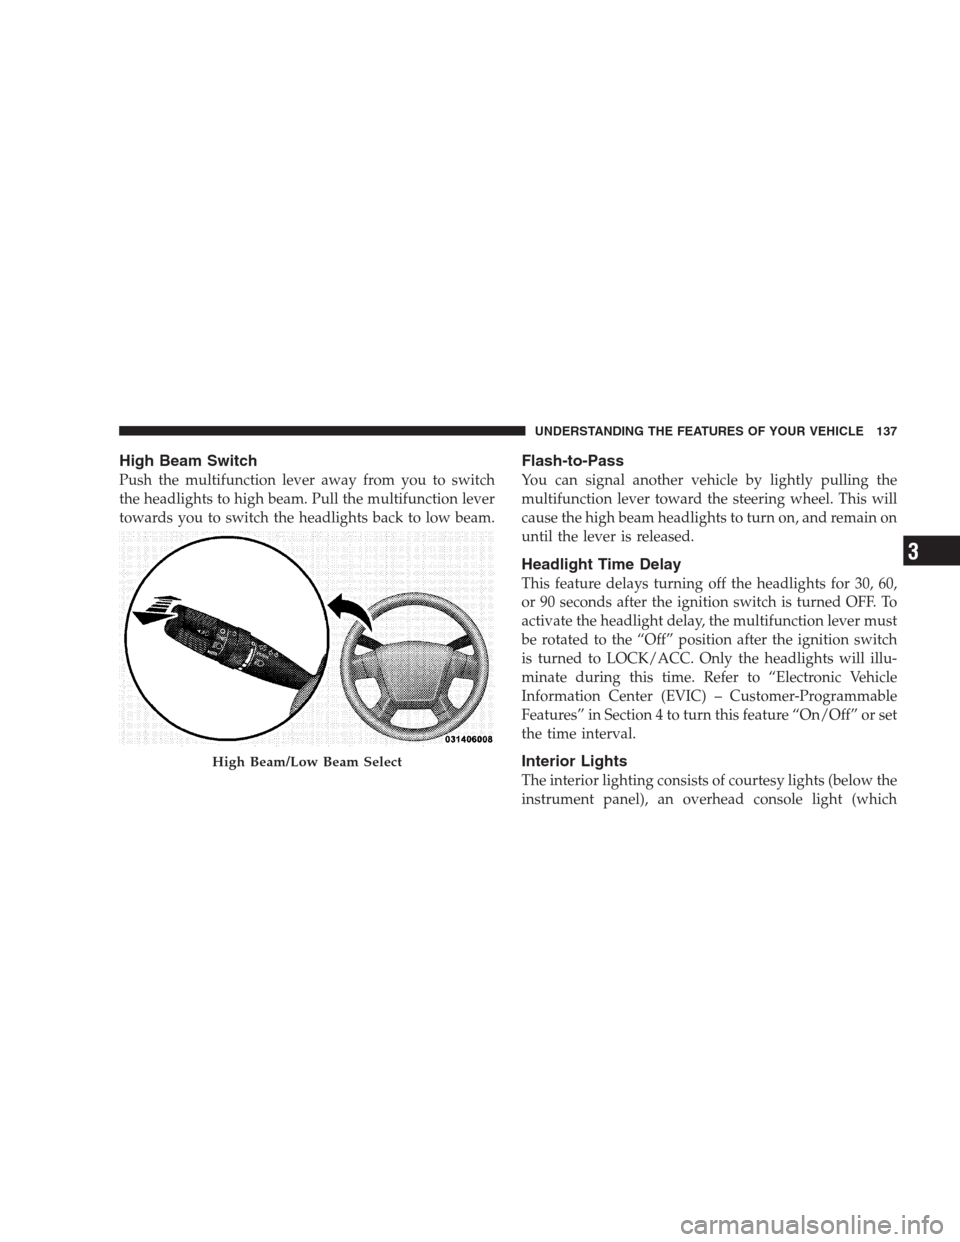
High Beam Switch
Push the multifunction lever away from you to switch
the headlights to high beam. Pull the multifunction lever
towards you to switch the headlights back to low beam.
Flash-to-Pass
You can signal another vehicle by lightly pulling the
multifunction lever toward the steering wheel. This will
cause the high beam headlights to turn on, and remain on
until the lever is released.
Headlight Time Delay
This feature delays turning off the headlights for 30, 60,
or 90 seconds after the ignition switch is turned OFF. To
activate the headlight delay, the multifunction lever must
be rotated to the “Off” position after the ignition switch
is turned to LOCK/ACC. Only the headlights will illu-
minate during this time. Refer to “Electronic Vehicle
Information Center (EVIC) – Customer-Programmable
Features” in Section 4 to turn this feature “On/Off” or set
the time interval.
Interior Lights
The interior lighting consists of courtesy lights (below the
instrument panel), an overhead console light (which
High Beam/Low Beam Select
UNDERSTANDING THE FEATURES OF YOUR VEHICLE 137
3
Page 140 of 521
contains both driver and passenger reading lights), read-
ing lights (located above the rear doors), and a rear cargo
light. Opening a door, pressing the UNLOCK button on
the Remote Keyless Entry (RKE) transmitter or turning
the center of the multifunction control lever to the
extreme up position, will activate all interior courtesy
lights.
Front Map/Reading Lights
These lights are mounted in the overhead console. Each
light can be turned on by pressing the recessed area of the
lens. To turn these lights off, press the recessed area of the
lens a second time. There are also reading lights located
above the rear doors. Each light can be turned on by
pressing the front recessed area of the lens. To turn these
lights off, press the recessed area of the lens a second
time.
Front Map/Reading Lights
138 UNDERSTANDING THE FEATURES OF YOUR VEHICLE
Page 167 of 521
POWER INVERTER — IF EQUIPPED
There is a 115-Volt, 150-Watt inverter outlet located on the
back of the center console to convert DC current to AC
current.This outlet can power cellular phones, electronics and
other low power devices requiring power up to 150
Watts. Certain high-end video games, such as Playsta-
tion3 and XBox360 will exceed this power limit, as will
most power tools. Due to built-in overload protection, the
power outlet will shut down if the power rating is
exceeded. Each device to be powered should be checked
first to make sure it does not exceed the outlet’s 150 Watts
maximum rating.
Power Inverter
UNDERSTANDING THE FEATURES OF YOUR VEHICLE 165
3
Page 169 of 521
CUPHOLDERS
In the center console, there are two cupholders for the
front seat passengers.
The rear passengers have access to two cupholders that
pull out from the lower center of the rear seat.
CARGO AREA FEATURES
Cargo Light
The cargo area light is activated by opening the liftgate,
opening any door, or by rotating the dimmer control on
the multifunction lever to the extreme top position. If all
doors are closed and only the liftgate is open, pushing onFront Cupholders
Rear Cupholders
UNDERSTANDING THE FEATURES OF YOUR VEHICLE 167
3
Page 265 of 521

Defrost
Air is directed to the windshield through the
outlets at the base of the windshield. Air is also
directed to the front door windows through the side
window demister grilles. Some airflow is delivered to the
floor while in defrost so that comfort can be maintained.
Defrost/Floor
Air flows through the front and rear floor outlets
and the outlets at the base of the windshield. Air is
also directed to the front door windows through the
side window demister grilles. Some airflow is delivered
to the floor while in defrost so that comfort can be
maintained.
Floor
Air flows through the floor outlets located under
the instrument panel and into the rear seating areathrough vents under the front seats. Some airflow is
delivered to defrost while in the floor mode so that
comfort can be maintained.
Bi-Level
Air flows both through the outlets located in the
instrument panel and those located on the floor. Air
flows through the registers in the back of the center
console, and under the front seats to the rear seat
passengers. These registers can be closed to partially
block airflow. The center console outlets deliver condi-
tioned air while the floor outlets deliver heated air.
Panel
Air flows through the outlets located in the instru-
ment panel. Air flows through the registers in the
back of the center console to the rear seat passengers.
These registers can be closed to block airflow.
UNDERSTANDING YOUR INSTRUMENT PANEL 263
4
Page 272 of 521

Bi-Level
Air flows both through the outlets located in the
instrument panel and those located on the floor. Air
flows through the registers in the back of the center
console, and under the front seats to the rear seat
passengers. These registers can be closed to block airflow.
The center console outlets deliver conditioned air while
the floor outlets deliver heated air.
Panel
Air flows through the outlets located in the instru-
ment panel. Air flows through the registers in the
back of the center console to the rear seat passengers.
These registers can be closed to block airflow.
Air Conditioning
Press this button to turn the air conditioning on
and off during manual operation only. Condi-
tioned outside air is then directed through theoutlets selected on the mode control dial. The button
includes an LED that illuminates when manual operation
is selected.
NOTE:To manually control the air conditioning, the
mode selector must be moved out of the AUTO position.
Recirculation
This button can be used to block out smoke,
odors, dust, high humidity, or if rapid cooling
is desired. The “Recirculation” mode should
only be used temporarily. The button includes
an LED that illuminates, which indicates that the “Recir-
culation” mode is active. You may use this feature
separately.
NOTE:Extended use of recirculation may cause the
windows to fog. If the interior of the windows begins to
fog, press the “Recirculate” button to return to outside
air. Some temperature/humidity conditions will cause
270 UNDERSTANDING YOUR INSTRUMENT PANEL