Page 413 of 521
manual). Tighten the gas cap until a�clicking�sound is
heard. This is an indication that the gas cap is properly
tightened.
The message will remain displayed until the vehicle
diagnostic system can retest the fuel system. The test will
perform the next time the vehicle is started, if the vehicle
was keyed off above 40°F (4°C) outside temperature and
the following vehicle start is above 40°F (4°C) outside
temperature. It may be possible to have a message that
will not clear due to the test being disabled due to low
outside temperatures. If the test is performed and the
problem is gone, the message will disappear.
If the problem persists, the message will appear the next
time the vehicle is started. This might indicate a damaged
cap. If the problem is detected twice in a row, the system
will turn on the Malfunction Indicator Light (MIL).
Resolving the problem will turn the MIL light off. See
your authorized dealer for service.EMISSIONS INSPECTION AND MAINTENANCE
PROGRAMS
In some localities, it may be a legal requirement to pass
an inspection of your vehicle’s emissions control system.
Failure to pass could prevent vehicle registration.
For states that require an Inspection and Mainte-
nance (I/M), this check verifies the Malfunction
Indicator Light (MIL) is functioning and is not on
when the engine is running, and that the OBD II system
is ready for testing.
Normally, the OBD II system will be ready. The OBD II
system maynotbe ready if your vehicle was recently
serviced, recently had a dead battery or a battery replace-
ment. If the OBD II system should be determined not
ready for the I/M test, your vehicle may fail the test.
MAINTAINING YOUR VEHICLE 411
7
Page 414 of 521
Your vehicle has a simple ignition key-actuated test,
which you can use prior to going to the test station. To
check if your vehicle’s OBD II system is ready, you must
do the following:
1. Insert your ignition key into the ignition switch.
2. Turn the ignition to the ON position, but do not crank
or start the engine.
3. If you crank or start the engine, you will have to start
this test over.
4. As soon as you turn your key to the ON position, you
will see the MIL symbol come on as part of a normal bulb
check.
5. Approximately 15 seconds later, one of two things will
happen:
a. The MIL will flash for about 10 seconds and then
return to being fully illuminated until you turn OFFthe ignition or start the engine. This means that your
vehicle’s OBD II system isnot readyand you should
notproceed to the I/M station.
b. The MIL will not flash at all and will remain fully
illuminated until you turn OFF the ignition or start the
engine. This means that your vehicle’s OBD II system
isreadyand you can proceed to the I/M station.
If your OBD II system isnot ready,you should see your
authorized dealer or repair facility. If your vehicle was
recently serviced or had a battery failure or replacement,
you may need to do nothing more than drive your
vehicle as you normally would in order for your OBD II
system to update. A recheck with the above test routine
may then indicate that the system is now ready.
Regardless of whether your vehicle’s OBD II system is
ready or not, if the MIL is illuminated during normal
vehicle operation you should have your vehicle serviced
412 MAINTAINING YOUR VEHICLE
Page 420 of 521
WARNING!
The air induction system (air cleaner, hoses, etc) can
provide a measure of protection in the case of engine
backfire. Do not remove the air induction system (air
cleaner, hoses, etc.) unless such removal is necessary
for repair or maintenance. Make sure that no one is
near the engine compartment before starting the
vehicle with the air induction system (air cleaner,
hoses, etc.) removed. Failure to do so can result in
serious personal injury.
Engine Air Cleaner Filter Selection
The quality of replacement engine air cleaner filters
varies considerably. Only high quality filters should be
used to assure most efficient service. MOPAR�engine air
cleaner filters are a high quality filter and are
recommended.
Maintenance-Free Battery
Your vehicle is equipped with a maintenance-free battery.
You will never have to add water, nor is periodic main-
tenance required.
WARNING!
•Battery fluid is a corrosive acid solution and can
burn or even blind you. Do not allow battery fluid
to contact your eyes, skin or clothing. Do not lean
over a battery when attaching clamps. If acid
splashes in eyes or on skin, flush the area imme-
diately with large amounts of water.
•Battery gas is flammable and explosive. Keep
flame or sparks away from the battery. Do not use
a booster battery or any other booster source with
an output greater than 12 Volts. Do not allow cable
clamps to touch each other.
(Continued)
418 MAINTAINING YOUR VEHICLE
Page 421 of 521
WARNING! (Continued)
•Battery posts, terminals and related accessories
contain lead and lead compounds. Wash hands
after handling.
CAUTION!
•It is essential when replacing the cables on the
battery that the positive cable is attached to the
positive post, and the negative cable is attached to
the negative post. Battery posts are marked (+)
positive and (-) negative and identified on the
battery case.
•If a “fast charger” is used while battery is in the
vehicle, disconnect both vehicle battery cables
before connecting the charger to the battery. Do
not use a “fast charger” to provide starting voltage.
Air Conditioner Maintenance
For best possible performance, your air conditioner
should be checked and serviced by an authorized dealer
at the start of each warm season. This service should
include cleaning of the condenser fins and a performance
test. Drive belt condition should also be checked at this
time.
WARNING!
•Use only refrigerants and compressor lubricants
approved by the manufacturer for your air condi-
tioning system. Some unapproved refrigerants are
flammable and can explode, injuring you. Other
unapproved refrigerants or lubricants can cause
the system to fail, requiring costly repairs. Refer to
Section 3 of the Warranty Information Book for
additional warranty information.
(Continued)
MAINTAINING YOUR VEHICLE 419
7
Page 450 of 521
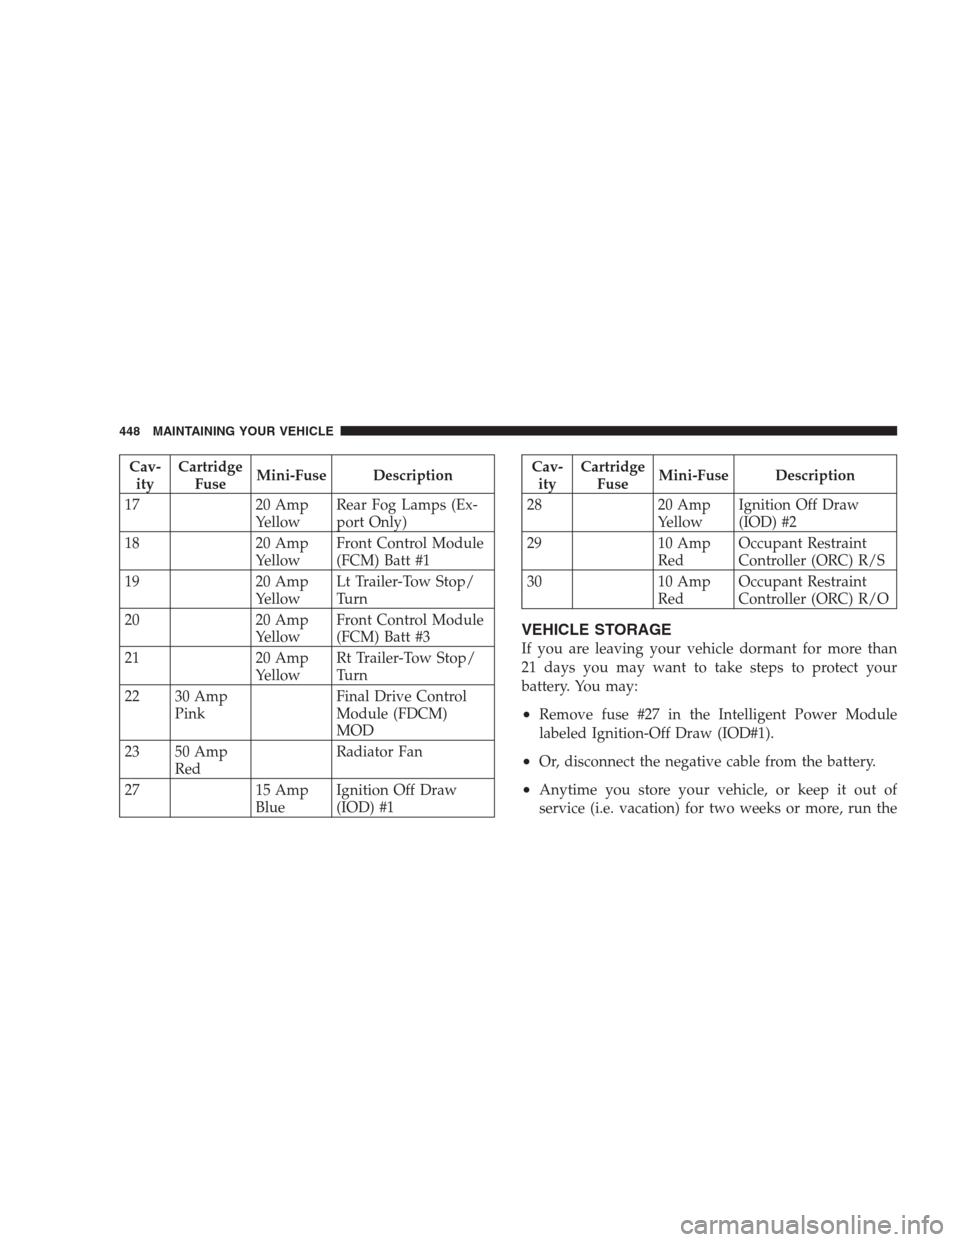
Cav-
ityCartridge
FuseMini-Fuse Description
17 20 Amp
YellowRear Fog Lamps (Ex-
port Only)
18 20 Amp
YellowFront Control Module
(FCM) Batt #1
19 20 Amp
YellowLt Trailer-Tow Stop/
Turn
20 20 Amp
YellowFront Control Module
(FCM) Batt #3
21 20 Amp
YellowRt Trailer-Tow Stop/
Turn
22 30 Amp
PinkFinal Drive Control
Module (FDCM)
MOD
23 50 Amp
RedRadiator Fan
27 15 Amp
BlueIgnition Off Draw
(IOD) #1Cav-
ityCartridge
FuseMini-Fuse Description
28 20 Amp
YellowIgnition Off Draw
(IOD) #2
29 10 Amp
RedOccupant Restraint
Controller (ORC) R/S
30 10 Amp
RedOccupant Restraint
Controller (ORC) R/O
VEHICLE STORAGE
If you are leaving your vehicle dormant for more than
21 days you may want to take steps to protect your
battery. You may:
•Remove fuse #27 in the Intelligent Power Module
labeled Ignition-Off Draw (IOD#1).
•Or, disconnect the negative cable from the battery.
•Anytime you store your vehicle, or keep it out of
service (i.e. vacation) for two weeks or more, run the
448 MAINTAINING YOUR VEHICLE
Page 465 of 521
if it has been 6 months since your last oil change even
if the oil change indicator message is NOT illumi-
nated.
•Change your engine oil more often if you drive your
vehicle off-road for an extended period of time.
•Under no circumstances should oil change intervals
exceed 6,000 miles (10,000 km) or 6 months, whichever
comes first.
Your authorized dealer will reset the oil change indicator
message after completing the scheduled oil change. If this
scheduled oil change is performed by someone other
than your authorized dealer the message can be reset by
referring to the steps described under ”Electronic Vehicle
Information Center” in Section 4 of this manual.
At Each Stop for Fuel
•Check the engine oil level about 5 minutes after a fully
warmed engine is shut off. Checking the oil level whilethe vehicle is on level ground will improve the accu-
racy of the oil level reading. Add oil only when the
level is at or below the ADD or MIN mark.
•Check the windshield washer solvent and add if
required.
Once a Month
•Check tire pressure and look for unusual wear or
damage.
•Inspect the battery and clean and tighten the terminals
as required.
•Check the fluid levels of the coolant reservoir, brake
master cylinder, power steering and transmission
(4.7L and 5.7L only) and add as needed.
•Check all lights and other electrical items for correct
operation.
MAINTENANCE SCHEDULES 463
8
M
A
I
N
T
E
N
A
N
C
E
S
C
H
E
D
U
L
E
S
Page 479 of 521
•Check the windshield washer solvent and add if
required.
Once a Month
•Check tire pressure and look for unusual wear or
damage.
•Inspect the battery and clean and tighten the terminals
as required.
•Check the fluid levels of the coolant reservoir, brake
master cylinder, and power steering and add as
needed.
•Check all lights and other electrical items for correct
operation.
At Each Oil Change
•Change the engine oil filter.
•Inspect the brake hoses and lines.
•Inspect for the presence of water in the fuel filter/
water separator unit.
CAUTION!
Failure to perform the required maintenance items
may result in damage to the vehicle.
Required Maintenance Intervals
Refer to the Maintenance Schedules on the following
pages for the required maintenance intervals.
MAINTENANCE SCHEDULES 477
8
M
A
I
N
T
E
N
A
N
C
E
S
C
H
E
D
U
L
E
S
Page 501 of 521

Torque Converter...................... 294
Autostick............................. 290
Auxiliary Electrical Outlet (Power Outlet)...... 163
Auxiliary Power Outlet................... 163
Battery............................... 418
Emergency Starting..................... 398
Keyless Transmitter Replacement (RKE)....... 25
Saving Feature (Protection)............... 135
Belts, Seat............................37,70
Body Mechanism Lubrication............... 420
B-Pillar Location........................ 331
Brake Assist System...................... 313
Brake Control System, Electronic............. 312
Brake Fluid............................ 430
Brake System........................... 430
Anti-Lock (ABS)....................309,312
Fluid Check.......................... 430
Master Cylinder....................... 430Parking............................. 308
Warning Light........................ 184
Brake/Transmission Interlock............... 287
Break-In Recommendations, New Vehicle........ 68
Bulb Replacement.....................449,450
Bulbs, Light............................ 71
Calibration, Compass..................... 201
Camera, Rear........................... 151
Capacities, Fluid........................ 456
Caps, Filler
Fuel............................... 364
Power Steering........................ 307
Radiator (Coolant Pressure)............... 427
Car Washes............................ 437
Carbon Monoxide Warning...............69,359
Cargo Area Cover....................... 168
Cargo Area Features...................... 167
Cargo Compartment...................... 167
INDEX 499
10