Page 1 of 16
X F
Q U I C K S T A R T G U I D E
V E H I C L E A C C E S S2
E N G I N E S TA R T I N G 3
C O M F O R T
A D J U S T M E N T S 4
C L I M AT E C O N T R O L \b
FA C I A 7
D R I V I N G 8
T O U C H S C R E E N
A N D A U D I O 1 2
\f L U E T O O T H P H O N E 1 4
N AV I G AT I O N 1 5
F I L L I N G S TAT I O N
I N F O R M AT I O N 1 \b
S O M \b O F T H \b F \b AT U R \b S D \b S C R \f B \b D M AY N O T A P P LY T O YO U R V \b H \f C L \b .
R \b F \b R T O T H \b O W N \b R ' S H A N D B O O K F O R F U L L O P \b R AT \f N G \f N S T R U C T \f O N S .
Page 2 of 16
")
Entering the vehicle
With keyless entry, operation of a locked door handle
or pressing the luggage compartment release button
will allow access if the Jaguar
Smart Key is within one
metre (39 inches) of
that entry point.
The Jaguar Smart Key
buttons do not need to be
pressed and it can be concealed in clothing or even
carried in a non metallic carrier.
The Jaguar Smart Key buttons can still be used to
unlock the vehicle.
Vehicle access\bEngine starting
Keyless entry
Leaving the vehicle
The vehicle WILL NOT automatically lock or arm
the alarm.
To lock and alarm the vehicle with a keyless
action the Jaguar Smart Key must be outside
the vehicle.
Press the door handle button once to single\b
lock. Press twice within three seconds to
double\block.
Alternatively, use the Jaguar Smart Key.
To check security, pull the door handle within
three seconds of locking.
Unlocking mode alternatives
Single�point entryallows only the driver’s door
to unlock with a single press. A second press
unlocks all other doors and luggage area.
Multi�point entry will unlock all of the doors
and luggage area with a single press.
To change between modes, with the vehicle
unlocked, press the lock and unlock buttons
simultaneously for three seconds. The hazard
warning lamps will flash twice to confirm the
change.
• Press once to lock the vehicle and arm the alarm.
• Press twice to double lock the vehicle.
• Press and hold to close any open windows and sunroof and lock all doors
(Global closing).
• Multi\bpoint entry \b Press once to disarm the alarm, unlock the doors and unlock
the luggage compartment.
• Press and hold to unlock all doors and open the windows and sunroof (Global
opening).
• Press once to switch the headlamps on for 25 seconds. Press again to
switch off.
• Press to disarm the alarm, unlock and open the luggage compartment.
• Press and hold for three seconds to activate/cancel the panic alarm.
1. Emergency key blade release button.
2. Emergency key blade.
Note: See the Owner’s Handbook for use.
2
Jaguar Smart Key
Page 3 of 16

Rear seat release handles
The split fold rear seats have release handles
located in the luggage compartment. Pull to release
one or both seat backs and fold forward. Head
restraints can be removed if required.
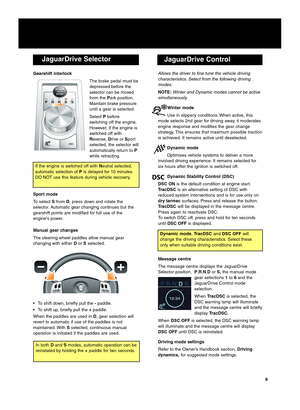
Engine start stop
P R N D S
STARTENGINESTOP
Operating note
TheSTART STOP button must be pressed to stop
the engine. If not, it will continue to run even if the
remote handset is removed from the vehicle.
The START STOP button is operational only when
the Jaguar Smart Key is inside the vehicle.
Ignition only on:
• A single press of the START STOPbutton will
switch on the ignition.
• A second press will switch off the ignition.
Engine start
• With the footbrake depressed, press and release the START STOP button to start the engine. The
JaguarDrive Selector will rise from the centre
console in readiness for gear selection.
• Press again to stop the engine and switch off the ignition.
Cold climate starting
In extreme low temperatures, there may be a delay of
up to \f2 seconds between the START STOPbutton
being pressed and the engine cranking. Ensure the
footbrake remains depressed. Do NOT press the
START STOP button again. Cranking time will be
increased.
Luggage compartment
Opening the luggage compartment
• With the vehicle unlocked or locked, press the luggage compartment button on the Jaguar Smart
Key.
• With the vehicle unlocked or locked from the inside, press the button on the facia.
• With the vehicle unlocked, press the release button under the luggage compartment chrome finisher.
\f
Page 4 of 16

Mirror dip when reversing
This feature can be used to improve lower side views
while reversing. It can be enabled or disabled via the
touch screen. From theHomescreen, select Vehicle,
then Veh. settings , thenParking.
To set a dip position:
• with the hand brake on, select reverse gear
• adjust the mirror position to view the lower rear kerb and vehicle.
Subsequently, each time reverse gear is selected, the
set dip position will be automatically selected. The
mirrors will return to their normal position when
another gear is selected.
Operating note
To prevent automatic movement of the steering
column, turn the control to the COLUMNposition.
Comfort adjustments
Steering wheel adjustment
Seat adjustment options will vary depending upon
vehicle specification.
1. Forward and backwards adjustment, cushion height and cushion front tilt.
2. Cushion length.
\f. Side bolster in/out adjustment.
4. Lumbar support.
5. Recline adjustment and head restraint height.
Steering wheel adjustment
Turn the control to COLUMNthen move the control
to adjust the height and reach.
Exit mode
With the control set to AUTO, the steering column
will move to provide greater clearance for exiting
when the driver's door is opened.
Entry mode
After the driver's door is closed and the START
STOP button is pressed the column will return to its
previous position.
1
2
354
4
Operating note
The seat heater controls are accessed via the
touch\bscreen.
Door mirrors
Door mirror adjustment
1.Press a button to select a
mirror.
2. Use to adjust the mirror
position.
Powerfold mirrors
Press buttons 1
simultaneously to fold the
mirrors inward. Press again to
unfold.
2
1
Seat adjustment
Page 5 of 16

Driving position memory
Seat belts
Ensure that passengers do not fully extend the
restraints and inadvertently engage the ALR feature
during normal use.A warning indicator on the instrument
pack will illuminate if a front seat belt is
unbuckled.
Automatic Locking Reels (ALR)
All passenger seat belts have ALR fitted primarily for
use with child seats but also for securing large items.
Refer to Child safety in the Owner’s Handbook for
further details.
Glovebox and valet mode
To set your personal security code:
• On the touch\bscreen select HomethenVehicle
followed by Veh. settings.
• Now select Valet mode.
• Enter a four digit code and touch OK.Valet on is
displayed as a confirmation.
To deselect valet mode
Access the Valet mode screen and enter your
personal four digit code. Now press OK.Valet off is
displayed and the glovebox and luggage
compartment are now accessible.
Insert the emergency key blade back into the Jaguar
Smart Key.
Driver's seat
When you have found your ideal driving position, the
vehicle can memorise seat, steering column and
mirror settings for future use.
1. Press the SETbutton located in the driver’s
door storage area. The red LED will
illuminate for a five second period.
2. While the LED is illuminated, press button 1
or 2to memorise the current settings.
The LED will extinguish and a chime will sound to
confirm that the settings have been memorised. If the
ignition is on, the message centre will display a
confirmation message.
Operating note
A seat position will only be memorised during the
five second period that the LED is illuminated.
An existing memory setting can be over\bwritten with
a new memory position.
Recalling a seat position
Press and hold button 1or 2until
the seat has finished moving.
5
To open the glovebox, place a finger directly onto the
icon.
Valet mode
The glovebox and luggage compartment can be
security locked to deny access to a parking
attendant. Before handing over your Jaguar Smart
Key, remove the emergency key blade and keep it in
a safe place.
Page 6 of 16
 mode.
The climate control will automatically adjust heat,
blower speed, air intake and airflow
distribution to maintain the selected
temperature(s) and reduce mi")
Comfort adjustments
1. AUTO(automatic) mode.
The climate control will automatically adjust heat,
blower speed, air intake and airflow
distribution to maintain the selected
temperature(s) and reduce misting without
constant manual adjustments.
Front and rear screen heating and timed air
recirculation may be selected in AUTOmode.
Selecting any other function will cancel AUTO
operation.
2. Temperature control. Press to adjust the temperature for the
respective side of the passenger compartment.
\f. Blower speed. Rotate to adjust airflow speed from the vents.
4. Front screen defrost\bdemist.
5. Heated front screen.
6. Heated rear screen.
7. Air recirculation Helps prevent fumes from entering.
2
3
16547
Touch�screen climate control
Full use of the climate control can also be made via
the touch\bscreen.
Select Climate on theHomescreen.
Air distribution To windscreen.
To face. To feet.
Temp. sync. Synchronises temperature of the
passenger and driver’s side.
Ventilated seats
There are three settings each for heating and
cooling. Touch the up arrow for heated
ventilation and for raising temperature.
Touch the down arrow for cooled ventilation and for
lowering temperature.
The first touch of either arrow will initiate the
maximum setting.
The setting will be indicated by the number of
illuminated red or blue LED’s.
Heated only seats (not shown)
There are three temperature settings. Touch the seat
icon to initiate.
• First touch \b maximum heat.
• Second touch \b intermediate.
• Third touch \b minimum.
• Fourth touch \b heating off.
The setting will be indicated by the number of
illuminated red LED’s.
Heated steering wheel
Touch the icon to heat the steering wheel.
Touch again to turn off.
Settings
Temp. sync. External
12C
Auto
21
19C.5 C
Auto
A/C
ON
.5
Climate
12:26pm
AutoRecommended mode
Select AUTOas the normal operating mode. This
will help prevent window misting and reduce odours
from the climate control system.
Temp. sync.
Operating note
Seat heating and ventilating will operate only while
the engine is running. This is to prevent the battery
becoming discharged.
6
Climate control
Page 7 of 16

Facia
11.Luggage compartment release.
12. Forward alert.
1\f. Rear fog lamps.
14. Horn.
15. Column adjust switch.
16. Climate control system.
17. Engine start/stop button.
18. DSC (Dynamic Stability Control)
switch.
19. ASL (Automatic Speed Limiter)
switch.
20. EPB (Electric Parking Brake).
1.
Master locking switches.
2. Hazard warning switch.
\f. Touch screen.
4. Home screen
5. Touch screen on/off
6. Direction indicators and exterior
lighting.
7. Audio and telephone switches.
8. Instrument pack, message
centre and warning indicators.
9. Cruise control switches.
10. Windscreen wiper and washer. 21.
Dynamic mode switch.
22. Winter mode switch.
2\f. JaguarDrive selector.
24. Audio system.
25. Mirror adjuster.
26. Mirror selector switches.
27. Window switch isolator.
28. Window switches.
S ART
S OP S
D C
13678910
11
13
1415
18
17
1624
12
2
22
23
19
20
21
26
25
28
27
45
7
Warning lamps
Low tyre pressure
Airbag fault
Fog lamps on
DSC off, Trac DSC ON
or DSC fault. Flashing \b
DSC operating.Seat belt reminder
ASL active
Forward alert active
EPB on, braking system
fault or brake fluid low
ABS fault or EPB fault
Adaptive Cruise Control
active
Engine malfunction
Page 8 of 16

Exterior lamps\bTrip computer
Move the lever up or down to operate the direction
indicators, forward for high beam and backwards for
high beam flash. A brief push up or down will flash
the indicators three times.Rotate the collar to the first position to select
side lamps.
Second position is headlamps.
Next position is Autolamps. Sensor
controlled to switch side lamps and low
beam headlamps on or off as appropriate.
Autolamps combined with exit delay.
Headlamps can remain on to illuminate the
immediate vicinity for a set period after
leaving the vehicle. There are three time
setting positions. Press the button on the end of the lever to
cycle through the trip computer displays in
the message centre. 1. Front screen wash/wipe.
2. Rain sensor activated wipe.
\f. Slow speed.
4. Fast speed.
5. Controls sensitivity of the rain sensor. With
position 2selected, rotate the collar upwards to
reduce sensitivity and increase the wiper delay.
4
3
2
1
5
Wipers and washers
Autolamps
If AUTO mode is selected and the front screen
wipers are operated for more than 20 seconds, the
exterior lamps will be switched ON automatically.
8
Electric parking brake
• Apply manually when stationary in Park,Drive or
Reverse by pulling up the parking brake switch.
• Can be manually released when the engine is running and the foot brake is applied.
Press the parking brake switch down to release
and pull it up to apply.
• If manually applied whilst in Drive orReverse, the
parking brake will automatically release when the
accelerator is applied.
ASL
P
DSC
Operating note
The brake must be manually applied when parking.
Driving
Do NOT use the recess in the electric parking brake
as a storage area.