2009 JAGUAR XF light
[x] Cancel search: lightPage 221 of 391

221
Wheels and tyres
Wear indicators
When the tread has worn down to
approximately 2 mm, wear indicators start to
appear at the surface of the tread pattern. This
produces a continuous band of rubber across
the tread as a visual indicator.
To maintain performance and grip the tyre
must be replaced as soon as the wear indicator
becomes visible. Sooner, if legislation requires
replacement at a greater tread depth.
Note: Tread depth should be checked
regularly, in some case more frequently than
the service intervals. For advice on checking
tyres contact your Dealer/Authorised repairer
or a tyre dealer.
Age degradation
Tyres degrade over time due to the effects of
ultraviolet light, extreme temperatures, high
loads, and environmen tal conditions. It is
recommended that tyres are replaced at least
every six years, but they may require
replacement more frequently.
Jaguar recommends that even if unused, the
spare tyre be replaced at the same time as the
four road tyres.
Punctured tyres
Tyre checks
Not all punctures result in the tyre deflating
immediately. Therefore, it is important to check
the tyres for damage and foreign objects,
regularly.
When driving, if a sudden vibration, or change
to the vehicle's hand ling is noticed, reduce
speed immediately. Do not brake hard, or make
any sudden manoeuvres or direction changes.
Drive slowly to an area off the main highway
and stop the vehicle.
Note: Driving the vehicle to a safe area may
cause damage to th e punctured tyre, but
occupant safety is far more important.
Inspect the tyres for signs of punctures,
damage or under inflati on. If any damage or
deformity is detected, the tyre should be
replaced. If a spare tyre is not available, then
the vehicle should be reco vered to a tyre repair
centre, or Dealer/Approved repairer.
WARNING
Wear indicators show the minimum
tread depth recommended by the
manufacturers. Tyres which have
worn to this point will have reduced grip and
poor water displacement characteristics.
CAUTION
If tread wear is uneve n across a tyre, or
the tyre wears excessively, the vehicle
should be checked by your Dealer/Authorised
Repairer as soon as possible.
E91698
WARNING
Do not drive the vehicle with a
punctured tyre. Even if the punctured
tyre has not deflated, it is unsafe to
use, as the tyre may deflate suddenly at any
time. See TYRE REPAIR KIT (page 229).
Page 227 of 391

227
Wheels and tyres
Wheel changing safety
Before raising the vehicle, or changing a wheel
ensure that you read, and comply with the
following warnings.
WARNINGS
Always find a safe place to stop, off
the highway and away from traffic.
Ensure that the vehicle is on firm level
ground.
Disconnect traile r/caravan from
vehicle.
Switch on the hazard warning lamps.
Ensure that all passengers, and
animals, are out of the vehicle and in
a safe place away from the highway.
Place a warning triangle at a suitable
distance behind th e vehicle, facing
towards oncoming traffic.
Ensure that the front wheels are in the
straight ahead position, and engage
the steering lock.
Apply the parking br ake, and engage
Park (P).
Ensure that the jack is on firm level
ground.
Never place anything between the
jack and the ground, or the jack and
the vehicle.
When one rear wheel is lifted off the
ground the selection P (Park) position
will not prevent the vehicle from
moving and possibly slipping off the jack as
the park brake only operates on the rear
wheels.
Do not start or run the engine while
the vehicle is supported only by a
jack.
The jack is designed for use when
changing a wheel only. Never work
beneath the vehicle with the jack as
the only means of s upport - use vehicle
support stands.
Always chock the wheel diagonally
opposite the wheel to be changed,
using the wheel chock supplied in the
tool kit. Chock the front of a front wheel, or the
rear of a rear wheel.
If jacking the vehicle on a slight slope
is unavoidable, place chocks on the
downhill side of the two opposite
wheels. An additional chock will be
needed.
Take care when lifting the spare
wheel, and removing the punctured
wheel. The wheels are heavy, and can
cause injuries if not handled
correctly.
Remove the spare wheel prior to
jacking the vehicle. To avoid
destabilising the vehicle when raised.
Take care when loosening the wheel
nuts. The wheel brace may slip off if
not properly attached, and the wheel
nuts may give way suddenly. Either
unexpected movement ma y cause an injury.
WARNINGS
Page 229 of 391

229
Wheels and tyres
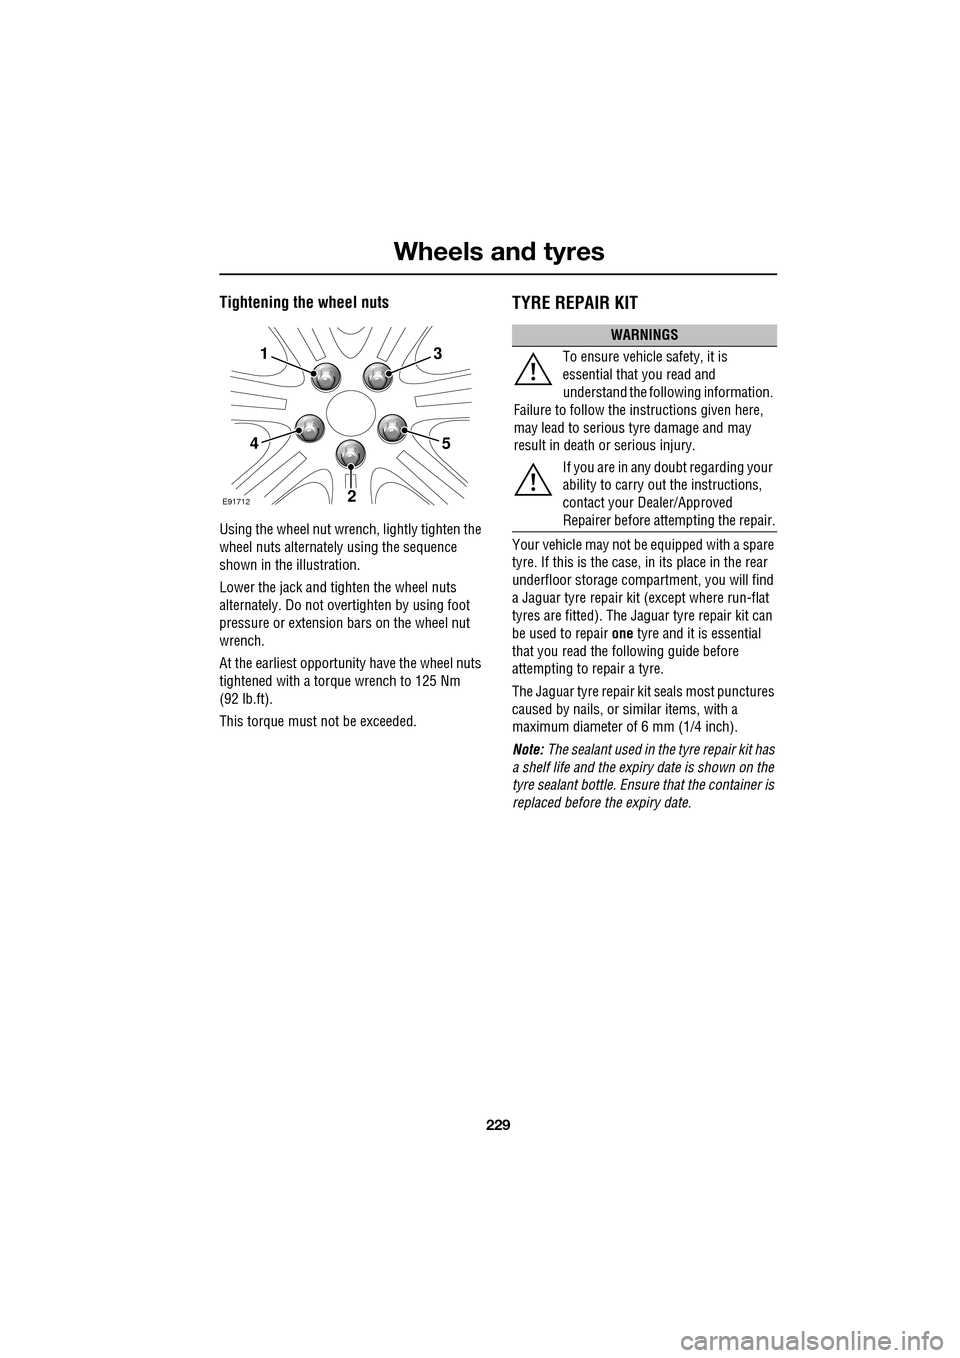
Tightening the wheel nuts
Using the wheel nut wrench, lightly tighten the
wheel nuts alternately using the sequence
shown in the illustration.
Lower the jack and tighten the wheel nuts
alternately. Do not over tighten by using foot
pressure or extension bars on the wheel nut
wrench.
At the earliest opportuni ty have the wheel nuts
tightened with a torque wrench to 125 Nm
(92 lb.ft).
This torque must not be exceeded.
TYRE REPAIR KIT
Your vehicle may not be equipped with a spare
tyre. If this is the case, in its place in the rear
underfloor storage compartment, you will find
a Jaguar tyre repair kit (except where run-flat
tyres are fitted). The Jaguar tyre repair kit can
be used to repair one tyre and it is essential
that you read the following guide before
attempting to repair a tyre.
The Jaguar tyre repair kit seals most punctures
caused by nails, or si milar items, with a
maximum diameter of 6 mm (1/4 inch).
Note: The sealant used in the tyre repair kit has
a shelf life and the expiry date is shown on the
tyre sealant bottle. Ensure that the container is
replaced before the expiry date.
1
4
2
5
3
E91712
WARNINGS
To ensure vehicle safety, it is
essential that you read and
understand the following information.
Failure to follow the instructions given here,
may lead to serious tyre damage and may
result in death or serious injury.
If you are in any doubt regarding your
ability to carry out the instructions,
contact your Dealer/Approved
Repairer before at tempting the repair.
Page 232 of 391

Wheels and tyres
232
Using the Jaguar tyre repair kit
Note: All vehicle drivers and occupants should
be made aware that a temporary repair has
been made to a tyre fitted to the vehicle. They
should also be made aware of the special
driving conditions im posed when using a
repaired tyre.
Repair procedure
1. Open the tyre repair kit and peel off the
maximum speed label. Attach the label to
the fascia in the driver's field of vision.
Take care not to obstruct any of the
instruments or warning lights.
2. Uncoil the compressor power cable and
the inflation hose.
3. Unscrew the orange cap from the sealant
bottle receiver and the sealant bottle cap.
4. Screw the sealant bottle into the receiver
(clockwise) until tight.
•Screwing the bottle onto the receiver will
pierce the bottle's se al. Do not unscrew
a full, or partly us ed bottle from the
receiver. Doing so will result in sealant
leaking from the bottle.
5. Remove the valve cap from the damaged
tyre.
6. Remove the protective cap from the
inflation hose and connect the inflation
hose to the tyre valve. Ensure that the hose
is screwed on firmly.
7. Ensure that the compressor switch is in
the off (0) position.
8. Insert the power cable connector into the
auxiliary power socket. See AUXILIARY
POWER SOCKETS (page 125).
WARNINGS
Avoid skin contact with the sealant
which contains natu ral rubber latex.
If the tyre inflati on pressure does not
reach 1.8 bar (26 lbf/in², 180 kPa)
within seven minutes, the tyre may
have suffered excessive damage. A temporary
repair will not be poss ible, and the vehicle
should not be driven until the tyre has been
replaced.
CAUTIONS
Before attempting a ty re repair, ensure
that the vehicle is parked safely, as far
away from passing traffic as possible.
Ensure that the parki ng brake is applied
and P (Park) is selected.
Do not attempt to remove foreign
objects such as nails, screws, etc. from
the tyre.
Always run the engine when using the
compressor, unless the vehicle is in an
enclosed or poorly ventil ated space, as this
may cause asphyxiation.
To prevent overheating, do not operate
the compressor continuously for longer
than ten minutes.
WARNING
Check the tyre sidewall prior to
inflation. If there are any cracks,
bumps or similar damage, do not
attempt to inflate the tyre. Do not stand
directly beside the tyre while the compressor
is pumping. Watch the ty re sidewall. If any
cracks, bumps or simila r damage appear, turn
off the compressor and let the air out by
means of the pressure relief valve. Do not
continue to use the tyre.
Page 235 of 391

235
Wheels and tyres
Note: Different types of tyre may affect the
performance of the TPM system. Always
replace tyres in accordance with
recommendations. See TYRE
SPECIFICATIONS - ARDUOUS TERRAIN
(page 239).
Your vehicle may be equipped with a TPM
System which monitors pressure in each tyre
(temporary use spare wheels are not fitted with
sensors and are conseque ntly not monitored).
Wheels fitted with a TPM system can be easily
visually identified by the external metal lock nut
and valve ( 1). All Jaguar n on-TPM system
wheels have a rubber valve fitted (2).
TPM system operation
The TPM system monitors pressure of the
tyres via sensors located in each wheel and a
receiver located within the vehicle.
Communication between se nsor and receiver
is via Radio Frequency (RF) signals.
The tyre pressure warning
comprises a yellow warning telltale
within the instrument panel, and
the associated messages within the message
centre. If the telltale light illu
minates, you should stop
and check your tyres as soon as possible and
inflate them to the recommended pressure as
stated on the tyre pressure placard. If low
pressure warnings occur frequently, the cause
must be determined and rectified.
When driving through variable climatic
conditions the TPM syst em warnings may be
intermittent.
Your vehicle will also indicate a TPM System
malfunction by initially flashing and
subsequent continuous illumination of the
warning telltale. A text message will
accompany the system malfunction and will
display TYRE PRESSURE SYSTEM FAULT . The
TPM system fault sequence will be activated at
every ignition cycle until the fault is rectified.
When a malfunction occurs, the system may
not be able to de tect or signal low tyre pressure
as intended.
TPM system malfuncti ons may occur for a
variety of reasons which may include other
radio frequency systems that could cause
interference or the installation of incompatible
replacement tyres on the vehicle.
1
2
E91713
AutokmInst Ful/100km
E95244
Page 245 of 391

245
Fuses
FUSE SPECIFICATION CHART
Engine compartment fuse box
Fuse No Rating (amps) Fuse
Colour Circuit
F1 - - Not used.
F2 - - Not used.
F3 20A Blue Emissions system (petrol only).
F4 20A Blue Emissions system (petrol only).
F5 40A Green Anti-lock brake pump.
F6 30A Pink Power wash pump.
F7 - - Not used.
F8 - - Not used.
F9 50A Red Engine management.
F10 - - Not used.
F11 - - Not used.
F12 50A Red Secondary air in jection (petrol only).
F13 30A Pink Wipers.
F14 30A Pink Starter solenoid.
F15 40A Green Screen heater.
F16 40A Green Screen heater.
F17 80A Black Radiator fan. (V6 petrol only)
F18 60A Yellow Glow plugs (diesel only).
F19 - - Not used.
F20 15A Blue Horn.
F21 25A Clear Anti-lock brakes.
F22 15A Blue Cigar lighter.
F23 - - Not used.
F24 5A Tan Adaptive cruise control.
F25 10A Red Anti-lock brakes.
F26 10A Red Engine manage ment. JaguarDrive selector. Transmission
control module.
F27 5A Tan Diesel - Engine management.
F27 5A Tan Petrol - Secondary air injection.
Page 251 of 391

251
Status after a collision
DRIVING AFTER A COLLISION
Before starting or driving
If the vehicle has been involved in an accident
it should be checked thoroughly before
attempting to start the engine or drive the
vehicle.
Check for:-
• Fuel leaks.
• Fluid leaks.
• Battery damage.
• Damage to wiring.
• Damage to lights.
• Damage to steering, suspension, wheels
or tyres.
• Sharp or protruding bodywork.
• Operation of doors and locks.
• Condition and operation of seat belts and
SRS components.
• Activation of the pe destrian protection
system.
• Condition of chil d seats and their
mounting/attach ment points.
Note: This list is not exhaustive.
Resetting the fuel cut-off
The fuel system cut-off forms part of the Safety
and Restraint System (SRS) fitted to your
vehicle. Following an impact, and depending on
the severity, the fuel pump may be switched
off.
1.Switch the ignition off, and wait for 10
seconds.
2. Without pressing the brake pedal, press
the engine START/STOP button, to switch
the electrical circuits on. Wait for 30
seconds.
3. Check the vehicle thoroughly for fuel leaks.
If a leak is detected switch the ignition off
immediately.
•The vehicle must not be started if a leak
is present. Seek qualified advice, and
have the vehicle recovered.
4. If no leaks are detected, start the engine.
WARNING
If the vehicle is involved in a collision
it should be checked by a Dealer/
Authorised repairer, or suitably
qualified personnel, before starting or driving.
WARNING
The fuel cut-off should never be reset
if you can smell fuel, or a leak can be
seen. Doing so can lead to a fire
which may cause personal injury or death.
Page 252 of 391

Status after a collision
252
When driving
When driving a vehicle which has been
involved in a collision use caution and pay extra
attention to the operation of the vehicle. If any
changes in vehicle operation after the collision
are noted when compared to it's operation
before the collision, do not continue to drive
the vehicle. Stop the vehi cle as soon as it is
safe to do so, and have the vehicle recovered.
Pay particular attent ion to changes in:-
• Steering.
• Braking.
• Unusual noises.
• Warning lights or messages displayed.
• Problems with electrical systems.
INSPECTING SAFETY SYSTEM
COMPONENTS
Following a collision the seat belt and
Supplementary Restrain t System components
should be inspected for damage and/or
deformity. The inspection and any subsequent
repair work should only be carried out by a
Dealer/Authorised Repair er, or other suitably
qualified personnel.
Components which require inspection
include:-
• Seat belt webbing and mechanisms.
• Seat belt pre-tensioners.
• Airbag covers and modules.
• Seat frames a nd mounting points.
• Child seats.
• Child seat anchor points.
• Pedestrian prot ection system.
Note: This list is not exhaustive.
In addition to the physical items checked, the
electronic control system and its associated
wiring should also be checked thoroughly. This
process will include a diagnostic check which
can only be carried out by a Dealer/Authorised
repairer or suitably qualified and equipped
persons.
WARNING
It is not recommended that the
vehicle be driven or used until all of
the occupant protection systems
have been checked.