2009 JAGUAR XF ESP
[x] Cancel search: ESPPage 309 of 391

309
Telephone
Safety
Driving
Check local regulations covering the use of
in-car telephones in the areas that you intend to
use your telephone, and always obey them.
Observe the following guidelines if you are
using the phone when driving.
• Give full attention to driving - safe driving
is your prime responsibility.
• Always use hands-free operation when
driving.
• When receiving a call, if driving conditions
demand, pull off the road and park.
Electronic devices
Most modern electronic equipment is shielded
from Radio Frequency (R F) signals. However,
certain equipment may not be shielded against
RF signals from your phone.
Pacemakers
The Health Industry Manufacturers'
Association recommends that a minimum
separation of 15 centimetres (six inches) is
maintained between a wireless phone antenna
and a pacemaker, to avoid potential
interference with the pacemaker. These
recommendations are consistent with the
independent research by, and
recommendations of, Wireless Technology
Research.
TELEPHONE PAIRING AND DOCKING
Before use, your mobile phone must be paired
and docked with the vehicle’s Bluetooth
system. This is done via your mobile phone or
the touch-screen.
Pairing and docking using your mobile
phone
Follow the steps below, to pair and dock your
phone with the vehicle using your mobile
phone.
Note: The process of pairing and docking your
phone with the vehicle using the mobile phone,
will vary depending on the type of mobile
phone used.
3. Ensure that the ignition is on and the
touch-screen is active.
4. Ensure that there is no mobile phone
currently docked with the vehicle's
Bluetooth system. If a mobile phone is
docked with the system, you will not be
able pair and dock another phone until the
current phone has been undocked. To
undock a phone, select Phone or Comms
on the home screen, then Settings and
then Undock .
5. Using the mobile phone, search for
Bluetooth devices. See your phone's
operating instructions for further
information.
WARNING
Read the following information
thoroughly before using your
telephone.
nametag
Register
Voice mail
Answer options
Phone options
Change phone
E96911
Comms
Add phone
Search new
Docked phone: Nokia 6230i
Undock
Page 318 of 391
Telephone
318
NAMES
Directory name search
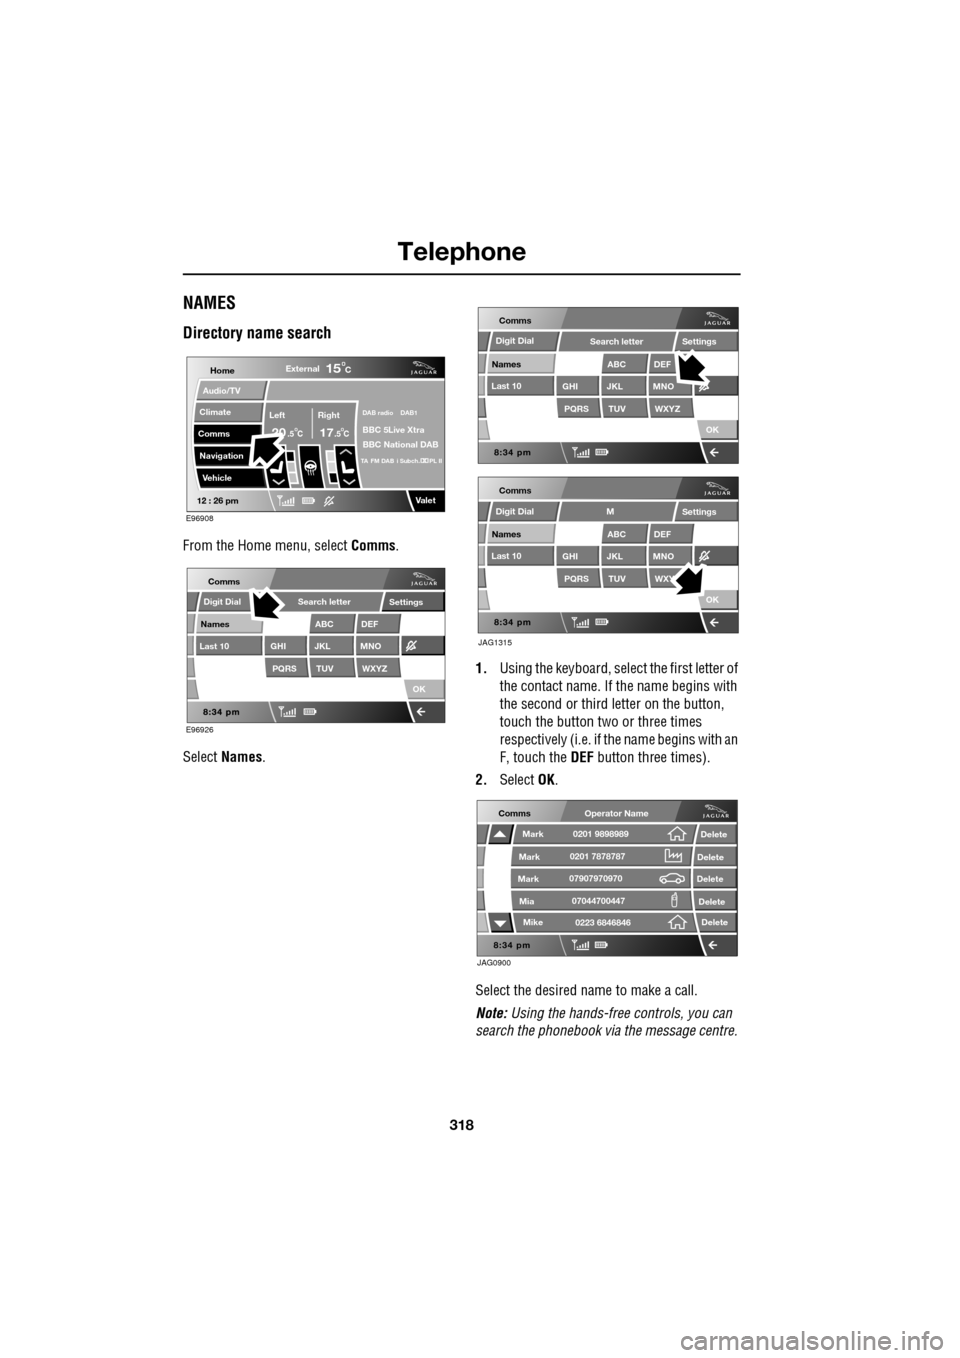
From the Home menu, select Comms.
Select Names . 1.
Using the keyboard, select the first letter of
the contact name. If th e name begins with
the second or third letter on the button,
touch the button two or three times
respectively (i.e. if th e name begins with an
F, touch the DEF button three times).
2. Select OK.
Select the desired name to make a call.
Note: Using the hands-free controls, you can
search the phonebook via the message centre.
Home
Audio/TV
Climate
Comms
Navigation
VehicleExternal
Left Right
20 17CC
15C
.5 .5
DAB radio DAB1
BBC 5Live Xtra
BBC National DAB
TA FM DAB i Subch. PL II
Valet12 : 26 pm
E96908
E96926
Comms
Digit Dial
Names
Last 10
Settings
PQRS
GHITUV
ABC
JKL
WXYZ
DEF
MNO
Search letter
OK
Comms
Comms
Names
Last 10
Settings
PQRS
GHITUV
ABC
JKL
WXYZ
DEF
MNO
Search letter
OK
Names
Last 10
Settings
PQRS
GHITUV
ABC
JKL
WXY
DEF
MNO
M
OK
JAG1315
Digit Dial
Digit Dial
JAG0900
Comms
Delete
Delete
Delete
Delete
Delete
Mark
Mark
Mark
Mike
Mia0201 9898989
0201 7878787
0223 6846846
07907970970
07044700447
Operator Name
Page 323 of 391
323
Telephone
TELEPHONE VOICE CONTROL
Voice control allows many of the telephone
features to be activa ted by voice commands.
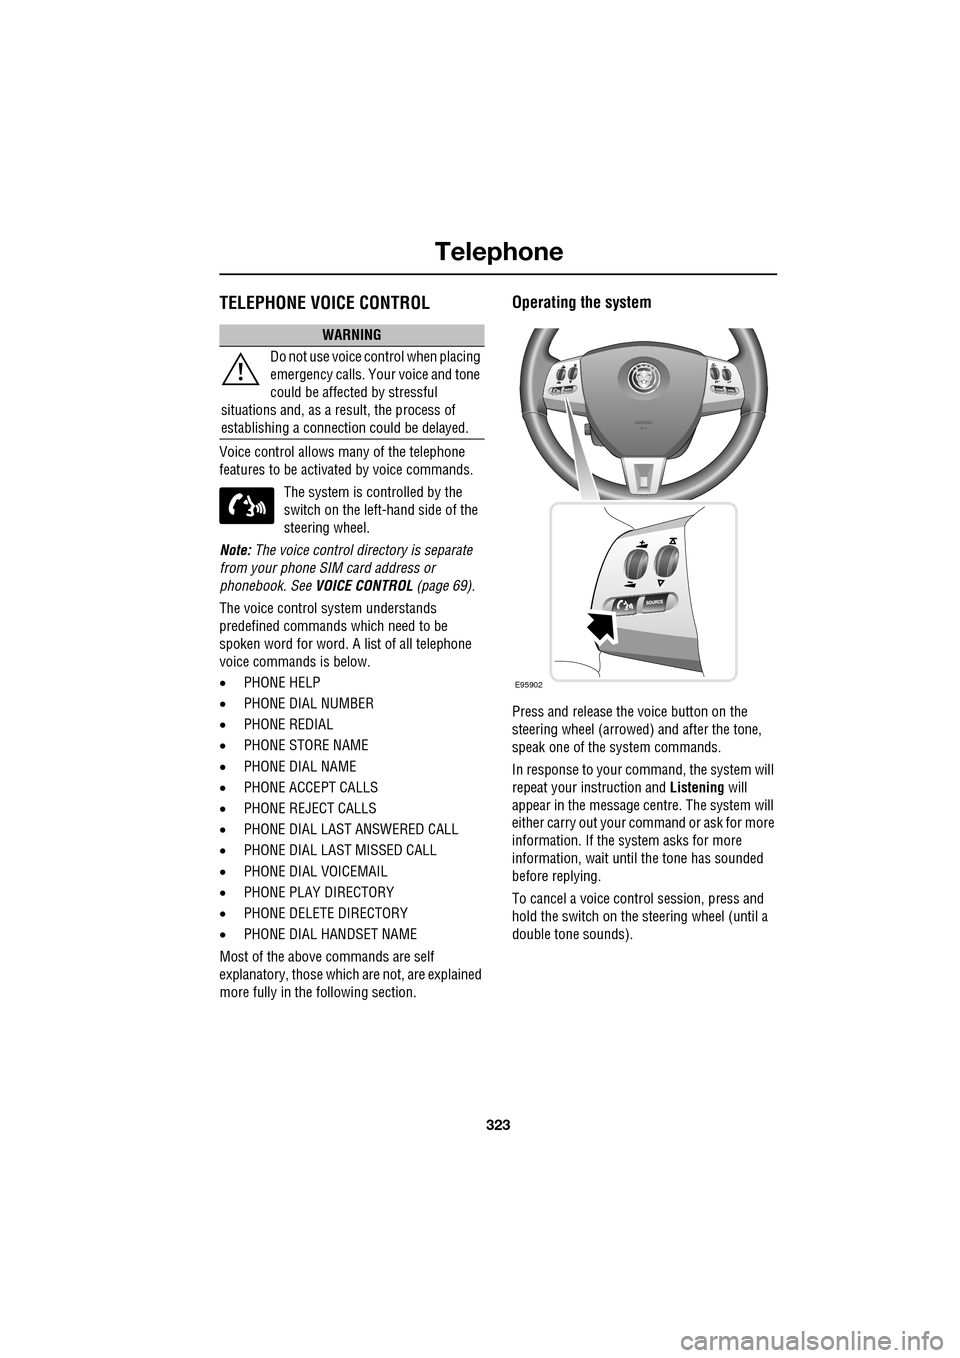
The system is controlled by the
switch on the left -hand side of the
steering wheel.
Note: The voice control dire ctory is separate
from your phone SIM card address or
phonebook. See VOICE CONTROL (page 69).
The voice control sy stem understands
predefined commands which need to be
spoken word for word. A list of all telephone
voice commands is below.
• PHONE HELP
• PHONE DIAL NUMBER
• PHONE REDIAL
• PHONE STORE NAME
• PHONE DIAL NAME
• PHONE ACCEPT CALLS
• PHONE REJECT CALLS
• PHONE DIAL LAST ANSWERED CALL
• PHONE DIAL LAST MISSED CALL
• PHONE DIAL VOICEMAIL
• PHONE PLAY DIRECTORY
• PHONE DELETE DIRECTORY
• PHONE DIAL HANDSET NAME
Most of the above commands are self
explanatory, those whic h are not, are explained
more fully in the following section.
Operating the system
Press and release the voice button on the
steering wheel (arrowed) and after the tone,
speak one of the system commands.
In response to your command, the system will
repeat your instruction and Listening will
appear in the message centre. The system will
either carry out your command or ask for more
information. If the system asks for more
information, wait until the tone has sounded
before replying.
To cancel a voice control session, press and
hold the switch on the steering wheel (until a
double tone sounds).
WARNING
Do not use voice control when placing
emergency calls. Your voice and tone
could be affected by stressful
situations and, as a result, the process of
establishing a connecti on could be delayed.
E95902
Page 324 of 391
Telephone
324
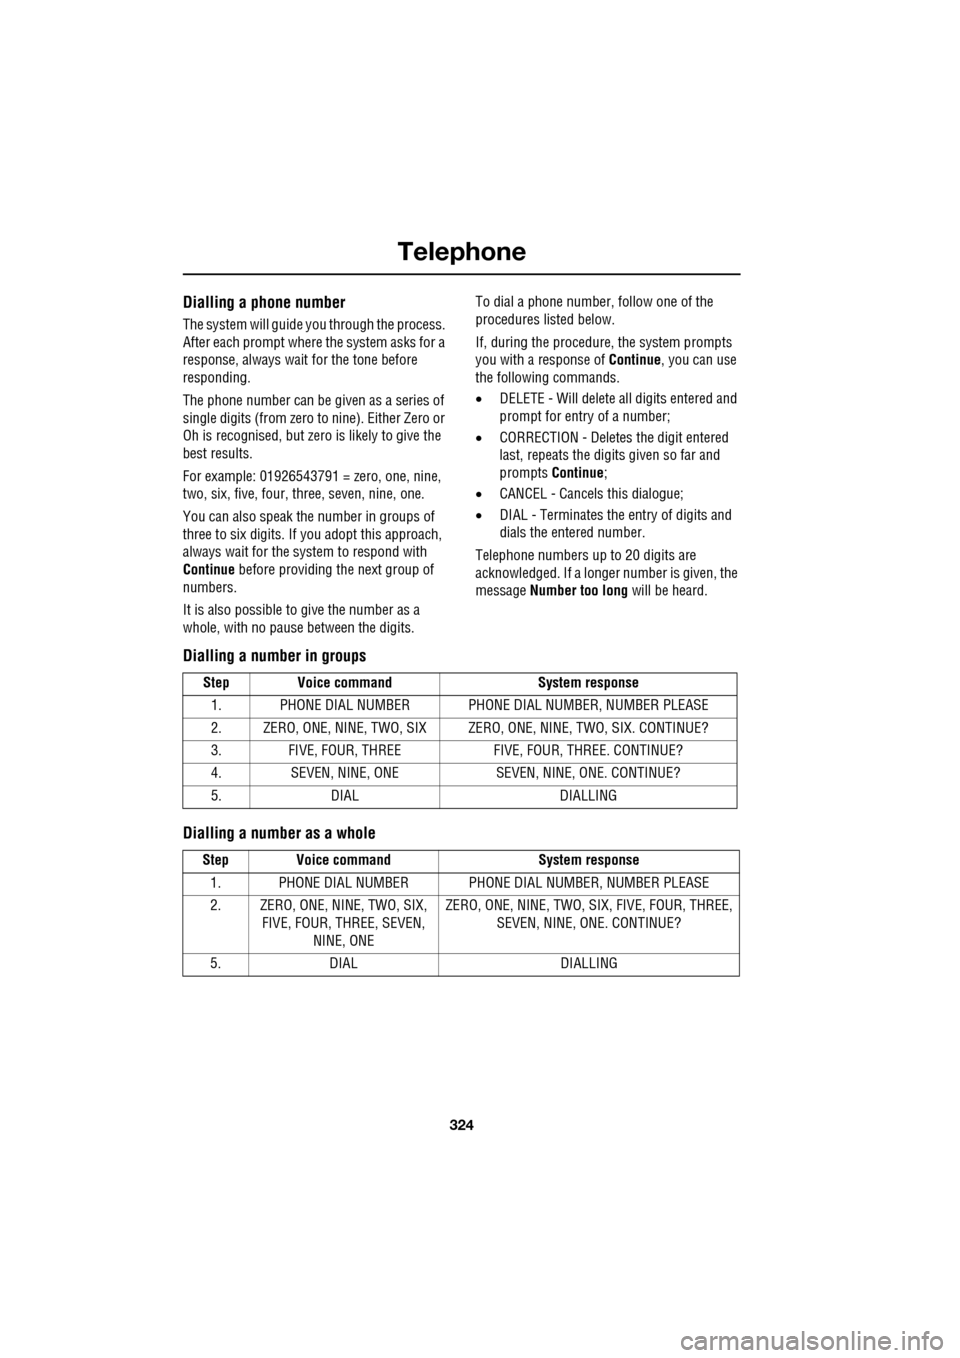
Dialling a phone number
The system will guide you through the process.
After each prompt where the system asks for a
response, always wait for the tone before
responding.
The phone number can be given as a series of
single digits (from zero to nine). Either Zero or
Oh is recognised, but zero is likely to give the
best results.
For example: 01926543791 = zero, one, nine,
two, six, five, four, three, seven, nine, one.
You can also speak the number in groups of
three to six digits. If you adopt this approach,
always wait for the system to respond with
Continue before providing the next group of
numbers.
It is also possible to give the number as a
whole, with no pause between the digits. To dial a phone number, follow one of the
procedures listed below.
If, during the procedure, the system prompts
you with a response of
Continue, you can use
the following commands.
• DELETE - Will delete all digits entered and
prompt for entry of a number;
• CORRECTION - Deletes the digit entered
last, repeats the digits given so far and
prompts Continue ;
• CANCEL - Cancels this dialogue;
• DIAL - Terminates the entry of digits and
dials the entered number.
Telephone numbers up to 20 digits are
acknowledged. If a longer number is given, the
message Number too long will be heard.
Dialling a number in groups
Dialling a number as a whole
Step Voice command System response
1. PHONE DIAL NUMBER PHONE DI AL NUMBER, NUMBER PLEASE
2. ZERO, ONE, NINE, TWO, SIX ZERO, ONE, NINE, TWO, SIX. CONTINUE?
3. FIVE, FOUR, THREE FIVE, FOUR, THREE. CONTINUE?
4. SEVEN, NINE, ONE SEVEN, NINE, ONE. CONTINUE?
5. DIAL DIALLING
Step Voice command System response
1. PHONE DIAL NUMBER PHONE DI AL NUMBER, NUMBER PLEASE
2. ZERO, ONE, NINE, TWO, SIX, FIVE, FOUR, THREE, SEVEN,
NINE, ONE ZERO, ONE, NINE, TWO, SIX, FIVE, FOUR, THREE,
SEVEN, NINE, ONE. CONTINUE?
5. DIAL DIALLING
Page 325 of 391
325
Telephone
Phone store name
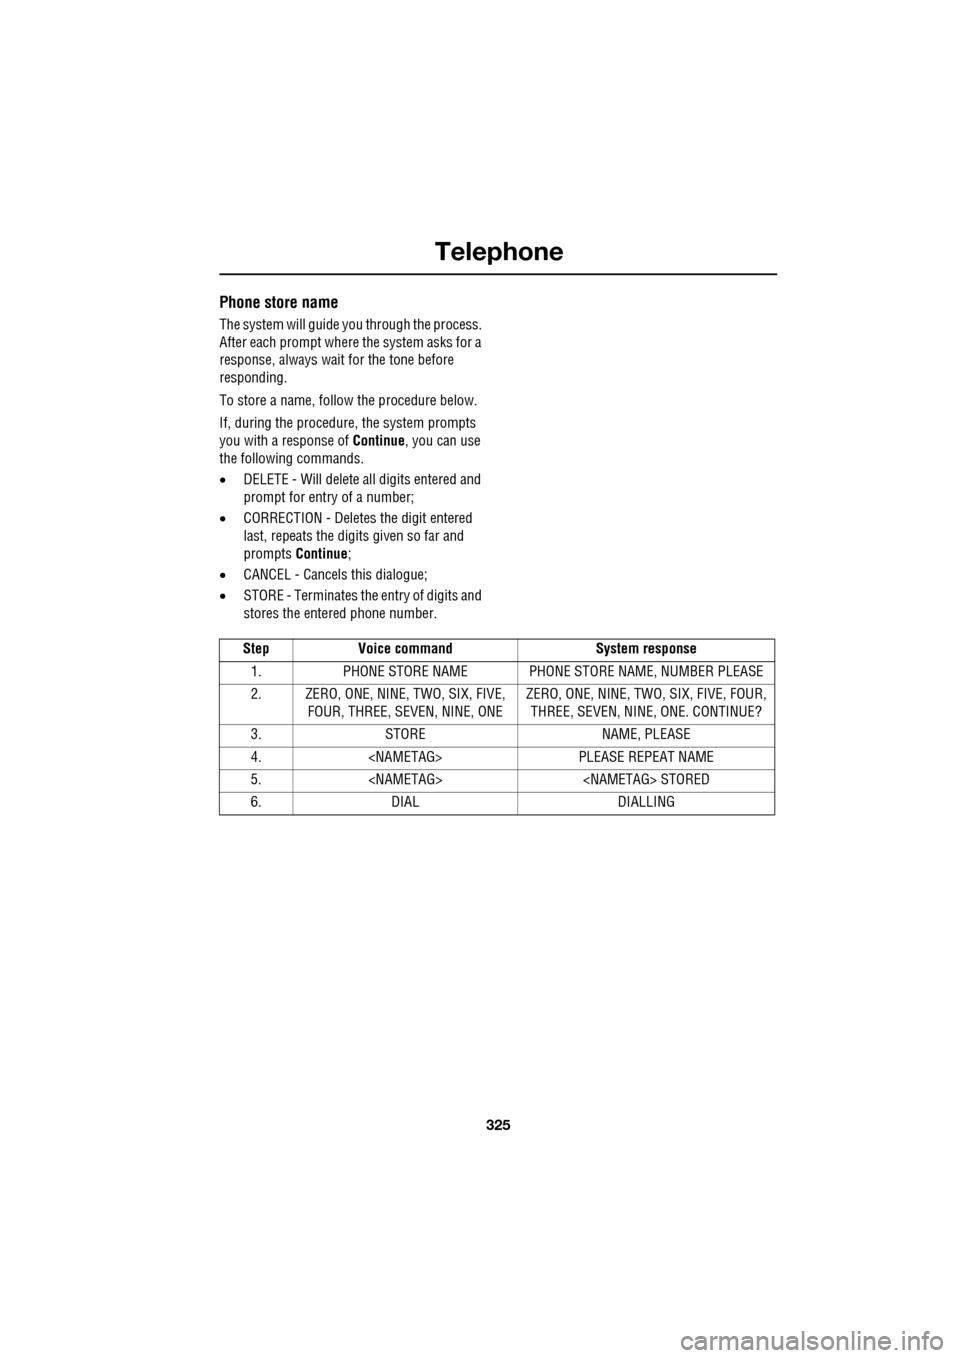
The system will guide you through the process.
After each prompt where the system asks for a
response, always wait for the tone before
responding.
To store a name, follow the procedure below.
If, during the procedure, the system prompts
you with a response of Continue, you can use
the following commands.
• DELETE - Will delete all digits entered and
prompt for entry of a number;
• CORRECTION - Delete s the digit entered
last, repeats the digi ts given so far and
prompts Continue ;
• CANCEL - Cancels this dialogue;
• STORE - Terminates the entry of digits and
stores the entered phone number.
Step Voice command System response
1. PHONE STORE NAME PHONE STORE NAME, NUMBER PLEASE
2. ZERO, ONE, NINE, TWO, SIX, FIVE, FOUR, THREE, SEVEN, NINE, ONE ZERO, ONE, NINE, TWO, SIX, FIVE, FOUR,
THREE, SEVEN, NINE, ONE. CONTINUE?
3. STORE NAME, PLEASE
4.
5.
6. DIAL DIALLING
Page 327 of 391
327
Telephone
Message centre messages
A number of responses by the telephone voice
system are reinforced by text messages
appearing in the mess age centre display.
These messages are in the following list.
• LISTENING
• VOICE NOT READY
• NOT AVAILABLE PHONE IN USE
• COMMAND NOT RECOGNISED
• NO SPEECH DETECTED
• STORING
• COMMAND CANCELLED
• SEARCHING
• HOLD BUTTON TO CANCEL
• DIRECTORY
Phonebook entries
You can also view the phonebook entries on
the message centre. See HANDS-FREE
CONTROLS (page 321).
Page 342 of 391

Navigation system
342
MAP DISPLAY ICONS
The icons on the split screens are:This is only displayed when
a satellite signal is not being
received.
This icon is displayed when
TMC is selected and a signal
is received.
When the bar is across the
TMC, then a signal is not
being received and TMC will
not function.
Touching this icon toggles it
with the N (North) icon (1).
The compass always points
North or else the vehicle
direction arrow always
points to the top of the map.
Distance and direction for
the next turn.
If the compass icon (6) is
showing, the vehicle
direction icon (8) is always
to the top of the map
irrespective of where North
is.
Example RDS-TMC Icon
(this one showing incident).
Go back one screen.
Touch to repeat last voice
instruction.
GPS
TMC
TMC
mi1.2
Example POI (this one
showing a fuel station).
This icon shows information
concerning journey distance
and the estimated time
remaining before arriving at
your destination.
It also indicates your journey from your
current position to the next waypoint or to
your destination. In th is example the journey
is to your destination, shown in the top of the
icon as the vehicle position arrow and a
pointer towards a red circle.
This icon shows distance
from your current position,
distance and direction to
way point 2.
This is your zoom button,
enabling you to alter the map
scale. The current level of
zoom is shown between the
two arrows (e.g. 2 miles).
You may also see a zoom
bar on the map.
This icon is toggled with the
compass (6). When this is
showing, North is always to
the top of the map.
This icon is visible when the
navigation screen has been
scrolled away from the
current vehicle position, so
that the vehicle (compass)
icon is no longer visible.
Touch the icon to re-centre
the screen on the current
vehicle position.
mi136
mi17
mi2
N
Page 348 of 391
Navigation system
348
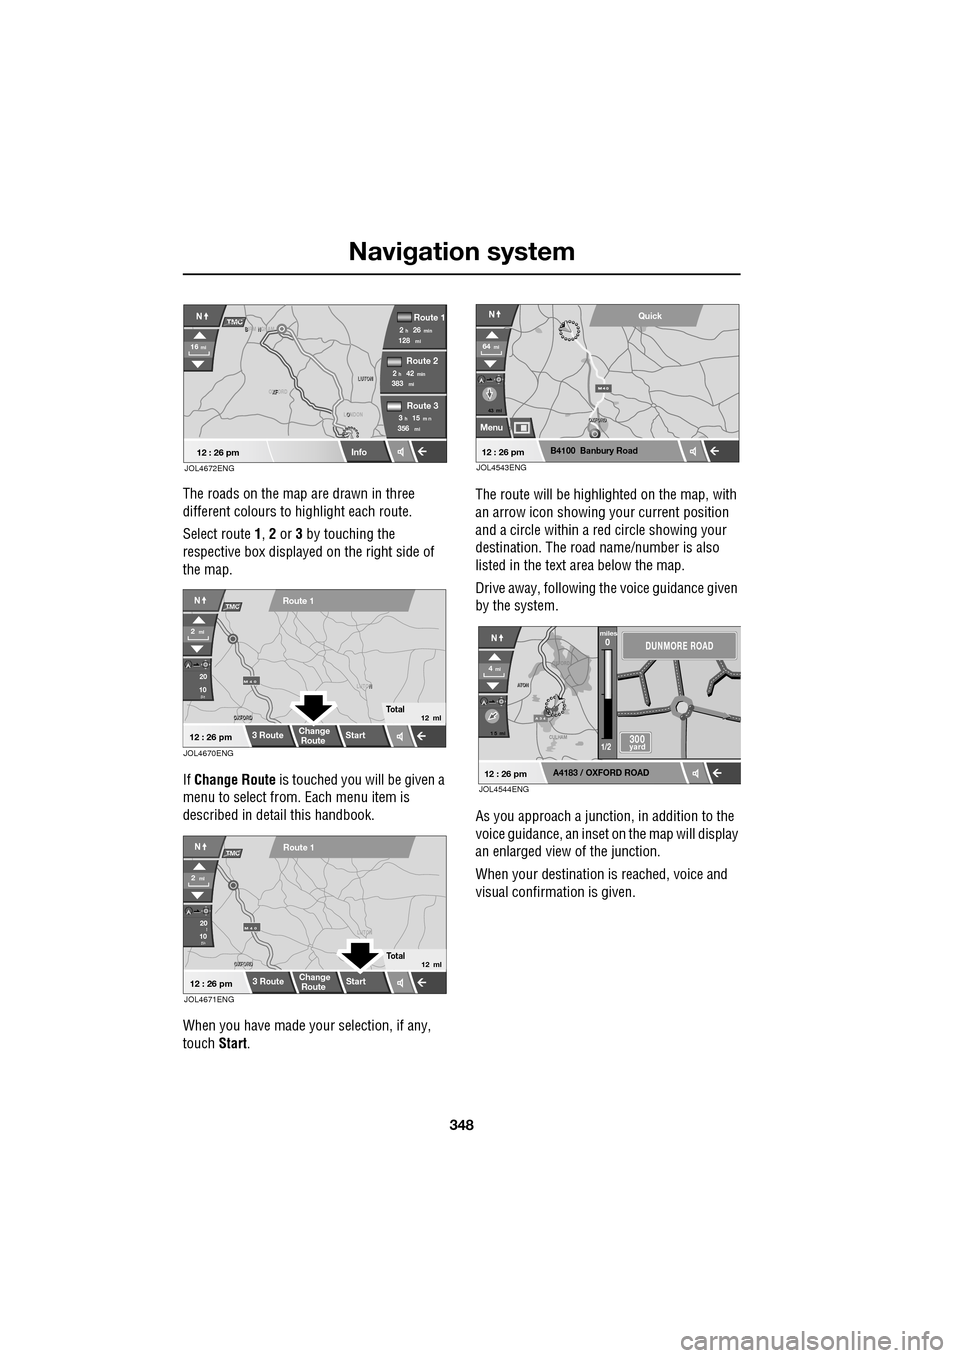
The roads on the map are drawn in three
different colours to highlight each route.
Select route 1, 2 or 3 by touching the
respective box displaye d on the right side of
the map.
If Change Route is touched you will be given a
menu to select from . Each menu item is
described in deta il this handbook.
When you have made your selection, if any,
touch Start. The route will be highlighted on the map, with
an arrow icon showing your current position
and a circle within a re
d circle showing your
destination. The road name/number is also
listed in the text area below the map.
Drive away, following the voice guidance given
by the system.
As you approach a junction, in addition to the
voice guidance, an inset on the map will display
an enlarged view of the junction.
When your destination is reached, voice and
visual confirmation is given.
XF
OXFORD LUTON
LUTON
12 : 26 pm
NTMC
Info
Route 1
mi
Route 2
Route 3
128min26h2
mi383min42h2
mi356m n15h3
16mi
O
LONDON
B N
BIRM NGHAM
JOL4672ENG
JOL4670ENG
OXFORD
OXFORD N
LUTON
M 4 0
12 : 26 pm
m
Route 1
Change
Route Start
3 Route
2ml
Total12 ml
20
10
NTMC
JOL4671ENG
OXFORD
OXFORD LUTON
M 4 0
12 : 26 pm
m
Route 1
Change
Route
Start
3 Route
2ml
Total12 ml
20
10l
NTMC
43 mi
Menu
B4100 Banbury Road
64mi
NQuick
12 : 26 pmJOL4543ENG
A 3 4
OXFORD
CULHAM
A
TON
A
TON
1 5 mi
A4183 / OXFORD ROAD
4mi
NDUNMORE ROAD
300 yard
miles0
1/2
12 : 26 pmJOL4544ENG