2009 JAGUAR XF buttons
[x] Cancel search: buttonsPage 129 of 391

129
Convenience features
To erase all programming
For first time programming, ensure that the
engine is switched off:
1.Ensure that the ignition system is in
convenience mode.
2. Press and hold the two outer buttons on
the transceiver in th e rear-view mirror.
Keep the buttons pressed until the
indicator lamp begins to flash (this will
take approximately 20 seconds), then
release the buttons.
All memories in the gara ge door opener have
now been cleared.
Note: Do not perform this procedure when
programming the addi tional garage door
opener buttons.
Programming
Ensuring that the engine is switched off:
1. Ensure that the ignition system is on.
2. Hold the end of the original garage door
opener hand-held transmitter
approximately 50 to 150 mm (2 to 6
inches) away from the transceiver in the
rear-view mirror, keeping the indicator
lamp in view. 3.
Using both hands , simultaneously press
and hold both the chosen transceiver
button on the rear-view mirror, as shown
above, and the hand-held transmitter
button. Keep both buttons pressed. The
indicator lamp will flash slowly at first and
then change to a fast flash. When the
indicator lamp flashes rapidly, release both
buttons. The rapid flas hing lamp indicates
successful programming.
4. If, after 60 seconds, the indicator lamp
does not flash rapidl y, release both the
transceiver and the hand-held transmitter
buttons and repeat the procedure starting
with Step 2. Position the hand-held
transmitter at a diffe rent angle and/or
distance.
5. Press and hold the programmed garage
door opener button and observe the
indicator lamp.
•If the indicator is continuous,
programming is complete and your
device should activate when the garage
door opener button is pressed and held
for approximately 1 to 2 seconds and
then released.
• If the indicator lamp blinks rapidly for
two seconds and then turns a
continuous light, pr oceed with the
following programming instructions for
rolling code device equipment.
E95123
Page 130 of 391

Convenience features
130
Rolling code device equipment
programming
Note: The assistance of a second person, may
make the following steps quicker and easier.
Once the button has been pressed there are
only 30 seconds in which to complete Step 3.
1. At the garage door opener receiver (motor
head unit) in the garage, locate the learn or
smart button/switch.
•The name of the button or switch may
vary between manufacturers.
2. Press and release the learn or smart
button.
3. Return to the vehicle and firmly press and
hold the programmed garage door opener
button for two seconds and release.
4. Repeat the press, hol d, release sequence
three times to complete the programming
process.
The garage door opener in the rear-view mirror
should now activate the rolling code device.
Reprogramming a single garage door
opener button
To programme a device to a previously trained
button:
1. Press and hold the desired
pre-programmed garage door opener
button for at least 20 seconds, but no
longer than 30 seconds, until the indicator
lamp begins to flash.
2. Without releasing th e rear-view mirror
button, position the hand-held transmitter
approximately 50 to 150 mm (2 to 6
inches) away from the transceiver in the
rear-view mirror, keeping the indicator
lamp in view.
3. Carry out Step 3 of Programming .
Entry gate programming
The technology of some entry gates requires
you to press and re-press (cycle) the hand-held
transmitter button ever y two seconds during
programming.
Continue to press and hold the desired
rear-view mirror button while you cycle your
hand-held transmitter unt il the indicator lamp
flashes rapidly.
Information and assistance
For information on the range of available
compatible products or accessories, or for
assistance, you should contact your Dealer/
Authorised Repairer.
You can also contact the supplier’s helpline on
0 0800 0466 354 65. This toll-free number can
be called from anywhere within Europe. No
separate country code is required (the first zero
is not required when calling from within
Germany).
Contact can also be made via the internet. The
website address is www.eurohomelink.com.
The e-mail address is:
[email protected] .
Note: Keep the original transmitter for future
use or programming procedures if, for
example, you purchase a new vehicle.
Note: The manufacturer is not responsible for
any radio or TV interference caused by
unauthorised modifications to this equipment.
Such modifications could void the user’s
authority to operate the equipment.
CAUTION
It is recommended that when you sell or
dispose of the vehicle, the programmed
transceiver buttons be erased for security
purposes.
Page 269 of 391

269
Audio unit overview
AUDIO UNIT OVERVIEW
The Jaguar infotainment system contains
AM/FM radio, compact disc player and portable
audio interface. Digital (DAB) radio, six-disc CD
player and TV are optional.
Audio controls
The audio unit is c ontrolled by the
touch-screen ( 1) and console buttons ( 2–8).
1. Touch-screen: See TOUCH-SCREEN
(page 109).
2. LOAD : Press to load one or more CDs.
See LOADING COMPACT DISCS
(page 292).
3. Seek up: Short press to seek next station
frequency up or next CD track.
4. Settings button:
•Short press to display the audio Settings
menu.
• Long press (two seconds) to display the
Vol presets settings menu. 5.
Audio system on/off and volume control:
•Press to switch the system on/off.
• Rotate to increase or decrease volume
level. Any volume adjustment made in
any mode will be memorised for that
mode.
6. SOURCE : Press repeatedly to scroll
through all audio sources: FM1, FM2, AM,
DAB1, DAB2, DAB3, CD , Portable audio
and TV.
7. Seek down: Short press to seek next
station frequency down or previous CD
track.
8. Eject: Press to eject CD. See EJECTING
COMPACT DISCS (page 294).
9. CD load and eject slot.
WARNING
Sustained exposure to high sound
levels can damage your hearing.
Audio/TV
DAB radio
CDAM/FM
12 : 26 pm
BBC R2 BBC R3
BBC R4 BBC LDN BBC W&M Mercia Galaxy 106 2Radio 1
Settings
Autostore
TP TA PTY AF REG 3CHFM2 89 0 BBC R2
Portable audio TV
E93935
1
9
8
7
6
5
2
3
4
Page 273 of 391
273
Audio unit operation
Standard and Premium sound systems
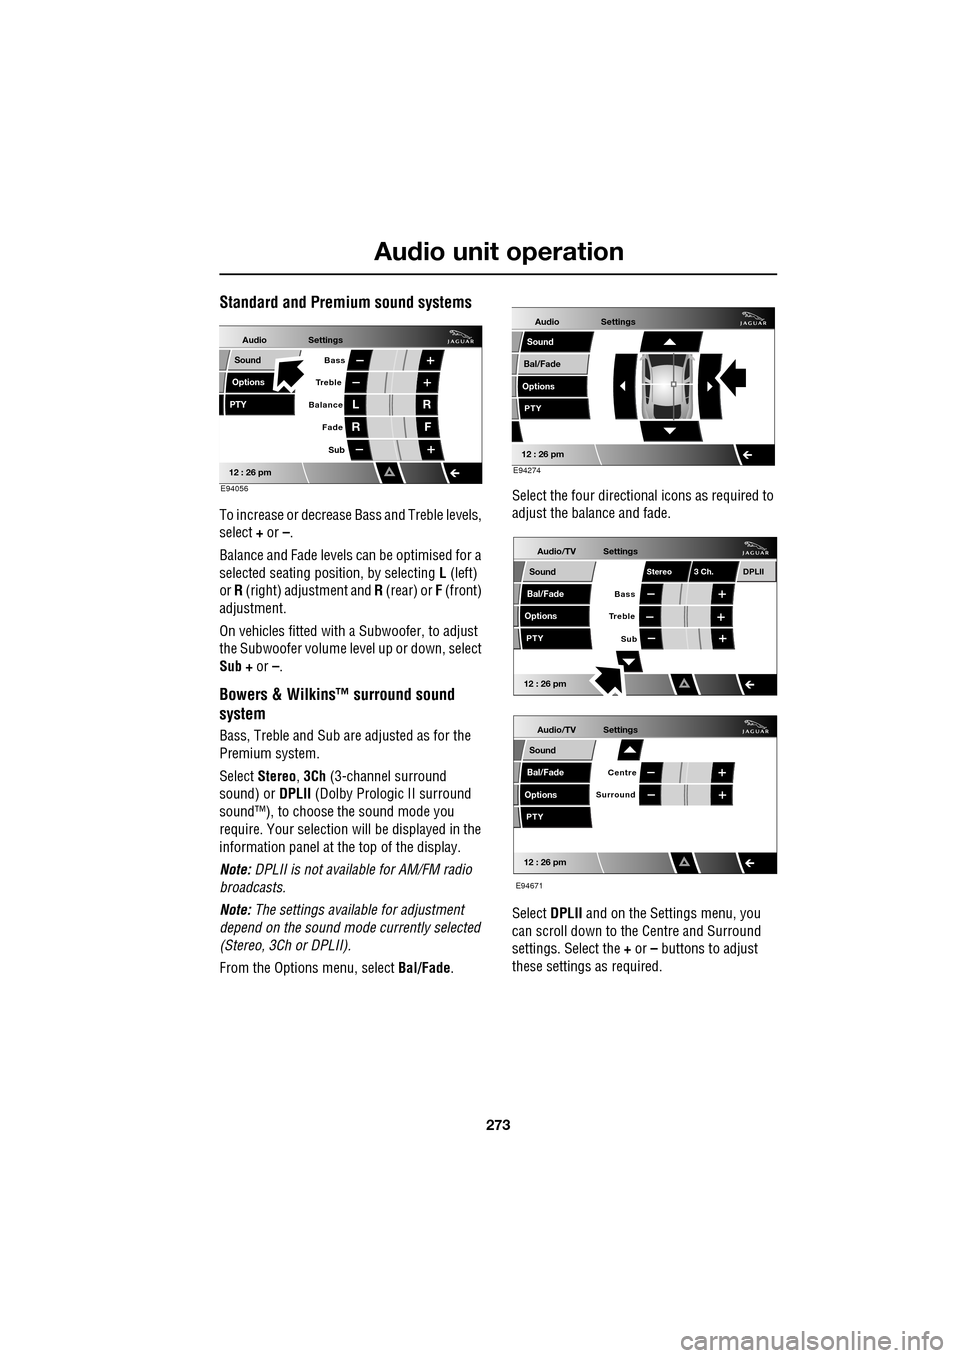
To increase or decrease Bass and Treble levels,
select + or –.
Balance and Fade levels can be optimised for a
selected seating posit ion, by selecting L (left)
or R (right) adjustment and R (rear) or F (front)
adjustment.
On vehicles fitted with a Subwoofer, to adjust
the Subwoofer volume le vel up or down, select
Sub + or –.
Bowers & Wilkins™ surround sound
system
Bass, Treble and Sub are adjusted as for the
Premium system.
Select Stereo , 3Ch (3-channel surround
sound) or DPLII (Dolby Prologic II surround
sound™), to choose the sound mode you
require. Your selection will be displayed in the
information panel at the top of the display.
Note: DPLII is not availa ble for AM/FM radio
broadcasts.
Note: The settings available for adjustment
depend on the sound mode currently selected
(Stereo, 3Ch or DPLII).
From the Options menu, select Bal/Fade. Select the four directio
nal icons as required to
adjust the balance and fade.
Select DPLII and on the Settings menu, you
can scroll down to the Centre and Surround
settings. Select the + or – buttons to adjust
these settings as required.
Audio
Options
PTY
Sound
12 : 26 pm
Settings
Treble Bass
Balance
FadeL
R R
F
E94056
Sub
Audio
Bal/Fade
Options
Sound
12 : 26 pm
Settings
PTY
E94274
Audio/TV
Bal/Fade
Options
Sound
12 : 26 pm
Settings
Treble
Sub
PTY
Bass
Stereo 3 Ch.DPLII
Audio/TV
Bal/Fade
Options
Sound
12 : 26 pm
Settings
Surround
PTY
Centre
E94671
Page 275 of 391
275
Audio unit operation
STATION PRESET BUTTONS
Tuning stations
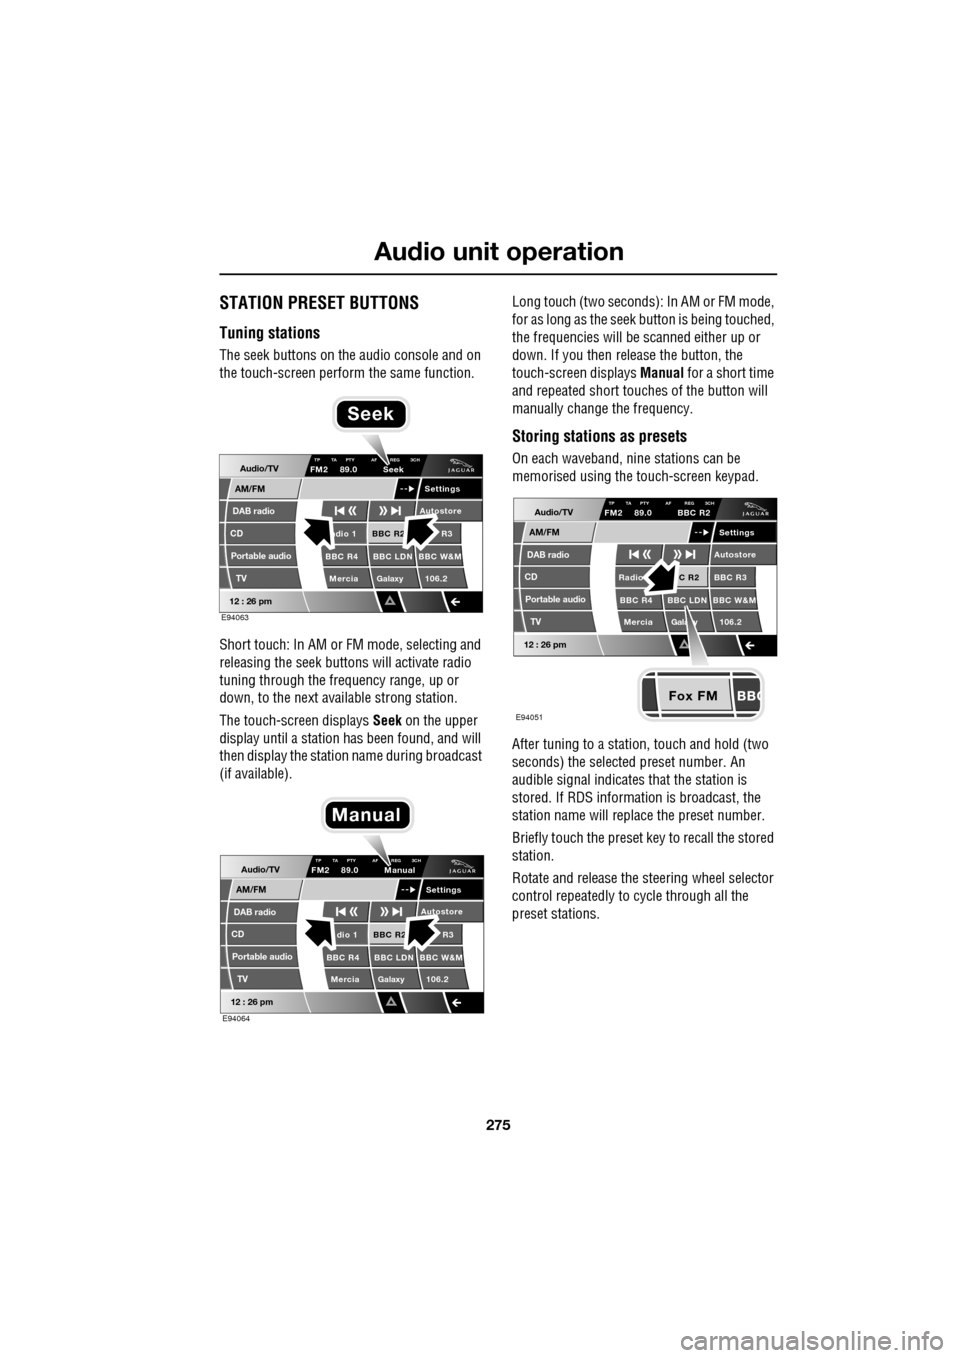
The seek buttons on the audio console and on
the touch-screen perform the same function.
Short touch: In AM or FM mode, selecting and
releasing the seek buttons will activate radio
tuning through the frequency range, up or
down, to the next available strong station.
The touch-screen displays Seek on the upper
display until a station has been found, and will
then display the station name during broadcast
(if available). Long touch (two seconds): In AM or FM mode,
for as long as the seek
button is being touched,
the frequencies will be scanned either up or
down. If you then release the button, the
touch-screen displays Manual for a short time
and repeated short touc hes of the button will
manually change the frequency.
Storing stations as presets
On each waveband, ni ne stations can be
memorised using the touch-screen keypad.
After tuning to a stati on, touch and hold (two
seconds) the selected preset number. An
audible signal indicates that the station is
stored. If RDS informat ion is broadcast, the
station name will replace the preset number.
Briefly touch the preset key to recall the stored
station.
Rotate and release the steering wheel selector
control repeatedly to cycle through all the
preset stations.Audio/TV
DAB radio
CD
AM/FM
12 : 26 pm
BBC R2 R3
BBC R4 BBC LDN BBC W&M Mercia Galaxy 106.2adio 1
Settings
Autostore
TP TA PTY AF REG 3CHFM2 89.0 Seek
Portable audio TV
E94063
Seek
Audio/TV
DAB radio
CD
AM/FM
12 : 26 pm
BBC R2 R3
BBC R4 BBC LDN BBC W&M Mercia Galaxy 106.2dio 1
Settings
Autostore
TP TA PTY AF REG 3CHFM2 89.0 Manual
Portable audio TV
E94064
Manual
Fox FM
Audio/TV
DAB radio
CD
AM/FM
12 : 26 pm
C R2 BBC R3
BBC R4 BBC LDN BBC W&M
Mercia Gala y 106.2Radio
Settings
Autostore
TP TA PTY AF REG 3CHFM2 89.0 BBC R2
Portable audio TV
E94051
Page 279 of 391
279
Audio unit menus
PTY alarm (where broadcast)
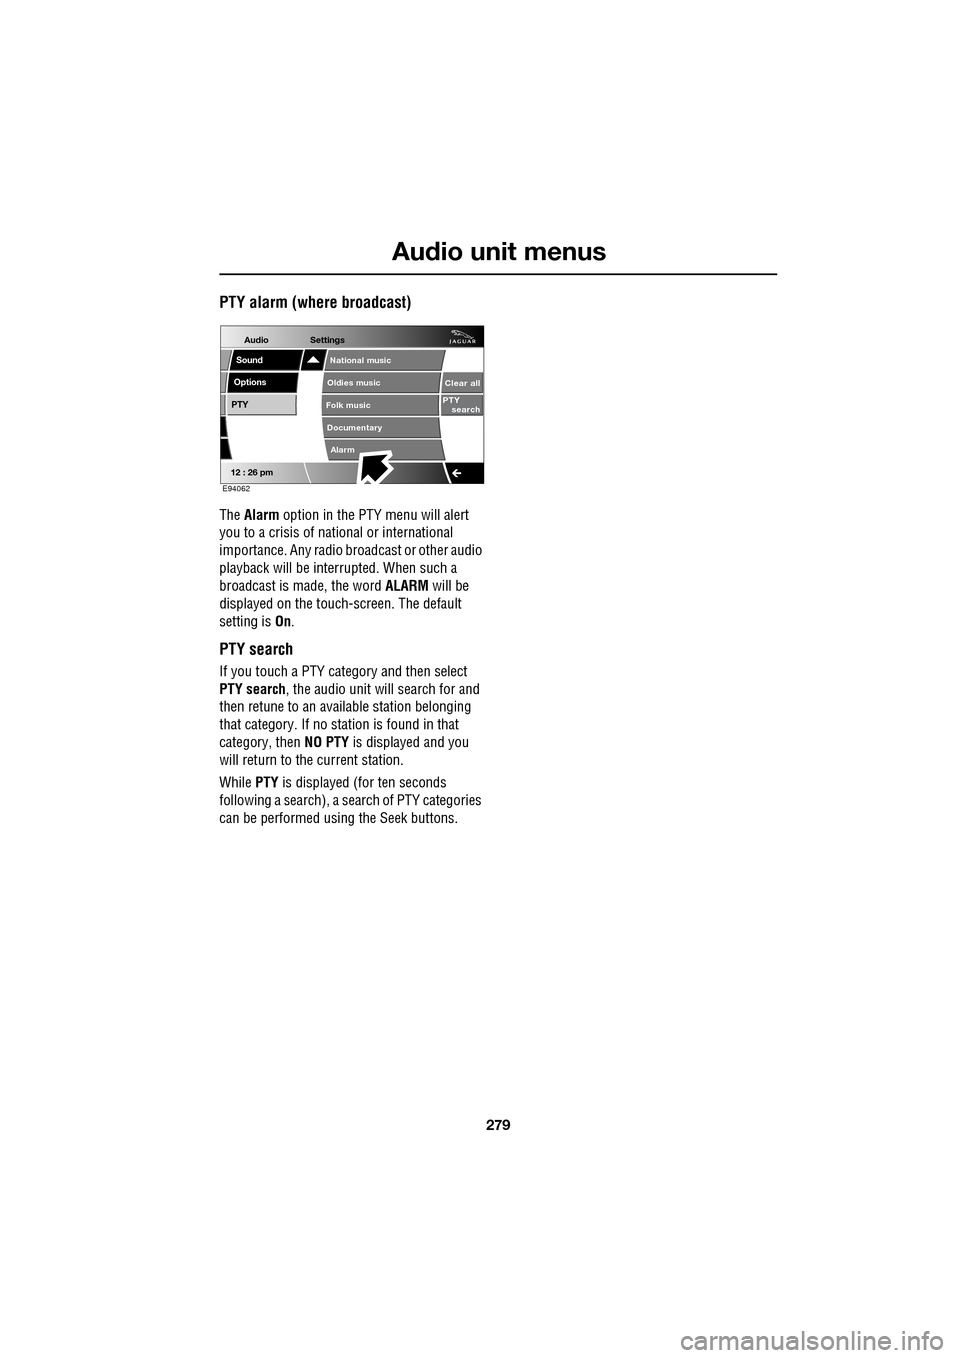
The Alarm option in the PTY menu will alert
you to a crisis of na tional or international
importance. Any radio br oadcast or other audio
playback will be interrupted. When such a
broadcast is made, the word ALARM will be
displayed on the touch-screen. The default
setting is On.
PTY search
If you touch a PTY category and then select
PTY search , the audio unit will search for and
then retune to an avai lable station belonging
that category. If no station is found in that
category, then NO PTY is displayed and you
will return to the current station.
While PTY is displayed (for ten seconds
following a search), a search of PTY categories
can be performed usin g the Seek buttons.
Audio
Options
PTY
Sound
12 : 26 pm
Settings
Alarm
National music
Oldies music
Folk music
Documentary
Clear all
PTY search
E94062
Page 284 of 391
Digital audio broadcasting
284
CHANNEL AUTOMATIC TUNING
Note: When you first use the DAB radio, you
will be unable to listen to any digital broadcasts
until you have comp leted the auto-tune
process.
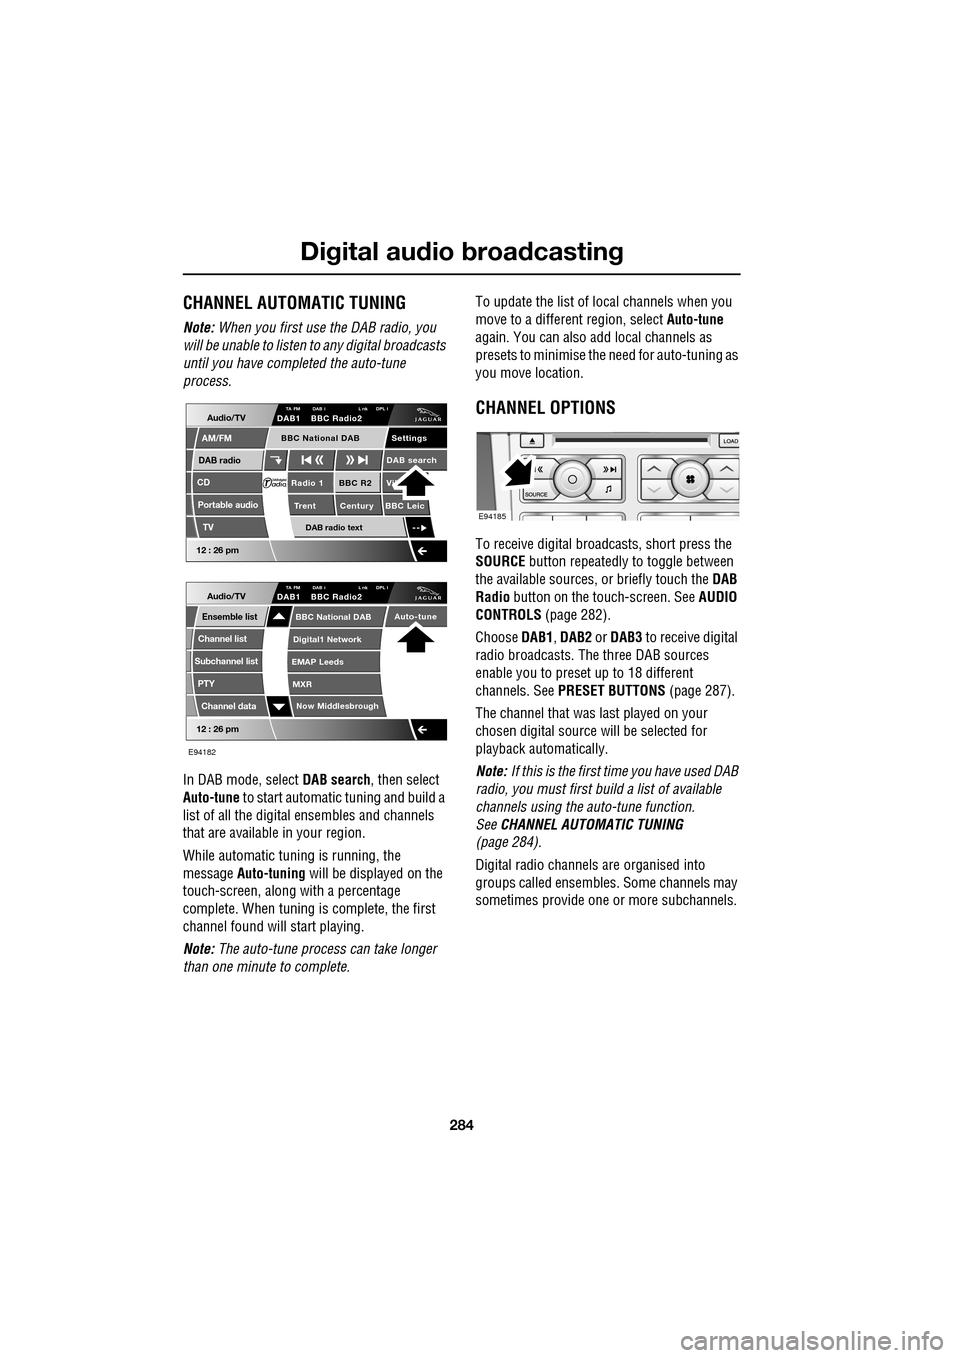
In DAB mode, select DAB search, then select
Auto-tune to start automatic tuning and build a
list of all the digital ensembles and channels
that are available in your region.
While automatic tuning is running, the
message Auto-tuning will be displayed on the
touch-screen, along with a percentage
complete. When tuning is complete, the first
channel found will start playing.
Note: The auto-tune process can take longer
than one minute to complete. To update the list of lo
cal channels when you
move to a different region, select Auto-tune
again. You can also add local channels as
presets to minimise the need for auto-tuning as
you move location.
CHANNEL OPTIONS
To receive digital broadcasts, short press the
SOURCE button repeatedly to toggle between
the available sources, or briefly touch the DAB
Radio button on the touch-screen. See AUDIO
CONTROLS (page 282).
Choose DAB1, DAB2 or DAB3 to receive digital
radio broadcasts. The three DAB sources
enable you to preset up to 18 different
channels. See PRESET BUTTONS (page 287).
The channel that was last played on your
chosen digital source will be selected for
playback automatically.
Note: If this is the first time you have used DAB
radio, you must first build a list of available
channels using the auto-tune function.
See CHANNEL AUTOMATIC TUNING
(page 284).
Digital radio channels are organised into
groups called ensembles. Some channels may
sometimes provide one or more subchannels.
Audio/TV
DAB radio
CD
AM/FM
12 : 26 pm
BBC R2 Vik
Trent Century BBC LeicRadio 1
Settings
DAB search
TA FM DAB i L nk DPL IDAB1 BBC Radio2
Portable audio
TV
DAB radio text
BBC National DAB
12 : 26 pm
Now Middlesbrough
BBC National DAB
Digital1 Network
EMAP Leeds
MXR
Audio/TVTA FM DAB i L nk DPL IDAB1 BBC Radio2
Channel list
Subchannel list
Ensemble list
PTY
Channel data
Auto-tune
E94182
E94185
Page 285 of 391
285
Digital audio broadcasting
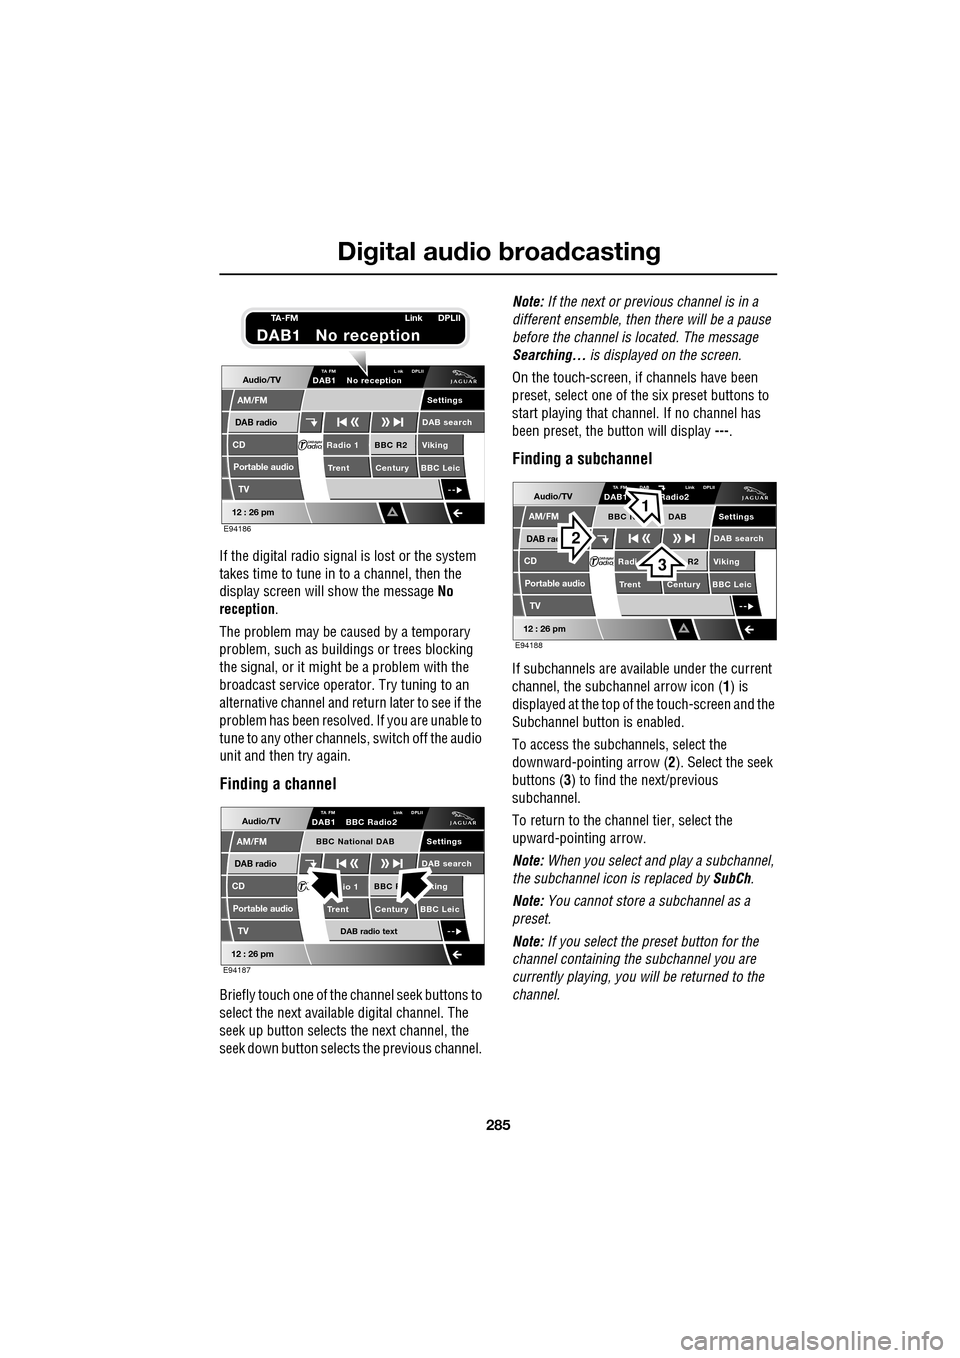
If the digital radio signal is lost or the system
takes time to tune in to a channel, then the
display screen will show the message No
reception.
The problem may be caused by a temporary
problem, such as buildings or trees blocking
the signal, or it might be a problem with the
broadcast servic e operator. Try tuning to an
alternative channel and return later to see if the
problem has been resolved. If you are unable to
tune to any other channe ls, switch off the audio
unit and then try again.
Finding a channel
Briefly touch one of the channel seek buttons to
select the next availabl e digital channel. The
seek up button selects th e next channel, the
seek down button selects the previous channel. Note:
If the next or previous channel is in a
different ensemble, then there will be a pause
before the channel is located. The message
Searching... is displayed on the screen.
On the touch-screen, if channels have been
preset, select one of the six preset buttons to
start playing that channel. If no channel has
been preset, the button will display ---.
Finding a subchannel
If subchannels are available under the current
channel, the subchannel arrow icon ( 1) is
displayed at the top of the touch-screen and the
Subchannel button is enabled.
To access the subchannels, select the
downward-pointing arrow ( 2). Select the seek
buttons ( 3) to find the next/previous
subchannel.
To return to the channel tier, select the
upward-pointing arrow.
Note: When you select and play a subchannel,
the subchannel icon is replaced by SubCh.
Note: You cannot store a subchannel as a
preset.
Note: If you select the preset button for the
channel containing the subchannel you are
currently playing, you will be returned to the
channel.
Audio/TV
DAB radio
CD
AM/FM
12 : 26 pm
BBC R2 Viking
Trent Century BBC LeicRadio 1
Settings
DAB search
TA FM L nk DPLIIDAB1 No reception
Portable audio
TV
E94186
TA-FM Link DPLII
DAB1 No reception
Audio/TV
DAB radio
CD
AM/FM
12 : 26 pm
BBC R king
Trent Century BBC Leicio 1
Settings
DAB search
TA FM Link DPLIIDAB1 BBC Radio2
Portable audio
TV
DAB radio text
BBC National DAB
E94187
Audio/TV
DAB rad
CD
AM/FM
12 : 26 pm
R2 Viking
T
rent Century BBC LeicRadi
Settings
DAB search
TA FM DAB Link DPLIIDAB1 Radio2
Portable audio
TV
BBC N DAB
E94188
2
3
1