2009 JAGUAR XF Reset
[x] Cancel search: ResetPage 180 of 391

Fuel and refuelling
180
DIESEL MISFUELLING PROTECTION
DEVICE
Diesel engine vehicles in some markets are
equipped with a misfuelling protection device,
incorporated into the fuel filler neck, designed
to alert that the wrong fuel type has been
selected. If the narrow filler nozzle fitted to
pumps delivering unleaded petrol is correctly
inserted (i.e. fully inserted) into the filler neck,
the misfuel protection de vice will activate.
The protection device c ontinually interrupts the
fuel flow from the pump, until the protector
mechanism in the filler neck is reset.
When activated, the yellow protection device
will be visible in the f iller neck. The device will
need to be reset before the tank can be
correctly filled with dies el fuel. This is achieved
using the reset tool, lo cated in the luggage
compartment, clipped onto the battery
restraining bar.
Note: It is the driver’s responsibility to fill the
vehicle with the correct fuel. The diesel
misfuelling protection devi ce only reduces the
risk of filling the vehicle with the incorrect fuel.
Note: When refuelling the vehicle using a
disposable fuel canister, use a canister
designed for diesel fuel where possible. The
spout on petrol canist ers may activate the
protection device. The device may also be
activated by fuel pumps with a smaller nozzle
than those fitted to standard diesel pumps.
Resetting the protection device
To reset the misfuelling protection device:
1. Insert the reset tool (with the teeth
uppermost) into the fi ller neck opening, as
far as it will go. The triangular section on
the reset tool stop s on the protection
device at the requi red insertion depth.
2. Pivot the reset tool handle downwards to
engage the teeth into the protection device.
3. Keeping the reset tool handle held down,
slowly pull the reset tool out of the filler
neck to reset the misfuelling protection
device.
Note: To ensure that the pr otection device is
correctly reset, check that the yellow protector
is no longer visible in the filler neck.
After resetting the misfuelling protection
device, remove the tool fr om the filler neck and
secure it to the battery restraining bar. If
subsequent driveability difficulties are
encountered, seek assistance from your
Dealer/Authorised Repairer.
WARNINGS
When the misfuelling protection
device is activated, it could cause fuel
to be discharged from the filler neck.
CAUTIONS
Using the incorrect fuel can result in
major damage to your vehicle’s engine
and fuel system.
JAG1618
1
2
3
Page 215 of 391

215
Vehicle battery
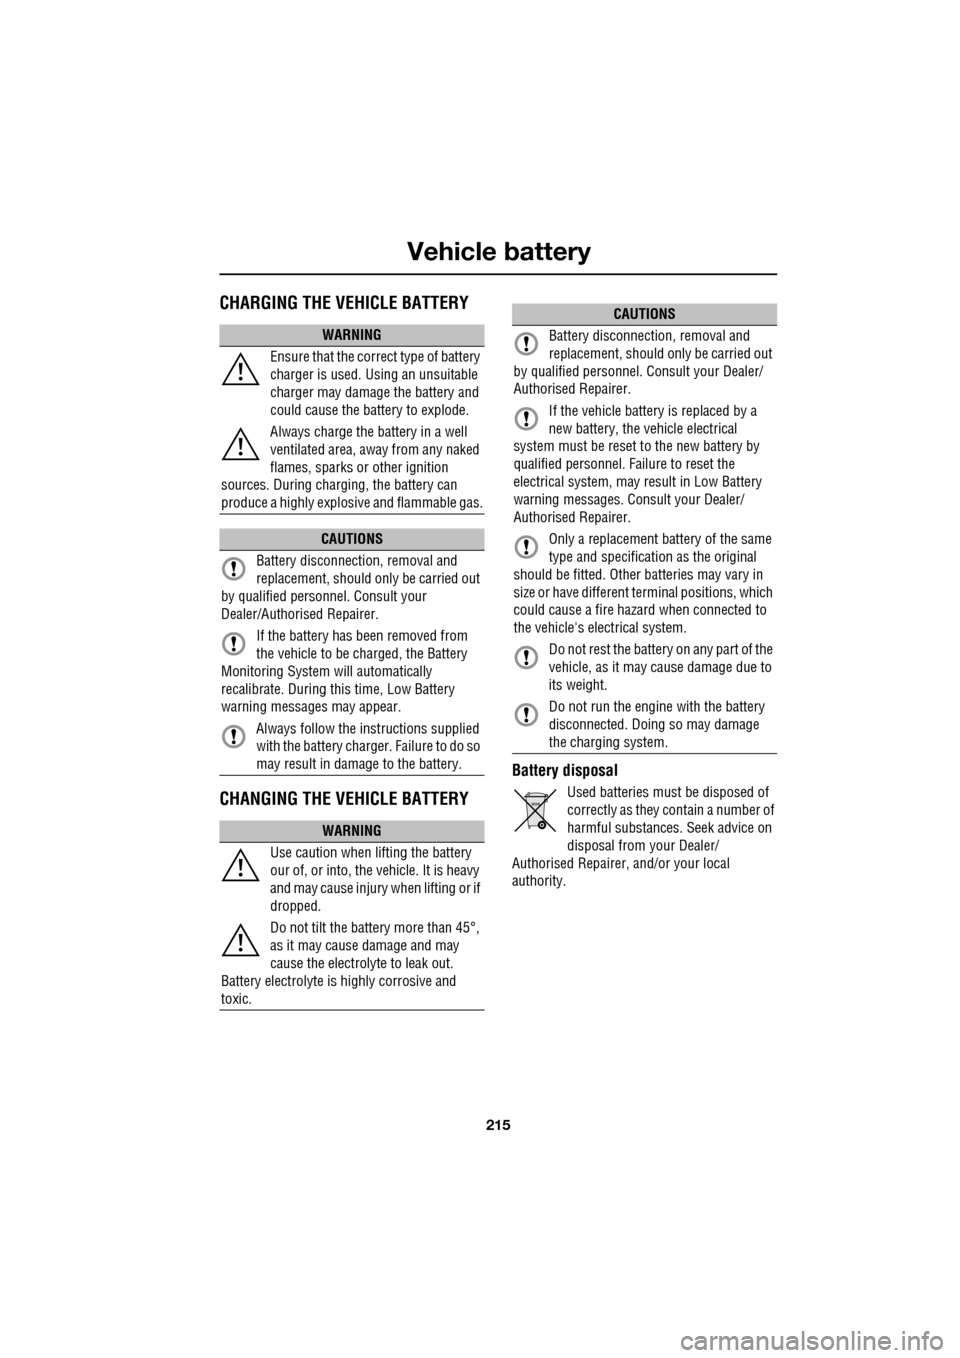
CHARGING THE VEHICLE BATTERY
CHANGING THE VEHICLE BATTERY
Battery disposal
Used batteries must be disposed of
correctly as they contain a number of
harmful substances. Seek advice on
disposal from your Dealer/
Authorised Repairer, and/or your local
authority.
WARNING
Ensure that the correct type of battery
charger is used. Using an unsuitable
charger may damage the battery and
could cause the battery to explode.
Always charge the battery in a well
ventilated area, away from any naked
flames, sparks or other ignition
sources. During charging, the battery can
produce a highly explosiv e and flammable gas.
CAUTIONS
Battery disconnecti on, removal and
replacement, should only be carried out
by qualified personne l. Consult your
Dealer/Authorised Repairer.
If the battery has been removed from
the vehicle to be charged, the Battery
Monitoring System will automatically
recalibrate. During this time, Low Battery
warning messages may appear.
Always follow the instructions supplied
with the battery charger. Failure to do so
may result in damage to the battery.
WARNING
Use caution when lifting the battery
our of, or into, the vehicle. It is heavy
and may cause injury when lifting or if
dropped.
Do not tilt the battery more than 45°,
as it may cause damage and may
cause the electrolyte to leak out.
Battery electrolyte is highly corrosive and
toxic.
CAUTIONS
Battery disconnect ion, removal and
replacement, should only be carried out
by qualified personnel. Consult your Dealer/
Authorised Repairer.
If the vehicle battery is replaced by a
new battery, the vehicle electrical
system must be reset to the new battery by
qualified personnel. Fa ilure to reset the
electrical system, may result in Low Battery
warning messages. Consult your Dealer/
Authorised Repairer.
Only a replacement battery of the same
type and specification as the original
should be fitted. Other batteries may vary in
size or have different terminal positions, which
could cause a fire hazard when connected to
the vehicle's electrical system.
Do not rest the battery on any part of the
vehicle, as it may cause damage due to
its weight.
Do not run the engine with the battery
disconnected. Doing so may damage
the charging system.
Page 251 of 391

251
Status after a collision
DRIVING AFTER A COLLISION
Before starting or driving
If the vehicle has been involved in an accident
it should be checked thoroughly before
attempting to start the engine or drive the
vehicle.
Check for:-
• Fuel leaks.
• Fluid leaks.
• Battery damage.
• Damage to wiring.
• Damage to lights.
• Damage to steering, suspension, wheels
or tyres.
• Sharp or protruding bodywork.
• Operation of doors and locks.
• Condition and operation of seat belts and
SRS components.
• Activation of the pe destrian protection
system.
• Condition of chil d seats and their
mounting/attach ment points.
Note: This list is not exhaustive.
Resetting the fuel cut-off
The fuel system cut-off forms part of the Safety
and Restraint System (SRS) fitted to your
vehicle. Following an impact, and depending on
the severity, the fuel pump may be switched
off.
1.Switch the ignition off, and wait for 10
seconds.
2. Without pressing the brake pedal, press
the engine START/STOP button, to switch
the electrical circuits on. Wait for 30
seconds.
3. Check the vehicle thoroughly for fuel leaks.
If a leak is detected switch the ignition off
immediately.
•The vehicle must not be started if a leak
is present. Seek qualified advice, and
have the vehicle recovered.
4. If no leaks are detected, start the engine.
WARNING
If the vehicle is involved in a collision
it should be checked by a Dealer/
Authorised repairer, or suitably
qualified personnel, before starting or driving.
WARNING
The fuel cut-off should never be reset
if you can smell fuel, or a leak can be
seen. Doing so can lead to a fire
which may cause personal injury or death.
Page 269 of 391

269
Audio unit overview
AUDIO UNIT OVERVIEW
The Jaguar infotainment system contains
AM/FM radio, compact disc player and portable
audio interface. Digital (DAB) radio, six-disc CD
player and TV are optional.
Audio controls
The audio unit is c ontrolled by the
touch-screen ( 1) and console buttons ( 2–8).
1. Touch-screen: See TOUCH-SCREEN
(page 109).
2. LOAD : Press to load one or more CDs.
See LOADING COMPACT DISCS
(page 292).
3. Seek up: Short press to seek next station
frequency up or next CD track.
4. Settings button:
•Short press to display the audio Settings
menu.
• Long press (two seconds) to display the
Vol presets settings menu. 5.
Audio system on/off and volume control:
•Press to switch the system on/off.
• Rotate to increase or decrease volume
level. Any volume adjustment made in
any mode will be memorised for that
mode.
6. SOURCE : Press repeatedly to scroll
through all audio sources: FM1, FM2, AM,
DAB1, DAB2, DAB3, CD , Portable audio
and TV.
7. Seek down: Short press to seek next
station frequency down or previous CD
track.
8. Eject: Press to eject CD. See EJECTING
COMPACT DISCS (page 294).
9. CD load and eject slot.
WARNING
Sustained exposure to high sound
levels can damage your hearing.
Audio/TV
DAB radio
CDAM/FM
12 : 26 pm
BBC R2 BBC R3
BBC R4 BBC LDN BBC W&M Mercia Galaxy 106 2Radio 1
Settings
Autostore
TP TA PTY AF REG 3CHFM2 89 0 BBC R2
Portable audio TV
E93935
1
9
8
7
6
5
2
3
4
Page 270 of 391

Audio unit overview
270
Steering wheel controls
1.Rotate up or down to increase or decrease
volume.
2. Rotate up or down and release repeatedly
to scroll through preset radio stations or
CD tracks. Rotate up and hold for two
seconds to select next strong radio station
or next loaded CD (if a six-disc system is
fitted).
3. SOURCE : Press repeatedly to scroll
through all audio sources.
4. Press to mute audio unit. This button is
also used to dial, answer or end calls in
phone mode and to st art a Voice session.
Sound system overview
There are three versions of the sound system:
• The standard Jaguar sound system
comprises a 140W sy stem with AM/FM
radio featuring EON, RDS, PTY, TA and
in-dash CD player with automatic volume
control, MP3 compatibility (six-disc
system only) and 8 speakers
• The Jaguar 320W Premium Sound System
system also includes a remote amplifier,
upgraded speakers plus an additional
subwoofer mounted in the rear of the
vehicle.
• The Bowers & Wilkins 440W Surround
Sound System has been developed in
conjunction with Bowe rs & Wilkins™ and
incorporates upgraded kevlar speakers,
additional mid range sp eakers mounted in
the front doors, an additional centre
speaker mounted in the fascia and
additional surround sound speakers to
support Dolby Prologic II Surround
Sound™.CAUTIONS
Care must be taken to avoid spilling or
splashing drinks onto the audio unit
controls, speakers or touch-screen. In the
event of such an occurrence, contact your
Dealer/Authorised Repairer.
The audio unit may be damaged if
unsuitable items, such as coins or credit
cards, are inserted into the CD load slot.
E94043
12
43
Page 272 of 391

Audio unit operation
272
While the volume is being adjusted, the volume
level is displayed on the touch-screen display
using a graduated bar.
Volume settings
A number of functions have preset volume
levels. You can adjust these settings on the Vol
presets menu.
1. From the touch-screen Home menu, select
Vehicle .
2. Select Syst. settings and then select Vol.
presets .
3. Use the + and – icons to adjust the volume
levels for the options available.
Automatic volume control (AVC)
This maintains radio volume at a level sufficient
to overcome road noise, as vehicle speed
increases or decreases.
On the Vol presets menu, select Low, Medium
or High levels for AVC.
The default AVC setting is Medium.
AUDIO CONTROL
Sound settings
On the main AM/FM screen, select Settings.
Select Sound to display the sound quality
settings menu.
Note: The list of settings available depends on
the sound system fitted to the vehicle.
See AUDIO UNIT OVERVIEW (page 269).
Home
Audio
Climate
Phone
Navigation
Vehicle Left Right
TP T
A PTY
Valet12 : 26 pm
Audio
External15C
E94087
Voice
Vehicle
Display set
Preferences
Button audioParking aid
Vol. presets
AVC Low
MediumHigh
12 : 26 pm
Navigation
Phone
E94052
Audio/TV
DAB radio
CD
AM/FM
12 : 26 pm
BBC R2 BBC R3
BBC R4 BBC LDN BBC W&M Mercia Galaxy 106.2Radio 1
Settings
Aut
TP TA PTY AF REG 3CHFM2 89.0 BBC R2
Portable audio TV
E94055
Page 274 of 391

Audio unit operation
274
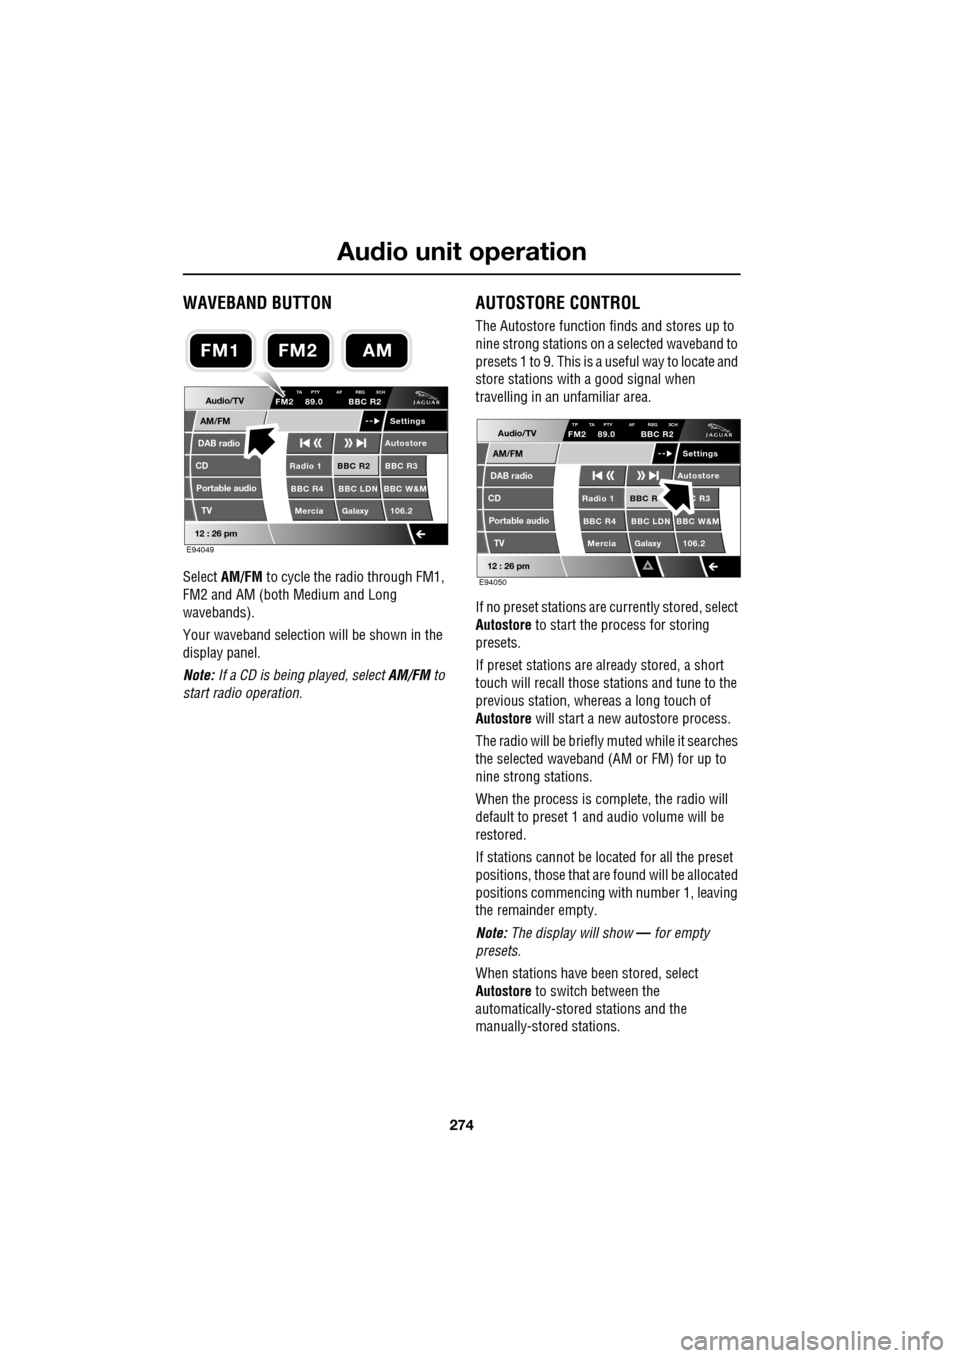
WAVEBAND BUTTON
Select AM/FM to cycle the radio through FM1,
FM2 and AM (both Medium and Long
wavebands).
Your waveband selection will be shown in the
display panel.
Note: If a CD is being played, select AM/FM to
start radio operation.
AUTOSTORE CONTROL
The Autostore function fi nds and stores up to
nine strong stations on a selected waveband to
presets 1 to 9. This is a useful way to locate and
store stations with a good signal when
travelling in an unfamiliar area.
If no preset stations are currently stored, select
Autostore to start the process for storing
presets.
If preset stations are already stored, a short
touch will recall those stations and tune to the
previous station, whereas a long touch of
Autostore will start a new autostore process.
The radio will be briefly muted while it searches
the selected waveband (AM or FM) for up to
nine strong stations.
When the process is co mplete, the radio will
default to preset 1 and audio volume will be
restored.
If stations cannot be located for all the preset
positions, those that are found will be allocated
positions commencing with number 1, leaving
the remainder empty.
Note: The display will show — for empty
presets.
When stations have been stored, select
Autostore to switch between the
automatically-stored stations and the
manually-stored stations.
Audio/TV
DAB radio
CD
AM/FM
12 : 26 pm
BBC R2 BBC R3
BBC R4 BBC LDN BBC W&M Mercia Galaxy 106.2Radio 1
Settings
Autostore
P TA PTY AF REG 3CHFM2 89.0 BBC R2
Portable audio TV
E94049
FM2AMFM1
Audio/TV
DAB radio
CD
AM/FM
12 : 26 pm
BBC R C R3
BBC R4 BBC LDN BBC W&M Mercia Galaxy 106.2Radio 1
Settings
Autostore
TP TA PTY AF REG 3CHFM2 89.0 BBC R2
Portable audio TV
E94050
Page 275 of 391

275
Audio unit operation
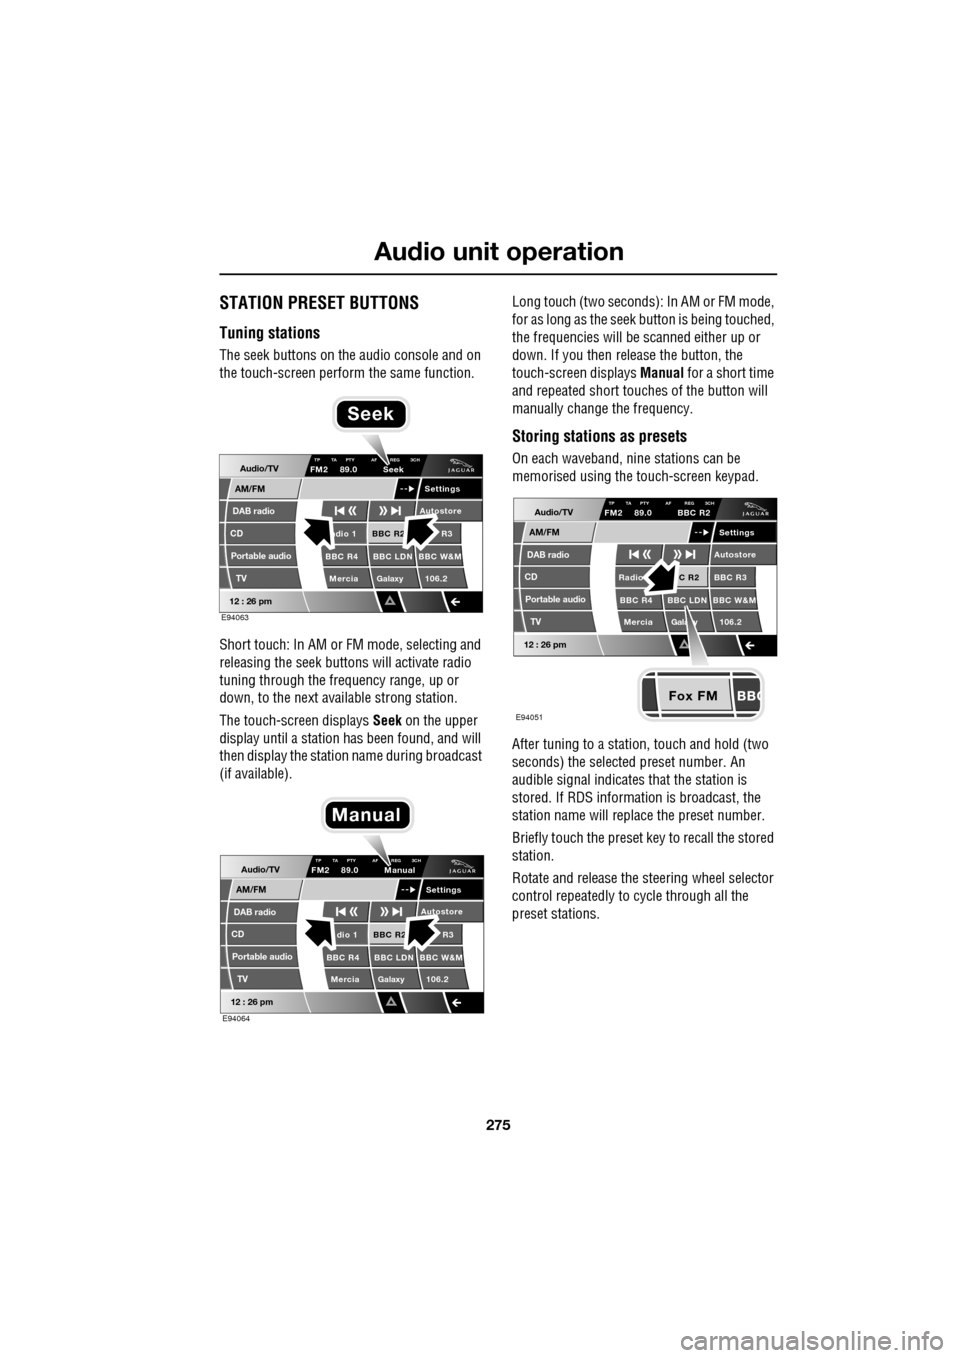
STATION PRESET BUTTONS
Tuning stations
The seek buttons on the audio console and on
the touch-screen perform the same function.
Short touch: In AM or FM mode, selecting and
releasing the seek buttons will activate radio
tuning through the frequency range, up or
down, to the next available strong station.
The touch-screen displays Seek on the upper
display until a station has been found, and will
then display the station name during broadcast
(if available). Long touch (two seconds): In AM or FM mode,
for as long as the seek
button is being touched,
the frequencies will be scanned either up or
down. If you then release the button, the
touch-screen displays Manual for a short time
and repeated short touc hes of the button will
manually change the frequency.
Storing stations as presets
On each waveband, ni ne stations can be
memorised using the touch-screen keypad.
After tuning to a stati on, touch and hold (two
seconds) the selected preset number. An
audible signal indicates that the station is
stored. If RDS informat ion is broadcast, the
station name will replace the preset number.
Briefly touch the preset key to recall the stored
station.
Rotate and release the steering wheel selector
control repeatedly to cycle through all the
preset stations.Audio/TV
DAB radio
CD
AM/FM
12 : 26 pm
BBC R2 R3
BBC R4 BBC LDN BBC W&M Mercia Galaxy 106.2adio 1
Settings
Autostore
TP TA PTY AF REG 3CHFM2 89.0 Seek
Portable audio TV
E94063
Seek
Audio/TV
DAB radio
CD
AM/FM
12 : 26 pm
BBC R2 R3
BBC R4 BBC LDN BBC W&M Mercia Galaxy 106.2dio 1
Settings
Autostore
TP TA PTY AF REG 3CHFM2 89.0 Manual
Portable audio TV
E94064
Manual
Fox FM
Audio/TV
DAB radio
CD
AM/FM
12 : 26 pm
C R2 BBC R3
BBC R4 BBC LDN BBC W&M
Mercia Gala y 106.2Radio
Settings
Autostore
TP TA PTY AF REG 3CHFM2 89.0 BBC R2
Portable audio TV
E94051