2009 JAGUAR XF clock
[x] Cancel search: clockPage 4 of 391

Contents
4
SIDE REPEATER LAMP .................................. 85
REAR LAMP BULBS ....................................... 85
BULB SPECIFICATION CHART ........................ 87
Wipers and washers
WINDSCREEN WIPERS .................................. 88
RAIN SENSOR ................................................ 89
WINDSCREEN WASHERS............................... 89
HEADLAMP WASHERS................................... 90
CHECKING THE WIPER BLADES .................... 90
CHANGING THE WIPER BLADES .................... 91
Windows and mirrors
ELECTRIC WINDOWS ..................................... 93
INTERIOR MIRROR ........................................ 94
EXTERIOR MIRRORS ..................................... 95
BLIND SPOT MONITOR .................................. 97
Instruments
INSTRUMENT PANEL OVERVIEW .................. 99
WARNING LAMPS AND INDICATORS .......... 100
AUDIBLE WARNINGS AND INDICATORS ..... 104
Information displays
GENERAL INFORMATION ............................. 105
WARNING AND INFORMATION MESSAGES. 106
TRIP COMPUTER ......................................... 107
TOUCH-SCREEN ........................................... 109
PERSONALISED SETTINGS .......................... 111
Climate control
AIR VENTS ................................................... 115
AUTOMATIC CLIMATE CONTROL ................. 116
ELECTRIC SUNROOF .................................... 121
Convenience features
SUN VISORS ................................................ 123
SUN BLINDS................................................. 123
INSTRUMENT LIGHTING DIMMER ............... 123
CLOCK .......................................................... 124
AUXILIARY POWER SOCKETS ..................... 125
GLOVE BOX .................................................. 125
CUP HOLDERS ............................................. 126
STORAGE COMPARTMENTS ........................ 127
GARAGE DOOR TRANSCEIVER .................... 128
PORTABLE AUDIO INTERFACE..................... 131
Starting the engine
GENERAL INFORMATION.............................. 132
KEYLESS STARTING ..................................... 133
SWITCHING OFF THE ENGINE....................... 134
DIESEL PARTICULATE FILTER (DPF)............ 135
Transmission
AUTOMATIC TRANSMISSION ....................... 137
Brakes
PRINCIPLE OF OPERATION .......................... 144
HINTS ON DRIVING WITH ABS ..................... 144
ELECTRIC PARKING BRAKE (EPB) ............... 146
Parking aid
PRINCIPLE OF OPERATION .......................... 148
USING THE PARKING AID ............................. 148
Rear view camera
PRINCIPLE OF OPERATION .......................... 152
Driving hints
RUNNING-IN ................................................. 154
ECONOMICAL DRIVING ................................ 155
Cruise control
PRINCIPLE OF OPERATION .......................... 156
USING CRUISE CONTROL............................. 156
Adaptive cruise control (ACC)
PRINCIPLE OF OPERATION .......................... 159
USING ACC ................................................... 159
FORWARD ALERT FUNCTION ....................... 164
ADVANCED EMERGENCY BRAKE ASSIST..... 165
Automatic speed limiter (ASL)
PRINCIPLE OF OPERATION .......................... 167
USING THE ASL ............................................ 167
Driving dynamics
GENERAL INFORMATION.............................. 169
WINTER MODE ............................................. 169
DYNAMIC MODE ........................................... 170
STABILITY CONTROL.................................... 170
Fuel and refuelling
SAFETY PRECAUTIONS................................. 174
Page 29 of 391

29
Locks
To lock: Ensure all the doors are closed, then
turn the key blade towards the front of the
vehicle and release. Thi s will lock all doors but
will not arm the alarm.
To unlock: Turn the key blade towards the rear
of the vehicle and release. If the security
system is disarmed, al l doors and the luggage
compartment will be unloc ked. If the security
system is armed, only the front left-hand door
will unlock. The interior lighting will be turned
on at reduced level for two minutes.
If the vehicle is unloc ked using the emergency
key blade with the security system armed, the
alarm will sound when a door is opened. To
deactivate the alarm, press the unlock button
on the Jaguar Smart Key or press the engine
START/STOP button with the Smart Key inside
the vehicle. If the Jaguar Smart Key is
inoperable, the alarm ca n be deactivated by
docking the Smart Key into the starter control
unit. See DOCKING/UNDOCKING THE JAGUAR
SMART KEY (page 20).
Unlocking the luggage compartment
If Valet mode is selected, or if the vehicle
battery is discharged, it will be necessary to
use the emergency key blade to unlock and
open the luggage compartment.
Note: If the security system is in Valet mode,
the touch-screen can be used to cancel Valet
mode, in which case the luggage compartment
can then be opened in the normal manner.
Note: If the alarm is armed when the
emergency key blade is used to unlock the
luggage compartment, the alarm will sound
when the luggage compartment is opened.
Press the unlock button on the Jaguar Smart
Key to disarm/deactivate the alarm. •
Use the emergency key blade to prise away
the black lock cover.
• Insert the emergency key blade, then turn
the key clockwise to unlock and open the
luggage compartment.
Note: Unlocking the luggage compartment
using the emergency key blade will cancel Valet
mode.
E93157
Page 83 of 391

83
Lighting
CHANGING A BULB
General information
Note: In certain markets its a legal requirement
to carry spare bulbs. A replacement bulb kit is
available as an approved accessory from your
Dealer/Authorised Repairer.
Halogen bulbs
Halogen bulbs are used for main beam and
dipped beam headlamps. Take care not to
touch the glass part of the bulb with your
fingers; always use a cl oth to handle the bulb.
If necessary use methylated spirits to remove
finger prints.
Xenon lamps
Seek advice about the correct
disposal of Xenon lamp units from
your Dealer/Authorised Repairer, or
your local authority.
HEADLAMP UNIT BULBS
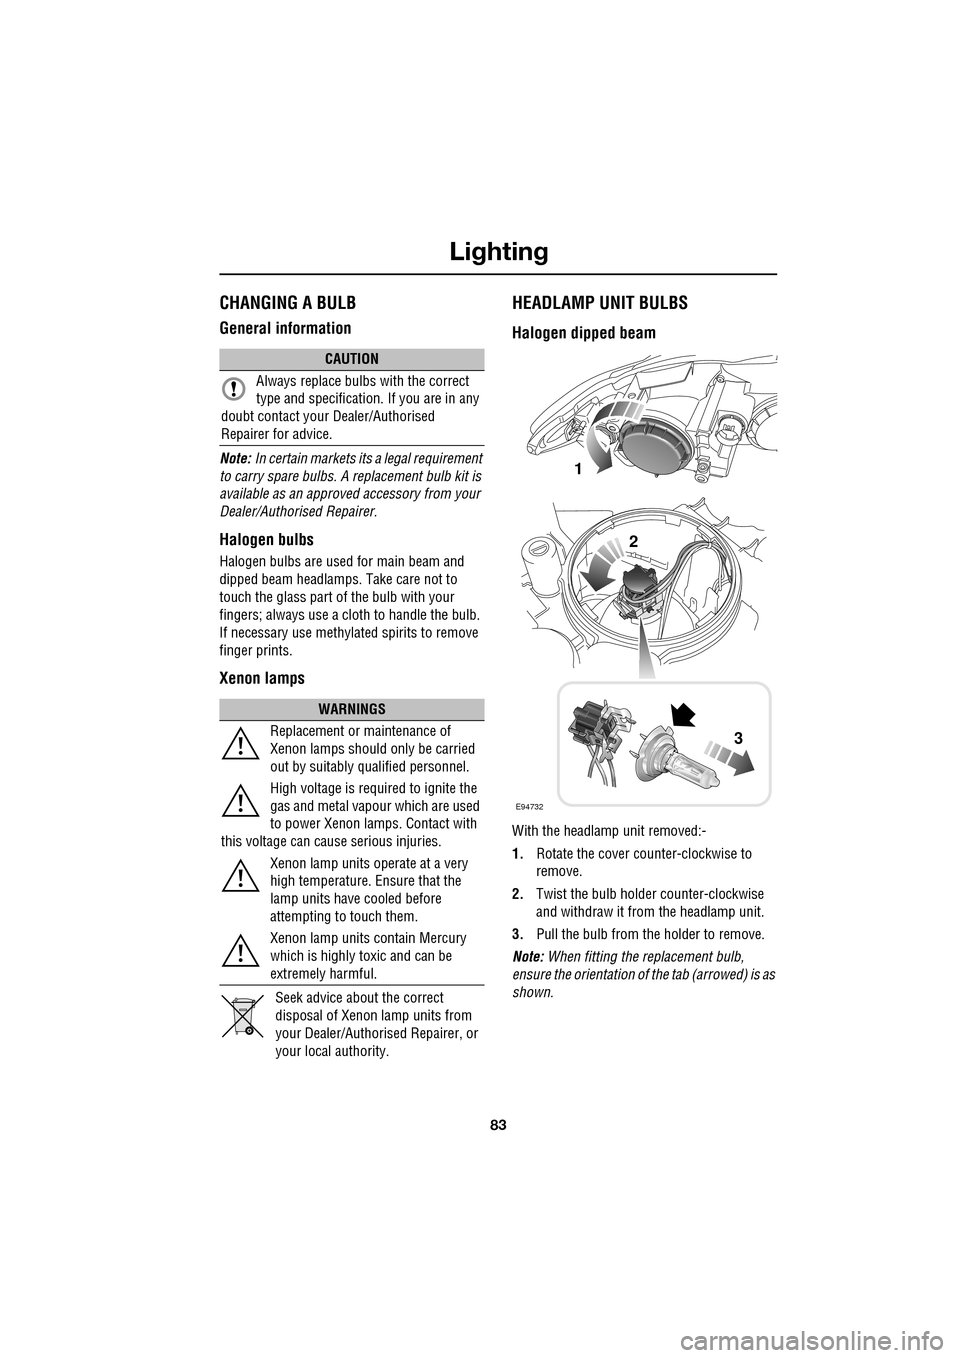
Halogen dipped beam
With the headlamp unit removed:-
1. Rotate the cover counter-clockwise to
remove.
2. Twist the bulb holder counter-clockwise
and withdraw it from the headlamp unit.
3. Pull the bulb from the holder to remove.
Note: When fitting the replacement bulb,
ensure the orientation of the tab (arrowed) is as
shown.
CAUTION
Always replace bulbs with the correct
type and specification. If you are in any
doubt contact your Dealer/Authorised
Repairer for advice.
WARNINGS
Replacement or maintenance of
Xenon lamps should only be carried
out by suitably qualified personnel.
High voltage is required to ignite the
gas and metal vapour which are used
to power Xenon lamps. Contact with
this voltage can cause serious injuries.
Xenon lamp units operate at a very
high temperature. Ensure that the
lamp units have cooled before
attempting to touch them.
Xenon lamp units contain Mercury
which is highly toxic and can be
extremely harmful.
E94732
1
2
3
Page 84 of 391

Lighting
84
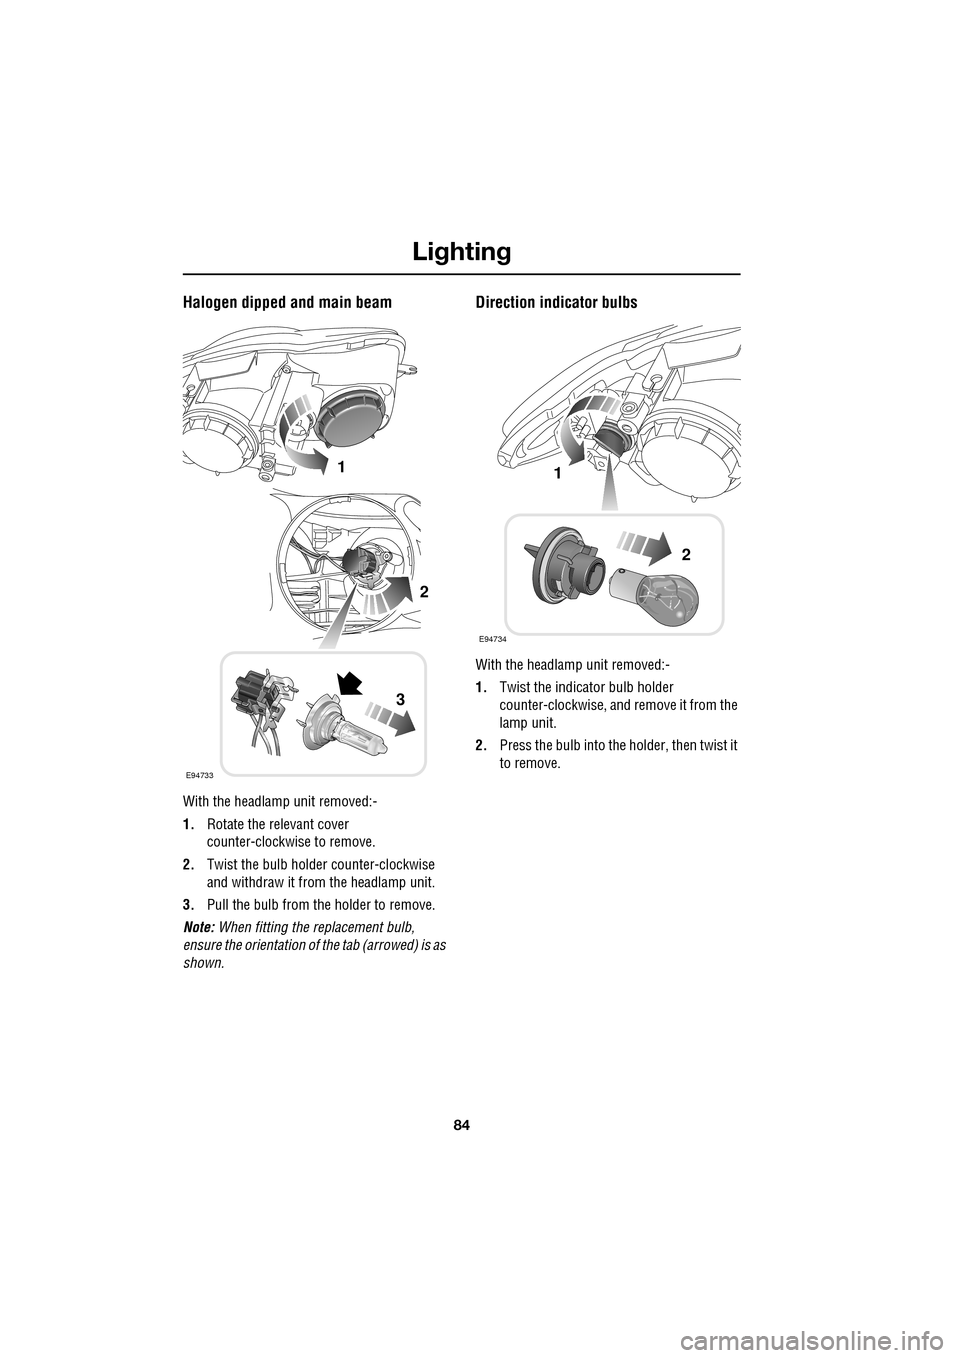
Halogen dipped and main beam
With the headlamp unit removed:-
1.Rotate the relevant cover
counter-clockwise to remove.
2. Twist the bulb holder counter-clockwise
and withdraw it from the headlamp unit.
3. Pull the bulb from the holder to remove.
Note: When fitting the replacement bulb,
ensure the orientation of the tab (arrowed) is as
shown.
Direction indicator bulbs
With the headlamp unit removed:-
1. Twist the indicator bulb holder
counter-clockwise, and remove it from the
lamp unit.
2. Press the bulb into the holder, then twist it
to remove.
E94733
1
2
3
E94734
1
2
Page 85 of 391

85
Lighting
Side lamp bulbs
1.Rotate the cover counter-clockwise and
remove.
2. Pull the bulb holder tab to remove from the
lamp unit.
3. Pull the bulb to remove.
When replacing, push the bulb holder into its
socket in the lamp unit until it clicks in place.
SIDE REPEATER LAMP
REAR LAMP BULBS
Rear direction indicator and reverse
lamp bulbs
With the rear lamp unit removed:-
1.Squeeze the two tabs together, then pull to
remove the relevant bulb holder.
2. Press and release the tab on the electrical
connector and pull to remove the bulb unit.
E94735
1
2
3
CAUTION
These lamps are LED units and should
only be replaced by a Dealer/Authorised
Repairer.
E94736
1
2
Page 86 of 391

Lighting
86
Number plate lamp bulb
1.Using a small flat-bla ded screwdriver as
shown, lever out the si de of the lamp unit
and remove.
2. Twist the bulb holder 90° counter-
clockwise to access the bulb.
3. Pull to remove the bulb from the holder.
Other rear lamp bulbs
The following rear lamps are LED units and
should not be replaced by the owner:
•Tail lamps.
• Brake lamps.
• Rear fog lamps.
• High level brake lamp.
• Rear side marker lamps.
E94737
1
2
3
CAUTION
LED lamp units should only be replaced
by a Dealer/Authorised Repairer.
Page 105 of 391

105
Information displays
GENERAL INFORMATION
The driver message centre display is situated
within the instrument panel between the
tachometer and speedometer gauges. The
message centre is active as soon as a door is
opened for access.
The primary function of the message centre is
to inform the driver of the following:
• Warning messages.
• Temporary alert messages.
• Information messages.
• Turn-by-turn navigation.
The message centre screen is divided into
various zones displaying the following:
1. Gear selection, automatic or manual.
2. Warning messages, accompanied by a red
or amber backlight, if system faults are
detected. Status messages are displayed
to indicate changes in state of certain
vehicle functions (e.g. navigation). When there are no current warning
messages, turn-by-turn navigation
information is displayed, giving
instructions for the next junction. This
facility can be turned off via the
touch-screen. See
TURN-BY-TURN
NAVIGATION (page 339).
The clock can be shown when no other
information is required to be displayed.
See CLOCK (page 124).
3. Trip computer information, including total
distance covered by the vehicle. See TRIP
COMPUTER (page 107).
4. Set trip computer information display
relating A, B or Auto trip computer.
See PERSONALISED SETTINGS
(page 111).
On diesel and V8 petrol models, the
electronic engine oil dipstick reading can
also be displayed, when selected using the
trip computer button. See ENGINE OIL
CHECK - V8 Petrol engines (page 199).
5. The fuel level gauge. The small arrow on
the top of the fuel pump symbol denotes
which side of the vehi cle the fuel filler cap
is located.
Automiles
Inst Fuelmpg
BOOT OPEN
E95066
1
2
3
4
5
Page 109 of 391

109
Information displays
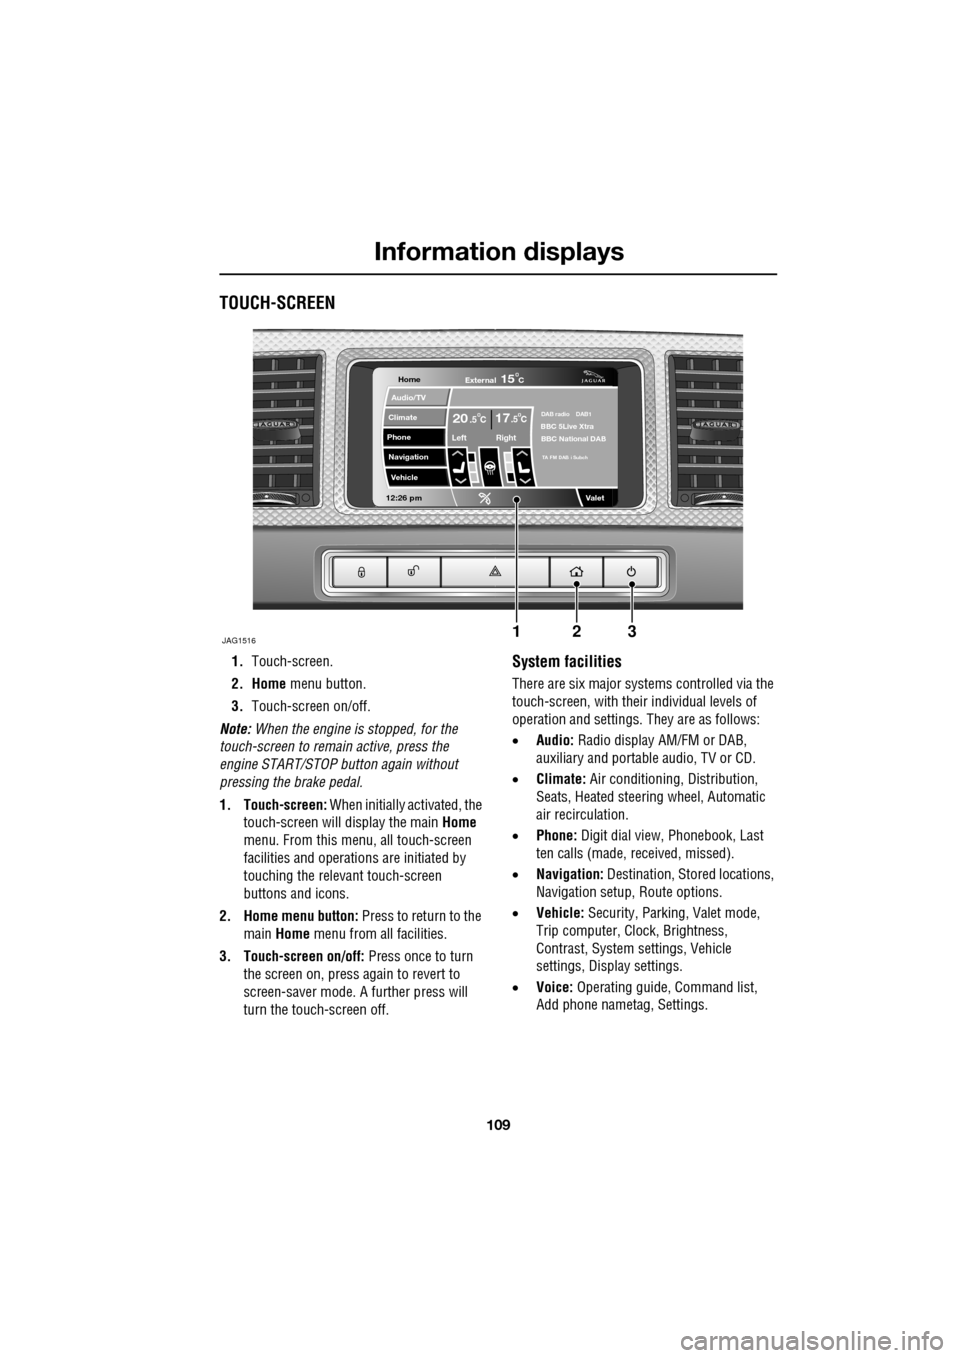
TOUCH-SCREEN
1.Touch-screen.
2. Home menu button.
3. Touch-screen on/off.
Note: When the engine is stopped, for the
touch-screen to remain active, press the
engine START/STOP button again without
pressing the brake pedal.
1. Touch-screen: When initially activated, the
touch-screen will display the main Home
menu. From this menu, all touch-screen
facilities and operati ons are initiated by
touching the relevant touch-screen
buttons and icons.
2. Home menu button: Press to return to the main Home menu from all facilities.
3. Touch-screen on/off: Press once to turn
the screen on, press again to revert to
screen-saver mode. A further press will
turn the touch-screen off.System facilities
There are six major systems controlled via the
touch-screen, with their individual levels of
operation and settings. They are as follows:
• Audio: Radio display AM/FM or DAB,
auxiliary and portable audio, TV or CD.
• Climate: Air conditioning, Distribution,
Seats, Heated steering wheel, Automatic
air recirculation.
• Phone: Digit dial view, Phonebook, Last
ten calls (made, received, missed).
• Navigation: Destination, St ored locations,
Navigation setup, Route options.
• Vehicle: Security, Parking, Valet mode,
Trip computer, Clock, Brightness,
Contrast, System settings, Vehicle
settings, Displa y settings.
• Voice: Operating guide, Command list,
Add phone nametag, Settings.
Home
Audio/TV
Climate
Phone
Navigation
Vehicle
Valet12:26 pm
JAG1516
External15C
Left Right
20 17CC.5 .5DAB radio DAB1BBC 5Live Xtra
BBC National DAB
TA FM DAB i Subch
123