2009 JAGUAR XF Locking
[x] Cancel search: LockingPage 39 of 391

39
Alarm
Alarm trigger information
If you have reason to believe that the alarm was
triggered when you were away from the
vehicle, it is possible to check on your return
using the touch-screen.
From the touch-screen Home menu, select
Vehicle and then Veh. settings . The Security
menu is displayed automatically as the default.
Use the arrow icons to scroll to the second
screen.
A text display (arrowed) will indicate if the
alarm has been triggere d, and also indicate
what the cause of the trigger was (e.g. Driver
door, Passenger door, Inclination sensor,
Trunk, etc.).
SECURITY SENSORS
Note: If the vehicle is to be transported by
road, rail or sea, the vehicle should not be
double-locked or the tilt and intrusion sensors
should be deactivated using the touch-screen.
See PROGRAMMING THE REMOTE CONTROL
(page 21). This prevents the alarm from
sounding as the vehi cle pitches and rolls.
Tilt sensor
The tilt sensor detect s any change in the
vehicle's inclination to the ground. When the
alarm is armed and the vehicle double-locked,
any change in the vehicle's inclination will
activate the tilt alarm. This feature protects
against unauthorised towing away or
jacking-up of the vehicle.
The tilt alarm is disarmed when the vehicle
security system is disarmed using the Jaguar
Smart Key.
Intrusion sensor
The intrusion sensor is mounted in the roof
console and detects any movement within the
vehicle cabin via the use of ultrasonic sound
waves. When the alarm is armed and the
vehicle double-locked, an y movement detected
inside the cabin will activate the alarm.
Note: It takes approximately 30 seconds for
the sensor to create an ultrasonic profile of the
cabin and be fully armed.
The intrusion alarm is disarmed when the
vehicle security system is disarmed using the
Jaguar Smart Key.
Note: Ensure all windows and sunroof are
closed prior to arming the alarm and
double-locking the vehicl e. Failure to do so
may result in false al arms being sounded due
to movements detected outside the vehicle.
Vehicle
Security
Parking
Passive armf On
Alarm sensors Of f On
12:26 pm
Off On
Auto-relock and
armValet mode
Passenger door
Alarm triggered by:
JAG1309
Page 40 of 391

Alarm
40
Passive arming
This vehicle is fitted with a passive arming
feature which can, if enabled, automatically
arm the anti-theft system. Passive arming will
automatically arm the perimeter alarm system
30 seconds after the driver's door is closed,
provided all doors, bonnet and luggage
compartment are closed, the ignition is
switched off and there are no valid Jaguar
Smart Keys inside the vehicle.
It will also automatically arm the perimeter
alarm system 30 seconds after the vehicle is
unlocked, if none of the doors or the luggage
compartment are opened.
Passive arming will not lock the vehicle,
although access to the luggage compartment
via the interior or exterior release buttons will
be inhibited and the fuel filler flap will be
locked.
Passive arming can be di sabled/enabled using
the touch-screen. See PROGRAMMING THE
REMOTE CONTROL (page 21).
Automatic relocking and re-arming of the
alarm
Automatic relock and re-a rm is a feature which,
if enabled, automatically relocks the vehicle
and arms the anti-theft system.
If the vehicle is in a locked and armed state and
the remote unlock button is pressed, but none
of the doors or the luggage compartment are
opened within 45 seconds, the vehicle will
automatically relock all the doors and the
luggage compartment a nd will re-arm the
alarm system.
Note: Automatic relocking and arming will only
relock to a centrally lo cked state and will only
arm to a perimeter alarm condition.
Automatic relocking an d re-arming can be
disabled/enabled using the touch-screen.
See PROGRAMMING THE REMOTE CONTROL
(page 21).
Sensor faults
If the security systems detect a fault with one
of the security sensors, two error tones will
sound from the alarm sire n after the vehicle is
unlocked and disarmed. If this condition
occurs, please visit your Dealer/Authorised
Repairer for rectification.
Page 44 of 391
Seats
44
HEAD RESTRAINTS
For information on adjusting power-operated
head restraints, refer to the Electric seats
section. SeeELECTRIC SEATS (page 42).
Whiplash protection
Both front seats are equi pped with Active Head
Restraints (AHR), which reduce the risk of neck
and spinal injury (whiplash) in the event of a
rear impact. See WHIPLASH PROTECTION
(page 57).
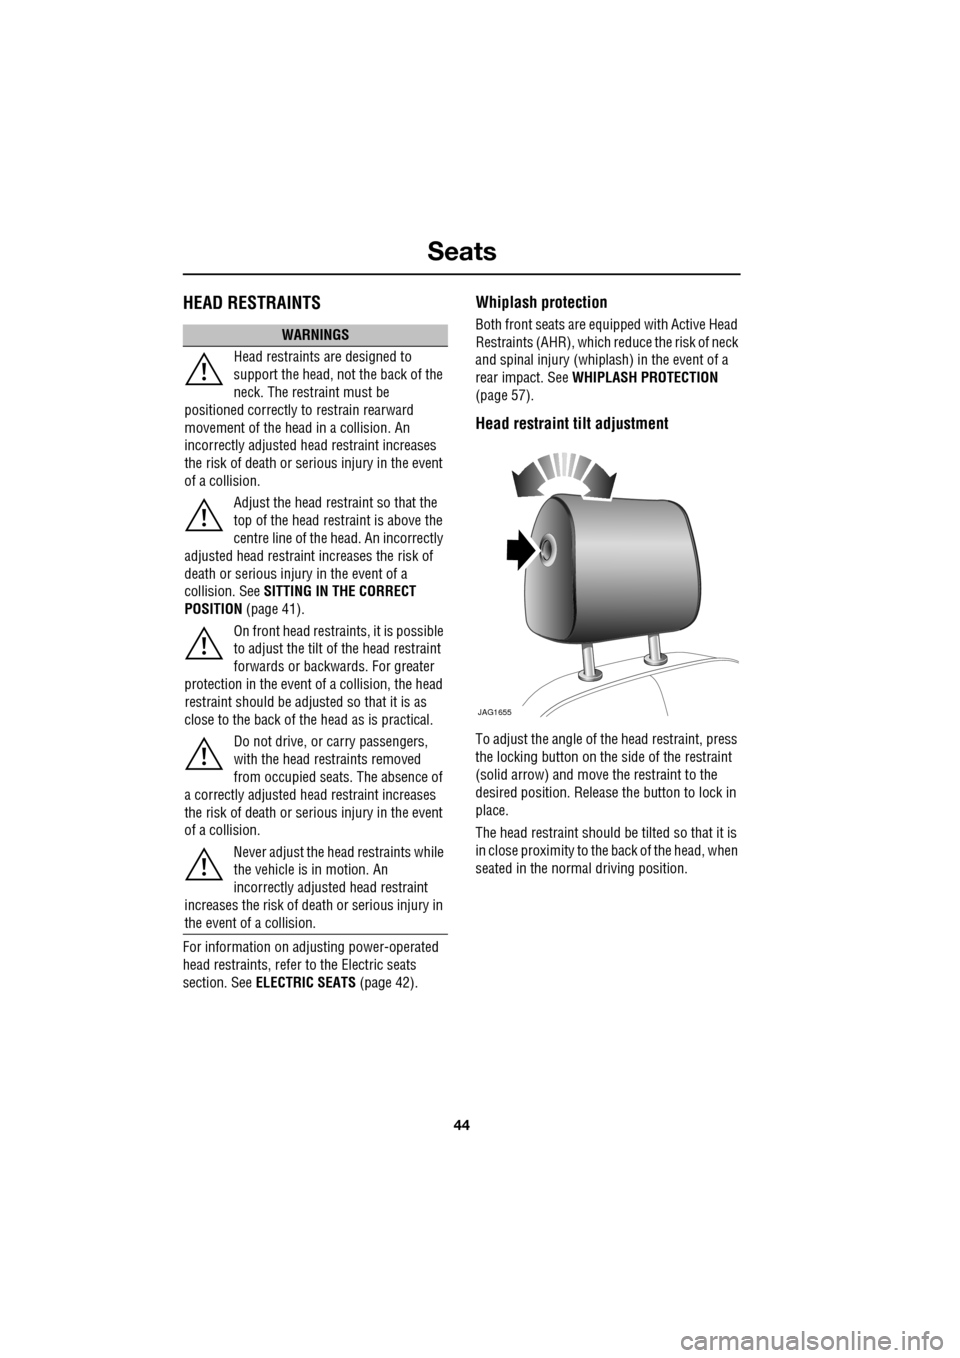
Head restraint tilt adjustment
To adjust the angle of the head restraint, press
the locking button on the side of the restraint
(solid arrow) and move the restraint to the
desired position. Release the button to lock in
place.
The head restraint should be tilted so that it is
in close proximity to the back of the head, when
seated in the normal driving position.
WARNINGS
Head restraints are designed to
support the head, not the back of the
neck. The restraint must be
positioned correctly to restrain rearward
movement of the head in a collision. An
incorrectly adjusted head restraint increases
the risk of death or seri ous injury in the event
of a collision.
Adjust the head restraint so that the
top of the head restraint is above the
centre line of the head. An incorrectly
adjusted head restraint increases the risk of
death or serious injury in the event of a
collision. See SITTING IN THE CORRECT
POSITION (page 41).
On front head restra ints, it is possible
to adjust the tilt of the head restraint
forwards or backwards. For greater
protection in the event of a collision, the head
restraint should be adjust ed so that it is as
close to the back of the head as is practical.
Do not drive, or carry passengers,
with the head restraints removed
from occupied seat s. The absence of
a correctly adjusted head restraint increases
the risk of death or seri ous injury in the event
of a collision.
Never adjust the head restraints while
the vehicle is in motion. An
incorrectly adjusted head restraint
increases the risk of death or serious injury in
the event of a collision.
JAG1655
Page 45 of 391
45
Seats
Manual head restraints
1.Press the locking collar to release the head
restraint.
2. Whilst pressing the locking collar, move
the head restraint up or down to the
required position.
Note: It is not necessary to press the locking
collar to adjust the head restraint upwards.
Head restraint removal
Manual head restraints may be removed, if
required, to fit larger child seats. Press the
locking collar and lift the restraint out of the
seat back. Ensure the restraint is refitted once
the child seat is removed.
Note: It is not possible to remove power-
operated head restraints. Note:
Refer to the Child Safety section for
details on correct child restraint fitment.
See CHILD SEATS (page 59).
REAR SEATS
The split fold rear seat can be folded
completely to accommodate large loads, or
partially to accommodate long loads, and still
retain seating for passengers.
CAUTION
Do not attempt to remove a front head
restraint fitted with a display screen.
This may damage elec trical connections.
E93185
WARNINGS
Always ensure that objects carried
within the vehicle are secured
properly. Unsecure d items can cause
death or serious injury in the event of an
impact or sudden manoeuvre.
Never allow passengers to travel in
the luggage compartment under any
circumstances. All vehicle occupants
should be seated correct ly, and wear a seat
belt at all times when the vehicle is in motion.
Failure to do so will greatl y increase the risk of
death and serious injury in the event of an
accident or heavy braking.
Always take note of safety warnings
and labels attached to the rear seats.
The labels give advice on safely
folding and erecting the seats.
Page 47 of 391
47
Seats
Raising the rear seats
The process for raising the rear seat is the
reverse of folding.
HEATED SEATS
Note: To prevent the battery from becoming
discharged the seat heaters will only operate
when the engine is running.
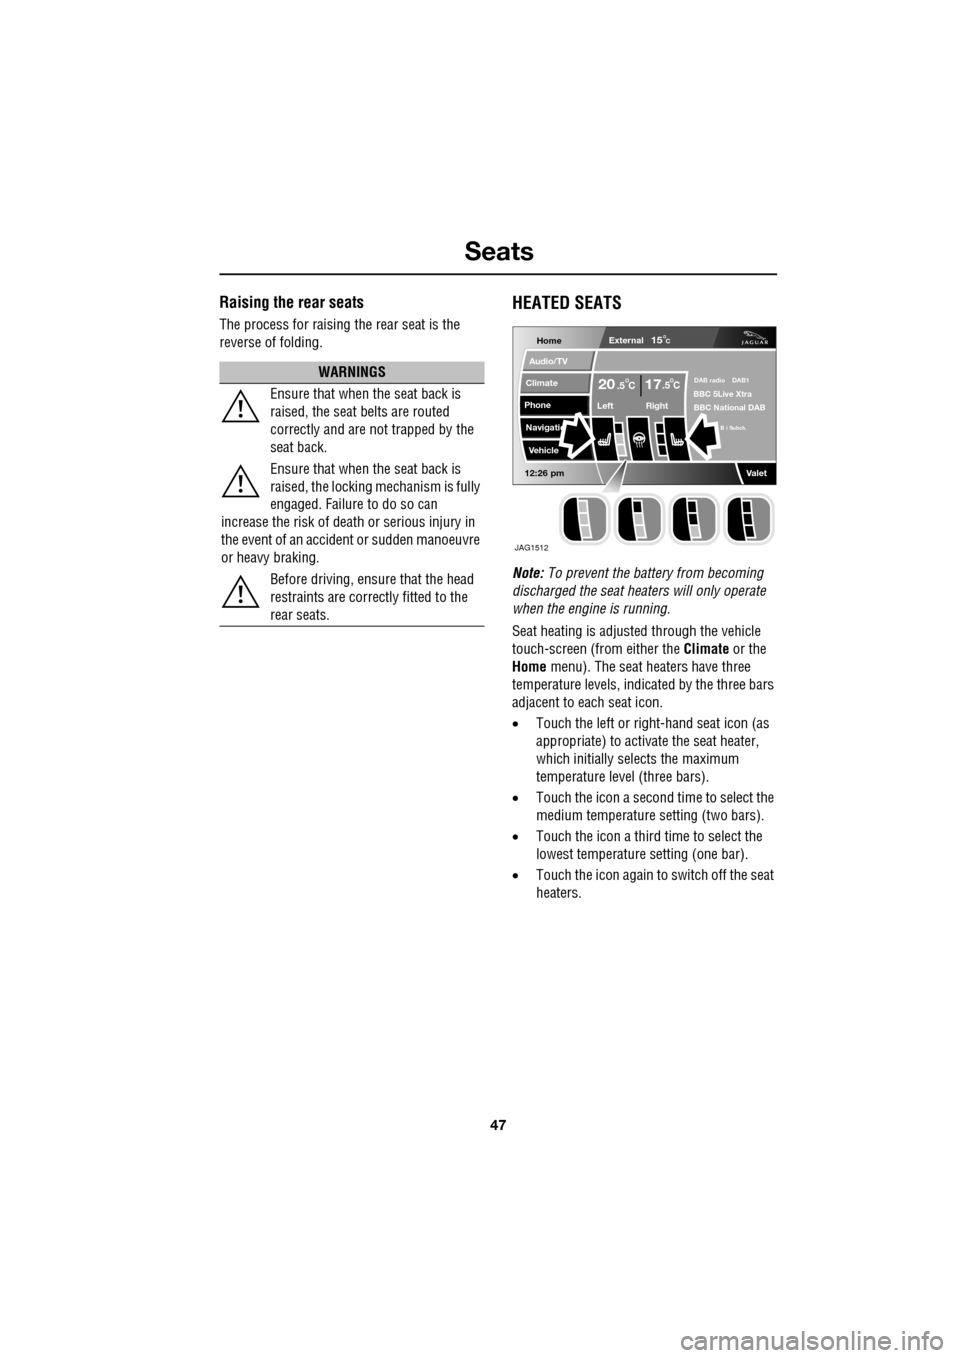
Seat heating is adjusted through the vehicle
touch-screen (from either the Climate or the
Home menu). The seat heaters have three
temperature levels, indica ted by the three bars
adjacent to each seat icon.
• Touch the left or right -hand seat icon (as
appropriate) to activate the seat heater,
which initially selects the maximum
temperature level (three bars).
• Touch the icon a second time to select the
medium temperature setting (two bars).
• Touch the icon a third time to select the
lowest temperature setting (one bar).
• Touch the icon again to switch off the seat
heaters.
WARNINGS
Ensure that when the seat back is
raised, the seat belts are routed
correctly and are not trapped by the
seat back.
Ensure that when the seat back is
raised, the locking mechanism is fully
engaged. Failure to do so can
increase the risk of death or serious injury in
the event of an accident or sudden manoeuvre
or heavy braking.
Before driving, ensure that the head
restraints are correctly fitted to the
rear seats.
Home
Audio/TV
Climate
Phone
Navigatio
Vehicle
Left Right
20 17CC.5 .5
Valet12:26 pm
External15C
DAB radio DAB1BBC 5Live Xtra
BBC National DAB
B i Subch.
JAG1512
Page 52 of 391
Seat belts
52
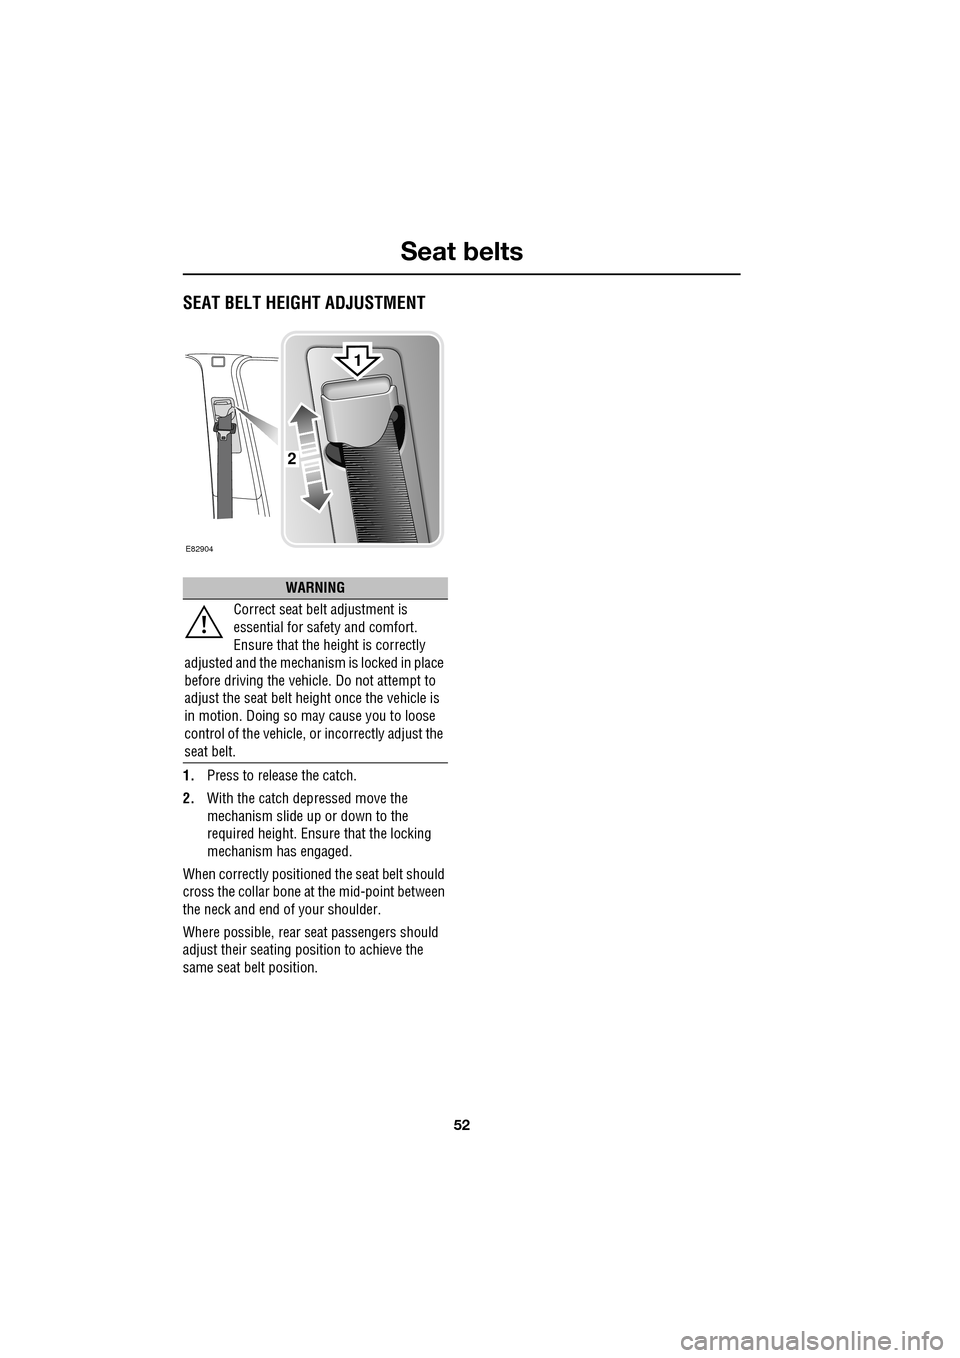
SEAT BELT HEIGHT ADJUSTMENT
1.Press to release the catch.
2. With the catch depressed move the
mechanism slide up or down to the
required height. Ensure that the locking
mechanism has engaged.
When correctly positione d the seat belt should
cross the collar bone at the mid-point between
the neck and end of your shoulder.
Where possible, rear seat passengers should
adjust their seating pos ition to achieve the
same seat belt position.
WARNING
Correct seat belt adjustment is
essential for safety and comfort.
Ensure that the height is correctly
adjusted and the mechanism is locked in place
before driving the vehicl e. Do not attempt to
adjust the seat belt height once the vehicle is
in motion. Doing so may cause you to loose
control of the vehicle, or incorrectly adjust the
seat belt.
E82904
2
1
Page 63 of 391
63
Child safety
ISOFIX child seats
•IUF = Suitable for ISOFIX forward child
restraint systems of universal category
approved for use in the mass group.
• IL = These ISOFIX child restraint systems
are of the specific vehicle, restricted or
semi-universal categories.
• * = Child seats suitable for use in these
locations are Britax Cosy-Tot Premium
Infant carrier and Br itax Duo Plus child
seat.
Note: Ages given are approximate. In case of
doubt, the child’s weight, not age, should be
used when considering an appropriate child
seat.
Installing an ISOFIX child seat
To install an ISOFIX child seat:-
1. Raise or remove the head restraint from
the relevant seat.
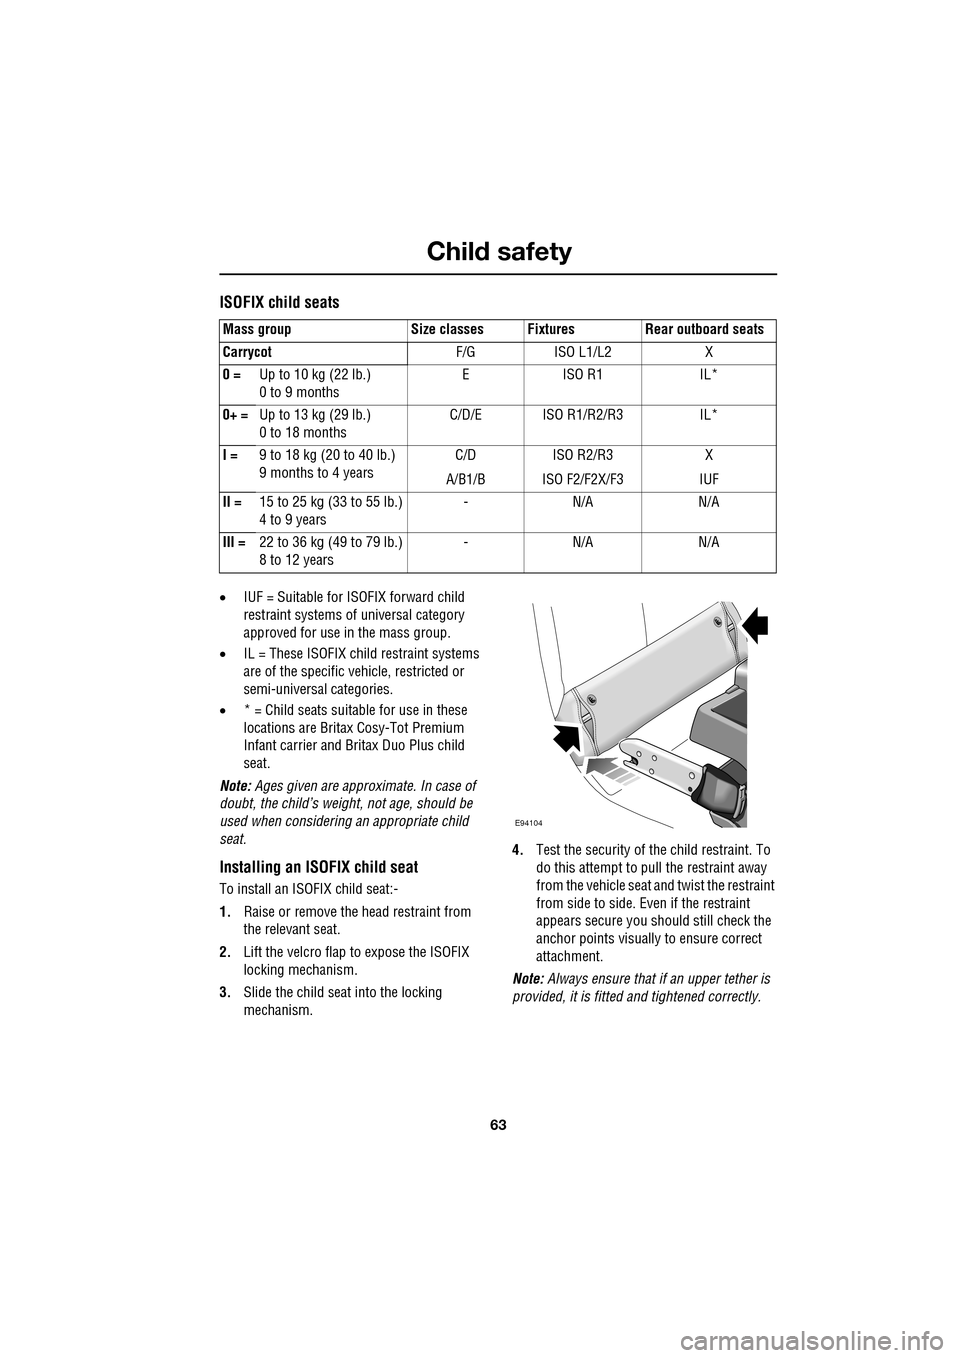
2. Lift the velcro flap to expose the ISOFIX
locking mechanism.
3. Slide the child seat into the locking
mechanism. 4.
Test the security of the child restraint. To
do this attempt to pull the restraint away
from the vehicle seat and twist the restraint
from side to side. Even if the restraint
appears secure you s hould still check the
anchor points visually to ensure correct
attachment.
Note: Always ensure that if an upper tether is
provided, it is fitted and tightened correctly.
Mass group Size classes Fixtures Rear outboard seats
Carrycot
F/G ISO L1/L2 X
0 = Up to 10 kg (22 lb.)
0 to 9 months EISO R1 IL*
0+ = Up to 13 kg (29 lb.)
0 to 18 months C/D/E ISO R1/R2/R3 IL*
I = 9 to 18 kg (20 to 40 lb.)
9 months to 4 years C/D
A/B1/B ISO R2/R3
ISO F2/F2X/F3 X
IUF
II = 15 to 25 kg (33 to 55 lb.)
4 to 9 years -N/A N/A
III = 22 to 36 kg (49 to 79 lb.)
8 to 12 years -N/A N/A
E94104
Page 90 of 391

Wipers and washers
90
Low screen wash
If the low washer fluid warning is on, the
windscreen wipers will not operate when the
wash/wipe is activated, even though there may
be washer fluid remaining in the reservoir
which is sprayed onto the screen. This is to
prevent damage to the wiper blades, scratching
of the glass or smearing dirt across the screen.
Normal, fast or single wipe can be selected
manually, to clear any spray from the
windscreen.
Timed jet function
If the timed jet func tion is configured,
the washer jets will only operate on the
up stroke of the wipers.
This function can be enabled/disabled by your
Dealer/Authorised Repairer.
Drip wipe
If the drip wipe function is configured,
the wipers will operate four seconds
after a wash wipe cycle has finished, to
clear any remaining drips from the windscreen.
This function can be enabled/disabled by your
Dealer/Authorised Repairer.
Blocked jets
If a washer jet becomes blocked, use a thin
strand of wire to unblock the jet by inserting
the wire into the jet. Ensure that the wire is
completely remove d after unblocking.
HEADLAMP WASHERS
Headlamp power wash operates automatically
with the windscreen wash, and will only
operate if the headlamps are switched on and
there is sufficient washer fluid in the reservoir.
Headlamp wash operates with every fourth
operation of the screen wa shers, provided that
ten minutes have elapsed since the last
operation of the headlamp washers.
Note: The power wash sequence is reset when
the headlamps or the ignition are turned off.
Note: Headlamp power wash is inhibited when
the low washer fluid warning is on.
CHECKING THE WIPER BLADES
The wiping edge of the blades should be
checked and cleaned periodically. Check the
blade rubber and replace the blade immediately
if cracks, splits or roughness are detected, to
prevent damage to the glass.
Clean the blade edge by wiping with a soft cloth
or sponge, using wa rm soapy water.
If the wipers fail to clear the windscreen when
operated, check the cond ition of the blade and
replace if necessary.
WARNING
Do not operate the washer jets during
adjustment. Windscreen washer fluid
may cause irritation to the eyes and
skin. Always read and observe the washer fluid
manufacturers instructions.
WARNING
Only use cleani ng products which
have been approved for use on
automotive glass and rubber.
Inappropriate products can cause smearing,
and increase glare.
E80573